---
url: /guides/advanced-features/bff.md
---
# BFF
BFF (Backends for Frontends) is an architectural pattern primarily used to address issues of data aggregation in front-end and back-end collaboration. Under the BFF architecture, front-end applications do not communicate directly with backend services. Instead, they interact with backend services through a dedicated BFF middleware layer, custom-made for the front end.
The main problems it tries to solve include:
- Aggregation, mapping, clipping, and proxying of lower-level APIs according to their own business needs.
- Cache data for some specific scenarios to improve performance and thus improve user experience.
- Quickly development of new products based on existing interfaces.
- Interface with third-party systems, such as login authentication.
Modern.js officially supported the BFF and provided the **Integrated BFF** to further strengthen the BFF's capabilities, mainly including the following capabilities:
- Quick development and debugging go live, running, building, and deploying BFF code in the same project.
- Minimal pure function call, directly import BFF function on the front end, and can be automatically converted into HTTP request when called.
- No private protocol, follow RESTful API specification, all BFF interfaces are standardized.
- Full TypeScript support.
- Meet user preferences and support multi-frame extension writing.
---
url: /guides/advanced-features/bff/cross-project.md
---
# Cross-Project Invocation
Based on the BFF architecture, Modern.js provides cross-project invocation capabilities, allowing BFF functions created in one project to be invoked by other projects through integrated calls, enabling function sharing and feature reuse across projects.
Cross-project invocation consists of **producer** and **consumer** sides. The producer is responsible for creating and providing BFF services while generating integrated invocation SDK, and the consumer initiates requests through these SDK.
## BFF Producer
Enable cross-project invocation via configuration. Projects with BFF capabilities enabled can act as BFF producers, or you can create standalone BFF applications.
When executing `dev` or `build`, the following artifacts for consumers will be automatically generated:
- API functions under the `dist/client` directory
- Runtime configuration functions under the `dist/runtime` directory
- Interface exports defined in `exports` field of `package.json`
- File list for npm publication specified in `files` field of `package.json`
### Existing BFF-enabled Projects
1. Enable Cross-Project Invocation
Ensure the current project has BFF enabled with API files defined under `api/lambda`. Add the following configuration:
```ts title="modern.config.ts"
export default defineConfig({
bff: {
crossProject: true,
}
});
```
2. Generate SDK Type Files
To provide type hints for the integrated invocation SDK, enable the `declaration` option in TypeScript configuration:
```ts title="tsconfig.json"
"compilerOptions": {
"declaration": true,
}
```
## BFF Consumer
:::info
You can initiate requests to BFF producers from projects using any framework via the SDK.
:::
### Intra-Monorepo Invocation
When producer and consumer are in the same Monorepo, directly import the SDK. API functions reside under `${package_name}/api`:
```ts title="src/routes/page.tsx"
import { useState, useEffect } from 'react';
import { get as hello } from '${package_name}/api/hello';
export default () => {
const [text, setText] = useState('');
useEffect(() => {
hello().then(setText);
}, []);
return
{text}
;
};
```
### Cross-Project Invocation
When producer and consumer are in separate repositories, publish the BFF producer as an npm package. The invocation method remains the same as intra-Monorepo.
### Domain Configuration and Extensions
For real-world scenarios requiring custom BFF service domains, use the configuration function:
```ts title="src/routes/page.tsx"
import { configure } from '${package_name}/runtime';
configure({
setDomain() {
return 'https://your-bff-api.com';
},
});
```
The `configure` function from `${package_name}/runtime` supports domain configuration via `setDomain`, interceptors, and custom SDK. When extending both **current project** and **cross-project** SDK on the same page:
```ts title="src/routes/page.tsx"
import { configure } from '${package_name}/runtime';
import { configure as innerConfigure } from '@modern-js/plugin-bff/client';
import axios from 'axios';
configure({
setDomain() {
return 'https://your-bff-api.com';
},
});
innerConfigure({
async request(...config: Parameters) {
const [url, params] = config;
const res = await axios({
url: url as string,
method: params?.method as Method,
data: params?.body,
headers: {
'x-header': 'innerConfigure',
},
});
return res.data;
},
});
```
---
url: /guides/advanced-features/bff/extend-server.md
---
# Extend BFF Server
In some applications, developers may want to handle all BFF functions uniformly, such as authentication, logging, data processing, etc.
Modern.js allows users to freely extend the BFF Server through [Middleware](/guides/advanced-features/web-server.md#middleware) method.
## Using Middleware
:::tip Version Consistency
Before using middleware, you need to install the `@modern-js/server-runtime` dependency. Make sure the version of `@modern-js/server-runtime` matches the version of `@modern-js/app-tools` in your project. All Modern.js official packages are released with a uniform version number, and version mismatches may cause compatibility issues.
Check the version of `@modern-js/app-tools` first, then install the same version of `@modern-js/server-runtime`:
```bash
# Check the current version of @modern-js/app-tools
pnpm list @modern-js/app-tools
# Install the same version of @modern-js/server-runtime
pnpm add @modern-js/server-runtime@
```
:::
Developers can use middleware by configuring middlewares in `server/modern.server.ts`. The following describes how to write a BFF middleware manually to add permission verification:
```ts title="server/modern.server.ts"
import {
type MiddlewareHandler,
defineServerConfig,
getCookie,
} from '@modern-js/server-runtime';
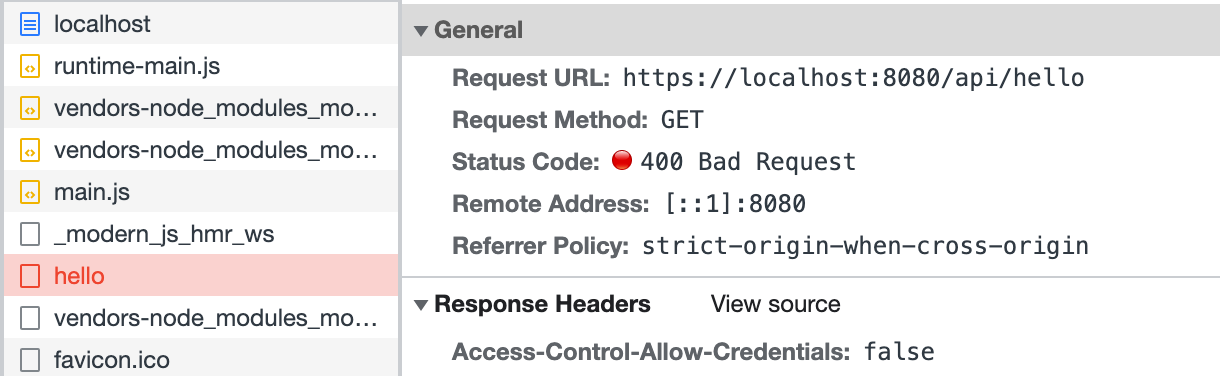
const requireAuthForApi: MiddlewareHandler = async (c, next) => {
if (c.req.path.startsWith('/api') && c.req.path !== '/api/login') {
const sid = getCookie(c, 'sid');
if (!sid) {
return c.json({ code: -1, message: 'need login' }, 400);
}
}
await next();
};
export default defineServerConfig({
middlewares: [
{
name: 'require-auth-for-api',
handler: requireAuthForApi,
},
],
});
```
Then add a regular BFF function `api/lambda/hello.ts`:
```ts title="api/lambda/hello.ts"
export default async () => {
return 'Hello Modern.js';
};
```
Next, in the frontend `src/routes/page.tsx`, add the interface access code and directly use the integrated method to call:
```ts title="src/routes/page.tsx"
import { useState, useEffect } from 'react';
import { get as hello } from '@api/hello';
export default () => {
const [text, setText] = useState('');
useEffect(() => {
async function fetchMyApi() {
const { message } = await hello();
setText(message);
}
fetchMyApi();
}, []);
return
{text}
;
};
```
Now run the `dev` command to start the project, and access `http://localhost:8080/` to find that the request for `/api/hello` has been intercepted:
Finally, modify the frontend code `src/routes/page.tsx`, and call the login interface before accessing `/api/hello`:
:::note
This part does not implement a real login interface; the code is just for demonstration.
:::
```ts
import { useState, useEffect } from 'react';
import { get as hello } from '@api/hello';
import { post as login } from '@api/login';
export default () => {
const [text, setText] = useState('');
useEffect(() => {
async function fetchAfterLogin() {
const { code } = await login();
if (code === 0) {
const { message } = await hello();
setText(message);
}
}
fetchAfterLogin();
}, []);
return
{text}
;
};
```
Refresh the page, and you can see that the access to `/api/hello` is successful:
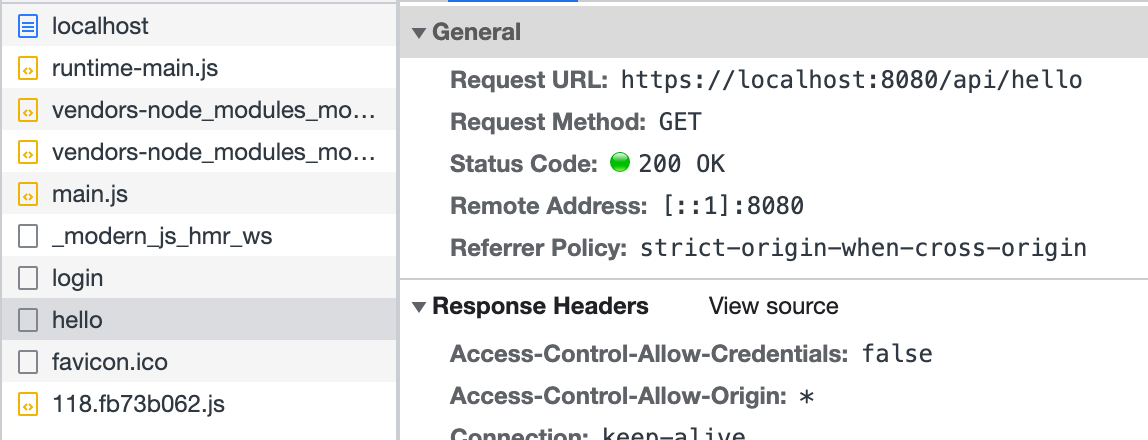
The above code simulates defining middleware in `server/Modern.server.ts` and implements a simple login function. Similarly, other functionalities can be implemented in this configuration file to extend the BFF Server.
---
url: /guides/advanced-features/bff/frameworks.md
---
# Runtime Framework
Modern.js uses [Hono.js](https://hono.dev/) as the BFF and Server runtime framework, so you can [extend BFF Server](/guides/advanced-features/bff/extend-server.md) based on the Hono.js ecosystem.
### Getting Request Context
Sometimes in BFF functions, it's necessary to obtain the request context to handle more logic. In such cases, you can use `useHonoContext` to get it:
```ts title="api/lambda/hello.ts"
import { useHonoContext } from '@modern-js/server-runtime';
export const get = async () => {
const c = useHonoContext();
console.info(`access url: ${c.req.url}`);
return 'Hello Modern.js';
};
```
:::info
For more details, refer to [useHonoContext](/apis/app/runtime/bff/use-hono-context.md).
:::
### Getting Cookies
When getting cookies in BFF functions, you need to get the request context through `useHonoContext`, then use `c.req.header('cookie')` to get the Cookie string and parse it manually:
```ts title="api/lambda/cookies.ts"
import { Api, Get } from '@modern-js/plugin-bff/server';
import { useHonoContext } from '@modern-js/server-runtime';
// Helper function to parse Cookie string
function parseCookies(
cookieHeader: string | undefined,
): Record {
const cookies: Record = {};
if (!cookieHeader) return cookies;
cookieHeader.split(';').forEach(cookie => {
const [name, ...rest] = cookie.trim().split('=');
if (name) {
cookies[name] = rest.join('=');
}
});
return cookies;
}
export const getCookies = Api(Get('/cookies'), async () => {
const c = useHonoContext();
const cookieHeader = c.req.header('cookie');
const cookies = parseCookies(cookieHeader);
const token = cookies.token;
const sessionId = cookies.sessionId;
return {
hasToken: !!token,
token: token || null,
sessionId: sessionId || null,
};
});
```
:::caution Note
The `c.req.cookie()` method does not exist in the current version. You need to use `c.req.header('cookie')` to get the Cookie string and parse it manually.
:::
### Defining BFF Functions
When using Hono as the runtime framework, you can define interfaces through [Api functions](/guides/advanced-features/bff/operators.md):
```ts title="api/lambda/user.ts"
import { Api, Get, Query } from '@modern-js/plugin-bff/server';
import { z } from 'zod';
const QuerySchema = z.object({
id: z.string(),
});
export const getUser = Api(
Get('/user'),
Query(QuerySchema),
async ({ query }) => {
return {
id: query.id,
name: 'Modern.js',
email: 'modernjs@bytedance.com',
};
},
);
```
:::info
For more details about Api functions and operators, refer to [Creating Extensible BFF Functions](/guides/advanced-features/bff/operators.md).
:::
### Using Middleware
Hono supports a rich middleware ecosystem, and you can use middleware in BFF functions:
```ts title="api/lambda/user.ts"
import { Api, Get, Middleware } from '@modern-js/plugin-bff/server';
export const getUser = Api(
Get('/user'),
Middleware(async (c, next) => {
// You can access Hono's Context in middleware
c.res.headers.set('X-Powered-By', 'Modern.js');
await next();
}),
async () => {
return {
name: 'Modern.js',
email: 'modernjs@bytedance.com',
};
},
);
```
:::info
For more details about middleware, refer to [Creating Extensible BFF Functions](/guides/advanced-features/bff/operators.md#middleware).
:::
### More Hono Documentation
For more detailed information about Hono, please refer to the [Hono official documentation](https://hono.dev/).
---
url: /guides/advanced-features/bff/function.md
---
# Basic Usage
In a Modern.js application, developers can define API files under the `api/lambda` directory and export API functions from these files. In the frontend code, these API functions can be directly invoked by importing the file, which initiates the API requests.
This invocation method is called **unified invocation**, where developers do not need to write glue code for the frontend and backend separately, thereby ensuring type safety across both.
## Enable BFF
To enable BFF functionality in a Modern.js project, follow these steps to modify the code:
1. Install BFF plugin dependencies
If the BFF plugin is not yet installed in your project, install it first:
```bash
pnpm add @modern-js/plugin-bff
```
:::tip Version Consistency
Make sure the version of `@modern-js/plugin-bff` matches the version of `@modern-js/app-tools` in your project. All Modern.js official packages are released with a uniform version number, and version mismatches may cause compatibility issues.
Check the version of `@modern-js/app-tools` first, then install the same version of `@modern-js/plugin-bff`:
```bash
# Check the current version of @modern-js/app-tools
pnpm list @modern-js/app-tools
# Install the same version of @modern-js/plugin-bff
pnpm add @modern-js/plugin-bff@
```
:::
2. Configure `modern.config.ts`
Import and add the BFF plugin in the `modern.config.ts` file:
```ts title="modern.config.ts"
import { defineConfig, appTools } from '@modern-js/app-tools';
import { bffPlugin } from '@modern-js/plugin-bff';
export default defineConfig({
plugins: [appTools(), bffPlugin()],
});
```
3. Configure TypeScript alias
To correctly recognize the `@api` alias in TypeScript, it is recommended to add path mapping in `tsconfig.json`:
```json title="tsconfig.json"
{
"compilerOptions": {
"paths": {
..., // other paths,
"@api/*": ["./api/lambda/*"]
}
},
"include": [
..., // other include directories
"api" // Add api directory
]
}
```
## BFF Functions
Functions that allow unified invocation are called **BFF Functions**. Here is an example of the simplest BFF function. First, create the `api/lambda/hello.ts` file:
```ts title="api/lambda/hello.ts"
export const get = async () => 'Hello Modern.js';
```
Then, import and invoke the function directly in `src/routes/page.tsx`:
```tsx title="src/routes/page.tsx"
import { useState, useEffect } from 'react';
import { get as hello } from '@api/hello';
export default () => {
const [text, setText] = useState('');
useEffect(() => {
hello().then(setText);
}, []);
return
{text}
;
};
```
The function imported in `src/routes/page.tsx` will be automatically converted into an API call, eliminating the need to use an SDK or Web Fetch to call the API.
After running `pnpm run dev`, open `http://localhost:8080/` and you can see that the page displays the content returned by the BFF function. In the Network tab, you can see a request was made to `http://localhost:8080/api/hello`.

## Function Routes
In Modern.js, the routing system for BFF functions is implemented based on the file system, which is another form of **conventional routing**. Each BFF function in the `api/lambda` directory is mapped to an API route. Here are some routing conventions.
:::info
All routes generated by BFF functions have a common prefix, which defaults to `/api`. This can be configured using [bff.prefix](/configure/app/bff/prefix.md).
:::
### Default Routes
Files named `index.ts` will be mapped to the parent directory.
- `api/lambda/index.ts` -> `{prefix}/`
- `api/lambda/user/index.ts` -> `{prefix}/user`
### Nested Routes
Nested directories are supported, and files will be automatically parsed into routes in the same way.
- `api/lambda/hello.ts` -> `{prefix}/hello`
- `api/lambda/user/list.ts` -> `{prefix}/user/list`
### Dynamic Routes
Similarly, creating a directory or file with `[xxx]` in the name supports dynamic route parameters. The rules for dynamic route function parameters can be found in [dynamic-path](/guides/advanced-features/bff/function.md#dynamic-path).
- `api/lambda/user/[username]/info.ts` -> `{prefix}/user/:username/info`
- `api/lambda/user/username/[action].ts` -> `{prefix}/user/username/:action`
### Whitelist
By default, all files under the `api/lambda/` directory are parsed as BFF function files, but the following files are ignored:
- Files starting with an underscore `_`. For example: `_utils.ts`.
- Files under directories starting with an underscore `_`. For example: `_utils/index.ts`, `_utils/cp.ts`.
- Test files. For example: `foo.test.ts`.
- TypeScript type files. For example: `hello.d.ts`.
- Files under `node_modules`.
## RESTful API
Modern.js BFF functions need to follow RESTful API standards for definition. Developers must define BFF functions according to a set of rules.
:::tip Design Principles
BFF functions should not only be invoked within the project but also be accessible to other projects via an SDK or Web fetch. Therefore, Modern.js does not define a **private protocol** for unified invocation but uses standard HTTP methods along with common HTTP request parameters like `params`, `query`, and `body` to define functions.
:::
### Function Export Rules
#### HTTP Method Named Functions
Modern.js BFF functions' export names determine the HTTP method for the corresponding API, such as `get`, `post`, etc. For example, to export a GET API:
```ts
export const get = async () => {
return {
name: 'Modern.js',
desc: 'A modern web engineering solution',
};
};
```
The following example exports a `POST` API:
```ts
export const post = async () => {
return {
name: 'Modern.js',
desc: 'A modern web engineering solution',
};
};
```
- Modern.js supports 9 HTTP methods: `GET`, `POST`, `PUT`, `DELETE`, `CONNECT`, `TRACE`, `PATCH`, `OPTIONS`, and `HEAD`, which can be used as function export names.
- Names are case-insensitive. If the method is `GET`, it can be written as `get`, `Get`, `GEt`, or `GET`, and the default export, i.e., `export default xxx`, will be mapped to `Get`.
#### Using Async Functions
Modern.js recommends defining BFF functions as async functions, even if there is no asynchronous process in the function, for example:
```ts
export const get = async () => {
return {
name: 'Modern.js',
desc: 'A modern web engineering solution',
};
};
```
This is because, during frontend invocation, the BFF function will be automatically converted into an HTTP API call, and HTTP API calls are asynchronous. On the frontend, it is typically used like this:
```tsx title="src/routes/page.tsx"
import { useState, useEffect } from 'react';
import { get as hello } from '@api/hello';
export default () => {
const [text, setText] = useState('');
useEffect(() => {
hello().then(setText);
}, []);
return
{text}
;
};
```
Therefore, to keep the type definitions consistent with the actual invocation experience, we recommend defining BFF functions as async functions.
### Function Parameter Rules
Function parameter rules are divided into two parts: dynamic routes in the request path (`Dynamic Path`) and request options (`RequestOption`).
#### Dynamic Path
Dynamic routes will be the first part of the BFF function parameters, with each parameter corresponding to a segment of the dynamic route. For example, the `level` and `id` parameters will be passed to the function in the following example:
```ts title="api/lambda/[level]/[id].ts"
export default async (level: number, id: number) => {
const userData = await queryUser(level, uid);
return userData;
};
```
Invoke the function by directly passing in the dynamic parameters:
```tsx title="src/routes/page.tsx"
import { useState, useEffect } from 'react';
import { get as getUser } from '@api/[level]/[id]';
export default () => {
const [name, setName] = useState('');
useEffect(() => {
getUser(6, 001).then(userData => setName(userData.name));
}, []);
return
{name}
;
};
```
#### RequestOption
Parameters following the dynamic path are an object called `RequestOption`, which includes the query string and request body. This field is used to define the types for `data` and `query`.
In a standard function without dynamic routes, `RequestOption` can be obtained from the first parameter, for example:
```ts title="api/lambda/hello.ts"
import type { RequestOption } from '@modern-js/plugin-bff/server';
export async function post({
query,
data,
}: RequestOption, Record>) {
// do something
}
```
Custom types can also be used here:
```ts title="api/lambda/hello.ts"
import type { RequestOption } from '@modern-js/plugin-bff/server';
type IQuery = {
// some types
};
type IData = {
// some types
};
export async function post({ query, data }: { query: IQuery; data: IData }) {
// do something
}
```
When the function file uses dynamic routing, dynamic routes will precede the `RequestOption` object parameter.
```ts title="api/lambda/[sku]/[id]/item.ts"
export async function post(
sku: string,
id: string,
{
data,
query,
}: RequestOption, Record>,
) {
// do somethings
}
```
Pass the corresponding parameters when invoking the function according to its definition:
```ts title="src/routes/page.tsx"
import { post } from '@api/[sku]/[id]/item';
export default () => {
const addSku = () => {
post('0001' /* sku */, '1234' /* id */, {
query: {
/* ... */
},
data: {
/* ... */
},
});
};
return
Add SKU
;
};
```
## Extend BFF Function
The standard BFF function writing method may not always meet your needs. For example, complex TS type requirements in business scenarios. Modern.js provides a more powerful BFF function writing method.
For more details, please refer to - [Creating Extensible BFF Functions](/guides/advanced-features/bff/operators.md).
## Code Sharing
Besides the BFF functions in the `api/` directory, which can be referenced in the `src/` directory through an integrated calling method, the `src/` and `api/` directories cannot directly reference each other's code by default. To achieve code sharing, a [`shared`](/apis/app/hooks/shared.md) directory can be created at the root of the project for both `src/` and `api/` to use commonly.
---
url: /guides/advanced-features/bff/operators.md
---
# Creating Extensible BFF Functions
The previous section showed how to export a simple BFF function in a file. In more complex scenarios, each BFF function may need to do independent type validation, pre-logic, etc.
Therefore, Modern.js exposes `Api`, which supports creating BFF functions through this API. BFF functions created in this way can be easily extended with functionality.
## Example
:::caution Note
- The `Api` function can only be used in TypeScript projects, not in pure JavaScript projects.
- Operator functions (such as `Get`, `Query`, etc. below) depend on [`zod`](https://www.npmjs.com/package/zod), which needs to be installed in the project first.
```shell
pnpm add zod
```
:::
A BFF function created by the `Api` function consists of the following parts:
- `Api()`, the function that defines the interface.
- `Get(path?: string)`, specifies the interface route.
- `Query(schema: T)`, `Redirect(url: string)`, extends the interface, such as specifying interface input parameters.
- `Handler: (...args: any[]) => any | Promise`, the function that handles the request logic of the interface.
The server can define the input parameters and types of the interface. Based on the types, the server will automatically perform type validation at runtime:
{props.children}
:::caution Note
When using the `Api` function, ensure that all code logic is placed inside the function. Operations such as `console.log` or using `fs` outside the function are not allowed.
:::
The browser side can also use the integrated call method with static type hints:
```typescript title="routes/page.tsx"
import { addUser } from '@api/user';
addUser({
query: {
name: 'modern.js',
email: 'modern.js@example.com',
},
data: {
phone: '12345',
},
});
```
## Interface Route
As shown in the example below, you can specify the route and HTTP Method through the `Get` function:
{props.children}
When the route is not specified, the interface route is defined according to the file convention. As shown in the example below, with the function writing method, there is a code path `api/lambda/user.ts`, which will register the corresponding interface `/api/user`.
{props.children}
:::info
Modern.js recommends defining interfaces based on file conventions to keep routes clear in the project. For specific rules, see [Function Routes](/guides/advanced-features/bff/function.md#function-routes).
:::
In addition to the `Get` function, you can use the following functions to define HTTP interfaces:
| Function | Description |
| :--------------------- | :---------------------- |
| Get(path?: string) | Accept GET requests |
| Post(path?: string) | Accept POST requests |
| Put(path?: string) | Accept PUT requests |
| Delete(path?: string) | Accept DELETE requests |
| Patch(path?: string) | Accept PATCH requests |
| Head(path?: string) | Accept HEAD requests |
| Options(path?: string) | Accept OPTIONS requests |
## Request
The following are request-related operators. Operators can be combined, but must comply with HTTP protocol. For example, GET requests cannot use the Data operator.
### Query Parameters
Using the `Query` function, you can define the type of query. After using the `Query` function, the query information can be obtained in the input parameters of the interface processing function, and the `query` field can be added to the input parameters of the frontend request function:
{props.children}
```typescript title="routes/page.tsx"
// Frontend code
get({
query: {
name: 'modern.js',
email: 'modern.js@example.com',
},
});
```
#### Query Parameter Type Conversion
URL query parameters are strings by default. If you need numeric types, you need to use `z.coerce.number()` for type conversion:
{props.children}
:::caution Note
URL query parameters are all string types. If you need numeric types, you need to use `z.coerce.number()` for conversion, not `z.number()` directly.
:::
### Pass Data
Using the `Data` function, you can define the type of data passed by the interface. After using `Data`, the interface data information can be obtained in the input parameters of the interface processing function.
:::caution
If you use the Data function, you must follow the HTTP protocol. When the HTTP Method is GET or HEAD, the Data function cannot be used.
:::
{props.children}
```typescript title="routes/page.tsx"
// Frontend code
post({
data: {
name: 'modern.js',
phone: '12345',
},
});
```
### Route Parameters
Route parameters can implement dynamic routes and get parameters from the path. You can specify path parameters through `Params(schema: z.ZodType)`
{props.children}
### Request Headers
You can define the request headers required by the interface through the `Headers(schema: z.ZodType)` function and pass the request headers through integrated calls:
{props.children}
## Parameter Validation
As mentioned earlier, when using functions such as `Query` and `Data` to define interfaces, the server will automatically validate the data passed from the frontend based on the schema passed to these functions.
When validation fails, you can catch errors through Try/Catch:
```typescript
try {
const res = await postUser({
query: {
user: 'modern.js',
},
data: {
message: 'hello',
},
});
return res;
} catch (error) {
console.log(error.data.code); // VALIDATION_ERROR
console.log(JSON.parse(error.data.message));
}
```
At the same time, you can get complete error information through `error.data.message`:
```json
[
{
code: 'invalid_string',
message: "Invalid email",
path: [0, 'user'],
validation: "email"
},
];
```
## Middleware
You can set function middleware through the `Middleware` operator. Function middleware will execute before validation and interface logic.
:::info
The `Middleware` operator can be configured multiple times, and the execution order of middleware is from top to bottom
:::
{props.children}
## Data Transformation Pipe
The `Pipe` operator can pass in a function that executes after middleware and validation are completed. It can be used in the following scenarios:
1. Transform query parameters or data carried by the request.
2. Perform custom validation on request data. If validation fails, you can choose to throw an exception or directly return error information.
3. If you only want to do validation without executing interface logic (for example, the frontend does not do separate validation, uses the interface for validation, but in some scenarios you don't want the interface logic to execute), you can terminate subsequent execution in this function.
`Pipe` defines a transformation function. The input parameters of the transformation function are `query`, `data`, and `headers` carried by the interface request. The return value will be passed to the next `Pipe` function or interface processing function as input parameters, so the data structure of the return value generally needs to be the same as the input parameters.
:::info
The `Pipe` operator can be configured multiple times. The execution order of functions is from top to bottom. The return value of the previous function is the input parameter of the next function.
:::
{props.children}
Also,
{props.children}
If you need to do more custom operations on the response, you can pass a function to the `end` function. The input parameter of the function is Hono's Context (`c`), and you can operate on `c.req` and `c.res`:
{props.children}
## Response
The following are response-related operators. Through response operators, you can process responses.
### Status Code HttpCode
You can specify the status code returned by the interface through the `HttpCode(statusCode: number)` function
{props.children}
### Response Headers SetHeaders
Supports setting response headers through the `SetHeaders(headers: Record)` function
{props.children}
### Redirect
Supports redirecting the interface through `Redirect(url: string)`:
{props.children}
## Request Context
As mentioned above, through operators, you can get `query`, `data`, `params`, etc. in the input parameters of the interface processing function. But sometimes we need to get more request context information. At this time, we can get it through [`useHonoContext`](/apis/app/runtime/bff/use-hono-context.md):
{props.children}
## FAQ
### Can I use TypeScript instead of zod schema
If you want to use TypeScript instead of zod schema, you can use [ts-to-zod](https://www.npmjs.com/package/ts-to-zod) to convert TypeScript to zod schema first, and then use the converted schema.
The reasons we chose zod instead of pure TypeScript to define input parameter type information are:
- zod has a low learning curve.
- In the validation scenario, zod schema has stronger expressiveness than TypeScript.
- zod is easier to extend.
- Solutions for obtaining TypeScript static type information at runtime are not mature enough.
For specific comparisons of different solutions, you can refer to [Why Use Zod](https://bytedance.feishu.cn/wiki/wikcnrNnidvxHLY2SIT4nadXOCh#doxcnGoki68KEOiw8UD1fYd3lRh). If you have more ideas and questions, please feel free to contact us.
## More Practices
### Add HTTP Cache to Interface
In frontend development, some server interfaces (such as some configuration interfaces) have long response times, but actually don't need to be updated for a long time. For such interfaces, we can set HTTP cache to improve page performance:
{props.children}
---
url: /guides/advanced-features/bff/sdk.md
---
# Extend Request SDK
The unified invocation of BFF functions is isomorphic in both CSR and SSR. The request SDK encapsulated by Modern.js relies on the [Fetch API](https://developer.mozilla.org/en-US/docs/Web/API/Fetch_API/Using_Fetch) on the browser side, and on [node-fetch](https://www.npmjs.com/package/node-fetch) on the server side. However, in actual business scenarios, additional processing may be required for requests or responses, such as:
- Writing authentication information in the request headers
- Uniform handling of response data or errors
- Using other methods to send requests when the native fetch function is unavailable on specific platforms
To address these scenarios, Modern.js provides the `configure` function, which offers a series of extension capabilities. You can use it to configure SSR passthrough request headers, add interceptors, or customize the request SDK.
:::caution Note
The `configure` function needs to be called before all BFF requests are sent to ensure that the default request configuration is overridden.
:::
```tsx title="routes/page.tsx"
import { configure } from '@modern-js/plugin-bff/client';
configure({
// ...
});
const Index = () =>
Hello world
;
export default Index;
```
## Configuring SSR Passthrough Request Headers
When using both Modern.js SSR and BFF, it is often necessary to pass some request header information from the SSR page request to the BFF service.
For example, imagine a project with a page URL `https://website.com`. This page is rendered using SSR, and in the component, it will call the API endpoint `https://website.com/api/info`, which requires the user's cookie information for authentication. The page needs to pass the `cookie` of the SSR page request to the BFF when requesting this API endpoint.
Currently, the following request headers are automatically passed through in Modern.js:
```ts
['cookie', 'user-agent', 'x-tt-logid', 'x-tt-stress'];
```
You can configure additional request headers using `configure`. For example, in the following snippet, Modern.js will automatically pass the `x-uid` information from the SSR page request to the BFF service:
```tsx
configure({
allowedHeaders: ['x-uid'],
});
```
## Adding Interceptors
In some business scenarios, you may need to handle requests and responses uniformly. This can be achieved by **configuring interceptors**:
```tsx
configure({
// The `request` here is the default request tool for unified invocation. The `interceptor` function needs to return a new request.
// The output of the new request must be the parsed body result.
interceptor(request) {
return async (url, params) => {
const res = await request(url, params);
// Interceptors may return Response objects, which need to be manually parsed as JSON
if (res instanceof Response) {
return res.json();
}
// If it's already parsed data, return directly
return res;
};
},
});
```
## Customizing the Request SDK
If configuring interceptors alone cannot meet your needs and you want to customize the request function, you can also configure it using `configure`:
```tsx
import nodeFetch from 'node-fetch';
const customFetch = (input: RequestInfo | URL, init: RequestInit) => {
const curFetch =
process.env.MODERN_TARGET !== 'node'
? fetch
: (nodeFetch as unknown as typeof fetch);
return curFetch(input, init).then(async res => {
const data = await res.json();
data.hello = 'hello custom sdk';
return data;
});
};
configure({
request: customFetch,
});
```
There are some conventions when configuring custom request functions:
- The function's parameters should align with the Fetch API or node-fetch in the browser. All unified invocations of BFF functions will send requests via this function.
- The function's output must be the actual data returned by the API, not a Promise, otherwise, the BFF function will not return data correctly.
- If it's an SSR project, the function must support sending requests on both the browser and server sides.
Below is an example of using axios to customize a request function:
```tsx title="App.tsx"
import { configure } from '@modern-js/plugin-bff/client';
import type { Method, AxiosRequestHeaders as Headers } from 'axios';
configure({
async request(...config: Parameters) {
const [url, params] = config;
const res = await axios({
url: url as string, // Here we need to use `as` because fetch and axios types are somewhat incompatible
method: params?.method as Method,
data: params?.body,
headers: params?.headers as Headers,
});
return res.data;
},
});
```
---
url: /guides/advanced-features/bff/upload.md
---
# File Upload
BFF combined with runtime framework provides file upload capabilities, supporting integrated calls and pure function manual calls.
### BFF Function
First, create the `api/lambda/upload.ts` file:
```ts title="api/lambda/upload.ts"
export const post = async ({ formData }: { formData: Record }) => {
console.info('formData:', formData);
// do somethings
return {
data: {
code: 0,
},
};
};
```
:::tip
The `formData` parameter in the interface processing function can access files uploaded from the client side. It is an `Object` where the keys correspond to the field names used during the upload.
:::
### Integrated Calling
Next, directly import and call the function in `src/routes/upload/page.tsx`:
```tsx title="routes/upload/page.tsx"
import { post } from '@api/upload';
import React, { type JSX } from 'react';
export default (): JSX.Element => {
const [file, setFile] = React.useState();
const handleChange = (e: React.ChangeEvent) => {
setFile(e.target.files);
};
const handleSubmit = async (e: React.MouseEvent) => {
e.preventDefault();
const formData = new FormData();
if (file) {
for (let i = 0; i < file.length; i++) {
formData.append('images', file[i]);
}
post({
formData,
});
}
};
return (
);
};
```
:::tip
Note: The input parameter type must be `{ formData: FormData }` for the upload to succeed.
:::
### Manual Calling
You can manually upload files using the `fetch API`, when calling `fetch`, set the `body` as `FormData` type and submit a post request.
```tsx title="routes/upload/page.tsx"
import React from 'react';
export default (): JSX.Element => {
const [file, setFile] = React.useState();
const handleChange = (e: React.ChangeEvent) => {
setFile(e.target.files);
};
const handleSubmit = async (e: React.FormEvent) => {
e.preventDefault();
const formData = new FormData();
if (file) {
for (let i = 0; i < file.length; i++) {
formData.append('images', file[i]);
}
await fetch('/api/upload', {
method: 'POST',
body: formData,
});
}
};
return (
);
};
```
---
url: /guides/advanced-features/build-performance.md
---
# Improve Build Performance
Modern.js optimizes build performance by default, but as the project becomes larger, you may encounter some build performance problems.
This document provides some optional speed-up strategies, developers can choose some of them to improve the build performance.
:::tip 📢 Notice
The strategies in [Bundle Size Optimization](/guides/advanced-features/page-performance/optimize-bundle.md) can also be used to improve build performance, so we won't repeat them here.
:::
## General optimization strategy
The following are some general optimization strategies, which can speed up the development build and production build, and some of them also optimize the bundle size.
### Upgrade Node.js version
In general, updating Node.js to the latest [LTS release](https://github.com/nodejs/release#release-schedule) will help improve build performance.
Modern.js requires Node.js version >= 20.19.5. We strongly recommend using the latest LTS version (such as Node.js 22 LTS) for the best build performance.
You can switch to the latest LTS version by following these steps:
```bash
# Install the latest LTS version (e.g., Node.js 22)
nvm install --lts
# Switch to the latest LTS version
nvm use --lts
# Set the latest LTS version as the default
nvm alias default lts/*
# View Node version
node -v
```
Or install Node.js 22 LTS specifically:
```bash
# Install Node.js 22 LTS
nvm install 22 --lts
# Switch to Node.js 22
nvm use 22
# Set Node.js 22 as the default version
nvm alias default 22
# View Node version
node -v
```
## Development optimization strategies
The following are strategies for improve build performance in development environment.
### Adjust Source Map format
In order to provide a good debugging experience, Modern.js uses the `cheap-module-source-map` format Source Map by default in the development environment, which is a high-quality Source Map format and will bring certain performance overhead.
You can improve build speed by adjusting the source map format of your development environment.
For example to disable Source Map:
```js
export default {
tools: {
bundlerChain(chain, { env }) {
if (env === 'development') {
chain.devtool(false);
}
},
},
};
```
Or set the source map format of the development environment to the cheapest `eval` format:
```js
export default {
tools: {
bundlerChain(chain, { env }) {
if (env === 'development') {
chain.devtool('eval');
}
},
},
};
```
> For detailed differences between different Source Map formats, see [rspack - devtool](https://rspack.rs/config/devtool).
### Adjust Browserslist for development
This strategy is similar to ["Adjust Browserslist"](/guides/advanced-features/page-performance/optimize-bundle.md#adjust-browserslist), the difference is that we can set different browserslist for development and production environment, thereby reducing the compilation overhead in the development environment.
For example, you can add the following config to `package.json`, which means that only the latest browsers are compatible in the development environment, and the actual browsers are compatible in the production environment:
```json
{
"browserslist": {
"production": [">0.2%", "not dead", "not op_mini all"],
"development": [
"last 1 chrome version",
"last 1 firefox version",
"last 1 safari version"
]
}
}
```
Note that this strategy can lead to some differences in the build result of development production environment.
## Production optimization strategies
The following are strategies for improve build performance in production environment.
### Disable Source Map
If your project does not need Source Map in the production, you can turn it off through the `sourcemap` config to improve the build speed.
```js
export default {
output: {
sourceMap: false,
},
};
```
See [output.sourceMap](/configure/app/output/source-map.md) for details.
---
url: /guides/advanced-features/compatibility.md
---
# Browser Compatibility
## Browserslist Configuration
Modern.js supports three ways to set the range of browsers that a web application needs to support.
### Method 1: Configure via `.browserslistrc` File
Modern.js supports setting the range of browsers that a web application needs to support. You can set the [Browserslist](https://browsersl.ist/) values in the `.browserslistrc` file.
When you create a new Modern.js project, a default `.browserslistrc` configuration is included, which indicates that JavaScript code will be compiled to ES6 format.
```yaml title=".browserslistrc"
chrome >= 87
edge >= 88
firefox >= 78
safari >= 14
```
When the `overrideBrowserslist` configuration is not specified in the project, this `.browserslistrc` file will take effect.
### Method 2: Configure via package.json
You can also configure browserslist by setting the `browserslist` field in the `package.json` file:
```json title="package.json"
{
"browserslist": [
"chrome >= 87"
// Other browser configurations...
]
}
```
### Method 3: Configure via `output.overrideBrowserslist`
You can also configure browserslist by setting the [`output.overrideBrowserslist`](/configure/app/output/override-browserslist.md) field in the `modern.config.js` file:
```js title="modern.config.js"
export default {
output: {
overrideBrowserslist: [
'chrome >= 87',
// Other browser configurations...
],
},
};
```
### Configuration Priority
The `overrideBrowserslist` configuration has a higher priority than the `.browserslistrc` file and the `browserslist` field in package.json.
In most scenarios, it is recommended to prioritize using the `.browserslistrc` file rather than the `overrideBrowserslist` configuration because the `.browserslistrc` file is the officially defined configuration file, has better general applicability, and can be recognized by other libraries in the community.
:::tip
Please refer to [Rsbuild - Setting Browser Range](https://v2.rsbuild.rs/zh/guide/advanced/browserslist) for more information.
:::
## Polyfill
### Compile-time Polyfill
Modern.js by default injects corresponding polyfill code at compile time through [core-js](https://github.com/zloirock/core-js).
By default, it will include the necessary polyfill code based on the project's Browserslist settings, so you generally do not need to worry about polyfill issues for your project source code and third-party dependencies. However, since some unused polyfill code is included, the final bundle size may increase.
:::info
For scenarios where certain third-party dependencies clearly do not require polyfills, you can set [`output.polyfill`](/configure/app/output/polyfill.md) to `usage`. This way, Babel will only inject polyfill code based on the syntax used in the code during compilation.
:::
### 运行时按需 Polyfill
Modern.js 中还提供了基于浏览器 [UA](https://developer.mozilla.org/zh-CN/docs/Web/HTTP/Headers/User-Agent) 信息的运行时按需 Polyfill 方案,相比于 Babel 优势如下:
- 不会插入到代码中,只根据访问页面的设备,按需下发 Polyfill 代码 ,减少整体代码体积。
- 相同浏览器会公用一份 Polyfill 代码。因此,随着项目越来越多,基于 UA 的 Polyfill 代码下发速度会越来越快,综合速度超过常规方案。
Modern.js 提供了 `@modern-js/plugin-polyfill` 插件来实现该功能,可以通过安装该插件来开启该功能:
```sh [npm]
npm install @modern-js/plugin-polyfill
```
```sh [yarn]
yarn add @modern-js/plugin-polyfill
```
```sh [pnpm]
pnpm add @modern-js/plugin-polyfill
```
然后在 `modern.config.ts` 中注册 Polyfill 插件:
```ts title="modern.config.ts"
import { polyfillPlugin } from '@modern-js/plugin-polyfill';
export default defineConfig({
plugins: [..., polyfillPlugin()],
});
```
配置 `output.polyfill` 为 `ua` 并且执行 `pnpm run build && pnpm run serve` 启动服务器后,访问页面可以看到 HTML 产物中包含如下脚本:
```js
```
在 Chrome 51 下访问页面可以看到 `http://localhost:8080/__polyfill__` 返回内容如下:

:::caution 注意
该功能只有在使用 Modern.js 内置的 Web Server 时才会生效。
如果有自定义模版的需求,请参考 [HTML 模板](/zh/guides/basic-features/html.md)。通过 `html.template` 或 `tools.html` 手动修改模版时,可能会导致该功能无法正确生效。
:::
---
url: /guides/advanced-features/international.md
---
# Internationalization
`@modern-js/plugin-i18n` 是 Modern.js 的国际化插件,基于
[i18next](https://www.i18next.com/) 和 [react-i18next](https://react.i18next.com/) 构建,为 Modern.js 应用提供完整的国际化解决方案。
## Core Features
- 🌍 **Multi-language Support**: Easily manage translation resources for multiple languages
- 🔍 **Smart Language Detection**: Supports automatic language detection from URL paths, cookies, request headers, and more
- 📦 **Flexible Resource Loading**: Supports three resource loading methods: HTTP, file system, and custom SDK
- 🛣️ **Route Integration**: Deeply integrated with Modern.js routing system, supports language path prefixes
- ⚡ **SSR Support**: Full support for server-side rendering (SSR) scenarios
- 🎯 **TypeScript Support**: Complete TypeScript type definitions
## Use Cases
- Web applications that need to support multiple languages
- Multi-language routing that is SEO-friendly
- Multi-language applications that require server-side rendering
- Applications that need to dynamically load translation resources from external services
## Documentation Navigation
- [Basic Concepts](/guides/advanced-features/international/basic.md) - Core concepts and terminology
- [Quick Start](/guides/advanced-features/international/quick-start.md) - Detailed installation and configuration guide
- [Configuration](/guides/advanced-features/international/configuration.md) - CLI and runtime configuration details
- [Locale Detection](/guides/advanced-features/international/locale-detection.md) - Multiple language detection methods and priorities
- [Resource Loading](/guides/advanced-features/international/resource-loading.md) - HTTP, FS, and SDK backend usage
- [Routing Integration](/guides/advanced-features/international/routing.md) - Path redirection and I18nLink component
- [API Reference](/guides/advanced-features/international/api.md) - Complete API documentation and type definitions
- [Advanced Usage](/guides/advanced-features/international/advanced.md) - SSR, multi-entry, custom instances, and more
- [Best Practices](/guides/advanced-features/international/best-practices.md) - Resource organization, error handling, type safety
---
url: /guides/advanced-features/international/advanced.md
---
# Advanced Usage
## SSR Configuration
The plugin fully supports server-side rendering (SSR) scenarios.
### Server-side Language Detection
In SSR scenarios, the plugin will detect language from HTTP requests:
1. **URL Path**: Extract language prefix from path
2. **Cookie**: Read language settings from cookies
3. **Request Headers**: Read from `Accept-Language` request header
**Configuration Example**:
```ts
i18nPlugin({
localeDetection: {
localePathRedirect: true,
i18nextDetector: true,
languages: ['zh', 'en'],
fallbackLanguage: 'en',
detection: {
order: ['path', 'cookie', 'header'],
lookupHeader: 'accept-language',
},
},
})
```
### SSR Resource Loading
In SSR scenarios, the plugin will automatically use the file system backend to load resources:
```ts
export default defineConfig({
server: {
ssr: true,
publicDir: './locales', // Resource file directory
},
plugins: [
i18nPlugin({
backend: {
enabled: true,
},
}),
],
});
```
Resource file structure:
```
Project Root/
└── locales/
├── en/
│ └── translation.json
└── zh/
└── translation.json
```
## Multi-Entry Configuration
If the project has multiple entries, you can configure language detection and backend options separately for each entry.
### Configure Language Detection by Entry
```ts
i18nPlugin({
localeDetection: {
// Global configuration
localePathRedirect: true,
languages: ['zh', 'en'],
fallbackLanguage: 'en',
// Override configuration by entry
localeDetectionByEntry: {
admin: {
localePathRedirect: false, // admin entry does not use path redirection
languages: ['en'], // admin entry only supports English
},
mobile: {
languages: ['zh', 'en', 'ja'], // mobile entry supports more languages
},
},
},
})
```
### Configure Backend by Entry
```ts
i18nPlugin({
backend: {
enabled: true,
loadPath: '/locales/{{lng}}/{{ns}}.json', // Default path
// Override configuration by entry
backendOptionsByEntry: {
admin: {
loadPath: '/admin/locales/{{lng}}/{{ns}}.json',
},
mobile: {
loadPath: '/mobile/locales/{{lng}}/{{ns}}.json',
},
},
},
})
```
## Custom i18next Instance
If you need to use a custom i18next instance, you can provide it in runtime configuration.
### Create Custom Instance
```ts
// src/i18n.ts
import i18next from 'i18next';
const customI18n = i18next.createInstance({
// Custom configuration
fallbackLng: 'en',
supportedLngs: ['zh', 'en'],
interpolation: {
escapeValue: false,
},
});
export default customI18n;
```
### Pass Custom Instance
```ts
// src/modern.runtime.ts
import { defineRuntimeConfig } from '@modern-js/runtime';
import customI18n from './i18n';
export default defineRuntimeConfig({
i18n: {
i18nInstance: customI18n,
initOptions: {
// Other configuration options
},
},
});
```
## Language Switching
### Programmatic Switching
Use the `changeLanguage` method of the `useModernI18n` Hook:
```tsx
import { useModernI18n } from '@modern-js/plugin-i18n/runtime';
function LanguageSwitcher() {
const { language, changeLanguage, supportedLanguages } = useModernI18n();
return (
);
}
```
### URL Synchronization
When `localePathRedirect` is enabled, switching languages will automatically update the URL:
```tsx
// Current URL: /en/about
// Call changeLanguage('zh')
// URL automatically updates to: /zh/about
```
If `localePathRedirect` is not enabled, language switching will only update the i18next instance and cache, without changing the URL.
---
url: /guides/advanced-features/international/api.md
---
# API Reference
## useModernI18n Hook
`useModernI18n` is a React Hook provided by the plugin for accessing internationalization functionality in components.
### Return Value
```ts
interface UseModernI18nReturn {
/** Current language code */
language: string;
/** Function to change language */
changeLanguage: (newLang: string) => Promise;
/** i18next instance (for advanced usage) */
i18nInstance: I18nInstance;
/** Supported language list */
supportedLanguages: string[];
/** Check if language is supported */
isLanguageSupported: (lang: string) => boolean;
/** Indicates if translation resources for current language are ready to use */
isResourcesReady: boolean;
}
```
### Usage Example
```tsx
import { useModernI18n } from '@modern-js/plugin-i18n/runtime';
function LanguageSwitcher() {
const { language, changeLanguage, supportedLanguages, isLanguageSupported } =
useModernI18n();
return (
Current language: {language}
{supportedLanguages.map(lang => (
))}
);
}
```
### changeLanguage Method
The `changeLanguage` method is used to switch languages. It will:
1. Update the language of the i18next instance
2. Update browser cache (Cookie/LocalStorage)
3. Update URL path (if `localePathRedirect` is enabled)
```tsx
const { changeLanguage } = useModernI18n();
// Switch language
await changeLanguage('zh');
```
:::info
`changeLanguage` is an async function that returns a Promise.
:::
### Language Support Check
`isLanguageSupported` is used to check if a language is in the supported language list:
```tsx
const { isLanguageSupported, changeLanguage } = useModernI18n();
function handleLanguageChange(lang: string) {
if (isLanguageSupported(lang)) {
changeLanguage(lang);
} else {
console.warn(`Language ${lang} is not supported`);
}
}
```
### Resource Loading State
`isResourcesReady` indicates whether the translation resources for the current language are loaded and ready to use. This is particularly useful when using SDK backend to load resources dynamically.
```tsx
import { useModernI18n } from '@modern-js/plugin-i18n/runtime';
function MyComponent() {
const { isResourcesReady } = useModernI18n();
if (!isResourcesReady) {
return
Loading translation resources...
;
}
return
Translation resources are ready
;
}
```
**When to use:**
- Display a loading state while resources are being loaded
- Prevent rendering content that depends on translations before resources are ready
- Handle resource loading errors gracefully
:::info
`isResourcesReady` automatically checks:
- If i18n instance is initialized
- If any resources for the current language are currently loading (SDK backend only)
- If all required namespaces for the current language are loaded in the store
:::
## I18nLink Component
The `I18nLink` component is used to create links with language prefixes.
### Props
```tsx
interface I18nLinkProps {
/** Target path (no need to include language prefix) */
to: string;
/** Child elements */
children: React.ReactNode;
/** Other Link component props (such as replace, state, etc.) */
[key: string]: any;
}
```
### Usage Example
```tsx
import { I18nLink } from '@modern-js/plugin-i18n/runtime';
function Navigation() {
return (
);
}
```
## Runtime Plugin API
In the `onBeforeRender` hook of Runtime plugins, you can modify the language using the `context.changeLanguage` method. This is useful for scenarios where you need to dynamically set the language based on request information (such as user preferences, geographic location, etc.).
### context.changeLanguage
In the `onBeforeRender` hook, the i18n plugin adds a `changeLanguage` method to the `context` for use by other Runtime plugins.
**Type Definition:**
```ts
interface TInternalRuntimeContext {
i18nInstance?: I18nInstance;
changeLanguage?: (lang: string) => Promise;
}
```
### Usage Example
```ts
import type { RuntimePlugin } from '@modern-js/runtime';
const myRuntimePlugin = (): RuntimePlugin => ({
name: 'my-runtime-plugin',
setup: api => {
api.onBeforeRender(async context => {
// Check if changeLanguage method exists (ensure i18n plugin is loaded)
if (context.changeLanguage) {
// Determine language based on some condition
const userLang = getUserLanguageFromRequest(context);
// Change language
await context.changeLanguage(userLang);
}
});
},
});
function getUserLanguageFromRequest(context: any): string {
// Get user language from request headers, cookies, or other sources
const acceptLanguage = context.ssrContext?.req?.headers['accept-language'];
// Parse and return appropriate language code
return parseAcceptLanguage(acceptLanguage) || 'zh';
}
export default myRuntimePlugin;
```
### Notes
1. **Execution Order**: Ensure the i18n plugin is registered before other plugins that use `changeLanguage`, so that `context.changeLanguage` is available.
2. **Async Operation**: `changeLanguage` is an async method and requires using `await` to wait for completion.
3. **Error Handling**: If an invalid language code is passed, an error will be thrown. It's recommended to add error handling:
```ts
api.onBeforeRender(async context => {
if (context.changeLanguage) {
try {
await context.changeLanguage('zh');
} catch (error) {
console.error('Failed to change language:', error);
}
}
});
```
4. **Language Validation**: It's recommended to verify that the language is in the supported language list before calling `changeLanguage`:
```ts
api.onBeforeRender(async context => {
if (context.changeLanguage && context.i18nInstance) {
const supportedLngs = context.i18nInstance.options?.supportedLngs || [];
const targetLang = 'zh';
if (supportedLngs.includes(targetLang)) {
await context.changeLanguage(targetLang);
}
}
});
```
:::info
The `changeLanguage` method will:
- Update the language of the i18n instance
- Cache the language selection in the browser environment (Cookie/LocalStorage)
- Trigger callbacks related to language switching
However, it will not automatically update the URL path. If you need to update the URL, you need to coordinate with the routing plugin or handle it manually.
:::
## Integration with react-i18next
The plugin is fully compatible with `react-i18next` and can use the `useTranslation` Hook and other `react-i18next` features.
### useTranslation Hook
```tsx
import { useTranslation } from 'react-i18next';
function MyComponent() {
const { t, i18n } = useTranslation();
return (
{t('welcome')}
{t('description', { name: 'Modern.js' })}
);
}
```
### Accessing i18next Instance
You can get the i18next instance through `useModernI18n`:
```tsx
import { useModernI18n } from '@modern-js/plugin-i18n/runtime';
import { useTranslation } from 'react-i18next';
function MyComponent() {
const { i18nInstance } = useModernI18n();
const { t } = useTranslation();
// Directly access i18next instance
console.log(i18nInstance.language);
console.log(i18nInstance.options);
return
{t('hello')}
;
}
```
## Type Definitions
### I18nInstance Interface
```ts
interface I18nInstance {
language: string;
isInitialized: boolean;
init: (options?: I18nInitOptions) => void | Promise;
changeLanguage: (lang: string) => void | Promise;
use: (plugin: any) => void;
createInstance: (options?: I18nInitOptions) => I18nInstance;
cloneInstance?: () => I18nInstance;
services?: {
languageDetector?: {
detect: (request?: any, options?: any) => string | string[] | undefined;
[key: string]: any;
};
[key: string]: any;
};
options?: {
backend?: BackendOptions;
[key: string]: any;
};
}
```
### I18nInitOptions Interface
```ts
interface I18nInitOptions {
lng?: string;
fallbackLng?: string;
supportedLngs?: string[];
initImmediate?: boolean;
detection?: LanguageDetectorOptions;
backend?: BackendOptions;
resources?: Resources;
ns?: string | string[];
defaultNS?: string | string[];
react?: {
useSuspense?: boolean;
[key: string]: any;
};
[key: string]: any;
}
```
### LanguageDetectorOptions Interface
```ts
interface LanguageDetectorOptions {
/** Detection order */
order?: string[];
/** Query parameter key name, default 'lng' */
lookupQuerystring?: string;
/** Cookie key name, default 'i18next' */
lookupCookie?: string;
/** LocalStorage key name, default 'i18nextLng' (browser only) */
lookupLocalStorage?: string;
/** SessionStorage key name (browser only) */
lookupSession?: string;
/** Starting index in path for language detection, default 0 */
lookupFromPathIndex?: number;
/** Cache method, can be false or string array (e.g., ['cookie', 'localStorage']) */
caches?: boolean | string[];
/** Cookie expiration time (minutes) */
cookieMinutes?: number;
/** Cookie expiration date (Date object, takes precedence over cookieMinutes) */
cookieExpirationDate?: Date;
/** Cookie domain */
cookieDomain?: string;
/** Request header key name, default 'accept-language' */
lookupHeader?: string;
}
```
### Resources Type
```ts
type Resources = {
[lng: string]: {
[ns: string]: string | Record;
};
};
```
:::info
The namespace value can be a string (for simple key-value pairs) or an object (for nested translation structures).
:::
---
url: /guides/advanced-features/international/basic.md
---
# Basic Concepts
Before integrating internationalization capabilities into your project, you need to understand internationalization-related concepts. Understanding core concepts can help you quickly establish a stable translation system and better solve various problems during use.
## Core Concepts
### i18n
`i18n` is the abbreviation for Internationalization, which refers to making applications run well in different languages, regions, and cultures. It requires considering factors such as multilingual resources, numbers/dates/currencies, and cultural differences at the design stage.
### i18next
i18next is a general-purpose internationalization framework that provides capabilities such as language detection, resource management, interpolation, and pluralization. @modern-js/plugin-i18n is based on i18next by default. Please refer to its [official documentation](https://www.i18next.com/) for complete configuration instructions.
### react-i18next
react-i18next is a React binding library for i18next, providing Hooks/components such as `useTranslation` and `Trans` to achieve good integration with React lifecycle:
```tsx
import { useTranslation } from 'react-i18next';
function App() {
const { t } = useTranslation();
return
{t('welcome')}
;
}
```
### i18n Instance
i18next exports a default instance by default, and also supports generating multiple instances through `createInstance`:
```ts
import i18next, { createInstance } from 'i18next';
i18next.init({
/* ... */
});
const custom = createInstance();
await custom.init({
/* Independent configuration */
});
```
The instance is responsible for translation resources, current language, language switching, and other functions. You can also pass a custom instance in Modern.js's `runtime`.
### Initialization (init)
i18next completes initialization through `init`. Common core options:
- `lng`: Initial language
- `ns` / `defaultNS`: Namespace list and default namespace
- `supportedLngs`: Allowed language set
- `fallbackLng`: Fallback language when resources are missing (can be an array or mapping)
- `interpolation`: Interpolation settings, usually configured with `escapeValue: false` in React environments
```ts
i18next.init({
lng: 'zh',
ns: ['translation', 'common'],
defaultNS: 'translation',
supportedLngs: ['zh', 'en'],
fallbackLng: ['en'],
interpolation: { escapeValue: false },
});
```
### `t` Function
`t` is the core API for obtaining translations. It can be used directly from the instance or obtained through react-i18next Hook:
```ts
i18next.t('welcome');
```
```tsx
const { t } = useTranslation();
t('welcome', { name: 'Modern.js', count: 3 });
```
`t` supports advanced features such as interpolation, pluralization, and context, which will be explained in detail later.
## Language Code
Language codes are used to identify the current interface language, following the ISO 639-1 standard (`en`, `zh`, etc.), and can also carry region information (`en-US`, `zh-CN`).
- **Supported Language List**: Declared through plugin configuration, so you can know what products need to be generated at compile time.
- **Default Language**: Used when user language cannot be detected or resources are missing.
- **Fallback Language Chain**: Chains like `en-US → en → zh` determine the search order when translations are missing.
```ts
// modern.config.ts
import { defineConfig } from '@modern-js/app-tools';
import { i18nPlugin } from '@modern-js/plugin-i18n';
export default defineConfig({
plugins: [
i18nPlugin({
localeDetection: {
languages: ['zh', 'en', 'ja'],
fallbackLanguage: ['zh', 'en'], // Supports fallback chain
},
}),
],
});
```
💡 It is recommended to maintain `supportedLanguages` and `fallbackLanguage` in sync to avoid situations where users switch to unconfigured languages.
## Namespace
Namespaces are used to split translation files by business modules, facilitating code splitting and on-demand loading. The default namespace `translation` is used when not specified.
```ts
// src/modern.runtime.ts
import { defineRuntimeConfig } from '@modern-js/runtime';
export default defineRuntimeConfig({
i18n: {
initOptions: {
ns: ['translation', 'common', 'dashboard'],
defaultNS: 'translation',
},
},
});
```
Using different namespaces in components:
```tsx
import { useTranslation } from 'react-i18next';
export function DashboardHeader() {
const { t } = useTranslation(['dashboard', 'common']);
return (
{t('dashboard:title')}
);
}
```
Namespaces can also be combined with dynamic loading to request large amounts of text on demand.
## Resource File Structure
Recommended resource file directory:
```
locales/
├── en/
│ ├── translation.json
│ ├── common.json
│ └── dashboard.json
└── zh/
├── translation.json
├── common.json
└── dashboard.json
```
- **File Naming**: `locales//.json`
- **Format**: Standard JSON, key-value pairs or nested objects
- **Organization**: Nested objects are used to represent UI hierarchy, such as buttons, dialogs, etc.
```json
{
"header": {
"title": "Welcome",
"actions": {
"save": "Save",
"cancel": "Cancel"
}
}
}
```
You can also directly inject resources through the `resources` option during initialization, or call `addResourceBundle` at runtime:
```ts
i18next.init({
resources: {
en: {
common: {
welcome: 'Welcome',
},
},
zh: {
common: {
welcome: '欢迎',
},
},
},
});
i18next.addResourceBundle('en', 'home', { title: 'Home' });
```
## Translation Key
Translation keys are paths to access translations, usually using dots to represent hierarchy: `common.button.submit`.
Naming convention recommendations:
- Use semantic words, avoid abbreviations
- Divide prefixes by module (`dashboard.table.*`)
- Can use `:` to specify namespace (`common:button.submit`)
- Avoid using complete Chinese text directly as keys
```tsx
const { t } = useTranslation();
button.textContent = t('common.button.submit', {
defaultValue: 'Submit',
});
```
## Interpolation and Variables
Interpolation allows dynamic injection of variables into translation text.
**Resource File**:
```json
{
"welcome": "Welcome, {{name}}!",
"invite": "{{name}} invites you to join {{project}}",
"formattedValue": "Current price: {{value, currency}}"
}
```
**Usage**:
```tsx
const { t } = useTranslation();
return (
<>
);
```
### Nested Interpolation
You can directly pass objects or multi-level variables:
```json
{
"greeting": "Hello, {{user.name}}, you have {{user.notifications}} new messages"
}
```
```tsx
t('greeting', {
user: { name: 'Jay', notifications: 3 },
});
```
### Formatted Interpolation
Format numbers, dates, etc. through the `interpolation.format` function:
```ts
export default defineRuntimeConfig({
i18n: {
initOptions: {
interpolation: {
format(value, format, lng) {
if (format === 'currency') {
return new Intl.NumberFormat(lng, {
style: 'currency',
currency: lng === 'zh' ? 'CNY' : 'USD',
}).format(Number(value));
}
if (value instanceof Date) {
return new Intl.DateTimeFormat(lng, { dateStyle: 'medium' }).format(
value,
);
}
return value;
},
},
},
},
});
```
```tsx
t('formattedValue', { value: 99.5, format: 'currency' });
```
### Escaping Interpolation
`react-i18next` escapes interpolation values by default to prevent XSS. If you need to render safe HTML, you need to explicitly enable `interpolation.escapeValue = false` and ensure the data is trustworthy.
## Pluralization
Pluralization automatically selects the appropriate word form based on the language, depending on the `count` parameter.
```json
{
"item": "1 item",
"item_plural": "{{count}} items",
"item_0": "no items"
}
```
```tsx
t('item', { count: 0 }); // no items
t('item', { count: 1 }); // 1 item
t('item', { count: 5 }); // 5 items
```
Different languages have different pluralization rules, for example:
- **English**: Singular, plural
- **Russian**: Multiple forms such as one, few, many
- **Chinese**: Usually only a single form, can use `_0` key to override special text
💡 If you need to customize pluralization rules, you can extend through `i18next.services.pluralResolver`. See advanced usage for details.
## Nested Translation Structure
Nested structures can intuitively reflect UI hierarchy.
```json
{
"common": {
"button": {
"submit": "Submit",
"cancel": "Cancel"
}
}
}
```
Use dots to access in code:
```tsx
const { t } = useTranslation();
t('common.button.submit');
```
Advantages of nested structures:
- Avoid lengthy key names
- Easy to view module text as a whole in JSON
- Can be combined with `keyPrefix` to simplify calls: `useTranslation('common', { keyPrefix: 'button' })`
## Fallback Language
When the current language is missing a key, it will continue searching according to the fallback language chain.
```ts
export default defineRuntimeConfig({
i18n: {
initOptions: {
lng: 'zh-CN',
fallbackLng: {
'zh-CN': ['zh', 'en'],
default: ['en'],
},
},
},
});
```
:::tip
You can fallback from regional languages (such as `zh-CN`) to general languages (`zh`), and finally to the default language (`en`), ensuring that all keys have available text.
:::
## Language Detection
i18next automatically identifies user language through language detection plugins. Modern.js plugin has built-in browser and server support.
```ts
import LanguageDetector from 'i18next-browser-languagedetector';
import i18next from 'i18next';
i18next.use(LanguageDetector).init({
supportedLngs: ['zh', 'en', 'ja'],
detection: {
order: ['path', 'cookie', 'localStorage', 'navigator'],
lookupCookie: 'i18next',
lookupLocalStorage: 'i18nextLng',
},
});
```
In Modern.js, you can directly enable built-in detection in the plugin configuration:
```ts
i18nPlugin({
localeDetection: {
i18nextDetector: true,
languages: ['zh', 'en'],
detection: {
order: ['path', 'cookie', 'header'],
},
},
});
```
:::warning
After enabling detection, there is no need to explicitly set `lng` in `init`. If you manually call `changeLanguage()` without passing a language, it will also automatically infer based on the detection configuration.
:::
---
url: /guides/advanced-features/international/best-practices.md
---
# Best Practices
## Resource File Organization
It's recommended to organize resource files as follows:
```
locales/
├── en/
│ ├── translation.json # Default namespace
│ ├── common.json # Common translations
│ └── errors.json # Error messages
└── zh/
├── translation.json
├── common.json
└── errors.json
```
**Configure Multiple Namespaces**:
```ts
export default defineRuntimeConfig({
i18n: {
initOptions: {
ns: ['translation', 'common', 'errors'],
defaultNS: 'translation',
},
},
});
```
**Using Namespaces**:
```tsx
import { useTranslation } from 'react-i18next';
function MyComponent() {
const { t } = useTranslation('common');
return
{t('welcome')}
;
}
```
## Error Handling
It's recommended to provide fallback options when resource loading fails:
### Check Resource Loading State
When using SDK backend or need to ensure resources are loaded, use `isResourcesReady` from `useModernI18n`:
```tsx
import { useModernI18n } from '@modern-js/plugin-i18n/runtime';
import { useTranslation } from 'react-i18next';
function MyComponent() {
const { isResourcesReady } = useModernI18n();
const { t } = useTranslation();
// Check if resources are loaded and ready
if (!isResourcesReady) {
return
;
}
```
### Alternative: Check i18next Initialization
For simpler cases, you can also check i18next initialization status:
```tsx
import { useTranslation } from 'react-i18next';
function MyComponent() {
const { t, i18n } = useTranslation();
// Check if i18n is initialized
if (!i18n.isInitialized) {
return
;
}
```
:::tip
`isResourcesReady` is more accurate for SDK backend scenarios as it checks if all required resources are actually loaded, not just if the instance is initialized.
:::
## Type Safety
Add type definitions for translation keys to improve development experience:
```ts
// types/i18n.d.ts
import 'react-i18next';
declare module 'react-i18next' {
interface CustomTypeOptions {
defaultNS: 'translation';
resources: {
translation: {
hello: string;
world: string;
welcome: string;
};
common: {
submit: string;
cancel: string;
};
};
}
}
```
Using type-safe translations:
```tsx
import { useTranslation } from 'react-i18next';
function MyComponent() {
const { t } = useTranslation();
// TypeScript will check if the key exists
return
{t('hello')}
; // ✅ Type safe
// return
{t('invalid')}
; // ❌ TypeScript error
}
```
---
url: /guides/advanced-features/international/configuration.md
---
# Configuration
Plugin configuration is divided into two parts: CLI configuration (`modern.config.ts`) and runtime configuration (`modern.runtime.ts`). Both need to be used together - CLI configuration is for basic plugin settings, while runtime configuration is for i18next initialization options.
:::warning
Function-type configurations (such as SDK loader functions) can only be set in runtime configuration (`modern.runtime.ts`), not in CLI configuration. This is because CLI configuration is executed at build time and cannot serialize functions.
:::
## CLI Configuration (modern.config.ts)
Configure plugin options in `modern.config.ts`:
```ts
import { i18nPlugin } from '@modern-js/plugin-i18n';
export default defineConfig({
plugins: [
i18nPlugin({
localeDetection: {
// Language detection configuration
},
backend: {
// Backend resource loading configuration
},
}),
],
});
```
### localeDetection Configuration
`localeDetection` is used to configure language detection related options:
:::warning
If `localePathRedirect` is enabled, the `detection` configuration must be placed in CLI configuration (`modern.config.ts`), because the server-side plugin needs to read this configuration to get language information and perform path redirection.
:::
```ts
interface BaseLocaleDetectionOptions {
/** Whether to enable path redirection, adds language prefix to URL when enabled */
localePathRedirect?: boolean;
/** Whether to enable i18next language detector */
i18nextDetector?: boolean;
/** Supported language list */
languages?: string[];
/** Default fallback language */
fallbackLanguage?: string;
/** Custom detection configuration */
detection?: LanguageDetectorOptions;
/** Routes to ignore automatic redirection (array of path patterns or function)
*
* Can be a string array (path patterns) or a function to determine if redirection should be ignored.
* Supports exact match and prefix match (e.g., '/api' will match '/api' and '/api/users').
*
* @example
* // String array
* ignoreRedirectRoutes: ['/api', '/admin']
*
* // Function
* ignoreRedirectRoutes: (pathname) => pathname.startsWith('/api')
*/
ignoreRedirectRoutes?: string[] | ((pathname: string) => boolean);
}
interface LocaleDetectionOptions extends BaseLocaleDetectionOptions {
/** Configure language detection by entry (multi-entry scenarios) */
localeDetectionByEntry?: Record;
}
```
**Example**:
```ts
i18nPlugin({
localeDetection: {
localePathRedirect: true,
i18nextDetector: true,
languages: ['zh', 'en', 'ja'],
fallbackLanguage: 'en',
detection: {
order: ['path', 'cookie', 'header'],
lookupCookie: 'i18next',
caches: ['cookie'],
},
},
});
```
### backend Configuration
`backend` is used to configure resource loading methods:
:::info
**Auto-detection**: The plugin automatically detects and enables backend in the following scenarios:
1. **If you configure `loadPath` or `addPath`**: The backend will be automatically enabled (`enabled: true`) without checking for locales directory, since you've already specified the resource path.
2. **If you don't configure backend**: The plugin will automatically detect if a `locales` directory exists in:
- Project root: `{projectRoot}/locales`
- Config public directory: `{projectRoot}/config/public/locales`
- Public directory configured via `server.publicDir`: `{projectRoot}/{publicDir}/locales`
If the directory exists and contains JSON files, the backend will be automatically enabled.
3. **If you explicitly set `enabled: false`**: No auto-detection will be performed, and the backend will remain disabled.
This automatic detection helps reduce unnecessary backend registration when locales directory doesn't exist, improving performance.
:::
```ts
interface BaseBackendOptions {
/** Whether to enable backend resource loading */
enabled?: boolean;
/** Resource file loading path (HTTP backend) */
loadPath?: string;
/** Missing translation save path (optional) */
addPath?: string;
/** Cache hit mode for chained backend (only effective when both `loadPath` and `sdk` are provided)
*
* - `'none'` (default, only when chained backend is not configured): If the first backend returns resources, stop and don't try the next backend
* - `'refresh'`: Try to refresh the cache by loading from the next backend and update the cache
* - `'refreshAndUpdateStore'` (default for chained backend): Try to refresh the cache by loading from the next backend,
* update the cache and also update the i18next resource store. This allows FS/HTTP resources to be displayed first,
* then SDK resources will update them asynchronously.
*
* @default 'refreshAndUpdateStore' when both loadPath and sdk are provided
*/
cacheHitMode?: 'none' | 'refresh' | 'refreshAndUpdateStore';
/** SDK loader function (custom backend)
*
* Note: In CLI configuration, can only be set to `true` or a string identifier to enable SDK mode.
* The actual SDK function must be provided through `initOptions.backend.sdk` in runtime configuration (`modern.runtime.ts`).
*
* When both `loadPath` (or FS backend) and `sdk` are provided, the plugin will automatically use `i18next-chained-backend`
* to chain multiple backends. The loading order will be:
* 1. HTTP/FS backend (primary) - loads from `loadPath` or file system first for quick initial display
* 2. SDK backend (update) - loads from the SDK function to update/refresh translations
*
* With `cacheHitMode: 'refreshAndUpdateStore'` (default), FS/HTTP resources will be displayed immediately,
* then SDK resources will be loaded asynchronously to update the translations.
*/
sdk?: I18nSdkLoader | boolean | string;
}
interface BackendOptions extends BaseBackendOptions {
/** Configure backend by entry (multi-entry scenarios) */
backendOptionsByEntry?: Record;
}
```
**Examples**:
**1. HTTP/FS backend only**:
You can explicitly enable backend:
```ts
i18nPlugin({
backend: {
enabled: true,
loadPath: '/locales/{{lng}}/{{ns}}.json',
},
});
```
Or simply configure `loadPath` or `addPath`, and backend will be automatically enabled:
```ts
i18nPlugin({
backend: {
// enabled will be automatically set to true
loadPath: '/locales/{{lng}}/{{ns}}.json',
},
});
```
**Auto-detection without configuration**:
If you don't configure backend at all, the plugin will automatically detect locales directory:
```ts
i18nPlugin({
// No backend config - plugin will auto-detect locales directory
localeDetection: {
languages: ['zh', 'en'],
fallbackLanguage: 'en',
},
});
```
If `locales` directory exists with JSON files, backend will be automatically enabled with default `loadPath: '/locales/{{lng}}/{{ns}}.json'`.
**2. Chained backend (recommended)**: Use both HTTP/FS backend and SDK backend
When `backend.enabled = true` and `sdk` is configured, if `loadPath` is not explicitly configured, the default `loadPath` will be used automatically and chained backend will be enabled:
```ts
i18nPlugin({
backend: {
enabled: true,
// When loadPath is not configured, default '/locales/{{lng}}/{{ns}}.json' will be used
sdk: true, // SDK backend
// cacheHitMode: 'refreshAndUpdateStore', // Default value, can be omitted
},
});
```
You can also explicitly configure `loadPath`:
```ts
i18nPlugin({
backend: {
enabled: true,
loadPath: '/locales/{{lng}}/{{ns}}.json', // HTTP/FS backend
sdk: true, // SDK backend
},
});
```
Provide the SDK function in `modern.runtime.ts`:
```ts
export default defineRuntimeConfig({
i18n: {
initOptions: {
backend: {
sdk: async options => {
// SDK implementation
if (options.lng && options.ns) {
return await mySdk.getResource(options.lng, options.ns);
}
},
},
},
},
});
```
When using chained backend, the system will:
1. First load resources from `/locales/{{lng}}/{{ns}}.json` and display immediately (quick initial display of basic translations)
2. Then asynchronously load resources from SDK and update the i18next store (update/supplement translations)
This ensures users see page content quickly while the latest translation resources are loaded in the background.
**3. SDK backend only**:
If you need to disable HTTP/FS backend and use only SDK backend, you can explicitly set `loadPath: ''`:
```ts
i18nPlugin({
backend: {
enabled: true,
loadPath: '', // Explicitly disable HTTP/FS backend
sdk: true, // Use SDK backend only
},
});
```
:::warning
When using SDK backend only, you must provide the actual SDK function in `modern.runtime.ts`, otherwise it will fallback to HTTP/FS backend.
:::
### Multi-Entry Configuration
If the project has multiple entries, you can configure each entry separately:
```ts
i18nPlugin({
localeDetection: {
localePathRedirect: true,
languages: ['zh', 'en'],
fallbackLanguage: 'en',
// Override configuration for specific entry
localeDetectionByEntry: {
admin: {
localePathRedirect: false, // admin entry does not use path redirection
},
},
},
backend: {
enabled: true,
// Override configuration for specific entry
backendOptionsByEntry: {
admin: {
loadPath: '/admin/locales/{{lng}}/{{ns}}.json',
},
},
},
});
```
## Runtime Configuration (modern.runtime.ts)
You can configure runtime options in `src/modern.runtime.ts`:
```ts
import { defineRuntimeConfig } from '@modern-js/runtime';
import i18next from 'i18next';
// It's recommended to create a new i18next instance to avoid using the global default instance
const i18nInstance = i18next.createInstance();
export default defineRuntimeConfig({
i18n: {
// Use custom i18next instance (optional)
i18nInstance: i18nInstance,
// i18next initialization options
initOptions: {
fallbackLng: 'en',
supportedLngs: ['zh', 'en'],
// Other i18next configuration options
},
},
});
```
### i18nInstance Configuration
If you need to use a custom i18n instance, you can provide it in runtime configuration:
```ts
import { defineRuntimeConfig } from '@modern-js/runtime';
import i18next from 'i18next';
// 创建自定义实例
const customI18n = i18next.createInstance({
// 自定义配置
});
export default defineRuntimeConfig({
i18n: {
i18nInstance: customI18n,
},
});
```
### initOptions Configuration
`initOptions` 会传递给 i18next 的 `init` 方法,支持所有 i18next 配置选项:
:::info
If `localePathRedirect` is enabled, the `detection` configuration should be set in CLI configuration, not in `initOptions`. This is because the server-side plugin needs to read the `detection` option from CLI configuration to perform language detection and path redirection.
:::
```ts
export default defineRuntimeConfig({
i18n: {
initOptions: {
// Language related
lng: 'en',
fallbackLng: 'en',
supportedLngs: ['zh', 'en'],
// Namespace related
ns: ['translation', 'common'],
defaultNS: 'translation',
// React related
react: {
useSuspense: false,
},
// Other i18next options
interpolation: {
escapeValue: false,
},
},
},
});
```
### SDK Backend Configuration
If using SDK backend, you need to provide the actual SDK function in runtime configuration:
:::info
Function-type configurations can only be set in runtime configuration. In CLI configuration, `sdk` can only be set to `true` or a string identifier to enable SDK mode. The actual function implementation must be provided in `modern.runtime.ts`.
:::
**Enable SDK mode in `modern.config.ts`**:
```ts
i18nPlugin({
backend: {
enabled: true,
sdk: true, // Enable SDK mode
},
});
```
**Provide SDK function in `modern.runtime.ts`**:
```ts
import { defineRuntimeConfig } from '@modern-js/runtime';
import type { I18nSdkLoader } from '@modern-js/plugin-i18n/runtime';
const mySdkLoader: I18nSdkLoader = async options => {
if (options.all) {
// Load all resources
return await fetchAllResources();
}
if (options.lng && options.ns) {
// Load single resource
const response = await fetch(`/api/i18n/${options.lng}/${options.ns}`);
return response.json();
}
// Handle other cases
return {};
};
export default defineRuntimeConfig({
i18n: {
initOptions: {
backend: {
sdk: mySdkLoader,
},
},
},
});
```
---
url: /guides/advanced-features/international/locale-detection.md
---
# Locale Detection
The plugin supports multiple language detection methods, which can be combined to meet different business requirements.
## Detection Methods
### 1. URL Path Detection (localePathRedirect)
When `localePathRedirect` is set to `true`, the plugin will detect the language from the URL path.
**Examples**:
- `/zh/about` → Detected language: `zh`
- `/en/about` → Detected language: `en`
- `/about` → If there's no language prefix, will redirect to the default language path
**Configuration**:
```ts
i18nPlugin({
localeDetection: {
localePathRedirect: true,
languages: ['zh', 'en'],
fallbackLanguage: 'en',
},
});
```
**Route Configuration** (Convention-based Routing):
When using convention-based routing, you need to create a `[lang]` directory under the `routes/` directory to represent the language parameter:
```bash
routes/
├── [lang]/
│ ├── layout.tsx # Layout component
│ ├── page.tsx # Home page
│ └── about/
│ └── page.tsx # About page
```
**routes/\[lang]/layout.tsx**:
```tsx
import { Outlet } from '@modern-js/runtime/router';
export default function Layout() {
return ;
}
```
**routes/\[lang]/page.tsx**:
```tsx
export default function Home() {
return
;
}
```
:::info
If using custom routing (`modern.routes.ts`), you need to add `:lang` dynamic parameter in the route configuration. Convention-based routing will automatically generate corresponding routes based on the file structure.
:::
### 2. i18next Language Detector
When `i18nextDetector` is set to `true`, the i18next language detector will be enabled, supporting language detection from the following locations:
- **Cookie**: Read language settings from cookies
- **LocalStorage**: Read from browser LocalStorage
- **Query Parameters**: Read from URL query parameters (e.g., `?lng=en`)
- **Request Headers**: Read from HTTP request headers (e.g., `Accept-Language`)
- **HTML Tag**: Read from the `lang` attribute of HTML tags
- **Subdomain**: Read from subdomain (e.g., `en.example.com`)
**Configuration**:
```ts
i18nPlugin({
localeDetection: {
i18nextDetector: true,
detection: {
order: ['cookie', 'querystring', 'header'],
lookupCookie: 'i18next',
lookupQuerystring: 'lng',
lookupHeader: 'accept-language',
caches: ['cookie'],
},
},
});
```
### 3. Custom Detection Configuration
You can customize detection behavior through the `detection` option:
```ts
i18nPlugin({
localeDetection: {
i18nextDetector: true,
detection: {
// Detection order
order: ['path', 'cookie', 'querystring', 'header'],
// Cookie related
lookupCookie: 'i18next',
cookieExpirationDate: new Date(Date.now() + 365 * 24 * 60 * 60 * 1000), // Expires in 1 year
cookieDomain: '.example.com',
// Query parameter related
lookupQuerystring: 'lng',
// Request header related
lookupHeader: 'accept-language',
// Cache configuration
caches: ['cookie', 'localStorage'],
},
},
});
```
## Detection Priority
The plugin's language detection follows the following priority order (from highest to lowest):
1. **SSR Data** (highest priority): Read language from `window._SSR_DATA` set during server-side rendering, applicable to both SSR and CSR projects
2. **Path Detection**: If `localePathRedirect` is `true`, detect language prefix from URL path
3. **i18next Detector**: Execute detection according to the order configured in `detection.order` (Cookie, LocalStorage, query parameters, request headers, etc.)
4. **User Configured Language**: Use the language configured in `initOptions.lng`
5. **Fallback Language**: Use `fallbackLanguage` as the final fallback
:::info
SSR data detection has the highest priority to ensure the client uses the language detected during server-side rendering, avoiding language flickering issues caused by client-side re-detection.
:::
**Example**:
```ts
// Configured detection order (only affects priority within i18next detector)
detection: {
order: ['path', 'cookie', 'querystring', 'header'],
}
// Actual detection flow:
// 1. First check SSR data (window._SSR_DATA)
// 2. Then check URL path (if localePathRedirect is enabled)
// 3. Then check i18next detector according to order:
// - Cookie
// - Query parameters
// - Request headers
// 4. Then use initOptions.lng (if configured)
// 5. Finally use fallbackLanguage
```
## Detection Options
### order (Detection Order)
Specifies the order of language detection, optional values:
- `path`: Detect from URL path
- `querystring`: Detect from query parameters
- `cookie`: Detect from cookies
- `localStorage`: Detect from LocalStorage
- `sessionStorage`: Detect from SessionStorage
- `navigator`: Detect from browser language settings
- `htmlTag`: Detect from HTML tags
- `header`: Detect from HTTP request headers
- `subdomain`: Detect from subdomain
:::warning
`path` detection requires `localePathRedirect` to be `true`. `localStorage`, `sessionStorage`, `navigator`, and `htmlTag` are only available in browser environments.
:::
### caches (Cache Method)
Specifies where the detected language should be cached, optional values:
- `false`: No caching
- `['cookie']`: Cache to Cookie
- `['localStorage']`: Cache to LocalStorage (browser only)
- `['cookie', 'localStorage']`: Cache to both Cookie and LocalStorage
### lookupQuerystring, lookupCookie, lookupLocalStorage, lookupSession, lookupHeader
Specifies the key name used when reading language from query parameters, cookies, LocalStorage, SessionStorage, or request headers:
- `lookupQuerystring`: Default `'lng'`, e.g., `?lng=en`
- `lookupCookie`: Default `'i18next'`
- `lookupLocalStorage`: Default `'i18nextLng'` (browser only)
- `lookupSession`: SessionStorage key name (browser only)
- `lookupHeader`: Default `'accept-language'`
### lookupFromPathIndex
Specifies which position in the URL path to start detecting language (when `'path'` is included in `order`):
- `lookupFromPathIndex`: Path segment index, defaults to `0` (first path segment)
**Example**:
```ts
// URL: /api/v1/en/users
// If lookupFromPathIndex = 2, detection starts from the third path segment ('en')
detection: {
order: ['path'],
lookupFromPathIndex: 2,
}
```
### cookieMinutes, cookieExpirationDate
Controls Cookie expiration time:
- `cookieMinutes`: Cookie expiration time (minutes), default `525600` (1 year)
- `cookieExpirationDate`: Cookie expiration date (Date object), takes precedence over `cookieMinutes`
**Example**:
```ts
detection: {
cookieMinutes: 60 * 24 * 7, // Expires in 7 days
// or
cookieExpirationDate: new Date(Date.now() + 7 * 24 * 60 * 60 * 1000), // Expires in 7 days
}
```
### ignoreRedirectRoutes
Specifies which routes should ignore automatic language redirection. This is very useful for API routes, static resources, and other paths that don't need language prefixes.
**Configuration**:
```ts
i18nPlugin({
localeDetection: {
localePathRedirect: true,
languages: ['zh', 'en'],
fallbackLanguage: 'en',
// String array: supports exact match and prefix match
ignoreRedirectRoutes: ['/api', '/admin', '/static'],
// Or use function for more flexible judgment
ignoreRedirectRoutes: pathname => {
return pathname.startsWith('/api') || pathname.startsWith('/admin');
},
},
});
```
**Matching Rules**:
- String array: Supports exact match (`'/api'`) and prefix match (`'/api'` will match `/api` and `/api/users`)
- Function: Receives pathname (with language prefix removed), returns `true` to indicate ignoring redirection
**Example**:
```ts
// Ignore all API routes and static resources
ignoreRedirectRoutes: ['/api', '/static', '/assets'];
// Use function to ignore all paths starting with /api
ignoreRedirectRoutes: pathname => pathname.startsWith('/api');
```
---
url: /guides/advanced-features/international/quick-start.md
---
# Quick Start
This guide will help you quickly integrate internationalization functionality into your Modern.js project.
## Install Plugin
First, install the necessary dependencies:
```bash
pnpm add @modern-js/plugin-i18n i18next react-i18next
```
:::tip 版本一致性
请确保 `@modern-js/plugin-i18n` 的版本与项目中 `@modern-js/app-tools` 的版本一致。所有 Modern.js 官方包都使用统一的版本号发布,版本不匹配可能会导致兼容性问题。
请先检查 `@modern-js/app-tools` 的版本,然后安装相同版本的 `@modern-js/plugin-i18n`:
```bash
# 检查当前 @modern-js/app-tools 的版本
pnpm list @modern-js/app-tools
# 安装相同版本的 @modern-js/plugin-i18n
pnpm add @modern-js/plugin-i18n@ i18next react-i18next
```
:::
:::info
`i18next` 和 `react-i18next` 是 peer dependencies,需要手动安装。
:::
## Basic Configuration
### Configure Plugin in `modern.config.ts`
```ts
import { appTools, defineConfig } from '@modern-js/app-tools';
import { i18nPlugin } from '@modern-js/plugin-i18n';
export default defineConfig({
server: {
publicDir: './locales', // Required: specify the resource file directory
},
plugins: [
appTools(),
i18nPlugin({
localeDetection: {
languages: ['zh', 'en'], // Supported language list
fallbackLanguage: 'en', // Default language
},
backend: {
enabled: true, // Enable backend resource loading
// loadPath defaults to '/locales/{{lng}}/{{ns}}.json', usually no need to modify
// Note: You can also omit 'enabled' and just configure 'loadPath' or 'addPath',
// or omit backend config entirely to let the plugin auto-detect locales directory
},
}),
],
});
```
:::info
`server.publicDir` is a required configuration used to specify the actual location of resource files. Even when using the default `loadPath`, this configuration is still required.
:::
### Configure Runtime Options in `src/modern.runtime.ts`
创建 `src/modern.runtime.ts` 文件并配置 i18n 运行时选项:
```ts
import { defineRuntimeConfig } from '@modern-js/runtime';
import i18next from 'i18next';
// 建议创建一个新的 i18next 实例,避免使用全局默认实例
const i18nInstance = i18next.createInstance();
export default defineRuntimeConfig({
i18n: {
i18nInstance: i18nInstance,
initOptions: {
fallbackLng: 'en',
supportedLngs: ['zh', 'en'],
},
},
});
```
:::info
`modern.runtime.ts` 是运行时配置文件,用于配置 i18next 的初始化选项。即使是最基础的配置,也建议创建此文件以确保插件正常工作。
建议使用 `i18next.createInstance()` 创建一个新的实例,而不是直接使用默认导出的 `i18next`,这样可以避免全局状态污染,并确保每个应用都有独立的 i18n 实例。
:::
### Create Language Resource Files
Create a `locales` folder in the project root and organize resource files by language:
```
locales/
├── en/
│ └── translation.json
└── zh/
└── translation.json
```
**locales/en/translation.json**:
```json
{
"hello": "Hello",
"world": "World",
"welcome": "Welcome to Modern.js"
}
```
**locales/zh/translation.json**:
```json
{
"hello": "你好",
"world": "世界",
"welcome": "欢迎使用 Modern.js"
}
```
### Use in Components
```tsx
import { useModernI18n } from '@modern-js/plugin-i18n/runtime';
import { useTranslation } from 'react-i18next';
function App() {
const { language, changeLanguage, supportedLanguages } = useModernI18n();
const { t } = useTranslation();
return (
{t('welcome')}
Current language: {language}
{supportedLanguages.map(lang => (
))}
);
}
export default App;
```
## Next Steps
- Learn detailed [Configuration](/guides/advanced-features/international/configuration.md) instructions
- Learn about multiple [Locale Detection](/guides/advanced-features/international/locale-detection.md) methods
- Check [Resource Loading](/guides/advanced-features/international/resource-loading.md) configuration options
---
url: /guides/advanced-features/international/resource-loading.md
---
# Resource Loading
The plugin supports three resource loading methods: HTTP backend, File System backend (FS Backend), and SDK backend. Additionally, the plugin supports chained backend, which allows combining multiple backends.
## HTTP Backend
HTTP backend loads resource files through HTTP requests, suitable for client-side rendering (CSR) scenarios.
### Configuration
```ts
i18nPlugin({
backend: {
enabled: true,
loadPath: '/locales/{{lng}}/{{ns}}.json',
},
});
```
### Resource File Structure
Resource files need to be placed in the `config/public` directory or the directory configured through `server.publicDir`:
```
config/public/
└── locales/
├── en/
│ └── translation.json
└── zh/
└── translation.json
```
Or configure a custom directory through `server.publicDir`:
```ts
export default defineConfig({
server: {
publicDir: './locales', // Specify resource file directory
},
plugins: [
i18nPlugin({
backend: {
enabled: true,
loadPath: '/locales/{{lng}}/{{ns}}.json',
},
}),
],
});
```
**Resource File Format**:
```json
{
"key1": "value1",
"key2": "value2",
"nested": {
"key": "value"
}
}
```
### Path Variables
`loadPath` supports the following variables:
- `{{lng}}`: Language code (e.g., `en`, `zh`)
- `{{ns}}`: Namespace (e.g., `translation`, `common`)
**Examples**:
```ts
// Default path format
loadPath: '/locales/{{lng}}/{{ns}}.json';
// Actual loading paths:
// /locales/en/translation.json
// /locales/zh/translation.json
// Custom path format
loadPath: '/i18n/{{lng}}/{{ns}}.json';
// Actual loading paths:
// /i18n/en/translation.json
// /i18n/zh/translation.json
```
## File System Backend (FS Backend)
File System backend reads resource files directly from the file system, suitable for server-side rendering (SSR) scenarios.
### Configuration
In SSR scenarios, the plugin will automatically use the file system backend. Resource files need to be placed in the project directory:
```
Project Root/
└── locales/
├── en/
│ └── translation.json
└── zh/
└── translation.json
```
### Resource File Path
The default path format for file system backend is a relative path:
```
./locales/{{lng}}/{{ns}}.json
```
You can customize the path through `loadPath`:
```ts
i18nPlugin({
backend: {
enabled: true,
loadPath: '/locales/{{lng}}/{{ns}}.json', // Use absolute path (recommended)
},
});
```
:::warning
The `loadPath` configuration is used for both HTTP backend (frontend) and file system backend (server-side). If configured as an absolute path starting with `/` (e.g., `/locales/{{lng}}/{{ns}}.json`), the file system backend will automatically convert it to a relative path (`./locales/{{lng}}/{{ns}}.json`). Therefore, it's recommended to use absolute paths in the configuration, which can meet both frontend and backend requirements.
:::
## SDK Backend
SDK backend allows loading resources through custom functions, suitable for scenarios where translation resources need to be loaded from external services, databases, or other custom sources.
### Enable SDK Mode
**Step 1: Enable SDK mode in `modern.config.ts`**
```ts
i18nPlugin({
backend: {
enabled: true,
sdk: true, // Enable SDK mode
},
});
```
**Step 2: Implement SDK function in `modern.runtime.ts`**
```ts
import { defineRuntimeConfig } from '@modern-js/runtime';
import type { I18nSdkLoader, Resources } from '@modern-js/plugin-i18n/runtime';
const mySdkLoader: I18nSdkLoader = async options => {
// Implement resource loading logic
if (options.all) {
// Load all resources
return await loadAllResources();
}
if (options.lng && options.ns) {
// Load single resource
return await loadSingleResource(options.lng, options.ns);
}
return {};
};
export default defineRuntimeConfig({
i18n: {
initOptions: {
backend: {
sdk: mySdkLoader,
},
},
},
});
```
### Implement SDK Loader Function
The SDK function receives an `I18nSdkLoadOptions` parameter and needs to return data in `Resources` format:
```ts
interface I18nSdkLoadOptions {
/** Single language code */
lng?: string;
/** Single namespace */
ns?: string;
/** Multiple language codes */
lngs?: string[];
/** Multiple namespaces */
nss?: string[];
/** Load all resources */
all?: boolean;
}
type Resources = {
[lng: string]: {
[ns: string]: Record;
};
};
```
### Batch Loading Examples
SDK backend supports multiple loading modes:
**1. Load single resource**:
```ts
const sdkLoader: I18nSdkLoader = async options => {
if (options.lng && options.ns) {
const response = await fetch(`/api/i18n/${options.lng}/${options.ns}`);
const data = await response.json();
return {
[options.lng]: {
[options.ns]: data,
},
};
}
return {};
};
```
**2. Batch load multiple languages**:
```ts
const sdkLoader: I18nSdkLoader = async options => {
if (options.lngs && options.ns) {
const resources: Resources = {};
for (const lng of options.lngs) {
const response = await fetch(`/api/i18n/${lng}/${options.ns}`);
resources[lng] = {
[options.ns]: await response.json(),
};
}
return resources;
}
return {};
};
```
**3. Batch load multiple namespaces**:
```ts
const sdkLoader: I18nSdkLoader = async options => {
if (options.lng && options.nss) {
const resources: Resources = {
[options.lng]: {},
};
for (const ns of options.nss) {
const response = await fetch(`/api/i18n/${options.lng}/${ns}`);
resources[options.lng][ns] = await response.json();
}
return resources;
}
return {};
};
```
**4. Load all resources**:
```ts
const sdkLoader: I18nSdkLoader = async options => {
if (options.all) {
const response = await fetch('/api/i18n/all');
return await response.json();
}
return {};
};
```
### Check Resource Loading State
When using SDK backend, you can check if resources are loaded using `isResourcesReady`:
```tsx
import { useModernI18n } from '@modern-js/plugin-i18n/runtime';
function MyComponent() {
const { isResourcesReady } = useModernI18n();
if (!isResourcesReady) {
return
Loading translation resources...
;
}
return
Resources are ready!
;
}
```
This is particularly useful when resources are loaded asynchronously, as it ensures all required namespaces for the current language are loaded before rendering content that depends on translations.
## Chained Backend
Chained backend allows using multiple backends simultaneously, enabling progressive resource loading and updates. When both `loadPath` (or FS backend) and `sdk` are configured, the plugin automatically uses `i18next-chained-backend` to chain resource loading.
### How It Works
The chained backend workflow:
1. **Initial Load**: First load resources from HTTP/FS backend and display immediately (quick display of basic translations)
2. **Async Update**: Then asynchronously load resources from SDK backend and update the i18next store (update/supplement translations)
This ensures users see page content quickly while the latest translation resources are loaded in the background.
### Configuration
**Step 1: Configure chained backend in `modern.config.ts`**
```ts
i18nPlugin({
backend: {
enabled: true,
loadPath: '/locales/{{lng}}/{{ns}}.json', // HTTP/FS backend
sdk: true, // SDK backend
// cacheHitMode: 'refreshAndUpdateStore', // Default value, can be omitted
},
});
```
**Step 2: Implement SDK function in `modern.runtime.ts`**
```ts
import { defineRuntimeConfig } from '@modern-js/runtime';
export default defineRuntimeConfig({
i18n: {
initOptions: {
backend: {
sdk: async options => {
// SDK implementation
if (options.lng && options.ns) {
return await mySdk.getResource(options.lng, options.ns);
}
},
},
},
},
});
```
### Cache Hit Mode (cacheHitMode)
The `cacheHitMode` option controls the behavior of chained backend:
- **`'none'`** (default, only when chained backend is not configured): If the first backend returns resources, stop and don't try the next backend
- **`'refresh'`**: Try to refresh the cache by loading from the next backend and update the cache
- **`'refreshAndUpdateStore'`** (default for chained backend): Try to refresh the cache by loading from the next backend, update the cache and also update the i18next resource store. This allows FS/HTTP resources to be displayed first, then SDK resources will update them asynchronously.
**Configuration example**:
```ts
i18nPlugin({
backend: {
enabled: true,
loadPath: '/locales/{{lng}}/{{ns}}.json',
sdk: true,
cacheHitMode: 'refreshAndUpdateStore', // Explicitly specify (default value)
},
});
```
### Use Cases
Chained backend is particularly suitable for the following scenarios:
1. **Progressive Loading**: Display local/static resources first, then load latest translations from remote services
2. **Offline Support**: Local resources as offline fallback, SDK resources provide online updates
3. **Performance Optimization**: Quickly display basic translations, load complete translation content in the background
4. **A/B Testing**: Local resources as default values, SDK provides dynamic translation variants
### Complete Example
```ts
// modern.config.ts
i18nPlugin({
backend: {
enabled: true,
loadPath: '/locales/{{lng}}/{{ns}}.json', // Local resources
sdk: true, // Remote SDK resources
cacheHitMode: 'refreshAndUpdateStore',
},
});
// modern.runtime.ts
import { defineRuntimeConfig } from '@modern-js/runtime';
export default defineRuntimeConfig({
i18n: {
initOptions: {
backend: {
sdk: async options => {
if (options.lng && options.ns) {
// Load latest translations from remote service
const response = await fetch(
`https://api.example.com/i18n/${options.lng}/${options.ns}`,
);
return {
[options.lng]: {
[options.ns]: await response.json(),
},
};
}
return {};
},
},
},
},
});
```
In this example:
- When the page loads, resources are first loaded from `/locales/{{lng}}/{{ns}}.json` and displayed immediately
- Latest translations are loaded asynchronously from `https://api.example.com/i18n/...` in the background
- After SDK resources are loaded, the i18next store is automatically updated, and the UI text is automatically updated
---
url: /guides/advanced-features/international/routing.md
---
# Routing Integration
The plugin is deeply integrated with Modern.js routing system, supporting language path prefixes and automatic path redirection.
## Enable Path Redirection
When `localePathRedirect` is set to `true`, the plugin will automatically add language prefixes to URLs and handle path redirection when switching languages.
**Configuration**:
```ts
i18nPlugin({
localeDetection: {
localePathRedirect: true,
languages: ['zh', 'en'],
fallbackLanguage: 'en',
// Optional: ignore automatic redirection for certain routes
ignoreRedirectRoutes: ['/api', '/admin'],
},
});
```
### Ignore Redirection Routes
Some routes (such as API routes, static resources, etc.) don't need language prefixes. You can use the `ignoreRedirectRoutes` configuration to ignore automatic redirection for these routes:
```ts
i18nPlugin({
localeDetection: {
localePathRedirect: true,
languages: ['zh', 'en'],
fallbackLanguage: 'en',
// String array: supports exact match and prefix match
ignoreRedirectRoutes: ['/api', '/admin', '/static'],
// Or use function for more flexible judgment
ignoreRedirectRoutes: pathname => {
return pathname.startsWith('/api') || pathname.startsWith('/admin');
},
},
});
```
For more details, please refer to the `ignoreRedirectRoutes` configuration in the [Locale Detection documentation](/guides/advanced-features/international/locale-detection.md#ignoreredirectroutes).
## Route Configuration
After enabling path redirection, you need to add `:lang` dynamic parameter to the route configuration.
### Convention-based Routing
When using convention-based routing, you need to create a `[lang]` directory under the `routes/` directory to represent the language parameter:
```bash
routes/
├── [lang]/
│ ├── layout.tsx # Layout component
│ ├── page.tsx # Home page
│ ├── about/
│ │ └── page.tsx # About page
│ └── contact/
│ └── page.tsx # Contact page
```
**routes/\[lang]/layout.tsx**:
```tsx
import { Outlet } from '@modern-js/runtime/router';
export default function Layout() {
return ;
}
```
**routes/\[lang]/page.tsx**:
```tsx
export default function Home() {
return
;
}
```
**Generated Route Structure**:
```
/:lang → Home page
/:lang/about → About page
/:lang/contact → Contact page
```
When accessing `/` or `/about`, it will automatically redirect to `/en` or `/en/about` (using the default language).
### Custom Routing
If using custom routing (`modern.routes.ts`), you need to add `:lang` dynamic parameter in the route configuration:
```tsx
import {
BrowserRouter,
Route,
Routes,
Outlet,
} from '@modern-js/runtime/router';
function App() {
return (
{/* Add :lang parameter */}
}>
} />
} />
} />
);
}
```
:::info
Convention-based routing will automatically generate corresponding routes based on the file structure. It's recommended to use convention-based routing. Only use custom routing when special route control is needed.
:::
## I18nLink Component
The `I18nLink` component is provided by `@modern-js/plugin-i18n` and automatically adds the current language prefix to paths.
### Basic Usage
```tsx
import { I18nLink } from '@modern-js/plugin-i18n/runtime';
function Navigation() {
return (
);
}
```
**When current language is `en`**:
- `` → Actual link: `/en`
- `` → Actual link: `/en/about`
**When current language is `zh`**:
- `` → Actual link: `/zh`
- `` → Actual link: `/zh/about`
### Automatic Language Prefix
`I18nLink` automatically handles language prefixes, no need to add them manually:
```tsx
// ✅ Correct: No need to manually add language prefix
About
// ❌ Wrong: Don't manually add language prefix
About
```
### Props
`I18nLink` accepts all `Link` component props and additionally supports:
```tsx
interface I18nLinkProps {
/** Target path (no need to include language prefix) */
to: string;
/** Child elements */
children: React.ReactNode;
/** Other Link component props */
[key: string]: any;
}
```
**Example**:
```tsx
About
Contact
```
---
url: /guides/advanced-features/low-level.md
---
# Low-Level Tools
## Usage
Modern.js internally integrates tools such as [TypeScript](https://www.typescriptlang.org/), [Rspack](https://rspack.rs/), [PostCSS](https://postcss.org/), [SWC](https://swc.rs/) by default.
Usually, the default configuration can meet most development needs. When there are special needs, it can be achieved through the underlying configuration.
Take configuring Rspack as an example, just add [tools.rspack](/configure/app/tools/rspack.md) to the modern.config.ts:
```ts title="modern.config.ts"
export default defineConfig({
tools: {
rspack: config => {
// Modify Rspack configuration
},
},
});
```
Configurations in the `tools` can be set to `Object` or `Function`.
When the value is `Object`, it will be merged with the default configuration. For the specific merging strategy, refer to the configuration options document (see table below).
When the value is `Function`, the first parameter is the default configuration value. You can directly modify this object without returning it, or you can return a new object or a merged object as the final result.
## Low-level Configuration Details
Currently provided is as follows:
| Tools | Config |
| ------------------ | ----------------------------------------------------------------------- |
| Rspack | [tools.rspack](/configure/app/tools/rspack.md) |
| Bundler Chain | [tools.bundlerChain](/configure/app/tools/bundler-chain.md) |
| SWC | [tools.swc](/configure/app/tools/swc.md) |
| TypeScript Checker | [tools.tsChecker](/configure/app/tools/ts-checker.md) |
| PostCSS | [tools.postcss](/configure/app/tools/postcss.md) |
| Less | [tools.less](/configure/app/tools/less.md) |
| Sass | [tools.sass](/configure/app/tools/sass.md) |
| CSS Extract | [tools.cssExtract](/configure/app/tools/css-extract.md) |
| CSS Loader | [tools.cssLoader](/configure/app/tools/css-loader.md) |
| Style Loader | [tools.styleLoader](/configure/app/tools/style-loader.md) |
| Lightning CSS | [tools.lightningcssLoader](/configure/app/tools/lightningcss-loader.md) |
| Minify CSS | [tools.minifyCss](/configure/app/tools/minify-css.md) |
| Autoprefixer | [tools.autoprefixer](/configure/app/tools/autoprefixer.md) |
| HTML Plugin | [tools.htmlPlugin](/configure/app/tools/html-plugin.md) |
---
url: /guides/advanced-features/page-performance/code-split.md
---
# Code Splitting
Code splitting is a common way to optimize frontend resource loading. This article will introduce the three types of code splitting supported by Modern.js:
:::info
When using Modern.js [Conventional routing](/guides/basic-features/routes/routes.md#conventional-routing). By default, code splitting is done according to the routing component, so you don't need to do it yourself.
:::
- dynamic `import`
- `React.lazy`
- `loadable`
## Dynamic import
When using dynamic `import()`, the JS modules passed to this API will be bundled as a separate JS file. For example:
```ts
import('./math').then(math => {
console.log(math.add(16, 26));
});
```
## React.lazy
The official way provided by React to split component code.
:::caution
`React.lazy` is typically used together with ``, hence it is only available in CSR or React 18+ Streaming SSR.
For projects that use Traditional SSR(renderToString), `React.lazy` is not supported. Please use the Loadable API instead.
:::
```tsx
import React, { Suspense } from 'react';
const OtherComponent = React.lazy(() => import('./OtherComponent'));
const AnotherComponent = React.lazy(() => import('./AnotherComponent'));
function MyComponent() {
return (
Loading...
}>
);
}
```
For details, see [React lazy](https://react.dev/reference/react/lazy).
## Loadable
In Modern.js, you can use the Loadable API, which is exported from `@modern-js/runtime/loadable`. Here's an example:
```tsx
import loadable from '@modern-js/runtime/loadable';
const OtherComponent = loadable(() => import('./OtherComponent'));
function MyComponent() {
return ;
}
```
With the out-of-the-box support of `loadable` in SSR by Modern.js, you no longer need to add Babel plugins or inject scripts into HTML during SSR.
However, it's important to note that any Loadable API in SSR does not support the use of ``.
:::info
If you want to use `` in CSR projects with React 17 and below, you can substitute `React.lazy` with `loadable.lazy`.
:::
For details, see [Loadable API](/apis/app/runtime/utility/loadable.md).
---
url: /guides/advanced-features/page-performance/inline-assets.md
---
# Inline Static Assets
Inline static assets refer to the practice of including the content of a static asset directly in a HTML or JS file, instead of linking to an external file. This can improve the performance of a website by reducing the number of HTTP requests that the browser has to make to load the page.
However, static assets inlining also has some disadvantages, such as increasing the size of a single file, which may lead to slower loading. Therefore, in the actual scenario, it is necessary to decide whether to use static assets inlining according to the specific situation.
Modern.js will automatically inline static assets that are less than 10KB, but sometimes you may need to manually control assets to force them to be inlined or not, and this document explains how to precisely control the inlining behavior of static assets.
## Automatic Inlining
By default, Modern.js will inline assets when the file size of is less than a threshold (the default is 10KB). When inlined, the asset will be converted to a Base64 encoded string and will no longer send a separate HTTP request. When the file size is greater than this threshold, it is loaded as a separate file with a separate HTTP request.
The threshold can be modified with the [output.dataUriLimit](/configure/app/output/data-uri-limit.md) config. For example, set the threshold of images to 5000 Bytes, and set media assets not to be inlined:
```ts
export default {
output: {
dataUriLimit: {
image: 5000,
media: 0,
},
},
};
```
## Force Inlining
You can force an asset to be inlined by adding the `inline` query when importing the asset, regardless of whether the asset's size is smaller than the size threshold.
```tsx
import React from 'react';
import img from '. /foo.png?inline';
export default function Foo() {
return ;
}
```
In the above example, the `foo.png` image will always be inlined, regardless of whether the size of the image is larger than the threshold.
In addition to the `inline` query, you can also use the `__inline` query to force inlining of the asset:
```tsx
import img from '. /foo.png?__inline';
```
### Referenced from CSS file
When you reference a static asset in your CSS file, you can also force inline the asset with the `inline` or `__inline` queries.
```css
.foo {
background-image: url('. /icon.png?inline');
}
```
:::tip Do you really need to force inlining?
Inline large assets will significantly increase the first paint time or first contentful paint time of a page, which will hurt user experience. And when you inline a static asset multiple times into a CSS file, the base64 content will be repeatedly injected, causing the bundle size to grow . Please use forced inlining with caution.
:::
## Force no inlining
When you want to always treat some assets as separate files, no matter how small the asset is, you can add the `url` query to force the asset not to be inlined.
```tsx
import React from 'react';
import img from '. /foo.png?url';
export default function Foo() {
return ;
}
```
In the above example, the `foo.png` image will always be loaded as a separate file, even if the size of the image is smaller than the threshold.
In addition to the `url` query, you can also use the `__inline=false` query to force the asset not to be inlined:
```tsx
import img from '. /foo.png?__inline=false';
```
### Referenced from CSS file
When you reference a static asset in your CSS file, you can also force the asset not to be inlined with `url` or `__inline=false` queries.
```css
.foo {
background-image: url('. /icon.png?url');
}
```
:::tip Do you really need to exclude assets from inlining?
Excluding assets from inlining will increase the number of assets that the Web App needs to load. This will reduce the efficiency of loading assets in a weak network environment or in scenarios where HTTP2 is not enabled. Please use force no Inline with caution.
:::
## Inline JS files
In addition to inlining static assets into JS files, Modern.js also supports inlining JS files into HTML files.
Just enable the [output.inlineScripts](/configure/app/output/inline-scripts.md) config, and the generated JS files will not be written into the output directory, but will be directly inlined to the corresponding in the HTML file.
```ts
export default {
output: {
inlineScripts: true,
},
};
```
:::tip
Inline JS files may cause the single HTML file to be too large, and it will break the HTTP caching. Please use it with caution.
:::
## Inline CSS files
You can also inline CSS files into HTML files.
Just enable the [output.inlineStyles](/configure/app/output/inline-styles.md) config, the generated CSS file will not be written into the output directory, but will be directly inlined to the corresponding in the HTML file.
```ts
export default {
output: {
inlineStyles: true,
},
};
```
## Add Type Declaration
When you use URL queries such as `?inline` and `?url` in TypeScript code, TypeScript may prompt that the module is missing a type definition:
```
TS2307: Cannot find module './logo.png?inline' or its corresponding type declarations.
```
To fix this, you can add type declarations for these URL queries, please create `src/global.d.ts` file and add the following type declarations:
```ts
declare module '*?inline' {
const content: string;
export default content;
}
declare module '*?inline' {
const content: string;
export default content;
}
declare module '*?__inline' {
const content: string;
export default content;
}
declare module '*?inline=false' {
const content: string;
export default content;
}
```
---
url: /guides/advanced-features/page-performance/optimize-bundle.md
---
# Bundle Size Optimization
Bundle size optimization is an important part of optimizing your production environment because it directly affects the user experience. In this document, we will introduce some common bundle size optimization methods in Modern.js.
## Reduce duplicate dependencies
In real projects, there will be some third-party dependencies installed with multiple versions. Duplicate dependencies can lead to larger bundles and slower builds.
We can detect or eliminate duplicate dependencies with some community tools.
- If you are using `pnpm >= 7.26.0`, you can use the [pnpm dedupe](https://pnpm.io/cli/dedupe) command to upgrade and eliminate duplicate dependencies.
```bash
pnpm dedupe
```
- If you are using `pnpm < 7.26.0`, you can use [pnpm-deduplicate](https://github.com/ocavue/pnpm-deduplicate) to analyze all duplicate dependencies, then update dependencies or declare [pnpm overrides](https://pnpm.io/package_json#pnpmoverrides) to merge duplicated dependencies.
```bash
npx pnpm-deduplicate --list
```
- If you are using `yarn`, you can use [yarn-deduplicate](https://github.com/scinos/yarn-deduplicate) to automatically merge duplicated dependencies:
```bash
npx yarn-deduplicate && yarn
```
## Use lightweight libraries
It is recommended to using lightweight libraries in your project, such as replacing [moment](https://momentjs.com/) with [day.js](https://day.js.org/).
If you want to find out the large libraries in the project, you can add the `BUNDLE_ANALYZE=true` environment variable when building:
```bash
BUNDLE_ANALYZE=true pnpm build
```
This will generate a bundle analysis report to help you identify large dependencies.
## Adjust Browserslist
Modern.js will compile the code according to the project's Browserslist config, and inject some Polyfills. If the project does not need to be compatible with legacy browsers, you can adjust the Browserslist and drop some legacy browsers, thereby reducing the compilation overhead on syntax and polyfill.
Modern.js's default [`output.overrideBrowserslist`](/configure/app/output/override-browserslist.md) config is:
```js
['chrome >= 87', 'edge >= 88', 'firefox >= 78', 'safari >= 14'];
```
For example, if you only need to be compatible with browsers above Chrome 100, you can change it to:
```js
['Chrome >= 100'];
```
:::tip
Please read the [Browserslist configuration](/guides/advanced-features/compatibility.md) chapter to know more about the usage of Browserslist.
:::
## Usage polyfill
When it is clear that third-party dependencies do not require additional polyfills, you can set [output.polyfill](/configure/app/output/polyfill.md) to `usage`.
In `usage` mode, Modern.js analyzes the syntax used in the source code and injects the required polyfill code on demand to reduce the size of polyfill.
```js
export default {
output: {
polyfill: 'usage',
},
};
```
:::tip
Please read the [Browser Compatibility](/guides/advanced-features/compatibility.md) chapter to know more about the usage of Browserslist.
:::
## Image Compression
In general front-end projects, the size of image often accounts for a large proportion of the total bundle size of the project.So if the image size can be reduced as much as possible, it will have a significant optimization effect on the project bundle size. You can enable image compression by registering a plugin in Modern.js:
```ts title="modern.config.ts"
import { pluginImageCompress } from '@rsbuild/plugin-image-compress';
export default {
builderPlugins: [pluginImageCompress()],
};
```
See details in [plugin-image-compress](https://github.com/rspack-contrib/rsbuild-plugin-image-compress).
## Split Chunk
A great chunk splitting strategy is very important to improve the loading performance of the application. It can make full use of the browser's caching mechanism to reduce the number of requests and improve the loading speed of the application.
A variety of [chunk splitting strategies](https://v2.rsbuild.rs/guide/optimization/code-splitting) are built into Modern.js, which can meet the needs of most applications. You can also customize the chunk splitting config according to your own business scenarios.
---
url: /guides/advanced-features/page-performance/react-compiler.md
---
# React Compiler
The React Compiler is an experimental compiler introduced in React 19 that can automatically optimize your React code.
Before starting to use the React Compiler, it is recommended to read the [React Compiler documentation](https://zh-hans.react.dev/learn/react-compiler) to understand its features, current status, and usage.
## How to Use
### React 19
If you are using React 19, Modern.js has built-in support for React Compiler, and no additional configuration is required.
### React 18
If you are using React 18, you need to configure it as follows:
1. Install `react-compiler-runtime` to allow the compiled code to run on versions before 19:
```bash
npm install react-compiler-runtime
```
2. Install `babel-plugin-react-compiler`:
```bash
npm install babel-plugin-react-compiler
```
3. Register the Babel plugin in your Modern.js configuration file:
```ts title="modern.config.ts"
import { appTools, defineConfig } from '@modern-js/app-tools';
import { pluginBabel } from '@rsbuild/plugin-babel';
export default defineConfig({
builderPlugins: [
pluginBabel({
babelLoaderOptions: (config, { addPlugins }) => {
addPlugins([
[
'babel-plugin-react-compiler',
{
target: '18', // 或 '17',根据你使用的 React 版本
},
],
]);
},
});
];
plugins: [appTools()],
});
```
> For detailed code, you can refer to the [Modern.js & React Compiler example project](https://github.com/web-infra-dev/modern-js-examples/tree/main/examples/react-compiler)
---
url: /guides/advanced-features/server-monitor/logger.md
---
# Logs Events
Log events are distributed by Modern.js as events of type `log`.
## Built-in Events
Based on server-side runtime logic, Modern.js provides the following log events:
| Stage | Message | Level |
| -------------- | --------------------------------------------- | ----- |
| RENDER\_HTML | App Render To HTML | error |
| RENDER\_STREAM | An error occurs during streaming SSR | error |
| RENDER\_SHELL | An error occurs during streaming render shell | error |
## Built-in Monitor
In Modern.js, log events are handled by `LoggerMonitor`, which outputs logs to the console.
:::info
The built-in `LoggerMonitor` depends on the [rslog](https://www.npmjs.com/package/rslog) library.
:::
For example, intentionally throwing an error in the project:
```tsx title=routes/page.tsx
import './index.css';
const Index = () =>
{a}
;
export default Index;
```
If running normally, you can see the following output in the console:
```shell
> Local: http://localhost:8080/
> press h + enter to show shortcuts
error SSR Error - App Prerender, error = ReferenceError: a is not defined
at Index (/somepath/page.tsx:3:1)
```
---
url: /guides/advanced-features/server-monitor/metrics.md
---
# Metrics Events
Metric events are distributed by Monitors as events of type `timing` or `counter`.
## Built-in Events
When SSR is enabled, we need to monitor server-side phase durations and have the capability to diagnose server-side issues.
Based on server-side runtime logic, Modern.js provides the following metric events:
| Key | Description |
| ------------------------ | ---------------------------------------------------------------------------------------------------------------------- |
| server-handle-request | Modern.js Server request handling duration |
| ssr-render-shell | \[SSR] When using Streaming SSR, React renders a shell for early streaming. This marks shell rendering completion time |
| ssr-render-html | \[SSR] Time taken by React to render component tree to HTML (typically under 50ms) |
| server-middleware | Total execution time of Modern.js custom server middlewares |
| server-loader | Server-side Data Loader total duration |
| server-loader-#id | Individual Data Loader durations on server-side |
| server-loader-navigation | Server-side Data Loader duration during client navigation |
Modern.js server workflow diagram:
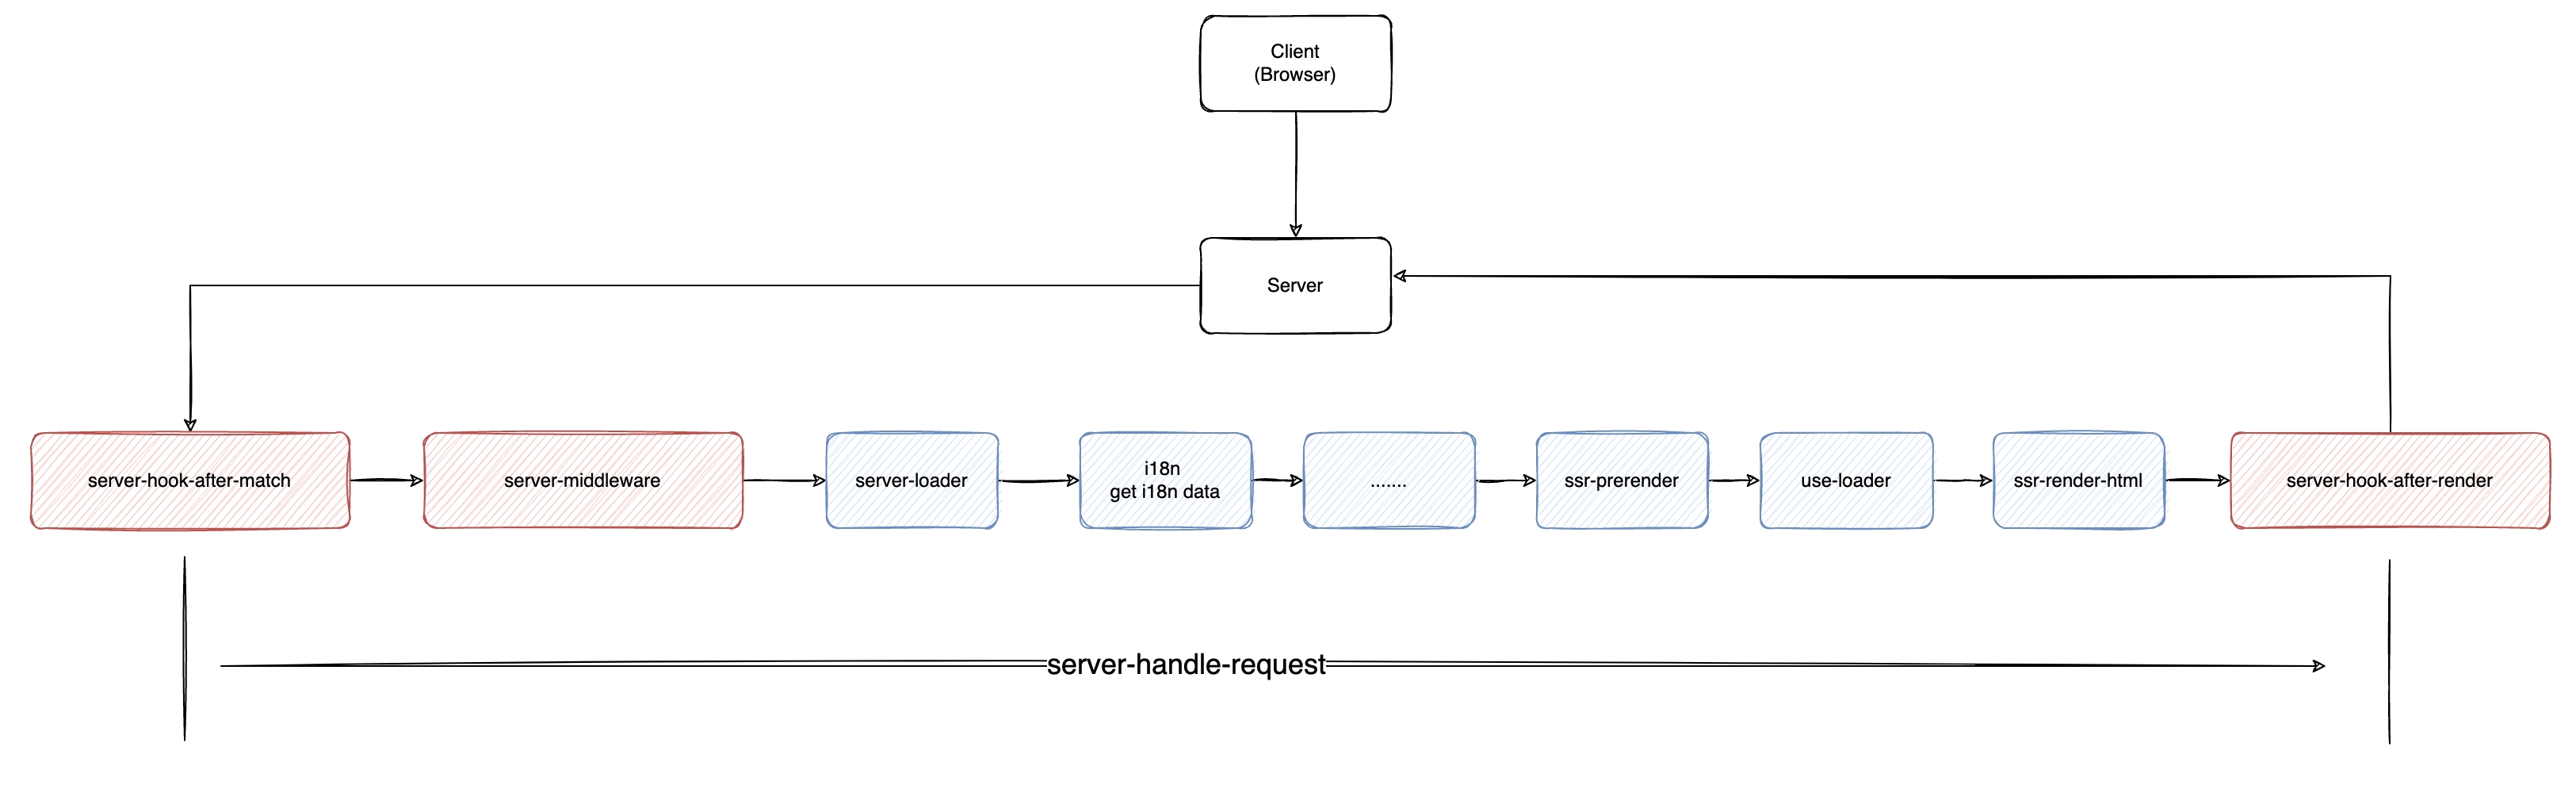
## Built-in Monitor
In Modern.js, metric events are also handled by `LoggerMonitor`, which outputs metrics to the console in a specific format.
:::info
The built-in `LoggerMonitor` depends on the [rslog](https://www.npmjs.com/package/rslog) library.
:::
The `rslog` instance initialized in Modern.js outputs logs at `debug` level and above in development environment by default, and outputs all logs in production environment. In the built-in `LoggerMonitor`, all metric events are output as Debug logs. Therefore, if you want to view metric event information in the development environment, you need to add additional environment variables.
Developers can add the environment variable `DEBUG=true` when running the `dev` command. If running normally, after accessing, you can see the following output in the console:
```shell
> Local: http://localhost:8080/
> press h + enter to show shortcuts
debug SSR Debug - server-loader, cost: 2.000094, req.url = /
debug SSR Debug - ssr-prerender, cost: 6.99997, req.url = /
debug SSR Debug - ssr-render-html, cost: 0.999927, req.url = /
debug Debug - server-handle-request, cost: 19.999981, req.url = /
debug --> GET / 200 90ms
```
## Server-Timing
Modern.js injects phase metrics as Server-Timing headers into HTML responses.
Developers can retrieve these metrics using the [Performance API](https://developer.mozilla.org/en-US/docs/Web/API/Performance) in browsers:
```ts
const navigation = performance.getEntriesByType('navigation')[0];
const serverTiming = navigation.serverTiming;
console.log(serverTiming);
```
---
url: /guides/advanced-features/server-monitor/monitors.md
---
# Monitors
Modern.js is a full-stack framework that supports both client-side and server-side development. When server-side rendering (SSR), the framework automatically injects additional logs and metrics during server runtime to help production issue diagnosis.
As server code operates in Node.js environments, developers cannot directly utilize browser consoles for troubleshooting. Given that different projects may adopt varied logging libraries or data reporting platforms, the framework provides a unified approach for developers to manage built-in logging and metric collection.
The Monitors module in Modern.js empowers application monitoring through two core capabilities: Monitor registration and monitoring event distribution. When developers invoke Monitors APIs, the framework propagates corresponding monitoring events to all registered Monitors.
:::note
Modern.js ships with a default Monitor implementation, while simultaneously allowing developers to register custom Monitors.
:::
## Monitors Type
The Monitors module is defined with the following types, where the `push` method is used to register Monitor and other methods are used to dispatch monitoring events.
```ts
export type LogLevel = 'error' | 'warn' | 'info' | 'debug' | 'trace';
export interface LogEvent {
type: 'log';
payload: {
level: LogLevel;
message: string;
args?: any[];
};
}
export interface TimingEvent {
type: 'timing';
payload: {
name: string;
dur: number;
desc?: string;
args?: any[];
};
}
export interface CounterEvent {
type: 'counter';
payload: {
name: string;
args?: any[];
};
}
export type MonitorEvent = LogEvent | TimingEvent | CounterEvent;
export type CoreMonitor = (event: MonitorEvent) => void;
export interface Monitors {
// Register Monitor
push(monitor: CoreMonitor): void;
// Log Event
error(message: string, ...args: any[]): void;
warn(message: string, ...args: any[]): void;
debug(message: string, ...args: any[]): void;
info(message: string, ...args: any[]): void;
trace(message: string, ...args: any[]): void;
// Metrics Event
timing(name: string, dur: number, ...args: any[]): void;
counter(name: string, ...args: any[]): void;
}
```
## Internal Monitor
Modern.js comes with a built-in default Monitor, where different events trigger different behaviors in the built-in Monitor. For more details, see:
- [Log Event](/guides/advanced-features/server-monitor/logger.md)
- [Metrics Event](/guides/advanced-features/server-monitor/metrics.md)
## Register Monitors
Developers can register their own Monitors using the `push` API, but this can only be done in [server middleware](/guides/advanced-features/web-server.md#unstable-middleware) or [server plugins](/plugin/server-plugins/api.md). Registration is not available in Data Loaders, components, or init functions.
```ts title="server/modern.server.ts"
import {
defineServerConfig,
type MiddlewareHandler,
} from '@modern-js/server-runtime';
import type { MonitorEvent } from '@modern-js/types';
const injectMonitorMiddleware: MiddlewareHandler = async (c, next) => {
const monitors = c.get('monitors');
const myMonitor = (event: MonitorEvent) => {
if (event.type === 'log') {
// Handle log events
console.log(`[${event.payload.level}] ${event.payload.message}`);
} else if (event.type === 'timing') {
// Handle timing events
console.log(`Timing: ${event.payload.name} = ${event.payload.dur}ms`);
} else if (event.type === 'counter') {
// Handle counter events
console.log(`Counter: ${event.payload.name}`);
}
};
monitors.push(myMonitor);
await next();
};
export default defineServerConfig({
middlewares: [
{
name: 'inject-monitor',
handler: injectMonitorMiddleware,
},
],
});
```
Register Monitor in server plugins:
```ts title="server/plugins/my-monitor-plugin.ts"
import type { ServerPlugin } from '@modern-js/server-runtime';
import type { MonitorEvent } from '@modern-js/types';
const myMonitorPlugin = (): ServerPlugin => ({
name: '@my-org/my-monitor-plugin',
setup(api) {
api.onPrepare(() => {
const { middlewares } = api.getServerContext();
// Define monitor, ensuring it's only created once
const myMonitor = (event: MonitorEvent) => {
if (event.type === 'log') {
// Handle log events
console.log(`[${event.payload.level}] ${event.payload.message}`);
} else if (event.type === 'timing') {
// Handle timing events
console.log(
`Timing: ${event.payload.name} = ${event.payload.dur}ms`,
);
} else if (event.type === 'counter') {
// Handle counter events
console.log(`Counter: ${event.payload.name}`);
}
};
// Use a flag to ensure monitor is only registered once
let monitorRegistered = false;
middlewares.push({
name: 'inject-monitor',
handler: async (c, next) => {
const monitors = c.get('monitors');
// Only register monitor on the first request
if (!monitorRegistered) {
monitors.push(myMonitor);
monitorRegistered = true;
}
await next();
},
});
});
},
});
export default myMonitorPlugin;
```
Then configure the plugin in `server/modern.server.ts`:
```ts title="server/modern.server.ts"
import { defineServerConfig } from '@modern-js/server-runtime';
import myMonitorPlugin from './plugins/my-monitor-plugin';
export default defineServerConfig({
plugins: [myMonitorPlugin()],
});
```
## Use Monitors
Modern.js allows developers to invoke Monitors in Data Loaders and components.
:::tip
Monitors can only be invoked in Node.js environments, and calling them in browser environments will have no effect.
:::
In Data Loaders, developers can use them as follows:
```ts title="routes/page.data.ts"
import { LoaderFunctionArgs } from '@modern-js/runtime/router';
import { getMonitors } from '@modern-js/runtime';
const loader = async ({ context }: LoaderFunctionArgs) => {
const monitors = getMonitors();
const start = Date.now();
try {
await fetch(...);
monitors.timing('loader_fetch_timing', Date.now() - start);
} catch(e) {
monitors.error(e);
}
}
```
When invoking Monitors in components, you need to determine whether the current runtime environment is Node.js:
```tsx title="routes/page.tsx"
import { use } from 'react';
import { RuntimeContext, getMonitors } from '@modern-js/runtime';
const Page = () => {
const context = use(RuntimeContext);
if (process.env.MODERN_TARGET === 'node') {
const monitors = getMonitors();
monitors.info('Page rendered');
}
return
Hello World
;
};
export default Page;
```
In middleware, we can also invoke Monitors, but the approach differs from runtime code as it requires accessing them through `context`:
```ts title="server/modern.server.ts"
import {
defineServerConfig,
type MiddlewareHandler,
} from '@modern-js/server-runtime';
export const handler: MiddlewareHandler = async (c, next) => {
const monitors = c.get('monitors');
const start = Date.now();
await next();
const end = Date.now();
// Report timing
monitors.timing('request_timing', end - start);
};
export default defineServerConfig({
middlewares: [
{
name: 'request-timing',
handler,
},
],
});
```
---
url: /guides/advanced-features/source-build.md
---
# Source Code Build Mode
The source code build mode is used in the monorepo development scenario, allowing developers to directly reference the source code of other sub-projects within the monorepo for development.
## Use Cases
In a monorepo, there are two main ways for projects to reference each other: artifact referencing and source code referencing. Let's use a simple monorepo as an example to illustrate the use case of source code referencing.
For example, the monorepo contains an app application and a lib:
```ts
monorepo
├── app
└── lib
└── src
└── index.ts
```
The app is built using Modern.js and relies on some methods from the lib:
```json
{
"name": "app",
"dependencies": {
"lib": "workspace:*"
}
}
```
### Artifact Referencing
**When using artifact referencing, the current project references the artifacts built from other sub-projects.**
In the example above, the lib is written in TypeScript. Typically, we need to build the lib's code in advance to generate JavaScript artifacts so that the app can reference it correctly. When the lib's code is updated, we need to rebuild it (or use `tsc --watch`) to ensure that the app can use the latest code.
The advantages of this approach are:
- The build processes of each sub-project are completely independent and can have different build configurations.
- Build caching can be applied to individual sub-projects.
The disadvantages are:
- The HMR chain becomes longer during local development.
- The process becomes cumbersome when a project contains multiple lib packages.
### Source Code Referencing
**When using source code referencing, the current project references the source code of other sub-projects for building.**
In the example mentioned earlier, when you enable the source code build mode and add the relevant configuration in the `lib` directory, Modern.js will automatically reference the `src/index.ts` source code of the lib. This means that you don't need to build the lib's code in advance, and when the source code of the lib is updated, it can trigger automatic hot updates for the app.
The advantages of this approach are:
- The sub-project does not rely on a build tool and does not require build configurations. The code of the sub-project will be compiled by the build tool of the current project.
- There is no need to execute the build process for the sub-projects in advance.
- HMR is more efficient during local development.
The disadvantages are:
- The current project needs to support syntax features used by sub-projects and follow the same syntax specifications, such as using a consistent version of decorator syntax. If the current project and sub-projects require different build configurations, building from source code may not be suitable.
- The current project requires compiling more code, which may result in longer build times.
## Building from Source Code
### Enabling Configuration
You can enable source code build mode by setting [experiments.sourceBuild](/configure/app/experiments/source-build.md) to `true`.
```ts
export default {
experiments: {
sourceBuild: true,
},
};
```
### Configuring Sub-projects
When the source code build mode is enabled, the Modern.js will prioritize reading the file specified in the `source` field of the sub-project during the build process. Therefore, you need to configure the `source` field in the package.json file of the sub-project and point it to the source code file.
For example, in the following example, when the lib package is referenced, the `./src/index.ts` file will be read for building:
```json title="package.json"
{
"name": "lib",
"main": "./dist/index.js",
"source": "./src/index.ts"
}
```
If the sub-project uses [exports](https://nodejs.org/api/packages.html#package-entry-points) field, you also need to add the `source` field in the `exports` field.
```json title="package.json"
{
"name": "lib",
"exports": {
".": {
"source": "./src/index.ts",
"default": "./dist/index.js"
},
"./features": {
"source": "./src/features/index.ts",
"default": "./dist/features/index.js"
}
}
}
```
## Configure Project Reference
In a TypeScript project, you need to use the capability provided by TypeScript called [Project Reference](https://www.typescriptlang.org/docs/handbook/project-references.html). It helps you develop source code more effectively.
### Introduction
Project reference provides the following capabilities:
- It allows TypeScript to correctly recognize the types of other sub-projects without the need to build them.
- When you navigate the code in VS Code, it automatically takes you to the corresponding source code file of the module.
- Modern.js reads the project reference configuration and automatically recognizes the `tsconfig.compilerOptions.path` configuration of the sub-project, so that the use of aliases in the sub-project works correctly.
### Example
In the example mentioned earlier, since the app project references the lib sub-project, we need to configure the `references` options in the app project's `tsconfig.json` to point to the relative directory of the lib:
```json title="app/tsconfig.json"
{
"references": [
{
"path": "../lib"
}
]
}
```
At the same time, we need to set `composite` to `true` in the lib project's `tsconfig.json`:
```json title="lib/A/tsconfig.json"
{
"compilerOptions": {
"composite": true
},
}
```
After adding these two options, the project reference is already configured. You can restart VS Code to see the effects of the configuration.
Note that the above example is a simplified one. In real monorepo projects, there may be more complex dependency relationships. You need to add a complete `references` configuration for the functionality to work correctly.
:::tip
If you want to learn more about project reference, please refer to the official documentation on [TypeScript - Project References](https://www.typescriptlang.org/docs/handbook/project-references.html).
:::
## Caveat
When using source code build mode, there are a few things to keep in mind:
1. Ensure that the current project can compile the syntax or features used in the sub-project. For example, if the sub-project uses Stylus to write CSS, the current app needs to support Stylus compilation.
2. Ensure that the current project has the same code syntax and features as the sub-project, such as consistent syntax versions for decorators.
3. Source code building may have some limitations. When encountering issues, you can remove the `source` field from the sub-project's package.json and debug using the built artifacts of the sub-project.
4. When `composite: true` is enabled, TypeScript will generate `*.tsbuildinfo` temporary files. You need to add these temporary files to the `.gitignore` file.
```text title=".gitignore"
*.tsbuildinfo
```
---
url: /guides/advanced-features/web-server.md
---
# Custom Web Server
Modern.js encapsulates most server-side capabilities required by projects, typically eliminating the need for server-side development. However, in certain scenarios such as user authentication, request preprocessing, or adding page skeletons, custom server-side logic may still be necessary.
To use the Custom Web Server in a Modern.js project, follow these steps:
1. Install `@modern-js/server-runtime` dependency
If the `@modern-js/server-runtime` dependency is not yet installed in your project, install it first:
```bash
pnpm add @modern-js/server-runtime
```
:::tip Version Consistency
Make sure the version of `@modern-js/server-runtime` matches the version of `@modern-js/app-tools` in your project. All Modern.js official packages are released with a uniform version number, and version mismatches may cause compatibility issues.
Check the version of `@modern-js/app-tools` first, then install the same version of `@modern-js/server-runtime`:
```bash
# Check the current version of @modern-js/app-tools
pnpm list @modern-js/app-tools
# Install the same version of @modern-js/server-runtime
pnpm add @modern-js/server-runtime@
```
:::
2. Create the `server` directory and configuration file
Create a `server/modern.server.ts` file in the project root directory:
```ts title="server/modern.server.ts"
import { defineServerConfig } from '@modern-js/server-runtime';
export default defineServerConfig({
middlewares: [], // Middleware
renderMiddlewares: [], // Render Middleware
plugins: [], // Plugins
onError: () => {}, // Error handling
});
```
After creating the file, you can write custom logic in this file.
## Capabilities of the Custom Web Server
Modern.js's Web Server is based on Hono, and in the latest version of the Custom Web Server, we expose Hono's middleware capabilities, you can refer to [Hono API](https://hono.dev/docs/api/context) for more usage.
In the `server/modern.server.ts` file, you can add the following configurations to extend the Server:
- **Middleware**
- **Render Middleware**
- **Server-side Plugin**
In the **Plugin**, you can define **Middleware** and **RenderMiddleware**. The middleware loading process is illustrated in the following diagram:
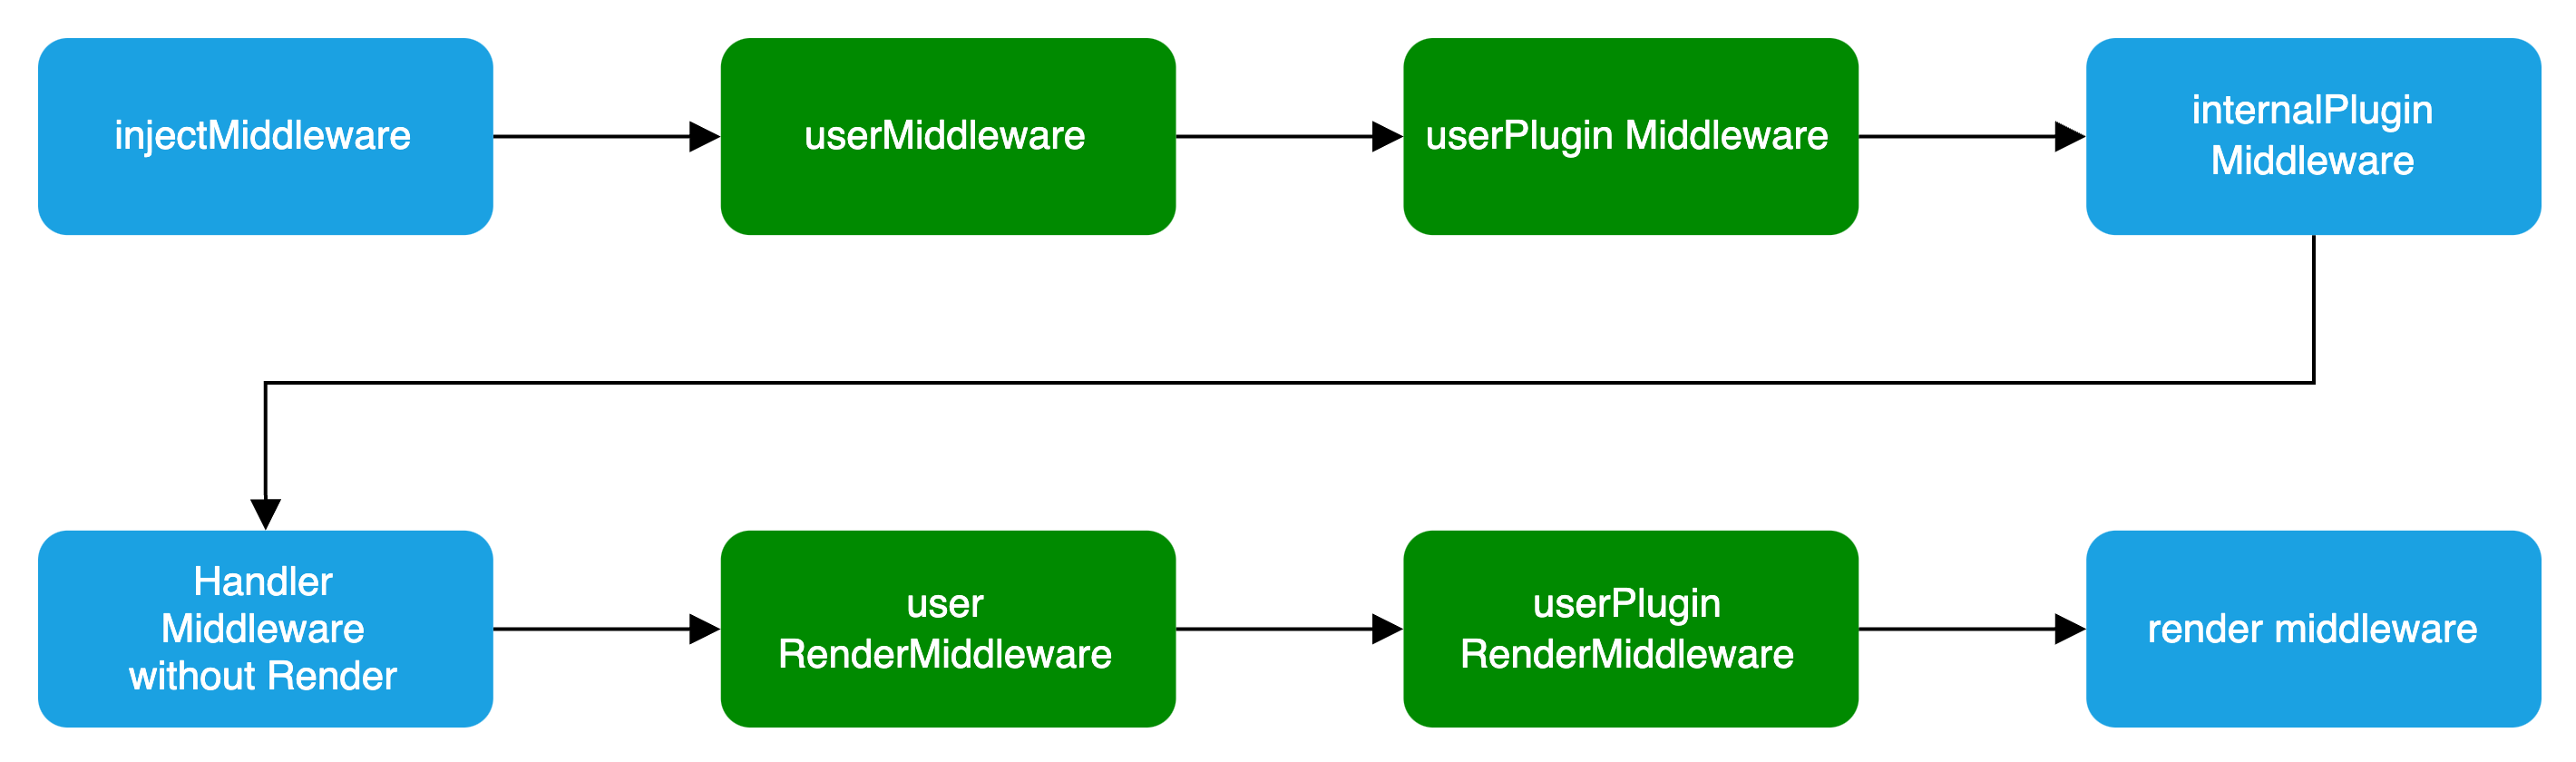
### Basic Configuration
```ts title="server/modern.server.ts"
import { defineServerConfig } from '@modern-js/server-runtime';
export default defineServerConfig({
middlewares: [],
renderMiddlewares: [],
plugins: [],
onError: () => {},
});
```
### Type Definition
`defineServerConfig` type definition is as follows:
```ts
import type { MiddlewareHandler } from 'hono';
type MiddlewareOrder = 'pre' | 'post' | 'default';
type MiddlewareObj = {
name: string;
path?: string;
method?: 'options' | 'get' | 'post' | 'put' | 'delete' | 'patch' | 'all';
handler: MiddlewareHandler | MiddlewareHandler[];
before?: Array;
order?: MiddlewareOrder;
};
type ServerConfig = {
middlewares?: MiddlewareObj[];
renderMiddlewares?: MiddlewareObj[];
plugins?: ServerPlugin[];
onError?: (err: Error, c: Context) => Promise | any;
};
```
### Middleware
Middleware supports executing custom logic before and after the **request handling** and **page routing** processes in Modern.js services.
If custom logic needs to handle both API routes and page routes, Middleware is the clear choice.
:::note
If you only need to handle BFF API routes, you can determine whether a request is for a BFF API by checking if `req.path` starts with the BFF `prefix`.
:::
Usage is as follows:
```ts title="server/modern.server.ts"
import {
defineServerConfig,
type MiddlewareHandler,
} from '@modern-js/server-runtime';
export const handler: MiddlewareHandler = async (c, next) => {
const monitors = c.get('monitors');
const start = Date.now();
await next();
const end = Date.now();
// Report Duration
monitors.timing('request_timing', end - start);
};
export default defineServerConfig({
middlewares: [
{
name: 'request-timing',
handler,
},
],
});
```
:::warning
You must execute the `next` function to proceed with the subsequent Middleware.
:::
### RenderMiddleware
If you only need to handle the logic before and after page rendering, modern.js also provides rendering middleware, which can be used as follows:
```ts title="server/modern.server.ts"
import {
defineServerConfig,
type MiddlewareHandler,
} from '@modern-js/server-runtime';
// Inject render performance metrics
const renderTiming: MiddlewareHandler = async (c, next) => {
const start = Date.now();
await next();
const end = Date.now();
c.res.headers.set('server-timing', `render; dur=${end - start}`);
};
// Modify the Response Body
const modifyResBody: MiddlewareHandler = async (c, next) => {
await next();
const { res } = c;
const text = await res.text();
const newText = text.replace('', '
bytedance
');
c.res = c.body(newText, {
status: res.status,
headers: res.headers,
});
};
export default defineServerConfig({
renderMiddlewares: [
{
name: 'render-timing',
handler: renderTiming,
},
{
name: 'modify-res-body',
handler: modifyResBody,
},
],
});
```
### Plugin
Modern.js supports adding the aforementioned middleware and rendering middleware for the Server in custom plugins, which can be used as follows:
```ts title="server/plugins/server.ts"
import type { ServerPlugin } from '@modern-js/server-runtime';
export default (): ServerPlugin => ({
name: 'serverPlugin',
setup(api) {
api.onPrepare(() => {
const { middlewares, renderMiddlewares } = api.getServerContext();
// Inject server-side data for page dataLoader consumption
middlewares?.push({
name: 'server-plugin-middleware',
handler: async (c, next) => {
c.set('message', 'hi modern.js');
await next();
// ...
},
});
// redirect
renderMiddlewares?.push({
name: 'server-plugin-render-middleware',
handler: async (c, next) => {
const user = getUser(c.req);
if (!user) {
return c.redirect('/login');
}
await next();
},
});
});
},
});
```
```ts title="server/modern.server.ts"
import { defineServerConfig } from '@modern-js/server-runtime';
import serverPlugin from './plugins/serverPlugin';
export default defineServerConfig({
plugins: [serverPlugin()],
});
```
```ts title="src/routes/page.data.ts"
import { useHonoContext } from '@modern-js/server-runtime';
import { defer } from '@modern-js/runtime/router';
export default () => {
const ctx = useHonoContext();
// SSR scenario consumes data injected by the Server Side
const message = ctx.get('message');
// ...
};
```
### onError
`onError` is a global error handling function used to capture and handle all uncaught errors in the Modern.js server. By customizing the `onError` function, developers can uniformly handle different types of errors, return custom error responses, and implement features such as error logging and error classification.
Below is a basic example of an `onError` configuration:
```ts title="server/modern.server.ts"
import { defineServerConfig } from '@modern-js/server-runtime';
export default defineServerConfig({
onError: (err, c) => {
// Log the error
console.error('Server error:', err);
// Return different responses based on the error type
if (err instanceof SyntaxError) {
return c.json({ error: 'Invalid JSON' }, 400);
}
// Customize BFF error response based on request path
if (c.req.path.includes('/api')) {
return c.json({ message: 'API error occurred' }, 500);
}
return c.text('Internal Server Error', 500);
},
});
```
---
url: /guides/basic-features/alias.md
---
# Path Alias
Path aliases allow developers to define aliases for modules, making it easier to reference them in code. This can be useful when you want to use a short, easy-to-remember name for a module instead of a long, complex path.
For example, if you frequently reference the `src/common/request.ts` module in your project, you can define an alias for it as `@request` and then use `import request from '@request'` in your code instead of writing the full relative path every time. This also allows you to move the module to a different location without needing to update all the import statements in your code.
In Modern.js, there are two ways to set up path aliases:
- Through the `paths` configuration in `tsconfig.json`.
- Through the [source.alias](/configure/app/source/alias.md) configuration.
## Using `tsconfig.json`'s `paths` Configuration
You can configure aliases through the `paths` configuration in `tsconfig.json`, which is the recommended approach in TypeScript projects as it also resolves the TS type issues related to path aliases.
For example:
```json title="tsconfig.json"
{
"compilerOptions": {
"paths": {
"@common/*": ["./src/common/*"]
}
}
}
```
After configuring, if you reference `@common/Foo.tsx` in your code, it will be mapped to the `/src/common/Foo.tsx` path.
:::tip
You can refer to the [TypeScript - paths](https://www.typescriptlang.org/tsconfig#paths) documentation for more details.
:::
## Use `source.alias` Configuration
Modern.js provides the [source.alias](/configure/app/source/alias.md) configuration option, which corresponds to the webpack/Rspack native [resolve.alias](https://webpack.js.org/configuration/resolve/#resolvealias) configuration. You can configure this option using an object or a function.
### Use Cases
Since the `paths` configuration in `tsconfig.json` is written in a static JSON file, it lacks dynamism.
The `source.alias` configuration can address this limitation by allowing you to dynamically set the `source.alias` using JavaScript code, such as based on environment variables.
### Object Usage
You can configure `source.alias` using an object, where the relative paths will be automatically resolved to absolute paths.
For example:
```js
export default {
source: {
alias: {
'@common': './src/common',
},
},
};
```
After configuring, if you reference `@common/Foo.tsx` in your code, it will be mapped to the `/src/common/Foo.tsx` path.
### Function Usage
You can also configure `source.alias` as a function, which receives the built-in `alias` object and allows you to modify it.
For example:
```js
export default {
source: {
alias: alias => {
alias['@common'] = './src/common';
return alias;
},
},
};
```
### Priority
The `paths` configuration in `tsconfig.json` takes precedence over the `source.alias` configuration. When a path matches the rules defined in both `paths` and `source.alias`, the value defined in `paths` will be used.
You can adjust the priority of these two options using [source.aliasStrategy](/configure/app/source/alias-strategy.md).
## Default Aliases
The Modern.js framework comes with the following aliases built-in:
```json
{
"@": "./src",
"@shared": "./shared"
}
```
Additionally, when the BFF plugin of the framework is enabled, the `@api` alias is automatically added.
```json
{
"@api": "./api"
}
```
---
url: /guides/basic-features/css/css-in-js.md
---
# Using CSS-in-JS
CSS-in-JS is a technique that allows you to write CSS styles within JS files.
Modern.js supports the commonly used community CSS-in-JS library [styled-components](https://styled-components.com/), which uses JavaScript's new feature [Tagged template](https://developer.mozilla.org/en-US/docs/Web/JavaScript/Reference/Template_literals#tagged_templates) to write component CSS styles.
The Modern.js plugin `@modern-js/plugin-styled-components` provides support for styled-components and adds server-side rendering capability for styled-components. You can use styled-components by installing the `@modern-js/plugin-styled-components` plugin.
## Using styled-components in Modern.js
First, you need to install the `styled-components` plugin dependency and the `styled-components` library:
```sh [npm]
npm install @modern-js/plugin-styled-components styled-components -D
```
```sh [yarn]
yarn add @modern-js/plugin-styled-components styled-components -D
```
```sh [pnpm]
pnpm install @modern-js/plugin-styled-components styled-components -D
```
Then configure the `styled-components` plugin in `modern.config.ts`:
```ts
import { defineConfig } from '@modern-js/app-tools';
import { styledComponentsPlugin } from '@modern-js/plugin-styled-components';
export default defineConfig({
plugins: [
styledComponentsPlugin({
// ...
displayName: true,
minify: process.env.NODE_ENV === 'production',
}),
],
});
```
The configuration options of the styledComponentsPlugin plugin are the same as those of the [@rsbuild/plugin-styled-components](https://www.npmjs.com/package/@rsbuild/plugin-styled-components) plugin. You can refer to the documentation of [@rsbuild/plugin-styled-components](https://www.npmjs.com/package/@rsbuild/plugin-styled-components) for configuration.
## Writing styles with styled-components
When you need to write a `div` component with red text inside, you can implement it as follows:
```js
import styled from '@modern-js/plugin-styled-components/styled';
const RedDiv = styled.div`
color: red;
`;
```
When you need to dynamically set component styles based on the component's `props`, for example, when the `primary` attribute of `props` is `true`, the button's color is white, otherwise red, the implementation is as follows:
```js
import styled from '@modern-js/plugin-styled-components/styled';
const Button = styled.button`
color: ${props => (props.primary ? 'white' : 'red')};
font-size: 1em;
`;
```
For more usage of styled-components, please refer to the [styled-components official website](https://styled-components.com/).
:::tip Tip
If you want to use other CSS-in-JS libraries such as [styled-jsx](https://www.npmjs.com/package/styled-jsx), [Emotion](https://emotion.sh/), etc., you need to install the corresponding dependencies first. Please refer to the official websites of the respective libraries for specific usage.
:::
---
url: /guides/basic-features/css/css-modules.md
---
# Use CSS Modules
[CSS Modules](https://github.com/css-modules/css-modules) allows us to write CSS code in a modular way, and these styles can be imported and used in JavaScript files. Using CSS Modules can automatically generate unique class names, isolate styles between different modules, and avoid class name conflicts.
Modern.js supports CSS Modules by default, you don't need to add additional configuration. Our convention is to use the `[name].module.css` filename to enable CSS Modules.
The following style files are considered CSS Modules:
- `*.module.scss`
- `*.module.less`
- `*.module.css`
## Example
- Write style:
```css
/* button.module.css */
.error {
background: red;
}
```
- Using styles:
```tsx
// Button.tsx
import React, { Component } from 'react';
// import style file
import styles from './button.module.css';
export default () => {
return ;
};
```
## Enable CSS Modules for all CSS files
By default, only files ending in `*.module.css` are treated CSS Modules.
If you want to treat all CSS files in the source directory as CSS Modules, you can enable the [output.disableCssModuleExtension](/configure/app/output/disable-css-module-extension.md) config, for example:
```ts
export default {
output: {
disableCssModuleExtension: true,
},
};
```
When set, the following two files are treated as CSS Modules:
```ts
import styles1 from './foo.module.css';
import styles2 from './bar.css';
```
:::tip
We do not recommend enabling this config, because after enabling disableCssModuleExtension, CSS Modules files and ordinary CSS files cannot be clearly distinguished, which is not conducive to long-term maintenance.
:::
## Enable CSS Modules for the specified style file
By default, only files ending in `*.module.css` are treated CSS Modules.
If you want to enable CSS Modules only for specified style files, you can configure [output.cssModules](/configure/app/output/css-modules.md), for example:
```ts
export default {
output: {
cssModules: {
auto: resource => {
return resource.includes('.module.') || resource.includes('shared/');
},
},
},
};
```
## Add Type Declaration
When you import CSS Modules in TypeScript code, TypeScript may prompt that the module is missing a type definition:
```
TS2307: Cannot find module './index.module.css' or its corresponding type declarations.
```
To fix this, you need to add a type declaration file for the CSS Modules, please create a `src/global.d.ts` file, and add the corresponding type declaration:
```ts title="src/global.d.ts"
declare module '*.module.css' {
const classes: { readonly [key: string]: string };
export default classes;
}
declare module '*.module.scss' {
const classes: { readonly [key: string]: string };
export default classes;
}
declare module '*.module.sass' {
const classes: { readonly [key: string]: string };
export default classes;
}
declare module '*.module.less' {
const classes: { readonly [key: string]: string };
export default classes;
}
declare module '*.module.styl' {
const classes: { readonly [key: string]: string };
export default classes;
}
```
If you enabled the `disableCssModuleExtension` config, you also need to add the following types:
```ts title="src/global.d.ts"
declare module '*.css' {
const classes: { readonly [key: string]: string };
export default classes;
}
declare module '*.scss' {
const classes: { readonly [key: string]: string };
export default classes;
}
declare module '*.sass' {
const classes: { readonly [key: string]: string };
export default classes;
}
declare module '*.less' {
const classes: { readonly [key: string]: string };
export default classes;
}
declare module '*.styl' {
const classes: { readonly [key: string]: string };
export default classes;
}
```
After adding the type declaration, if the type error still exists, you can try to restart the current IDE, or adjust the directory where `global.d.ts` is located, making sure the TypeScript can correctly identify the type definition.
## Generate exact type definitions
Although the above method can provide the type of CSS Modules, it cannot accurately prompt which classNames are exported by a certain CSS file.
Modern.js supports generating accurate type declarations for CSS Modules, you only need to enable the [output.enableCssModuleTSDeclaration](/configure/app/output/enable-css-module-tsdeclaration.md) config, and then execute the build, Modern.js will generate type declaration files for all CSS Modules.
```ts
export default {
output: {
enableCssModuleTSDeclaration: true,
},
};
```
### Example
For example, there are two files `src/index.ts` and `src/index.module.scss` under a certain folder:
```tsx title="src/index.ts"
import styles from './index.module.scss';
export default () => {
return (
Page Header
);
};
```
```scss title="src/index.module.scss"
.page-header {
color: black;
}
```
After executing the build, the `src/index.module.scss.d.ts` type declaration file will be automatically generated:
```ts title="src/index.module.scss.d.ts"
// This file is automatically generated.
// Please do not change this file!
interface CssExports {
'page-header': string;
pageHeader: string;
}
export const cssExports: CssExports;
export default cssExports;
```
Then open the `src/index.ts` file again, you will see that the `styles` object already has a exact type.
### Related configuration
In the above example, `src/index.module.scss.d.ts` is generated by compilation, you can choose to commit them to the Git repository, or you can choose to ignore them in the `.gitignore` file:
```bash
# Ignore auto generated CSS declarations
*.module.css.d.ts
*.module.sass.d.ts
*.module.scss.d.ts
*.module.less.d.ts
*.module.styl.d.ts
```
In addition, if the generated code causes ESLint to report errors, you can also add the above configuration to the `.eslintignore` file.
---
url: /guides/basic-features/css/css.md
---
# Styling
Modern.js has built-in a variety of commonly used CSS solutions, including Less / Sass / Stylus preprocessors, PostCSS, CSS Modules, CSS-in-JS, and Tailwind CSS.
## Using Less, Sass and Stylus
Modern.js has built-in popular community CSS preprocessors, including Less and Sass.
By default, you don't need to configure Less and Sass. If you have custom loader configuration requirements, you can set them up by configuring [tools.less](/configure/app/tools/less.md) and [tools.sass](/configure/app/tools/sass.md).
You can also use Stylus in Modern.js by installing the Stylus plugin provided by Rsbuild. For usage, please refer to [Stylus Plugin](https://v2.rsbuild.rs/plugins/list/plugin-stylus).
## Using PostCSS
Modern.js has built-in [PostCSS](https://postcss.org/) to transform CSS code.
Please refer to [Rsbuild - Using PostCSS](https://v2.rsbuild.rs/guide/styling/css-usage) for detailed usage.
## Using Lightning CSS
Modern.js supports using [Lightning CSS](https://lightningcss.dev/) to convert CSS code. This feature can be turned on by configuring [tools.lightningcssLoader](/configure/app/tools/lightningcss-loader.md).
Please refer to [Rsbuild - Using Lightning CSS](https://v2.rsbuild.rs/guide/styling/css-usage#lightning-css) for detailed usage.
## Using Uno CSS
Please read the [Rsbuild - Using UnoCSS](https://v2.rsbuild.rs/guide/styling/unocss) for detailed usage.
---
url: /guides/basic-features/css/tailwindcss.md
---
# Using Tailwind CSS
[Tailwind CSS](https://tailwindcss.com/) is a CSS framework and design system based on Utility Class, which can quickly add common styles to components, and support flexible extension of theme styles.
## Using Tailwind CSS in Modern.js
To use [Tailwind CSS](https://tailwindcss.com/) in Modern.js, you only need to configure it according to the Rsbuild steps. Rsbuild supports Tailwind CSS versions v3 and v4:
- [Tailwind CSS v3](https://v2.rsbuild.rs/guide/styling/tailwindcss-v3#tailwind-css-v3)
- [Tailwind CSS v4](https://v2.rsbuild.rs/guide/styling/tailwindcss)
## Tailwind CSS Autocomplete
Tailwind CSS provides an official extension called [Tailwind CSS IntelliSense](https://github.com/tailwindlabs/tailwindcss-intellisense) for autocompletion of Tailwind CSS class names, CSS functions, and directives in VS Code.
You can follow the steps below to enable the autocomplete feature:
1. Install the [Tailwind CSS IntelliSense](https://github.com/tailwindlabs/tailwindcss-intellisense) extension in VS Code.
2. If the root directory of your project does not have a `tailwind.config.{ts,js}` file, you need to create one and write the Tailwind CSS configuration for your current project. Otherwise, the IDE plugin will not work correctly.
## Browser Compatibility
Tailwind CSS v3 does not support the IE 11 browser, please refer to:
- [Tailwind CSS v3 - Browser Support](https://tailwindcss.com/docs/browser-support).
If you use Tailwind CSS on IE 11 browser, some styles may not be available, please use it with caution.
---
url: /guides/basic-features/data/data-cache.md
---
# Data Caching
The `cache` function allows you to cache the results of data fetching or computation, Compared to full-page [rendering cache](/guides/basic-features/render/ssr-cache.md), it provides more fine-grained control over data granularity and is applicable to various scenarios such as Client-Side Rendering (CSR), Server-Side Rendering (SSR), and API services (BFF).
## Basic Usage
:::note
If you use the `cache` function in BFF, you should import the cache funtion from `@modern-js/server-runtime/cache`
`import { cache } from '@modern-js/server-runtime/cache'`
:::
```ts
import { cache } from '@modern-js/runtime/cache';
import { fetchUserData } from './api';
const getUser = cache(fetchUserData);
const loader = async () => {
const user = await getUser('123'); // When the parameters of the function changes, the function will be re-executed
return {
user,
};
};
```
### Parameters
- `fn`: The data fetching or computation function to be cached
- `options` (optional): Cache configuration
- `tag`: Tag to identify the cache, which can be used to invalidate the cache
- `maxAge`: Cache validity period (milliseconds)
- `revalidate`: Time window for revalidating the cache (milliseconds), similar to HTTP Cache-Control's stale-while-revalidate functionality
- `getKey`: Simplified cache key generation function based on function parameters
- `customKey`: Custom cache key generation function, used to maintain cache when function references change
The type of the `options` parameter is as follows:
```ts
interface CacheOptions {
tag?: string | string[];
maxAge?: number;
revalidate?: number;
getKey?: (...args: Args) => string;
customKey?: (options: {
params: Args;
fn: (...args: Args) => any;
generatedKey: string;
}) => string | symbol;
}
```
### Return Value
The `cache` function returns a new function with caching capabilities. Multiple calls to this function will not re-execute the `fn` function.
## Usage Scope
Unlike React's [cache](https://react.dev/reference/react/cache) function which can only be used in server components,
Modern.js's `cache` function can be used in any frontend or server-side code.
## Detailed Usage
### Without options Parameter
When no `options` parameter is provided, it's primarily useful in SSR projects, the cache lifecycle is limited to a single SSR rendering request. For example, when the same cachedFn is called in multiple data loaders, the cachedFn function won't be executed repeatedly. This allows data sharing between different data loaders while avoiding duplicate requests. Modern.js will re-execute the `fn` function with each server request.
:::info
Without the `options` parameter, it can be considered a replacement for React's [`cache`](https://react.dev/reference/react/cache) function and can be used in any server-side code (such as in data loaders of SSR projects), not limited to server components.
:::
```ts
import { cache } from '@modern-js/runtime/cache';
import { fetchUserData } from './api';
const getUser = cache(fetchUserData);
const loader = async () => {
const user = await getUser();
return {
user,
};
};
```
### With options Parameter
#### `maxAge` Parameter
After each computation, the framework records the time when the cache is written.
When the function is called again, it checks if the cache has expired based on the `maxAge` parameter.
If expired, the `fn` function is re-executed; otherwise, the cached data is returned.
```ts
import { cache, CacheTime } from '@modern-js/runtime/cache';
const getDashboardStats = cache(
async () => {
return await fetchComplexStatistics();
},
{
maxAge: CacheTime.MINUTE * 2, // Calling this function within 2 minutes will return cached data
},
);
```
#### `revalidate` Parameter
The `revalidate` parameter sets a time window for revalidating the cache after it expires. It can be used together with the `maxAge` parameter, similar to HTTP Cache-Control's stale-while-revalidate mode.
In the following example, the cache behavior is divided into three phases based on time:
1. **0 to 2 minutes (within `maxAge`)**: Cache is fresh, returns cached data directly without re-fetching
2. **2 to 3 minutes (between `maxAge` and `maxAge + revalidate`)**: Cache has expired but is within the revalidation window, returns stale data immediately while re-fetching and updating the cache in the background
3. **Beyond 3 minutes (exceeding `maxAge + revalidate`)**: Cache is completely expired, re-executes the function to fetch new data
```ts
import { cache, CacheTime } from '@modern-js/runtime/cache';
const getDashboardStats = cache(
async () => {
return await fetchComplexStatistics();
},
{
maxAge: CacheTime.MINUTE * 2,
revalidate: CacheTime.MINUTE * 1,
},
);
```
#### `tag` Parameter
The `tag` parameter identifies the cache with a tag, which can be a string or an array of strings.
You can invalidate caches based on this tag, and multiple cache functions can use the same tag.
```ts
import { cache, revalidateTag } from '@modern-js/runtime/cache';
const getDashboardStats = cache(
async () => {
return await fetchDashboardStats();
},
{
tag: 'dashboard',
},
);
const getComplexStatistics = cache(
async () => {
return await fetchComplexStatistics();
},
{
tag: 'dashboard',
},
);
await revalidateTag('dashboard'); // Invalidates the cache for both getDashboardStats and getComplexStatistics functions
```
#### `getKey` Parameter
The `getKey` parameter simplifies cache key generation, especially useful when you only need to rely on part of the function parameters to differentiate caches. It's a function that receives the same parameters as the original function and returns a string.
Its return value becomes part of the final cache key, but the key is still combined with a unique function identifier, making the cache **function-scoped**.
```ts
import { cache, CacheTime } from '@modern-js/runtime/cache';
import { fetchUserData } from './api';
const getUser = cache(
async (userId, options) => {
// Here options might contain many configurations, but we only want to cache based on userId
return await fetchUserData(userId, options);
},
{
maxAge: CacheTime.MINUTE * 5,
// Only use the first parameter (userId) as the cache key
getKey: (userId, options) => userId,
},
);
// The following two calls will share the cache because getKey only uses userId
await getUser(123, { language: 'zh' });
await getUser(123, { language: 'en' }); // Cache hit, won't request again
// Different userId will use different cache
await getUser(456, { language: 'zh' }); // Won't hit cache, will request again
```
You can also use Modern.js's `generateKey` function together with getKey to generate the cache key:
:::info
The `generateKey` function in Modern.js ensures that a consistent and unique key is generated even if object property orders change, guaranteeing stable caching.
:::
```ts
import { cache, CacheTime, generateKey } from '@modern-js/runtime/cache';
import { fetchUserData } from './api';
const getUser = cache(
async (userId, options) => {
return await fetchUserData(userId, options);
},
{
maxAge: CacheTime.MINUTE * 5,
getKey: (userId, options) => generateKey(userId),
},
);
```
Additionally, `getKey` can also return a numeric type as a cache key:
```ts
const getUserById = cache(fetchUserDataById, {
maxAge: CacheTime.MINUTE * 5,
// Directly use the numeric ID as the cache key
getKey: id => id,
});
await getUserById(42); // Uses 42 as the cache key
```
#### `customKey` parameter
The `customKey` parameter is used to **fully customize** the cache key. It is a function that receives an object with the following properties and returns a string as the cache key.
Its return value **directly becomes** the final cache key, **overriding** the default combination of a function identifier and parameter-based key. This allows you to create **globally unique** keys and share cache across different functions.
- `params`: Array of arguments passed to the cached function
- `fn`: Reference to the original function being cached
- `generatedKey`: Cache key automatically generated by the framework based on input parameters
:::info
Generally, the cache will be invalidated in the following scenarios:
1. The function's input parameters change
2. The maxAge condition is no longer satisfied
3. The `revalidateTag` method has been called
By default, the framework generates a stable function ID based on the function's string representation and combines it with the generated parameter key. `customKey` can be used when you need complete control over the cache key generation, especially useful for sharing cache across different function instances. If you just need to customize how parameters are converted to cache keys, it is recommended to use `getKey`.
:::
This is very useful in some scenarios, such as when you want to share cache across different function instances or when you need predictable cache keys for external cache management.
```ts
import { cache } from '@modern-js/runtime/cache';
import { fetchUserData } from './api';
// Different function references, but share the same cache via customKey
const getUserA = cache(fetchUserData, {
maxAge: CacheTime.MINUTE * 5,
customKey: ({ params }) => {
// Return a stable string as the cache key
return `user-${params[0]}`;
},
});
// Even if the function reference changes,
// as long as customKey returns the same value, the cache will be hit
const getUserB = cache(
(...args) => fetchUserData(...args), // New function reference
{
maxAge: CacheTime.MINUTE * 5,
customKey: ({ params }) => {
// Return the same key as getUserA
return `user-${params[0]}`;
},
},
);
// Now you can share cache across different function implementations
await getUserA(123); // Fetches data and caches with key "user-123"
await getUserB(123); // Cache hit, returns cached data
// You can utilize the generatedKey parameter to modify the default key
const getUserC = cache(fetchUserData, {
customKey: ({ generatedKey }) => `prefix-${generatedKey}`,
});
// For predictable cache keys that can be managed externally
const getUserD = cache(
async (userId: string) => {
return await fetchUserData(userId);
},
{
maxAge: CacheTime.MINUTE * 5,
customKey: ({ params }) => `app:user:${params[0]}`,
},
);
```
#### `onCache` Parameter
The `onCache` parameter allows you to track cache statistics such as hit rate. It's a callback function that receives information about each cache operation, including the status, key, parameters, and result.
```ts
import { cache, CacheTime } from '@modern-js/runtime/cache';
// Track cache statistics
const stats = {
total: 0,
hits: 0,
misses: 0,
stales: 0,
hitRate: () => stats.hits / stats.total,
};
const getUser = cache(fetchUserData, {
maxAge: CacheTime.MINUTE * 5,
onCache({ status, key, params, result }) {
// status can be 'hit', 'miss', or 'stale'
stats.total++;
if (status === 'hit') {
stats.hits++;
} else if (status === 'miss') {
stats.misses++;
} else if (status === 'stale') {
stats.stales++;
}
console.log(
`Cache ${
status === 'hit' ? 'hit' : status === 'miss' ? 'miss' : 'stale'
} for key: ${String(key)}`,
);
console.log(`Current hit rate: ${stats.hitRate() * 100}%`);
},
});
// Usage example
await getUser(1); // Cache miss
await getUser(1); // Cache hit
await getUser(2); // Cache miss
```
The `onCache` callback receives an object with the following properties:
- `status`: The cache operation status, which can be:
- `hit`: Cache hit, returning cached content
- `miss`: Cache miss, executing the function and caching the result
- `stale`: Cache hit but data is stale, returning cached content while revalidating in the background
- `key`: The cache key, which is either the result of `customKey` or the default generated key
- `params`: The parameters passed to the cached function
- `result`: The result data (either from cache or newly computed)
This callback is only invoked when the `options` parameter is provided. When using the cache function without options, the `onCache` callback is not called.
The `onCache` callback is useful for:
- Monitoring cache performance
- Calculating hit rates
- Logging cache operations
- Implementing custom metrics
### Storage
#### Default Storage
Currently, both client and server caches are stored in memory.
The default storage limit for all cached functions is 1GB. When this limit is reached, the oldest cache is removed using an LRU algorithm.
:::info
Considering that the results of `cache` function caching are not large, they are currently stored in memory by default.
:::
You can specify the storage limit using the `configureCache` function:
```ts
import { configureCache, CacheSize } from '@modern-js/runtime/cache';
configureCache({
maxSize: CacheSize.MB * 10, // 10MB
});
```
#### Custom Storage Container
In addition to the default memory storage, you can use custom storage containers such as Redis, file systems, databases, etc. This enables cache sharing across processes and servers.
##### Container Interface
Custom storage containers need to implement the `Container` interface:
```ts
interface Container {
get: (key: string) => Promise;
set: (key: string, value: string, options?: { ttl?: number }) => Promise;
has: (key: string) => Promise;
delete: (key: string) => Promise;
clear: () => Promise;
}
```
##### Basic Usage
```ts
import { configureCache } from '@modern-js/runtime/cache';
// Use custom storage container
configureCache({
container: customContainer,
});
```
##### Using `customKey` to Ensure Cache Key Stability
:::warning Important Recommendation
When using custom storage containers (such as Redis), **it's recommended to configure `customKey`** to ensure cache key stability. This ensures:
1. **Cross-process sharing**: Different server instances can share the same cache
2. **Cache validity after application restart**: Cache remains valid after restarting the application
3. **Cache persistence after code deployment**: Cache for the same logic remains effective after code updates
:::
The default cache key generation mechanism is based on function references, which may not be stable enough in distributed environments. It's recommended to use `customKey` to provide stable cache keys:
```ts
import { cache, configureCache } from '@modern-js/runtime/cache';
// Configure Redis container
configureCache({
container: redisContainer,
});
// Recommended: Use customKey to ensure key stability
const getUser = cache(
async (userId: string) => {
return await fetchUserData(userId);
},
{
maxAge: CacheTime.MINUTE * 5,
// Use stable identifiers related to the cached function as cache keys
customKey: () => `fetchUserData`,
},
);
```
##### Redis Storage Example
Here's an example of using Redis as a storage backend:
```ts
import { Redis } from 'ioredis';
import { Container, configureCache } from '@modern-js/runtime/cache';
class RedisContainer implements Container {
private client: Redis;
constructor(client: Redis) {
this.client = client;
}
async get(key: string): Promise {
const value = await this.client.get(key);
return value ? JSON.parse(value) : null;
}
async set(
key: string,
value: string,
options?: { ttl?: number },
): Promise<'OK'> {
if (options?.ttl) {
return this.client.set(key, JSON.stringify(value), 'EX', options.ttl);
}
return this.client.set(key, JSON.stringify(value));
}
async has(key: string): Promise {
const result = await this.client.exists(key);
return result === 1;
}
async delete(key: string): Promise {
const result = await this.client.del(key);
return result > 0;
}
async clear(): Promise {
// Be cautious with this in production. It will clear the entire Redis database.
// A more robust implementation might use a key prefix and delete keys matching that prefix.
await this.client.flushdb();
}
}
// Configure Redis storage
const redisClient = new Redis({
host: 'localhost',
port: 6379,
});
configureCache({
container: new RedisContainer(redisClient),
});
```
##### Notes
1. **Serialization**: All cached data will be serialized to strings for storage. The container only needs to handle string get/set operations.
2. **TTL Support**: If your storage backend supports TTL (Time To Live), you can use the `options.ttl` parameter in the `set` method (in seconds).
---
url: /guides/basic-features/data/data-fetch.md
---
# Data Fetching
Modern.js provides out-of-the-box data fetching capabilities. Developers can use these APIs to fetch data in their projects. It's important to note that these APIs do not help the application make requests but assist developers in managing data better and improving project performance.
## What is Data Loader
Modern.js recommends managing routes using [conventional routing](/guides/basic-features/routes/routes.md). Each route component (`layout.ts`, `page.ts`, or `$.tsx`) can have a same-named `.data` file. These files can export a `loader` function, known as Data Loader, which executes before the corresponding route component renders to provide data for the component. Here is an example:
```bash
.
└── routes
├── layout.tsx
└── user
├── layout.tsx
├── layout.data.ts
├── page.tsx
└── page.data.ts
```
In the `routes/user/page.data.ts` file, you can export a Data Loader function:
```ts title="routes/user/page.data.ts"
export type ProfileData = {
/* some types */
};
export const loader = async (): Promise => {
const res = await fetch('https://api/user/profile');
return await res.json();
};
```
In the route component, you can use the `useLoaderData` function to fetch data:
```ts title="routes/user/page.tsx"
import { useLoaderData } from '@modern-js/runtime/router';
import type { ProfileData } from './page.data.ts';
export default function UserPage() {
const profileData = useLoaderData() as ProfileData;
return
{profileData}
;
}
```
:::caution
Route components and `.data` files share types. Use `import type` to avoid unexpected side effects.
:::
In a CSR environment, the `loader` function executes on the browser side and can use browser APIs.
In an SSR environment, the `loader` function only executes on the server side for initial page loads and when navigating. Here it can call any Node.js APIs, and any dependencies or code used won't be included in the client-side bundle.
When navigating on the client side, based on [conventional routing](/guides/basic-features/routes/routes.md), Modern.js supports parallel execution (requests) of all `loader` functions. For example, when visiting `/user/profile`, the `loader` functions under `/user` and `/user/profile` will execute in parallel, solving the request-render waterfall issue and significantly improving page performance.
:::tip
The `loader` is responsible for data fetching, with route parameters and request information provided as input. Generally, there's no need to access browser APIs. It's recommended to keep it environment-agnostic for future SSR compatibility.
:::
## `loader` Function
The `loader` function has two parameters used for getting route parameters and request information.
### params
`params` is the dynamic route segments when the route is a [dynamic route](/guides/basic-features/routes/routes.md#dynamic-routes), which passed as parameters to the `loader` function:
```tsx title="routes/user/[id]/page.data.ts"
import { LoaderFunctionArgs } from '@modern-js/runtime/router';
// When visiting /user/123, the function parameter is `{ params: { id: '123' } }`
export const loader = async ({ params }: LoaderFunctionArgs) => {
const { id } = params;
const res = await fetch(`https://api/user/${id}`);
return res.json();
};
```
### request
`request` is an instance of [Fetch Request](https://developer.mozilla.org/en-US/docs/Web/API/Request). A common use case is to get query parameters from `request`:
```tsx
import { LoaderFunctionArgs } from '@modern-js/runtime/router';
export const loader = async ({ request }: LoaderFunctionArgs) => {
const url = new URL(request.url);
const userId = url.searchParams.get('id');
return queryUser(userId);
};
```
### Return Value
The return value of the `loader` function **must be one of two data structures**: a serializable data object or an instance of [Fetch Response](https://developer.mozilla.org/en-US/docs/Web/API/Response):
```tsx
const loader = async (): Promise => {
return {
message: 'hello world',
};
};
export default loader;
```
By default, the `loader` response's `Content-type` is `application/json`, and its `status` is 200. You can customize the `Response` to change these:
```tsx
const loader = async (): Promise => {
const data = { message: 'hello world' };
return new Response(JSON.stringify(data), {
status: 200,
headers: {
'Content-Type': 'application/json; utf-8',
},
});
};
```
## Using Data Loader in Different Environments
The `loader` function may run on the server or client. When it runs on the server, it's called a Server Loader; when it runs on the client, it's called a Client Loader.
In CSR applications, the `loader` function runs on the client, hence it is a Client Loader by default.
In SSR applications, the `loader` function runs only on the server, hence it is a Server Loader by default. During SSR rendering, Modern.js will directly call the `loader` function on the server side. When navigating on the client side, Modern.js sends an HTTP request to the SSR service, also triggering the `loader` function on the server side.
:::note
Having the `loader` function run only on the server in SSR applications brings several benefits:
- **Simplifies usage**: Guarantees consistent data-fetching methods in SSR applications, so developers don't have to distinguish between client and server code.
- **Reduces client bundle size**: Moves logic code and dependencies from the client to the server.
- **Improves maintainability**: Less direct influence of data logic on front-end UI and avoids issues of accidentally including server dependencies in the client bundle or vice versa.
:::
We recommend using the `fetch` API in `loader` functions to make requests. Modern.js provides a default polyfill for the `fetch` API, allowing it to be used on the server side. This means you can fetch data in a consistent manner whether in CSR or SSR:
```tsx
export async function loader() {
const res = await fetch('URL_ADDRESS');
const data = await res.json();
return {
message: data.message,
};
}
```
## Error Handling
### Basic Usage
In a `loader` function, you can handle errors by using `throw error` or `throw response`. When an error is thrown in the `loader` function, Modern.js will stop executing the remaining code in the current `loader` and switch the front-end UI to the defined [`ErrorBoundary`](/guides/basic-features/routes/routes.md#error-handling) component:
```tsx
// routes/user/profile/page.data.ts
export async function loader() {
const res = await fetch('https://api/user/profile');
if (!res.ok) {
throw res;
}
return res.json();
}
// routes/user/profile/error.tsx
import { useRouteError } from '@modern-js/runtime/router';
const ErrorBoundary = () => {
const error = useRouteError() as Response;
return (
{error.status}
{error.statusText}
);
};
export default ErrorBoundary;
```
### Modify HTTP Code
In SSR projects, you can control the page status code by throwing a response in the `loader` function and display the corresponding UI.
In the following example, the page's status code will match this `response`, and the page will display the `ErrorBoundary` UI:
```ts
// routes/user/profile/page.data.ts
export async function loader() {
const user = await fetchUser();
if (!user) {
throw new Response('The user was not found', { status: 404 });
}
return user;
}
// routes/error.tsx
import { useRouteError } from '@modern-js/runtime/router';
const ErrorBoundary = () => {
const error = useRouteError() as { data: string };
return
{error.data}
;
};
export default ErrorBoundary;
```
:::tip
Both `throw` and `return` Response can modify the status code. The difference is that `throw` will enter the `ErrorBoundary`, while `return` will not.
:::
## Accessing Data from Upper Components
In many scenarios, child components need to access data from the upper component's `loader`. You can use the `useRouteLoaderData` function to easily get data from the upper component:
```tsx
// routes/user/profile/page.tsx
import { useRouteLoaderData } from '@modern-js/runtime/router';
export function UserLayout() {
// Get data returned by the `loader` in routes/user/layout.data.ts
const data = useRouteLoaderData('user/layout');
return (
{data.name}
{data.age}
);
}
```
`useRouteLoaderData` accepts a parameter `routeId`. In conventional routing, Modern.js automatically generates the `routeId`, which is the path of the corresponding component relative to `src/routes`. For example, in the example above, if a child component wants to get data returned by the loader in `routes/user/layout.tsx`, the `routeId` value is `user/layout`.
In a multi-entry scenario, the `routeId` value needs to include the corresponding entry name, which is typically the directory name if not explicitly specified. For example, with the following directory structure:
```bash
.
└── src
├── entry1
│ └── routes
│ └── layout.tsx
└── entry2
└── routes
└── layout.tsx
```
To get data returned by the loader in `entry1/routes/layout.tsx`, the `routeId` value would be `entry1_layout`.
## Loading UI (Experimental)
:::info Experimental
This feature is currently experimental, and its API may change in the future.
:::
Create `user/layout.data.ts` and add the following code:
```ts title="routes/user/layout.data.ts"
import { defer } from '@modern-js/runtime/router';
export const loader = () =>
defer({
userInfo: new Promise(resolve => {
setTimeout(() => {
resolve({
age: 1,
name: 'user layout',
});
}, 1000);
}),
});
```
Add the following code in `user/layout.tsx`:
```tsx title="routes/user/layout.tsx"
import { Await, defer, useLoaderData, Outlet } from '@modern-js/runtime/router';
export default function UserLayout() {
const { userInfo } = useLoaderData() as { userInfo: Promise };
return (
Loading...}>
(
{userInfo.name}{userInfo.age}
)}
>
);
}
```
:::tip
For more details on ``, refer to the [Await](https://reactrouter.com/en/main/components/await) documentation. For more details on `defer`, refer to the [defer](https://reactrouter.com/en/main/guides/deferred) documentation.
:::
## Data Caching
During route navigation, Modern.js will only load data for the parts of the route that change. For example, if the current route is `a/b`, and the Data Loader for the `a` path has already executed, then when transitioning from `/a/b` to `/a/c`, the Data Loader for the `a` path will not re-execute, but the Data Loader for the `c` path will execute and fetch the data.
This default optimization strategy avoids redundant data requests. However, you might wonder how to update the data for the `a` path's Data Loader?
In Modern.js, the Data Loader for a specific path will reload in the following scenarios:
1. After triggering a [Data Action](/guides/basic-features/data/data-write.md)
2. When URL parameters change
3. When the user clicks a link that matches the current page URL
4. When the route component defines a [`shouldRevalidate`](#/shouldrevalidate) function that returns `true`
:::tip
If you define a [`shouldRevalidate`](#/shouldrevalidate) function for a route, this function will be checked first to determine whether data reloads.
:::
### `shouldRevalidate`
:::warning
Currently, `shouldRevalidate` only takes effect in CSR and Streaming SSR.
:::
In route components (`layout.tsx`, `page.tsx`, `$.tsx`), you can export a `shouldRevalidate` function. This function is triggered on each route change in the project and can control which route data to reload. If this function returns `true`, Modern.js will reload the corresponding route data.
```ts title="routes/user/layout.tsx"
import type { ShouldRevalidateFunction } from '@modern-js/runtime/router';
export const shouldRevalidate: ShouldRevalidateFunction = ({
actionResult,
currentParams,
currentUrl,
defaultShouldRevalidate,
formAction,
formData,
formEncType,
formMethod,
nextParams,
nextUrl,
}) => {
return true;
};
```
:::tip
For more details on the `shouldRevalidate` function, refer to the [react-router](https://reactrouter.com/start/data/route-object#shouldrevalidate) documentation.
:::
## Incorrect Usages
1. The `loader` can only return serializable data. In an SSR environment, the return value of the `loader` function will be serialized as a JSON string and then deserialized as an object on the client side. Therefore, the `loader` function should not return non-serializable data such as functions.
:::warning
This limitation currently does not exist in CSR, but we strongly recommend adhering to it, as future versions may enforce this restriction in CSR as well.
:::
```ts
// This won't work!
export default () => {
return {
user: {},
method: () => {},
};
};
```
2. Modern.js will call the `loader` function for you, and you should not call it yourself:
```ts
// This won't work!
export const loader = async () => {
const res = fetch('https://api/user/profile');
return res.json();
};
import { loader } from './page.data.ts';
export default function RouteComp() {
const data = loader();
}
```
3. Do not import `loader` files from route components, and do not import variables from route components into `loader` files. If you need to share types, use `import type`.
```ts
// Not allowed
// routes/layout.tsx
import { useLoaderData } from '@modern-js/runtime/router';
import { ProfileData } from './page.data.ts'; // should use "import type" instead
export const fetch = wrapFetch(fetch);
export default function UserPage() {
const profileData = useLoaderData() as ProfileData;
return
{profileData}
;
}
// routes/layout.data.ts
import { fetch } from './layout.tsx'; // should not be imported from the route component
export type ProfileData = {
/* some types */
};
export const loader = async (): Promise => {
const res = await fetch('https://api/user/profile');
return await res.json();
};
```
4. When running on the server, `loader` functions are packaged into a single bundle. Therefore, we do not recommend using `__filename` and `__dirname` in server code.
## Frequently Asked Questions
1. What is the relationship between `loader` and BFF functions?
In CSR projects, the `loader` executes on the client side and can directly call BFF functions to make API requests.
In SSR projects, each `loader` is also a server-side API. We recommend using `loader` instead of BFF functions with HTTP Method GET to avoid an extra layer of forwarding and execution.
---
url: /guides/basic-features/data/data-write.md
---
# Data Writing
In the [Data Fetching](/guides/basic-features/data/data-fetch.md) section, we introduced how Modern.js fetches data. This might bring up two questions:
1. How do I update the data returned by the Data Loader?
2. How do I send new data to the server?
In Modern.js, you can use Data Action to address these scenarios.
## What is Data Action
Modern.js recommends managing routes using [conventional routing](/guides/basic-features/routes/routes.md). Each route component (`layout.ts`, `page.ts`, or `$.tsx`) can have a same-named `.data` file. These files can export an `action` function, known as Data Action, which developers can call at an appropriate time:
```bash
.
└── routes
└── user
├── layout.tsx
└── layout.data.ts
```
You can export a Data Action function in the `routes/user/layout.data.ts` file:
```ts title="routes/user/layout.data.ts"
import type { ActionFunction } from '@modern-js/runtime/router;
export const action: ActionFunction = ({ request }) => {
const newUser = await request.json();
const name = newUser.name;
return updateUserProfile(name);
}
```
In the route component, you can use `useFetcher` to get the corresponding `submit` function, which executes and triggers Data Action:
```tsx title="routes/user/layout.tsx"
import {
useFetcher,
useLoaderData,
useParams,
Outlet
} from '@modern-js/runtime/router';
export default () => {
const userInfo = useLoaderData();
const { submit } = useFetcher();
const editUser = () => {
const newUser = {
name: 'Modern.js'
}
return submit(newUser, {
method: 'post',
encType: 'application/json',
})
}
return (
{userInfo}
)
}
```
After executing `submit`, the defined `action` function will be triggered. You can get the submitted data from the [parameters](/guides/basic-features/data/data-write.md#parameters) in the `action` function and ultimately send the data to the server.
Once the `action` function executes, Modern.js will automatically run the `loader` function code to update the data and view accordingly.
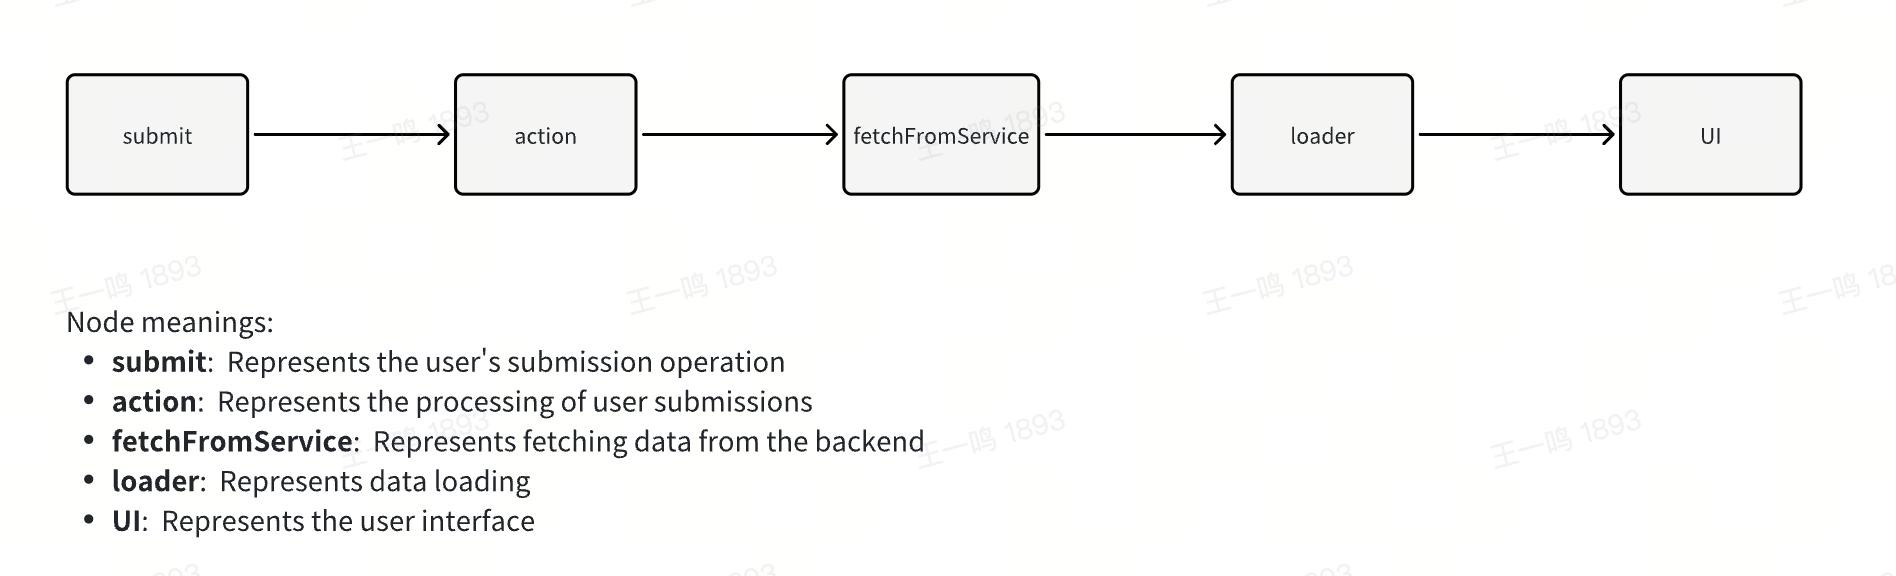
## `action` Function
Similar to the `loader` function, the `action` function takes two parameters: `params` and `request`.
### params
`params` is the dynamic route segments when the route is a [dynamic route](/guides/basic-features/routes/routes.md#dynamic-routes), which are passed as parameters to the `action` function:
```tsx title="routes/user/[id]/page.data.ts"
import { ActionFunctionArgs } from '@modern-js/runtime/router;
// When visiting /user/123, the function parameter is `{ params: { id: '123' } }`
export const action = async ({ params }: ActionFunctionArgs) => {
const { id } = params;
const res = await fetch(`https://api/user/${id}`);
return res.json();
};
```
### request
`request` is an instance of [Fetch Request](https://developer.mozilla.org/en-US/docs/Web/API/Request).
Using `request`, you can retrieve data submitted from the client in the action function, such as `request.json()`, `request.formData()`, `request.json()`, etc. Refer to [Data Types](#data-types) for which API to use.
```tsx title="routes/user/[id]/page.data.ts"
import { ActionFunctionArgs } from '@modern-js/runtime/router';
export const action = async ({ request }: ActionFunctionArgs) => {
const newUser = await request.json();
return updateUser(newUser);
};
```
### Return Value
The return value of the `action` function can be any serializable content or a [Fetch Response](https://developer.mozilla.org/en-US/docs/Web/API/Response) instance. You can access the content via [`useActionData`](https://reactrouter.com/en/main/hooks/use-action-data).
## useSubmit and useFetcher
### Difference
You can call Data Action using [`useSubmit`](https://reactrouter.com/en/main/hooks/use-submit) or [`useFetcher`](https://reactrouter.com/en/main/hooks/use-fetcher). The difference is that `useSubmit` triggers browser navigation, while `useFetcher` does not.
useSubmit:
```ts
const submit = useSubmit();
submit(null, { method: "post", action: "/logout" });
```
useFetcher:
```ts
const { submit } = useFetcher();
submit(null, { method: "post", action: "/logout" });
```
The `submit` function takes two parameters. The first parameter is the `formData` passed to the server. The second parameter is an optional object where:
- `method` corresponds to the form submission method. In most data writing scenarios, you can set the `method` to `post`.
- `action` specifies the route component to trigger the Data Action. If not provided, it defaults to the current route component's action. For example, executing submit in `user/page.tsx` or its sub-components will trigger the action defined in `user/page.data.ts`.
:::info
More information about the API can be found in the relevant documentation: [`useSubmit`](https://reactrouter.com/en/main/hooks/use-submit), [`useFetcher`](https://reactrouter.com/en/main/hooks/use-fetcher).
:::
### Data Types
The first parameter of the `submit` function can accept different types of values.
For example, `FormData`:
```ts
let formData = new FormData();
formData.append("cheese", "gouda");
submit(formData);
// In the action, you can get the data by request.json
```
or `URLSearchParams`:
```ts
let searchParams = new URLSearchParams();
searchParams.append("cheese", "gouda");
submit(searchParams);
// In the action, you can get the data by request.json
```
or any value that the `URLSearchParams` constructor accepts:
```ts
submit("cheese=gouda&toasted=yes");
submit([
["cheese", "gouda"],
["toasted", "yes"],
]);
// In the action, you can get the data by request.json
```
By default, if the first parameter of the `submit` function is an object, the corresponding data will be encoded as `formData`:
```ts
submit(
{ key: "value" },
{
method: "post",
encType: "application/x-www-form-urlencoded",
}
);
// In the action, you can get the data by request.formData
```
You can also specify the encoding type via the second parameter:
```tsx
submit(
{ key: "value" },
{ method: "post", encType: "application/json" }
);
submit('{"key":"value"}', {
method: "post",
encType: "application/json",
});
// In the action, you can get the data by request.json
```
or submit plain text:
```ts
submit("value", { method: "post", encType: "text/plain" });
// In the action, you can get the data by request.text
```
## Why Data Action?
Modern.js provides Data Action primarily to keep the UI and server state in sync, reducing the burden of state management. Traditional state management methods maintain state separately on the client and remote server:
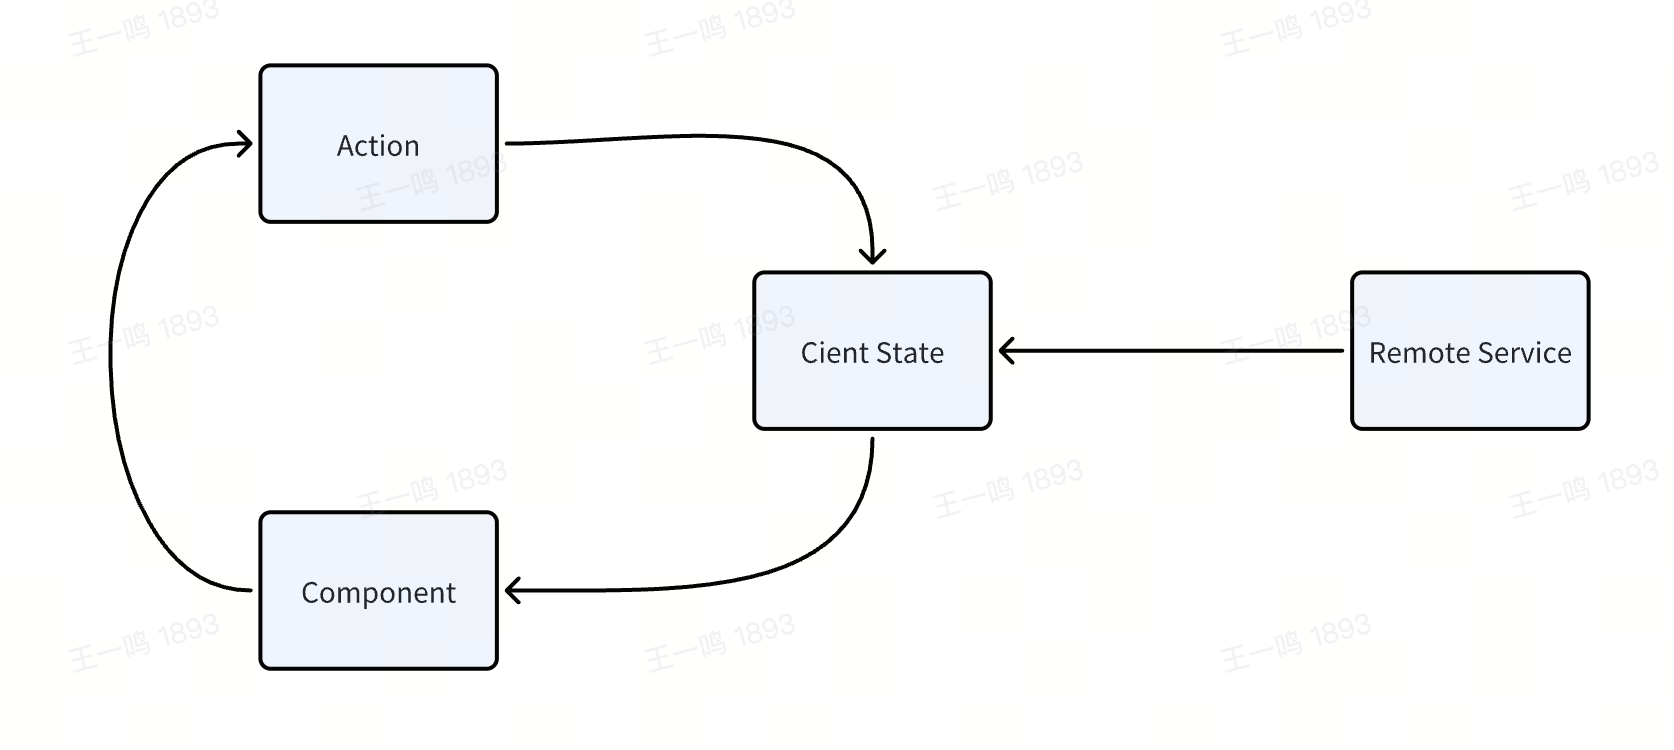
In Modern.js, we aim to help developers automatically synchronize client and server state using Loader and Action:
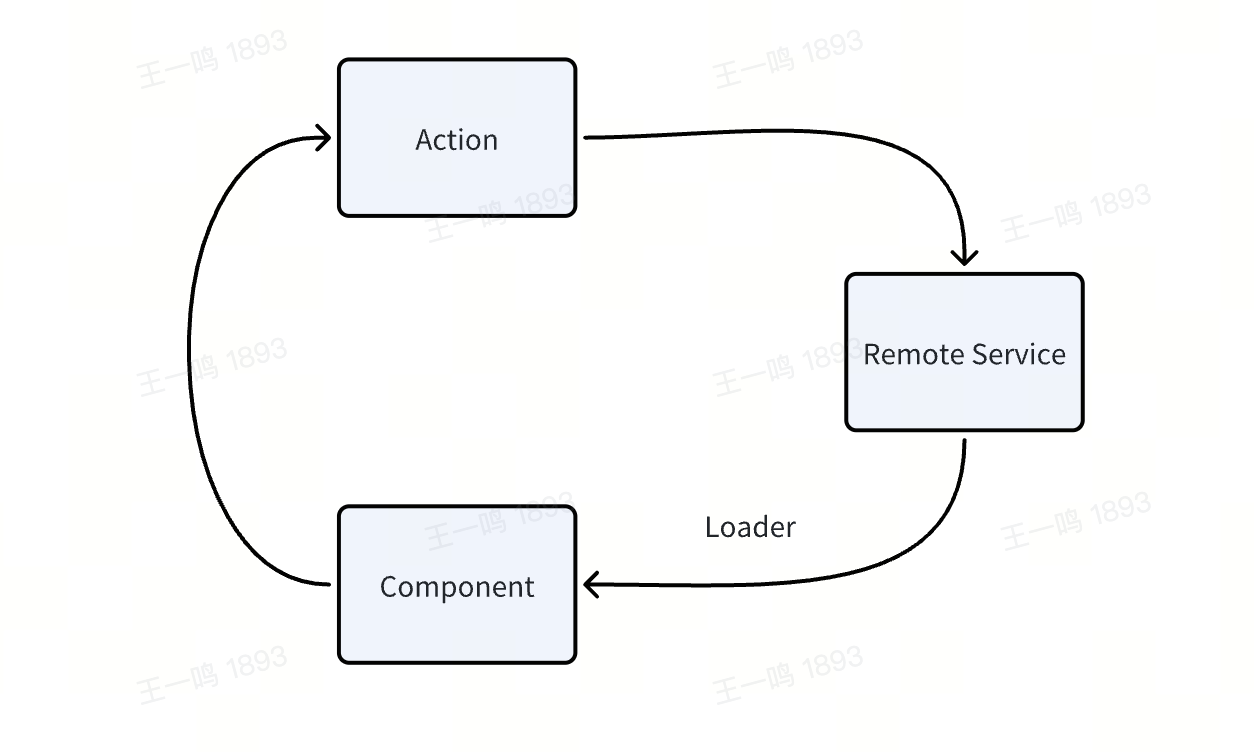
If the shared data in your project mainly comes from the server, you don't need to introduce a client-side state management library. Use Data Loader to request data and share it in sub-components via [`useRouteLoaderData`](/guides/basic-features/data/data-fetch.md). Use Data Action to modify and synchronize the server's state.
## CSR and SSR
Similar to Data Loader, in SSR projects, Data Action is executed on the server (the framework automatically sends requests to trigger Data Action), while in CSR projects, Data Action is executed on the client.
---
url: /guides/basic-features/debug/mock.md
---
# Data Mocking
Modern.js allows you to easily generate mock data so that the front-end can develop independently without depending on the back-end API.
## Enabling Mock
By convention, when there is an `index.ts` in the `config/mock/` directory, mock data will be automatically enabled:
```bash
.
├── config
│ └── mock
│ └── index.ts
├── src
│ └── App.tsx
└── modern.config.ts
```
## Writing Mock Files
The `config/mock/index.ts` file only needs to export an object containing all Mock APIs. The properties of the object are composed of the request configuration `method` and `url`, and the corresponding property values can be `Object`, `Array`, or `Function`:
```js
export default {
/* The attribute is the concrete method and request url, and the value is object or array as the result of the request */
'GET /api/getInfo': { data: [1, 2, 3, 4] },
/* the default method is GET */
'/api/getExample': { id: 1 },
/* You can use custom functions to dynamically return data, req and res are both Node.js HTTP objects. */
'POST /api/addInfo': (req, res, next) => {
res.setHeader('Access-Control-Allow-Origin', '*');
res.end('200');
},
};
```
When you access `http://localhost:8080/api/getInfo`, the API will return JSON `{ "data": [1, 2, 3, 4] }`.
## Return Random Data
Libraries such as [Mock.js](https://github.com/nuysoft/Mock/wiki/Getting-Started) can be used in `config/mock/index.js` to generate random data. For example:
```js
const Mock = require('mockjs');
module.exports = {
'/api/getInfo': Mock.mock({
'data|1-10': [{ name: '@cname' }],
}) /* => {data: [{name: "Jack"}, {name: "Jim"}, {name: "Mary"}} */,
};
```
:::info Other Mock Libraries
- [Chancejs](https://github.com/chancejs/chancejs)
- [Mock](https://github.com/nuysoft/Mock/wiki/Getting-Started)
:::
## Delayed Response
- You can do this by using the browser's "weak connection simulation" feature.
- Delays can be set via `setTimeout`, for example:
```ts
export default {
'/api/getInfo': (req, res) => {
setTimeout(() => {
res.end('delay 2000ms');
}, 2000);
},
};
```
## Use Mock On Demand
Under the `config/mock/index.ts`, you can also export the `config` to control the Mock service.
```ts
import type { IncomingMessage } from 'node:http';
import type { ServerResponse } from 'node:http';
type MockConfig = {
enable: ((req: IncomingMessage, res: ServerResponse) => boolean) | boolean;
};
export const config = {
enable: false
}
```
Currently only the `enable` configuration is supported, which allows developers to control whether to execute mock.
:::note
After modifying `config`, there is no need to restart the service, which will take effect immediately.
:::
---
url: /guides/basic-features/debug/proxy.md
---
# Local Proxy
Modern.js provides a way to configure the development proxy in [`dev.server.proxy`](/configure/app/dev/server.md).
For example, to proxy the local interface to another address:
```ts title="modern.config.ts"
import { defineConfig } from '@modern-js/app-tools';
export default defineConfig({
dev: {
server: {
proxy: {
// http://localhost:8080/api -> https://example.com/api
// http://localhost:8080/api/foo -> https://example.com/api/foo
'/api': 'https://example.com',
},
},
},
});
```
---
url: /guides/basic-features/debug/rsdoctor.md
---
# Using Rsdoctor
Rsdoctor is a Rspack build analysis tool. In Modern.js, we recommend using Rsdoctor to diagnose and analyze the build process and build outputs.
## Install Dependencies
```sh [npm]
npm add @rsdoctor/rspack-plugin -D
```
```sh [yarn]
yarn add @rsdoctor/rspack-plugin -D
```
```sh [pnpm]
pnpm add @rsdoctor/rspack-plugin -D
```
```sh [bun]
bun add @rsdoctor/rspack-plugin -D
```
```sh [deno]
deno add npm:@rsdoctor/rspack-plugin -D
```
## Register Plugin
In `modern.config.ts`, you can register the Rspack plugin via `tools.bundlerChain`. Refer to the example below:
```ts title="modern.config.ts"
import { RsdoctorRspackPlugin } from '@rsdoctor/rspack-plugin';
export default {
// ...
tools: {
bundlerChain(chain) {
// Only register the plugin when RSDOCTOR is true, as the plugin will increase build time.
if (process.env.RSDOCTOR) {
chain.plugin('rsdoctor').use(RsdoctorRspackPlugin, [
{
// Plugin options
},
]);
}
},
},
};
```
## Execute Build
You can execute the build command within your project. After the build is complete, Rsdoctor will automatically open the analysis page for the build.
```bash
RSDOCTOR=true npm run build
```
## Related Documentation
For more information, please refer to the [Rsdoctor Website](https://rsdoctor.rs/).
---
url: /guides/basic-features/debug/using-storybook.md
---
# Using Storybook
[Storybook](https://storybook.js.org/) is a tool specifically designed for component debugging. It provides:
- A rich variety of debugging capabilities
- Integration with some testing tools
- Reusable documentation content
- Sharing capabilities
- Workflow automation
## Principle
Rsbuild provides [Storybook Rsbuild](https://storybook.rsbuild.rs/index.html), which allows any Rsbuild project to use this tool for building Storybook.
Modern.js implements `storybook-addon-modernjs` based on this tool. This plugin loads the Modern.js configuration file and converts it into a configuration usable by **Storybook Rsbuild**.
:::info
This document only provides the simplest usage. For more information, please refer to [Storybook Rsbuild Modern.js Integration](https://storybook.rsbuild.rs/guide/integrations/modernjs.html).
:::
## Installation
```sh [npm]
npm install @rsbuild/core storybook-builder-rsbuild storybook-addon-modernjs -D
```
```sh [yarn]
yarn add @rsbuild/core storybook-builder-rsbuild storybook-addon-modernjs -D
```
```sh [pnpm]
pnpm add @rsbuild/core storybook-builder-rsbuild storybook-addon-modernjs -D
```
```sh [bun]
bun add @rsbuild/core storybook-builder-rsbuild storybook-addon-modernjs -D
```
```sh [deno]
deno add npm:@rsbuild/core npm:storybook-builder-rsbuild npm:storybook-addon-modernjs -D
```
You need to install `@rsbuild/core` in your project, otherwise the plugin may not work properly.
## Configure `.storybook/main.ts`
```ts
import type { StorybookConfig } from 'storybook-react-rsbuild'
const config: StorybookConfig = {
stories: ['../src/**/*.stories.@(js|jsx|mjs|ts|tsx)'],
addons: ['storybook-addon-modernjs'],
framework: 'storybook-react-rsbuild',
}
export default config
```
## BFF Integrated Calls in Storybook
When you want to call BFF APIs directly in Storybook components (for example `/api/**`), start the BFF service and configure a proxy in Storybook's dev server to avoid CORS issues.
### 1. Add scripts
Add the following scripts to `package.json` to start the BFF server and Storybook separately. The `BFF_PROXY` environment variable ensures the proxy is only enabled during Storybook build:
```json
{
"scripts": {
"dev:api": "modern dev --api-only",
"storybook": "BFF_PROXY=1 storybook dev -p 6006 --no-open",
}
}
```
### 2. Configure proxy
Add the following config in `modern.config.ts` to proxy requests to the BFF service only during Storybook build:
```ts
export default applyBaseConfig({
dev: process.env.BFF_PROXY
? {
server: {
proxy: {
'/api': 'http://localhost:8080',
},
},
}
: {},
});
```
Proxy path and port follow this logic:
- If `dev.server.proxy` is configured, use that configuration
- If not configured, the proxy path falls back to `bff.prefix`, otherwise `/api`
- If not configured, the target port falls back to `server.port`, otherwise `8080`
- The final target is `http://localhost:`
### 3. Start
```bash
pnpm dev:api
pnpm storybook
```
Now you can request the path configured in `bff.prefix`; if not configured, use `/api/**`.
## Example
You can check out the [example](https://github.com/rspack-contrib/storybook-rsbuild/tree/main/sandboxes/modernjs-react) to learn how to use Storybook in Modern.js.
---
url: /guides/basic-features/deploy.md
---
# Deploy Application
Currently, Modern.js offers two deployment way:
- You can host your application in a container that includes a Node.js environment on your own, which provides flexibility for the deployment of the application.
- You can also deploy your application through a platform. Currently, Modern.js officially supports deployment on [Netlify](https://www.netlify.com/), [Vercel](https://vercel.com/), and [Github pages](https://pages.github.com/).
:::info
Currently, Modern.js only supports running in a Node.js environment. Support for more runtime environments will be provided in the future.
:::
## Build Deployment Products
Running the `modern deploy` command will automatically produce deployment products. This process includes optimizing Bundler build products and their dependencies, detecting the current deployment platform, and automatically generating deployment products that can run on that platform.
If you want to generate and test the output locally for a specific deployment platform, you can specify the platform by setting the environment variable: `modern deploy`:
```bash
MODERNJS_DEPLOY=netlify npx modern deploy
```
:::info
When deploying on the deployment platforms officially supported by Modern.js, there is no need to specify environment variables.
:::
## Using ModernJS built-in Node.js Server
### Single Repo
By default, Modern.js outputs builds that can be run in a Node.js environment when no Modern.js-supported deployment platform is detected.
Use the following command to build the project:
```bash
npx modern deploy
```
When running the `modern deploy` command, Modern.js will generate runnable products and output the following content in terminal:
```bash
Static directory: `.output/static`
You can preview this build by `node .output/index`
```
At this point, you can run the entire server by `node .output/index`, and the static resources required for the page are in the `.output/static` directory. You can upload these static resources to a CDN yourself:
:::info
By default, when running Modern.js Server, it listens on port 8080. If you want to change the listening port, you can specify the `PORT` environment variable:
```
PORT=3000 node .output/index
```
:::
### Monorepo
For Monorepo projects, in addition to building the current project, it is also necessary to build other sub-projects in the repository that the current project depends on.
Assume that the name in the `package.json` of the current project is `app`. Taking pnpm as an example of a monorepo management tool, you can add the following command to the `package.json` of the current project to build products for the current project:
```json title="app/package.json"
{
"scripts": {
"build:packages": "pnpm --filter 'app^...' run build",
"deploy": "pnpm run build:packages && modern deploy"
}
}
```
If you use Rush as your Monorepo management tool, you can add the following commands to your `package.json`:
```json
{
"scripts": {
"build:packages": "rush rebuild --to-except app",
"deploy": "rushx build:packages && modern deploy"
}
}
```
After the build is completed, Modern.js will generate all dependencies in the `.output/node_modules` directory of the project. Similarly, you can run the Modern.js server using `node .output/index`.
## Netlify
Netlify is a popular Web development platform designed for building, deploying, and maintaining modern web projects. Deploying on Netlify mainly requires configuring the `netlify.toml` file.
Depending on the complexity of your project, you can configure it incrementally by this doc.
### Pure Front-end Project
Add the `netlify.toml` file to the root directory of the current project:
```bash
.
├── src
├── modern.config.ts
├── netlify.toml
└── package.json
```
Add the following content to `netlify.toml`:
```toml
[build]
publish = "dist"
command = "modern deploy"
```
:::info
You can refer to the [deployment project example](https://github.com/web-infra-dev/modern-js-examples/tree/main/examples/modern-js-deploy-csr).
:::
Now, add a project to the Netlify platform and deploy it!
### Full Stack Project
Full-stack projects refer to projects that use Custom Web Server, SSR or BFF. These projects need to be deployed on **Netlify Functions**. Based on the `netlify.toml` file mentioned above, add the following configuration:
```toml title="netlify.toml"
[build]
publish = "dist"
command = "modern deploy"
[functions]
directory = ".netlify/functions"
node_bundler = "none"
included_files = [".netlify/functions/**"]
```
:::info
1. Currently, Modern.js does not support deployment on Netlify Edge Functions. We will support it in future versions.
2. You can refer to the [deployment project example](https://github.com/web-infra-dev/modern-js-examples/tree/main/examples/modern-js-deploy-ssr).
:::
### Monorepo
:::info
The following guide is mainly for full-stack projects, for pure CSR projects, just follow [Pure Frontend Project](#pure-front-end-project-1) to deploy.
:::
For Monorepo projects, in addition to building our current project, you also need to build other sub-projects in the repository that the current project depends on.
We take a pnpm Monorepo repository as an example and deploy the Monorepo project on Netlify.
Assuming the directory structure of the Monorepo repository is as follows:
```
.
├── packages
│ ├── app
│ └── app-dep1
├── package.json
├── pnpm-lock.yaml
└── pnpm-workspace.yaml
```
You need to configure Base directory on the netlify platform as `packages/app`:
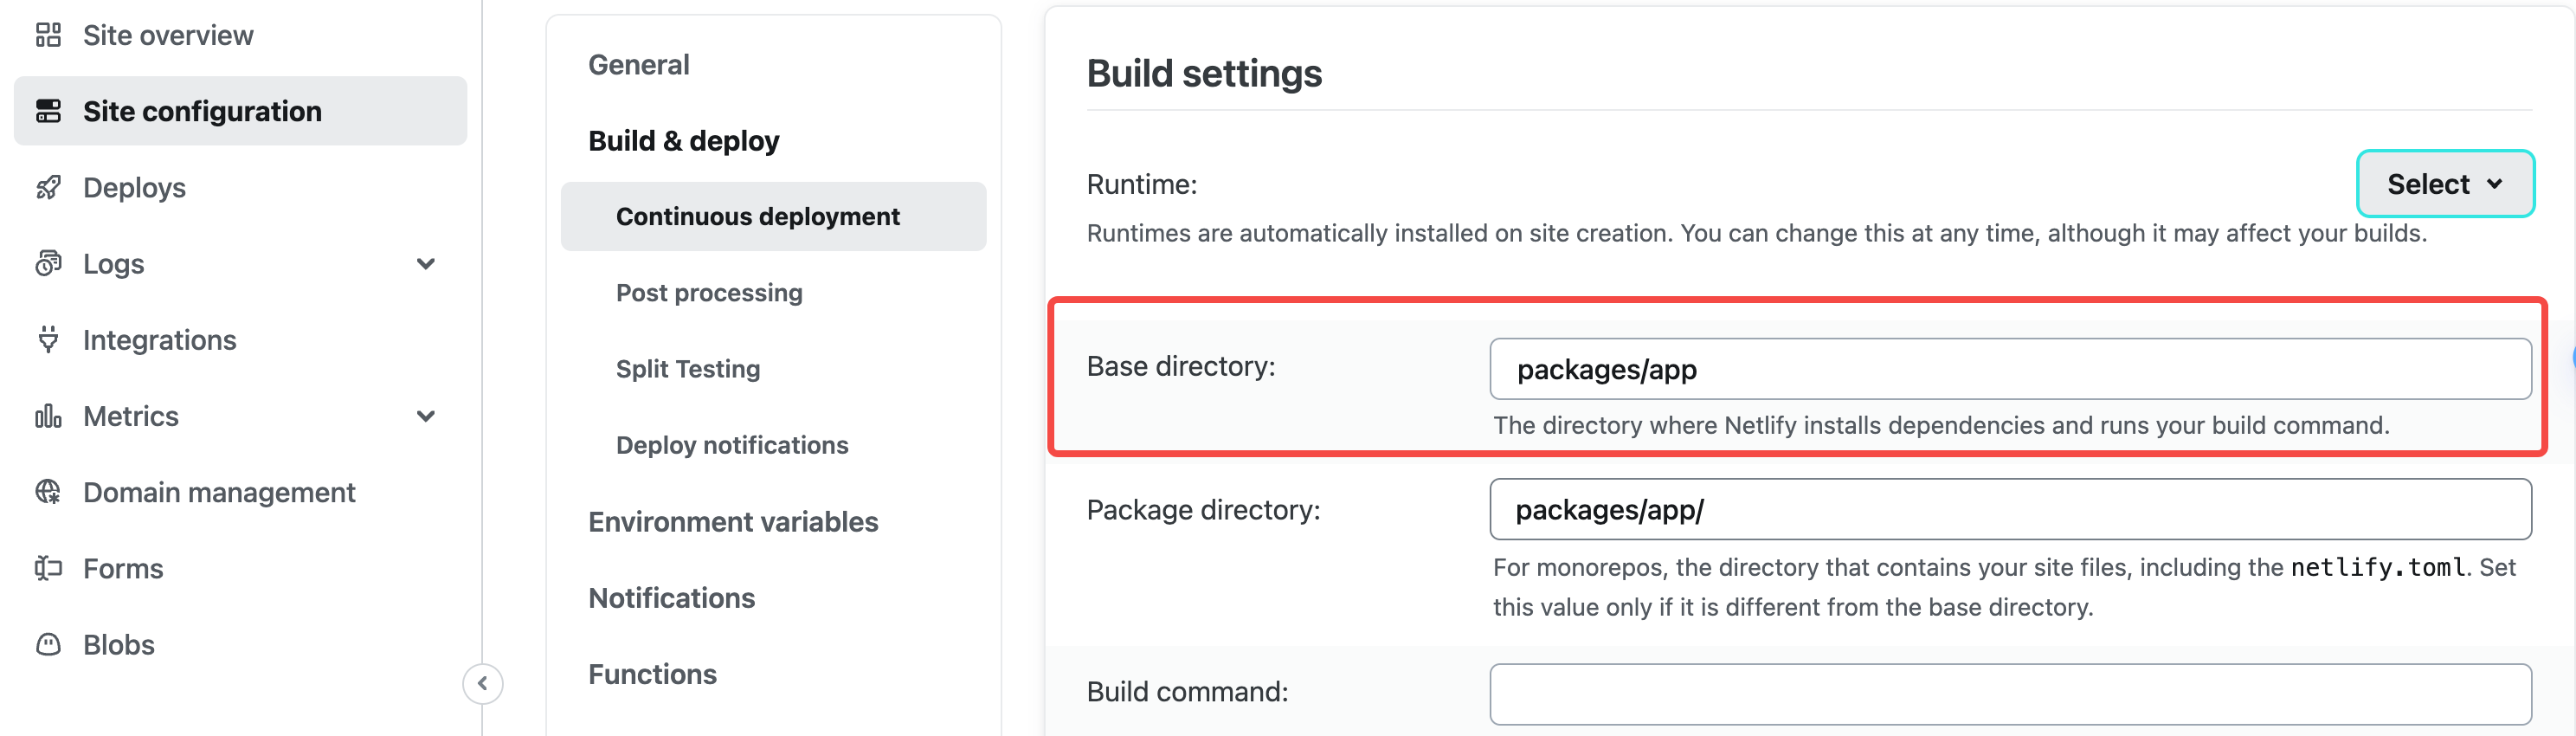
Add the following script in `packages/app/package.json`, before executing the deployment command of the `app` repository, first execute the build of other repositories in the workspace:
```json
{
"scripts": {
"build:packages": "pnpm --filter 'app^...' run build",
"deploy": "pnpm run build:packages && modern deploy"
}
}
```
Configure the build command in `netlify.toml`:
```toml
[build]
publish = "dist"
command = "npm run deploy"
[functions]
directory = ".netlify/functions"
node_bundler = "none"
included_files = [".netlify/functions/**"]
```
Just submit your code and deploy it using the Netlify platform.
## Vercel
Vercel is a deployment platform for modern web applications that provides a rich set of features to support deploying static websites, server-side rendered applications, and more. To deploy on Vercel, you usually need to configure the `vercel.json` file, which you can configure incrementally depending on the complexity of your project.
### Pure Front-end Project
Add the `vercel.json` file to the root directory of the current project:
```bash
./
├── src
├── modern.config.ts
├── vercel.json
└── package.json
```
Add the following content to `vercel.json`:
```json title="vercel.json"
{
"buildCommand": "modern deploy",
"outputDirectory": ".vercel/output"
}
```
Commit your project to git, select Framework Preset as `Other` on the Vercel platform and deploy.
:::info
You can refer to the [deployment project examples](https://github.com/web-infra-dev/modern-js-examples/tree/main/examples/modern-js-deploy-csr).
:::
### Full Stack Project
Full-stack projects refer to projects that use Custom Web Server, SSR or BFF. These projects need to be deployed on **Vercel Functions**.
In addition to configuring `vercel.json` in the same way as a [pure front-end project](#pure-front-end-project), there are two points to note for full-stack projects:
1. Currently, Modern.js does not support deploying BFF projects on the Vercel platform. We will support it in future versions.
2. The Node.js version for function execution is determined by the project configuration on the Vercel platform.
:::info
You can refer to the [deployment project examples](https://github.com/web-infra-dev/modern-js-examples/tree/main/examples/modern-js-deploy-ssr).
:::
### Monorepo
:::info
The following guide is mainly for full-stack projects, for pure CSR projects, just follow [Pure Frontend Project](#pure-front-end-project-1) to deploy.
:::
For Monorepo projects, in addition to building our current project, you also need to build other sub-projects in the repository that the current project depends on.
We take a pnpm Monorepo repository as an example and deploy the Monorepo project on Vercel.
Assuming the directory structure of the Monorepo repository is as follows:
```
.
├── packages
│ ├── app
│ └── app-dep1
├── package.json
├── pnpm-lock.yaml
└── pnpm-workspace.yaml
```
First, you need to configure the **Root Directory** as `packages/app` on the Vercel platform:
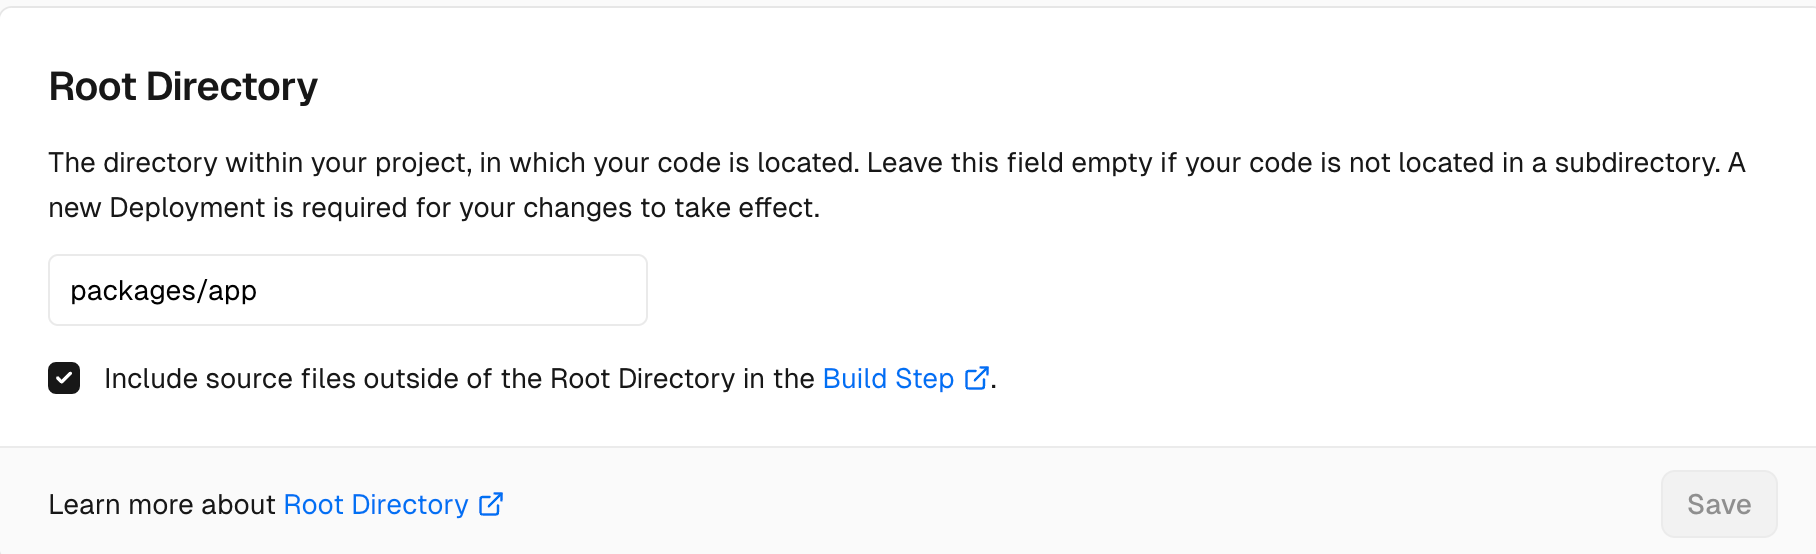
Specify Node.js runtime as `20.x`:
```json title="package.json"
"engines": {
"node": "20.x"
}
```
Add the following script to `packages/app/package.json` to run `build` command of the other repositories in the workspace before run the `deploy` command for the `app` repository:
```json
{
"scripts": {
"build:packages": "pnpm --filter 'app^...' run build",
"deploy": "pnpm run build:packages && modern deploy"
}
}
```
Add the following content to the `packages/app/vercel.json` file:
```json title="vercel.json"
{
"buildCommand": "npm run deploy",
"outputDirectory": ".vercel/output"
}
```
Just submit your code and deploy it using the Vercel platform.
## Github Pages
If you're creating a GitHub Pages for a repository without a custom domain, the page URL will follow this format: `http://.github.io/`. Therefore, you need to add the following configuration in `modern.config.ts`:
```ts
import { defineConfig } from '@modern-js/app-tools';
export default defineConfig({
//...
server: {
baseUrl: '/',
},
output: {
assetPrefix: '/',
},
});
```
GitHub Pages supports two deployment ways: branch deployment or GitHub Actions deployment.
For branch deployment, follow these steps:
1. In the GitHub repository, navigate to Settings > Pages > Source > Deploy from a branch
2. Install the `gh-pages` as devDependency
3. Add the following script to `package.json`
```
"scripts": {
//...
"deploy:gh-pages": "MODERNJS_DEPLOY=ghPages modern deploy && gh-pages -d .output"
}
```
4. Run `npm run deploy:gh-pages`
:::info
1. Running `MODERNJS_DEPLOY=ghPages modern deploy` will build the production output for GitHub in the .output directory.
2. You can refer to the [project](https://github.com/web-infra-dev/modern-js-examples/tree/main/examples/modern-js-deploy-csr)
:::
For GitHub Actions deployment, select Settings > Pages > Source > GitHub Actions, and add a workflow file to the project. You can refer to the [example](https://github.com/web-infra-dev/modern-js-examples/tree/main/examples/modern-js-deploy-csr).
## Using Self-Built Node.js Server
Typically, we recommend using the built-in Node.js server of Modern.js to deploy applications. It supports hosting both pure frontend and full-stack projects, ensuring consistent performance in both development and production environments.
If your project is purely frontend, you can also deploy the application to the self-built Node.js server. Below is an example of using a Koa server to host the output of a pure frontend project.
For instance, if you have a Node.js server repository, you can copy the output of the project into this repository. The structure would look like this:
```bash
.
├── .output
│ ├── html
│ └── static
└── server.js
```
In `server.js`, assume you have the following code:
```ts title="server.js"
import Koa from 'koa';
const app = new Koa();
app.use(async (ctx, next) => {
ctx.body = 'Hello Modern.js';
});
app.listen(3000);
```
Now, you can add some code to include the logic for accessing static resources and HTML files in `server.js`. We need to use the `mime-types` package to get the MIME types of static resources, so let's install the dependency first:
```sh [npm]
npm add mime-types
```
```sh [yarn]
yarn add mime-types
```
```sh [pnpm]
pnpm add mime-types
```
```sh [bun]
bun add mime-types
```
```sh [deno]
deno add npm:mime-types
```
```ts title="server.js"
const Koa = require('koa');
const fs = require('fs');
const path = require('path');
const mime = require('mime-types');
const app = new Koa();
app.use(async (ctx, next) => {
if (ctx.path.startsWith('/static')) {
ctx.type = mime.lookup(ctx.path);
ctx.body = fs.createReadStream(
path.resolve(__dirname, `.output${ctx.path}`),
);
} else if (ctx.path === '/') {
ctx.type = 'html';
ctx.body = fs.createReadStream(
path.resolve(__dirname, '.output/html/main/index.html'),
);
}
});
app.listen(3000);
```
:::note
The above code is a basic example. Your application might have multiple entry points and require different HTML files for different paths. A custom Node.js server would also involve more complex logic.
Please note that if your project uses Modern.js conventional routing or if you have set up client-side routing with React Router, you must access HTML files through the correct `baseURL`.
In Modern.js, the default `baseURL` is `'/'`. You can configure it by modifying [`server.baseUrl`](/configure/app/server/base-url.md) in `modern.config.ts`.
:::danger
For projects with client-side routing, you can never access HTML files through the `/index.html` path.
:::
## Nginx
Nginx is a high-performance HTTP and reverse proxy server that can handle static files, reverse proxy, load balancing, and other functions. Deploying on Nginx typically requires configuring the `nginx.conf` file.
If your project is a purely front-end project, you can also deploy the application through Nginx. Here is an example of an Nginx configuration to demonstrate how to host the output of a purely front-end project.
```nginx title="nginx.conf"
# user [user] [group];
worker_processes 1;
events {
worker_connections 1024;
}
http {
include mime.types;
default_type application/octet-stream;
server {
listen 8080;
server_name localhost;
location / {
# root [projectPath]/.output/html/main;
index index.html;
try_files $uri $uri/ =404;
}
location /static {
# alias [projectPath]/.output/static;
}
}
}
```
In the above configuration, you need to replace `[projectPath]` with your project path and `[user]` and `[group]` with your current user and user group.
You can copy the above configuration into the `nginx.conf` file in the Nginx installation directory and then start the Nginx service. You can also start the configuration file in a specified path using `nginx -c`, in which case you need to ensure that the path configured in the `include` directive is correct.
---
url: /guides/basic-features/env-vars.md
---
# Environment Variables
Modern.js provides support for environment variables, including built-in environment variables and custom environment variables.
## Built-in Environment Variables
### ASSET\_PREFIX
The current path prefix of the asset, which is a read-only environment variable.
### NODE\_ENV
The current execution environment and is a **read-only** environment variable whose have different values under different execution commands:
- `production`: Default value when running `modern build` or `modern serve`.
- `development`: Default value when running `modern dev`, also the default value in other cases.
### MODERN\_ENV
Set the current execution environment manually. In addition to the values in the NODE\_ENV, custom environment names are supported here, such as `staging`, `boe`, etc.
:::tip
MODERN\_ENV priority is higher than NODE\_ENV.
:::
### MODERN\_TARGET
When using `@modern-js/runtime`, Modern.js will automatically inject `MODERN_TARGET` to distinguish between SSR and CSR environments.
You can use `process.env.MODERN_TARGET` to determine the environment and execute appropriate code.
```ts title="App.tsx"
function App() {
if (process.env.MODERN_TARGET === 'browser') {
console.log(window.innerHeight);
}
}
```
After the development build, you can see that the SSR and CSR bundles as follows:
```js title="dist/bundles/main.js"
// SSR bundles
function App() {
if (false) {
}
}
```
```js title="dist/static/main.js"
// CSR bundles
function App() {
if (true) {
console.log(window.innerHeight);
}
}
```
This can provide different outputs for different environments to ensure that the bundle size is minimized. It can also be convenient to deal with some side effects for different environments.
:::note Dead Code Elimination
In production environment, minimizers such as Terser and SWC will analyze the code and remove dead code to reduce the bundle size. This process is called "Dead Code Elimination" (DCE).
For example, the code inside the `if (false)` statement will be removed, while the code inside the `if (true)` will be preserved.
If you do not use `process.env.MODERN_TARGET` as described above, the code minimizer may not be able to analyze the dead code, resulting in an increased bundle size.
:::
## Custom Environment Variables
You can specify custom environment variables in both `shell` and `.env` files.
### Via `shell`
Add custom environment variables before the command:
```shell
REACT_APP_FOO=123 BAR=456 pnpm run dev
```
### Via `.env` file
Create a `.env` file in the project root and add custom environment variables, which are added to the Node.js process by default, for example:
```bash
REACT_APP_FOO=123
BAR=456
```
The `.env` file follows the following loading rules:
- `.env`: default.
- `.env.{ MODERN_ENV | NODE_ENV }`: Overrides `.env` for a specific environment.
When you need to use different config according to the environment, you can define environment variables in the `.env` file corresponding to the environment name, and manually set the execution environment when starting the project.
For example, when starting a project with the following command, the `.env` and `.env.staging` will load:
```shell
MODERN_ENV=staging pnpm run dev
```
## Using Environment Variables
### Convention Names
`NODE_ENV` can be used directly in front-end code. In addition, custom environment variables starting with `MODERN_` can also be used directly in code.
For Example:
```js
if (process.env.NODE_ENV === 'development') {
// do something
}
```
After executing the `pnpm run dev`, you can see the following bundle:
```js
if (true) {
// do something
}
```
In custom HTML templates, you can also use such environment variables directly. For example, in `config/html/head.html`:
```html
```
### Any Other Names
If you need to use environment variables with any other names in your code, you can configure them in [`source.globalVars`](/configure/app/source/global-vars.md). For example:
```ts title="modern.config.ts"
export default defineConfig({
source: {
globalVars: {
'process.env.VERSION': process.env.VERSION,
},
},
});
```
At this point, the `process.env.VERSION` in the code will be replaced by the value of `VERSION` in the environment variables.
:::note
`source.globalVars` also supports replacing other expressions or strings with specified values, not limited to environment variables.
:::
## Use Global Replacement
In addition to environment variables, Modern.js also supports replacing variables in code with other values or expressions, which can be used to distinguish between development environment and production environment in code.
For example, converts the expression `TWO` to `1 + 1`:
```ts
export default {
source: {
define: {
TWO: '1 + 1',
},
},
};
```
```ts
const foo = TWO;
// ⬇️ Turn into being...
const foo = 1 + 1;
```
In most cases, `source.globalVars` is already sufficient to replace variables. But the values passed in by `source.globalVars` will be serialized by JSON by default. So it cannot be replaced like `1 + 1` in the example above, at this time, we need to use [`source.define`](/configure/app/source/define.md).
---
url: /guides/basic-features/html.md
---
# HTML Template
Modern.js provides **JSX syntax** and **HTML(EJS) syntax** to customize the HTML template.
## JSX Syntax
According to Modern.js conventions, you can create a `Document.tsx` file under `src/` or the entry directory and default export a component. The rendering result of this component can be used as the HTML template of the entry.
For example, consider the following directory structure:
```bash
.
└── src
├── Document.tsx
├── entry-a
│ ├── Document.tsx
│ └── routes
├── entry-b
│ └── routes
└── modern-app-env.d.ts
```
`entry-a` will use the `Document.tsx` file under the current entry as the template. If there is no `Document.tsx` file under the current entry, like `entry-b`, it will look for the `Document.tsx` file under the root directory.
If not found, default template will be used.
:::tip
`Document.tsx` is compiled at build time by the Modern.js Document plugin using a dedicated Rspack child compiler targeting Node.js, and is rendered to a string with `renderToStaticMarkup` as the HTML template content, similar to [Static Site Generation](/guides/basic-features/render/ssg.md). The HTML template module is not part of the page bundler compilation, so React Hooks in the component will not run in the browser runtime, and non-JavaScript assets such as images cannot be resolved or imported.
:::
### HTML Components
Modern.js provides some components for rendering pages to help developers generate templates. These components can be used from `@modern-js/runtime/document`:
```tsx
import { Html, Body, Root, Head, Scripts } from '@modern-js/runtime/document';
```
- `Html`: provide the ability of native HTML Element and render necessary components that the developer did not add by default. `` and `` must exist, and other components can be assembled as needed.
- `Body`: provide the ability of native Body Element and needs to contain the `` component internally. It also supports other elements as child elements at the same time, such as adding footers.
- `Root`: the root node `` to be rendered. The default id of the root node is `id = 'root'`. You can set `props.rootId` to change the id attribute. Child components can be added and will be rendered in the HTML template. After React rendering is complete, it will be overwritten and is generally used to implement global Loading.
- `Head`: provide the ability of native Head Element and automatically fills in `` and `` components.
- `Scripts`: Used to control the placement of the `
Some Params:
entryName: main
title:
rootId: root
bottom
```
### Scripts Component Example
You can use the `` component to insert the `
```
:::info
The implementation of custom HTML fragments is to merge the fragments with the built-in template. Since the `` already exists in the default template, the title tag in the custom HTML template will not take effect. Please use [html.title](/configure/app/html/title.md) to modify the page title.
:::
### Customize the entire HTML Template
In some cases, HTML fragments may not offer enough control. Modern.js provides a fully customized way.
:::caution Note
It is generally not recommended to directly override the default HTML template, as some functional options may be lost. If it is truly necessary to customize the entire HTML template, it is recommended to modify based on the built-in template as needed.
:::
Under the `config/html/` directory, create an `index.html` file that will replace the default HTML template.
:::info
The default HTML template can be viewed in `node_modules/.modern-js/${entryName}/index.html`.
:::
### Template Parameters
The parameters used in the template can be defined by the [html.templateParameters](/configure/app/html/template-parameters.md) configuration.
### Config By Entry
The HTML fragments in the `config/html/` directory take effect for all entries in the application. If you want to customize HTML fragments by entry, you can create a directory named after the **entry name** under the `config/html/` directory, and then customize the HTML fragments in this directory.
For example, the following HTML fragments are only effective for the `entry1` entry:
```bash
.
├── config/
│ └── html/
│ └── entry1
│ ├── head.html
│ └── body.html
└── src/
├── entry1/
│ └── routes
└── entry2/
└── routes
```
---
url: /guides/basic-features/output-files.md
---
# Output Files
This chapter will introduces the directory structure of output files and how to control the output directory of different types of files.
## Default Directory Structure
The following is a basic directory for output files. By default, the compiled files will be output in the `dist` directory of current project.
```bash
dist
├── static
│ ├── css
│ │ ├── [name].[hash].css
│ │ └── [name].[hash].css.map
│ │
│ └── js
│ ├── [name].[hash].js
│ ├── [name].[hash].js.LICENSE.txt
│ └── [name].[hash].js.map
│
└── html
└── [name]
└── index.html
```
The most common output files are HTML files, JS files, and CSS files:
- HTML files: default output to the `html` directory.
- JS files: default output to `static/js` directory,
- CSS files: default output to the `static/css` directory.
In addition, JS files and CSS files sometimes generate some related files:
- License files: contains open source license, which is output to the same level directory of the JS file, and adds `.LICENSE.txt` suffix.
- Source Map files: contains the source code mappings, which is output to the same level directory of JS files and CSS files, and adds a `.map` suffix.
In the filename, `[name]` represents the entry name corresponding to this file, such as `index`, `main`. `[hash]` is the hash value generated based on the content of the file.
## Modify the Directory
Modern.js provides some configs to modify the directory or filename, you can:
- Modify the filename through [output.filename](/configure/app/output/filename.md).
- Modify the output path of through [output.distPath](/configure/app/output/dist-path.md).
- Modify the license file through [output.legalComments](/configure/app/output/legal-comments.md).
- Remove Source Map file through [output.sourceMap](/configure/app/output/source-map.md).
- Remove the folder corresponding to the HTML files through [html.outputStructure](/configure/app/html/output-structure.md).
## Static Assets
When you import static assets such as images, SVG, fonts, media, etc. in the code, they will also be output to the `dist/static` directory, and automatically assigned to the corresponding subdirectories according to the file type:
```bash
dist
└── static
├── image
│ └── foo.[hash].png
│
├── svg
│ └── bar.[hash].svg
│
├── font
│ └── baz.[hash].woff2
│
└── media
└── qux.[hash].mp4
```
You can use the [output.distPath](/configure/app/output/dist-path.md) config to uniformly input these static assets into a directory, for example, output to the `assets` directory:
```ts
export default {
output: {
distPath: {
image: 'assets',
svg: 'assets',
font: 'assets',
media: 'assets',
},
},
};
```
The above config produces the following directory structure:
```bash
dist
└── assets
├── foo.[hash].png
├── bar.[hash].svg
├── baz.[hash].woff2
└── qux.[hash].mp4
```
## Flatten the Directory
Sometimes you don't want the dist directory to have too many levels, you can set the directory to an empty string to flatten the generated directory.
See the example below:
```ts
export default {
output: {
distPath: {
js: '',
css: '',
html: '',
},
},
html: {
outputStructure: 'flat',
}
};
```
The above config produces the following directory structure:
```bash
dist
├── [name].[hash].css
├── [name].[hash].css.map
├── [name].[hash].js
├── [name].[hash].js.map
└── [name].html
```
## Not Written to Disk
By default, Modern.js will write the generated files to disk, so developers can view the file content or configure proxy rules for static assets.
In development, you can choose to keep the generated files in the Dev Server's memory to reduce the overhead of file operations.
Just set the `dev.writeToDisk` config to `false`:
```ts
export default {
dev: {
writeToDisk: false,
},
};
```
---
url: /guides/basic-features/render/before-render.md
---
# Render Preprocessing
In certain scenarios, applications need to perform preprocessing operations before rendering. Modern.js recommends using **[Runtime Plugins](/plugin/introduction.md#runtime-plugins)** to implement this type of logic.
## Defining a Runtime Plugin
```ts
import type { RuntimePlugin } from '@modern-js/runtime';
const myRuntimePlugin = (): RuntimePlugin => ({
name: 'my-runtime-plugin',
setup: api => {
api.onBeforeRender(context => {
// Logic to execute before rendering
console.log('Before rendering:', context);
});
},
});
export default myRuntimePlugin;
```
## Registering the Plugin
Register the plugin in your project's `src/modern.runtime.ts` file:
```ts
import { defineRuntimeConfig } from '@modern-js/runtime';
import myRuntimePlugin from './plugins/myRuntimePlugin';
export default defineRuntimeConfig({
plugins: [myRuntimePlugin()],
});
```
## Use Case -- Global Data Injection
Through the `context` parameter of the `onBeforeRender` hook, you can inject global data into your application. Application components can access this data using the `use(RuntimeContext)` Hook.
:::info
This feature is particularly useful in the following scenarios:
- Applications requiring page-level preliminary data
- Custom data injection workflows
- Framework migration scenarios (e.g., migrating from Next.js)
:::
**Defining a Data Injection Plugin**
```ts
import type { RuntimePlugin } from '@modern-js/runtime';
const dataInjectionPlugin = (): RuntimePlugin => ({
name: 'data-injection-plugin',
setup: api => {
api.onBeforeRender(context => {
// Inject data into the context
context.message = 'Hello World';
});
},
});
export default dataInjectionPlugin;
```
**Using Injected Data in Components**
```tsx
import { use } from 'react';
import { RuntimeContext } from '@modern-js/runtime';
export default function MyComponent() {
const context = use(RuntimeContext);
const { message } = context;
return <div>{message}</div>;
}
```
**Using with SSR**
In SSR scenarios, the browser can access data injected via `onBeforeRender` during server-side rendering. Developers can decide whether to re-fetch data on the browser side to override server data based on their requirements.
```ts
import type { RuntimePlugin } from '@modern-js/runtime';
const dataInjectionPlugin = (): RuntimePlugin => ({
name: 'data-injection-plugin',
setup: api => {
api.onBeforeRender(context => {
if (process.env.MODERN_TARGET === 'node') {
// Set data during server-side rendering
context.message = 'Hello World By Server';
} else {
// Check data during client-side rendering
if (!context.message) {
// If server data is not available, set client data
context.message = 'Hello World By Client';
}
}
});
},
});
export default dataInjectionPlugin;
```
---
url: /guides/basic-features/render/overview.md
---
# Rendering Mode Overview
Modern.js supports multiple rendering modes, and different rendering modes are suitable for different scenarios. Choosing the right rendering mode can significantly improve application performance and user experience.
## Rendering Mode Quick Reference
| Rendering Mode | Characteristics | Use Cases |
| ----------------- | -------------------------------------------------------------------------------------------------------------------------------- | ---------------------------------------------------------------------------------- |
| **CSR** | Executes JavaScript in the browser to render pages | Applications with strong interactivity and low SEO requirements |
| **SSR** | Pre-renders complete HTML pages on the server | Websites with high requirements for first-screen performance and SEO |
| **Streaming SSR** | Renders and returns progressively, displaying initial UI faster | Applications requiring faster first-screen perception speed (**Default SSR mode**) |
| **RSC** | Components render on the server, reducing client JS size; high cohesion between data and component logic, reducing state passing | Projects pursuing optimal performance and needing to reduce client-side code |
| **SSG** | Generates static pages at build time, can be cached by CDN | Websites with relatively static content, such as blogs and documentation sites |
## Performance Comparison
| Rendering Technology | Core Advantages | Main Bottlenecks |
| ----------------------- | ------------------------------------------------------ | ------------------------------------------------ |
| **SSR** | Server-side pre-rendering, beneficial for SEO | Must wait for all data to load before responding |
| **Streaming SSR** | Renders and returns progressively, faster first screen | JS bundle size is still large |
| **Streaming SSR + RSC** | Reduces client JS size | - |
## How to Choose
### Quick Decision Guide
- **Static Content + SEO Required** → **SSG**
- **SEO Required + First Screen Performance** → **Streaming SSR** (default)
- **Pursuing Optimal Performance** → **Streaming SSR + RSC**
- **CSR Project Gradual Optimization** → **CSR + RSC**
- **Highly Interactive + No SEO Needed** → **CSR**
### Combining Modes
Modern.js supports combining multiple rendering modes:
- **Streaming SSR + RSC**: Streaming rendering + reduced client-side code
- **SSG + SSR**: Some pages static, some pages dynamic
- **CSR + RSC**: Client-side rendering + partial Server Components
## Related Documentation
- [Server-Side Rendering (SSR)](/guides/basic-features/render/ssr.md)
- [Streaming Server-Side Rendering (Streaming SSR)](/guides/basic-features/render/streaming-ssr.md)
- [React Server Components (RSC)](/guides/basic-features/render/rsc.md)
- [Static Site Generation (SSG)](/guides/basic-features/render/ssg.md)
- [Rendering Cache](/guides/basic-features/render/ssr-cache.md)
---
url: /guides/basic-features/render/rsc.md
---
# React Server Components (RSC)
React Server Components (RSC) is a new component type that allows components to be rendered in a server environment, bringing better performance and developer experience to modern web applications.
## Core Advantages
- **Zero Client JavaScript**: Server Components code is not bundled to the client, significantly reducing client bundle size
- **Direct Access to Server Resources**: Can directly access server resources such as databases, file systems, and internal APIs without additional API layers
- **Better Performance**: Data fetching is closer to the data source, reducing client-side data waterfalls and improving first-screen load speed
- **Automatic Code Splitting**: Code splitting based on actual rendered data, not just routes, enabling more granular code optimization
- **Higher Cohesion**: Logic closely related to data, permissions, caching, etc., can remain in Server Components, improving component cohesion and reducing state lifting and cross-level passing
:::tip Prerequisite
Before starting, we recommend reading React's official [Server Components documentation](https://react.dev/reference/rsc/server-components) to get a basic understanding of Server Components.
:::
## Quick Start
1. **Ensure React and React DOM are upgraded to version 19** (recommended version 19.2.4 or above)
2. **Install the `react-server-dom-rspack@0.0.1-beta.1` dependency**
```bash
npm install react-server-dom-rspack@0.0.1-beta.1
```
:::warning Notes
1. Currently, [Server Functions](https://react.dev/reference/rsc/server-functions) are not supported in SPA projects
2. Currently, when building with Rspack, the output chunks and bundle size are not yet optimal. We will further optimize this in the near future
:::
3. Set [`server.rsc`](/configure/app/server/rsc.md) to `true`:
```ts title="modern.config.ts"
import { defineConfig } from '@modern-js/app-tools';
export default defineConfig({
server: {
rsc: true,
},
});
```
:::info Migrating from Legacy CSR Projects
If you have a CSR project that uses Modern.js Data Loaders, after enabling RSC, Data Loaders will execute on the server by default.
For detailed migration guide, please refer to [CSR Project Migration to RSC](#csr-project-migration-guide).
:::
## Usage Guide
### Default Behavior
By default, when RSC is enabled, all components in Modern.js are **Server Components** by default. Server Components allow you to fetch data on the server and render UI. When you need interactivity (such as event handling, state management) or use browser APIs, you can use the `"use client"` directive to mark components as **Client Components**.
### Component Type Selection
#### When to Use Client Component
When a component needs the following features, you need to use the `"use client"` directive to mark it as a Client Component:
- **Interactivity**: Using [State](https://react.dev/learn/managing-state) and [event handlers](https://react.dev/learn/responding-to-events), such as `onClick`, `onChange`, `onSubmit`
- **Lifecycle**: Using [lifecycle](https://react.dev/learn/lifecycle-of-reactive-effects)-related hooks, such as `useEffect`, `useLayoutEffect`
- **Browser APIs**: Using browser APIs (such as `window`, `document`, `localStorage`, `navigator`, etc.)
- **Custom Hooks**: Using [custom hooks](https://react.dev/learn/reusing-logic-with-custom-hooks), especially those that depend on client-side features
#### When to Use Server Component
The following scenarios should use Server Components (default behavior, no additional marking required):
1. **Accessing Server Resources**: Using APIs available only on the server (such as Node.js APIs, file systems, consul, RPC, etc.)
2. **Data Fetching**: Fetching data on the server to optimize performance and reduce client requests
3. **Security**: Accessing private environment variables or API keys, avoiding exposure to the client
4. **Reducing Bundle Size**: Using large dependency libraries that don't need to be included in the client bundle
5. **Static Content**: Rendering static or infrequently changing content
### Client Boundary
Once a file is marked with `"use client"`, all other modules it imports (if they haven't been marked with `"use client"` yet) will also be considered client code and included in the client JavaScript bundle. This is the concept of **Client Boundary**.
:::tip Understanding Client Boundary
The `"use client"` directive creates a boundary: all code within the boundary will be bundled to the client. This means that even if the `Button` and `Tooltip` components don't have the `"use client"` directive themselves, they will become client code because they are imported by `InteractiveCard`.
:::
```tsx title="components/InteractiveCard.tsx"
'use client'; // <--- This is where the Client Boundary starts
import { useState } from 'react';
import Button from './Button'; // Button.tsx doesn't have "use client", but will be included in the client bundle
import Tooltip from './Tooltip'; // Tooltip.tsx also doesn't have "use client", and will be included
export default function InteractiveCard() {
const [isActive, setIsActive] = useState(false);
return (
<div onClick={() => setIsActive(!isActive)}>
<p>Click me!</p>
<Button />
<Tooltip text="This is a card" />
</div>
);
}
```
### How to Combine Both Component Types
Server Components and Client Components don't exist in isolation; they need to work together. Remember the following two rules:
#### Server Component Can Import Client Component
This is the most common pattern. Your page body is a Server Component responsible for data fetching and layout, while interactive parts are embedded as Client Components.
```tsx title="routes/page.tsx"
// Server Component (default, no marking needed)
import CounterButton from './CounterButton'; // This is a Client Component
async function getPageData() {
// Fetch data on the server
const res = await fetch('https://api.example.com/data');
return res.json();
}
export default async function Page() {
const data = await getPageData();
return (
<div>
<h1>{data.title}</h1> {/* Server-side rendered */}
<p>This part is static.</p>
{/* Client Component can be seamlessly embedded in Server Component */}
<CounterButton />
</div>
);
}
```
```tsx title="routes/CounterButton.tsx"
'use client'; // Client Component
import { useState } from 'react';
export default function CounterButton() {
const [count, setCount] = useState(0);
return <button onClick={() => setCount(c => c + 1)}>Count: {count}</button>;
}
```
#### Client Component Cannot Directly Import Server Component
This may seem counterintuitive at first. The reason is that Server Component code doesn't exist on the client at all. When a Client Component renders in the browser, it cannot execute a function that only exists on the server.
However, there are two patterns to work around this limitation:
**1. Pass Server Component via `children` Prop**
You can pass Server Components as the `children` Prop to a Client Component. For example, an animated Tabs component where the tab switching logic is client-side, but the content of each tab might be static and fetched from the server.
```tsx title="app/components/Tabs.tsx"
'use client'; // Client Component
import React, { useState } from 'react';
interface TabsProps {
tabLabels: string[];
children: React.ReactNode;
}
export default function Tabs({ tabLabels, children }: TabsProps) {
const [activeTab, setActiveTab] = useState(0);
return (
<div>
<nav>
{tabLabels.map((label, index) => (
<button key={label} onClick={() => setActiveTab(index)}>
{label}
</button>
))}
</nav>
{/* React.Children.toArray ensures only the active child component is rendered */}
<div>{React.Children.toArray(children)[activeTab]}</div>
</div>
);
}
```
```tsx title="app/dashboard/page.tsx"
// Server Component (default)
import Tabs from '../components/Tabs';
import Analytics from '../components/Analytics'; // Server Component
import UserSettings from '../components/UserSettings'; // Server Component
export default function DashboardPage() {
const labels = ['Analytics', 'Settings'];
return (
<main>
<h1>Dashboard</h1>
{/*
Here, Tabs is a Client Component (handling interactive logic),
but Analytics and UserSettings are Server Components rendered on the server,
passed to the Tabs component as children props.
This maintains interactivity while maximizing the advantages of server-side rendering.
*/}
<Tabs tabLabels={labels}>
<Analytics />
<UserSettings />
</Tabs>
</main>
);
}
```
Through this pattern, you can keep components on the server to the maximum extent while maintaining interactivity, achieving optimal performance. This is one of the most powerful composition patterns in RSC.
**2. Route Components Can Independently Choose Component Type**
Each level of route components (such as `layout.tsx`, `page.tsx`) can independently choose to be a Client Component or Server Component:
```ts
-routes -
layout.tsx - // Can be a Client Component
page.tsx; // Can be a Server Component
```
For example, if `layout.tsx` is a Client Component (requiring client-side interactivity), you can still set `page.tsx` as a Server Component (for data fetching and rendering). This approach provides great flexibility and allows non-RSC projects to gradually migrate to RSC projects.
## Server Component and Data Loader
In RSC projects, you have two ways to fetch data: directly in Server Components, or using [Data Loader](/guides/basic-features/data/data-fetch.md). Both approaches have their advantages, and you can choose flexibly based on your scenario.
### Comparison of Two Data Fetching Approaches
| Feature | Fetching in Server Component | Fetching in Data Loader |
| ----------------------- | ----------------------------------- | ---------------------------------------- |
| Avoid Request Waterfall | Requires manual optimization | ✅ Automatically parallel execution |
| Component Cohesion | ✅ Data and UI in the same place | Data logic separated into separate files |
| Maintainability | ✅ Easier to understand and maintain | Requires maintaining additional files |
| Type Safety | ✅ Natural type inference | Requires manual type management |
**Generally, we recommend fetching data in Server Components**, because waterfall requests have less performance impact on the server, and this approach makes components more cohesive, with data fetching logic and UI rendering in the same place, making it easier to understand and maintain. However, if your page has multiple independent data sources and you want to completely avoid request waterfall issues, Data Loader's parallel execution feature will be more advantageous.
### Data Loader Execution Environment in RSC Projects
In RSC projects, the execution environment of Data Loaders is related to file naming:
- **`*.data.ts`**: Executes only on the **server**, and data can be consumed by both Client Components and Server Components
- **`*.data.client.ts`**: Executes only on the **client**
```bash
.
└── routes
└── user
├── page.tsx # Route component (can be Server or Client Component)
├── page.data.ts # Executes on server, data can be consumed by any component
└── page.data.client.ts # Executes on client
```
In Modern.js RSC projects, Server Components can receive data returned by Data Loaders through the `loaderData` prop:
```tsx title="routes/user/page.tsx"
// Server Component receives loaderData through props
export default function UserPage({ loaderData }: { loaderData: { name: string } }) {
return <div>Welcome, {loaderData.name}</div>;
}
```
```tsx title="routes/user/page.tsx"
'use client';
// Client Component can also receive loaderData through props
export default function UserPage({ loaderData }: { loaderData: { name: string } }) {
return <div>Welcome, {loaderData.name}</div>;
}
```
### Data Loader Returning Server Component
In Modern.js RSC projects, Data Loaders have a powerful feature: **they can return Server Components**. This is very helpful for gradual migration, allowing you to render server-generated content in Client Components.
```tsx title="routes/user/layout.data.tsx"
// Server Component defined in data loader file
function UserProfile() {
return <div>User Profile (Server Rendered)</div>;
}
export const loader = async () => {
const userData = await fetchUserData();
return {
user: userData,
// Return a Server Component as part of the data
ProfileComponent: <UserProfile />,
};
};
```
```tsx title="routes/user/layout.tsx"
'use client';
import { Outlet } from '@modern-js/runtime/router';
export default function UserLayout({
loaderData,
}: {
loaderData: { user: any; ProfileComponent: React.ReactNode };
}) {
const { user, ProfileComponent } = loaderData;
return (
<div>
{/* Directly render Server Component in Client Component */}
{ProfileComponent}
<div>User: {user.name}</div>
<Outlet />
</div>
);
}
```
## CSR Project Migration Guide
Modern.js's RSC capability supports both SSR and CSR projects. For existing CSR projects, if you want to gradually migrate to RSC, we recommend following these steps:
1. **Enable RSC Configuration**
```ts title="modern.config.ts"
import { defineConfig } from '@modern-js/app-tools';
export default defineConfig({
server: {
rsc: true,
},
});
```
2. **Mark All Route Components with `'use client'`**
This ensures that existing components maintain their behavior and continue to run as Client Components.
```tsx title="routes/page.tsx"
'use client';
export default function Page() {
// Existing client-side logic remains unchanged
}
```
3. **Rename All `*.data.ts` to `*.data.client.ts`**
Since `*.data.ts` in RSC projects executes on the server by default, to maintain consistency with CSR project behavior (Data Loaders execute on the client), you need to rename the files.
```bash
# Before renaming
routes/user/page.data.ts
# After renaming
routes/user/page.data.client.ts
```
After completing these steps, you can gradually migrate components to Server Components and enjoy the performance benefits of RSC.
## Notes
### Projects Using Streaming SSR
If you're using both Streaming SSR and RSC, in React 19 you need to use `use` instead of the `Await` component:
```typescript
function NonCriticalUI({ p }: { p: Promise<string> }) {
let value = React.use(p);
return <h3>Non critical value {value}</h3>;
}
<React.Suspense fallback={<div>Loading...</div>}>
<NonCriticalUI p={nonCriticalData} />
</React.Suspense>;
```
## Best Practices
### Data Fetching
1. Whether it's an SSR or RSC project, it's recommended to use the `cache` function provided by Modern.js for data fetching logic executed on the server by default. This ensures that for each server-side render, no matter how many times the function is called, it will only execute once.
> This is also the recommended usage by React.js, which provides the [cache](https://react.dev/reference/react/cache) function. Modern.js's [cache](/guides/basic-features/data/data-cache.md) can be considered a superset of it.
```typescript
import { cache } from '@modern-js/runtime/cache';
const getCriticalCached = cache(getCritical);
```
- Based on using the `cache` function, you no longer need to manage server-side state through `props`, `context`, etc. We recommend fetching data in the nearest Server Component where it's needed. With the `cache` function, even if the same function is called multiple times, this makes project state management, business logic, and performance optimization simpler.
```typescript
// layout.tsx
export default async function Layout() {
const criticalData = await getCriticalCached();
}
export default async function Page() {
const criticalData = await getCriticalCached();
}
```
### Optimal Performance
To leverage the advantages of RSC or Streaming SSR, we need to make as many components as possible flow. A core principle is to make the area wrapped by Suspense as small as possible (this is also one of the reasons we recommend using the `cache` function).
For Server Components that directly consume data, we recommend wrapping them with Suspense at a higher level:
> In this scenario, Server Components are often asynchronous. There's another case where Server Components are synchronous and data is consumed by Client Components, described below.
```javascript
// profile/components/PostsList.tsx
export default async function PostsList() {
const posts = await getUserPosts();
return (
<ul>
{posts.map(post => (
<li key={post.id}>{post.title}</li>
))}
</ul>
);
}
```
```javascript
// profile/page.tsx
import { Suspense } from 'react';
import UserInfo from './components/UserInfo';
import PostsList from './components/PostsList';
import PostsSkeleton from './components/PostsSkeleton';
export default function ProfilePage() {
return (
<div>
<UserInfo />
<hr />
{/*
We wrap the slow PostsList in Suspense.
While PostsList is fetching data, users will see PostsSkeleton.
Once PostsList data is ready, it will automatically replace the skeleton.
*/}
<Suspense fallback={<PostsSkeleton />}>
<PostsList posts={postsPromise} />
</Suspense>
</div>
);
}
```
There's another scenario where data is consumed in Client Components. In this case, we should avoid using `await` in Server Components to avoid blocking rendering:
```javascript
// profile/components/PostsList.tsx
'use client';
export default function PostsList({ postsPromise }) {
const posts = use(postsPromise);
return (
<ul>
{posts.map(post => (
<li key={post.id}>{post.title}</li>
))}
</ul>
);
}
```
```javascript
// profile/page.tsx
import { Suspense } from 'react';
import UserInfo from './components/UserInfo';
import PostsList from './components/PostsList'; // Now a Client Component
import PostsSkeleton from './components/PostsSkeleton';
import { getUserPosts } from '../lib/data'; // Import data fetching function
// Note: This component is not async
export default function ProfilePage() {
// 1. Call the data fetching function on the server, but don't await it
// This immediately returns a Promise
const postsPromise = getUserPosts();
return (
<div>
<UserInfo />
<hr />
{/* 2. Suspense boundary is still required. It will catch
the Promise thrown by the `use` hook inside PostsList */}
<Suspense fallback={<PostsSkeleton />}>
{/* 3. Pass the Promise object itself as a prop to the client component */}
<PostsList postsPromise={postsPromise} />
</Suspense>
</div>
);
}
```
### Helmet
When using React 19, you no longer need to use Helmet. We recommend directly using the [components](https://react.dev/reference/react-dom/components) provided by React.
## Common Issues
### `This entry point is not yet supported outside of experimental channels`
The project's bundle has introduced a non-19 React version, commonly seen in monorepos. Please ensure all dependencies use React 19.
## Related Links
- [React Server Components Official Documentation](https://react.dev/reference/rsc/server-components)
- [React Server Functions Documentation](https://react.dev/reference/rsc/server-functions)
- [Data Cache](/guides/basic-features/data/data-cache.md)
- [Server-Side Rendering (SSR)](/guides/basic-features/render/ssr.md)
- [Streaming SSR](/guides/basic-features/render/streaming-ssr.md)
---
url: /guides/basic-features/render/ssg.md
---
# Static Site Generation
SSG (Static Site Generation) is a technical solution that generates complete static web pages at build time based on data and templates. This means that in a production environment, pages are pre-rendered with content and can be cached by a CDN. SSG can offer better performance and higher security for pages that do not require dynamic data.
## Enabling SSG
To enable SSG functionality in a Modern.js project, follow these steps to modify the code:
1. Install SSG plugin dependencies
If the SSG plugin is not yet installed in your project, install it first:
```bash
pnpm add @modern-js/plugin-ssg
```
:::tip Version Consistency
Make sure the version of `@modern-js/plugin-ssg` matches the version of `@modern-js/app-tools` in your project. All Modern.js official packages are released with a uniform version number, and version mismatches may cause compatibility issues.
Check the version of `@modern-js/app-tools` first, then install the same version of `@modern-js/plugin-ssg`:
```bash
# Check the current version of @modern-js/app-tools
pnpm list @modern-js/app-tools
# Install the same version of @modern-js/plugin-ssg
pnpm add @modern-js/plugin-ssg@<version>
```
:::
2. Configure modern.config.ts
Import and add the SSG plugin in the `modern.config.ts` file, and configure `output.ssg`:
```ts title="modern.config.ts"
import { defineConfig, appTools } from '@modern-js/app-tools';
import { ssgPlugin } from '@modern-js/plugin-ssg';
export default defineConfig({
plugins: [appTools(), ssgPlugin()],
output: {
ssg: true,
},
});
```
:::info Scope of Application
- Use `output.ssg` for single-entry apps.
- Use `output.ssgByEntries` for multi-entry apps.
- When only `output.ssg: true` is set and `output.ssgByEntries` is not configured, all routes under all entries will be treated as SSG routes.
:::
## Development Debugging
Since SSG also renders pages in a Node.js environment, we can enable SSR during the **development phase** to expose code issues early and validate the SSG rendering effect:
```ts title="modern.config.ts"
export default defineConfig({
server: {
ssr: process.env.NODE_ENV === 'development',
}
}
```
## Using SSG in Conventional Routing
In **conventional routing**, Modern.js generates routes based on the file structure under the entry point, allowing the framework to collect complete route information.
### Basic Usage
For example, the following is a project directory structure using conventional routing:
```bash
.
└── routes
├── layout.tsx
├── page.tsx
└── user
├── layout.tsx
├── page.tsx
└── profile
└── page.tsx
```
The above file directory will generate the following three routes:
- `/`
- `/user`
- `/user/profile`
:::tip
If you are not familiar with the rules of conventional routing, refer to the [Routing Solution](/guides/basic-features/routes/routes.md) first.
:::
Add component code in `src/routes/page.tsx`:
```jsx title="src/routes/page.tsx"
export default () => {
return <div>Index Page</div>;
};
```
Run the command `pnpm run dev` at the project root and check the `dist/` directory, where only one HTML file `main/index.html` is generated.
Run the command `pnpm run build` at the project root, and after the build completes, check the `dist/` directory again. This time, you'll find `main/index.html`, `main/user/index.html`, and `main/user/profile/index.html` files, each corresponding to the routes listed above.
Each route in **conventional routing** will generate a separate HTML file. Checking `main/index.html`, you will find it contains the text `Index Page`, which demonstrates the effect of SSG.
After running `pnpm run serve` to start the project, inspect the returned document in the Network tab of the browser's development tools. The document includes the fully rendered content from the component.
## Using SSG in Manual Routing
**Manual routing** defines routes through component code, requiring the application to run to obtain accurate route information. Therefore, you cannot use the SSG feature out of the box. Developers need to configure which routes require SSG.
For example, consider the following code with multiple routes. By setting `output.ssg` to `true`, it will only render the entry route (`/`) by default.
```tsx title="src/App.tsx"
import { BrowserRouter, Route, Routes } from '@modern-js/runtime/router';
import { StaticRouter } from '@modern-js/runtime/router/server';
import { use } from 'react';
import { RuntimeContext } from '@modern-js/runtime';
const Router = typeof window === 'undefined' ? StaticRouter : BrowserRouter;
export default () => {
const context = use(RuntimeContext);
const pathname = context?.request?.pathname;
return (
<Router location={pathname}>
<Routes>
<Route index element={<div>index</div>} />
<Route path="about" element={<div>about</div>} />
</Routes>
</Router>
);
};
```
If you want to enable SSG for `/about` as well, you can configure `output.ssg`:
```ts title="modern.config.ts"
export default defineConfig({
output: {
ssg: {
routes: ['/', '/about'],
},
},
});
```
After running `pnpm run build`, you will see a new `main/about/index.html` file in the `dist/` directory.
After running `pnpm run serve` to start the project, inspect the returned document in the Network tab of the browser's development tools. The document includes the fully rendered content from the component.
:::info
The above example introduces single-entry scenarios. For more information, refer to the [API Documentation](/configure/app/output/ssg.md).
:::
## Adding Dynamic Routes
In manual routing or conventional routing with dynamic segments (e.g., `/user/[id]`), provide concrete paths directly in `routes`.
```js
export default defineConfig({
output: {
ssg: {
routes: ['/', '/about', '/user/modernjs'],
},
},
});
```
## Multi-entry
For multi-entry apps, configure per entry via `output.ssgByEntries`:
```js
export default defineConfig({
output: {
ssgByEntries: {
home: {
routes: ['/', '/about', '/user/modernjs'],
},
admin: false,
},
},
});
```
:::info
See API details: [output.ssgByEntries](/configure/app/output/ssgByEntries.md)
:::
## Configuring Request Headers for Rendering
Modern.js supports configuring request headers for specific entries or routes. For example:
```js
export default defineConfig({
output: {
ssg: {
headers: {
'x-tt-env': 'ppe_modernjs',
},
routes: [
'/',
{
url: '/about',
headers: {
from: 'modern-website',
},
},
],
},
},
});
```
In the above configuration, the `x-tt-env` request header is set for all routes, and the `from` request header is specifically set for the `/about` route.
:::tip
Headers set in routes will override headers set for entries.
:::
---
url: /guides/basic-features/render/ssr-cache.md
---
# Rendering Cache
When developing applications, sometimes we cache computation results using hooks like React's `useMemo` and `useCallback`. By leveraging caching, we can reduce the number of computations, thus saving CPU resources and improving user experience.
Modern.js supports caching server-side rendering (SSR) results, reducing the computational and rendering time during subsequent requests. This accelerates page load time and improves user experience. Additionally, caching lowers server load, conserves computational resources, and speeds up user access.
## Configuration
Create a `server/cache.[t|j]s` file in your application and export the `cacheOption` configuration to enable SSR rendering cache:
```ts title="server/cache.ts"
import type { CacheOption } from '@modern-js/server-runtime';
export const cacheOption: CacheOption = {
maxAge: 500, // ms
staleWhileRevalidate: 1000, // ms
};
```
## Configuration Details
### Cache Configuration
The caching strategy implements [stale-while-revalidate](https://developer.mozilla.org/en-US/docs/Web/HTTP/Headers/Cache-Control).
Within the `maxAge` period, the cache content is directly returned. Exceeding `maxAge` but within `staleWhileRevalidate`, the cache content is still returned directly, but it re-renders asynchronously.
**Object Type**
```ts
export interface CacheControl {
maxAge: number;
staleWhileRevalidate: number;
customKey?: string | ((pathname: string) => string);
}
```
Here, `customKey` is the custom cache key. By default, Modern.js uses the request `pathname` as the cache key, but developers can define it when necessary.
**Function Type**
```ts
export type CacheOptionProvider = (
req: IncomingMessage,
) => Promise<CacheControl | false> | CacheControl | false;
```
Sometimes, developers need to use `req` to customize the cache key, or prevent caching for specific URLs. You can configure this as a function, as shown:
```ts title="server/cache.ts"
import type { CacheOption, CacheOptionProvider } from '@modern-js/server-runtime';
const provider: CacheOptionProvider = (req) => {
const { url, headers, ... } = req;
if(url.includes('no-cache=1')) {
return false;
}
const key = computedKey(url, headers, ...);
return {
maxAge: 500, // ms
staleWhileRevalidate: 1000, // ms
customKey: key,
}
}
export const cacheOption: CacheOption = provider;
```
**Mapping Type**
```ts
export type CacheOptions = Record<string, CacheControl | CacheOptionProvider>;
```
Sometimes, different routes require different caching strategies. We also offer a mapping configuration method, as shown below:
```ts title="server/cache.ts"
import type { CacheOption } from '@modern-js/server-runtime';
export const cacheOption: CacheOption = {
'/home': {
maxAge: 50,
staleWhileRevalidate: 100,
},
'/about': {
maxAge: 1000 * 60 * 60 * 24, // one day
staleWhileRevalidate: 1000 * 60 * 60 * 24 * 2 // two days
},
'*': (req) => { // If no above route matches, this applies
const { url, headers, ... } = req;
const key = computedKey(url, headers, ...);
return {
maxAge: 500,
staleWhileRevalidate: 1000,
customKey: key,
}
}
}
```
- The route `http://xxx/home` will apply the first rule.
- The route `http://xxx/about` will apply the second rule.
- The route `http://xxx/abc` will apply the last rule.
The above `/home` and `/about` are patterns, meaning `/home/abc` will also match. You can use regex in these patterns, such as `/home/.+`.
### Cache Container
By default, the server uses memory for caching. Typically, services are deployed in a Serverless container, creating a new process for each access, making it impossible to use the previous cache.
Thus, Modern.js allows developers to define custom cache containers. Containers must implement the `Container` interface:
```ts
export interface Container<K = string, V = string> {
/**
* Returns a specified element from the container. If the value that is associated to the provided key is an object, then you will get a reference to that object and any change made to that object will effectively modify it inside the Container.
* @returns Returns the element associated with the specified key. If no element is associated with the specified key, undefined is returned.
*/
get: (key: K) => Promise<V | undefined>;
/**
* Adds a new element with a specified key and value to the container. If an element with the same key already exists, the element will be updated.
*
* The ttl indicates cache expiration time.
*/
set: (key: K, value: V, options?: { ttl?: number }) => Promise<this>;
/**
* @returns boolean indicating whether an element with the specified key exists or not.
*/
has: (key: K) => Promise<boolean>;
/**
* @returns true if an element in the container existed and has been removed, or false if the element does not exist.
*/
delete: (key: K) => Promise<boolean>;
}
```
Developers can implement a Redis cache container as shown below:
```ts
import Redis from 'ioredis';
import type { Container, CacheOption } from '@modern-js/server-runtime';
class RedisContainer implements Container {
redis = new Redis();
async get(key: string) {
return this.redis.get(key);
}
async set(key: string, value: string): Promise<this> {
this.redis.set(key, value);
return this;
}
async has(key: string): Promise<boolean> {
return this.redis.exists(key) > 0;
}
async delete(key: string): Promise<boolean> {
return this.redis.del(key) > 0;
}
}
const container = new RedisContainer();
export const customContainer: Container = container;
export const cacheOption: CacheOption = {
maxAge: 500, // ms
staleWhileRevalidate: 1000, // ms
};
```
## Cache Identification
When rendering cache is enabled, Modern.js identifies the cache status of the current request through the `x-render-cache` response header. Here's an example response:
```bash
< HTTP/1.1 200 OK
< Access-Control-Allow-Origin: *
< content-type: text/html; charset=utf-8
< x-render-cache: hit
< Date: Thu, 29 Feb 2024 02:46:49 GMT
< Connection: keep-alive
< Keep-Alive: timeout=5
< Content-Length: 2937
```
The `x-render-cache` header can have the following values:
| Name | Description |
| ------- | ----------------------------------------------------------------------------------- |
| hit | Cache hit, returned cache content |
| stale | Cache hit, but data is stale, returned cache content and re-rendered asynchronously |
| expired | Cache expired, re-rendered and returned new content |
| miss | Cache missed |
---
url: /guides/basic-features/render/ssr.md
---
# Server-Side Rendering
Server-Side Rendering (SSR) generates complete HTML pages on the server and sends them to the browser for direct display, without requiring additional client-side rendering.
## Core Advantages
- **Faster First Screen**: Server-side pre-rendering allows the browser to display content directly without waiting for JavaScript execution
- **Better SEO**: Search engines can directly index complete HTML content
- **Out of the Box**: No need to write complex server-side logic or maintain separate services
:::info Default Rendering Mode
Modern.js SSR **uses streaming rendering (Streaming SSR) by default**, allowing pages to be returned progressively as they render, so users can see initial content faster.
For detailed usage, refer to the [Streaming SSR](/guides/basic-features/render/streaming-ssr.md) documentation.
To switch to traditional SSR mode (waiting for all data to load before returning at once), you can configure:
```ts title="modern.config.ts"
import { defineConfig } from '@modern-js/app-tools';
export default defineConfig({
server: {
ssr: {
mode: 'string', // Traditional SSR mode
},
},
});
```
:::
## Enabling SSR
Enabling SSR in Modern.js is straightforward. Simply set [`server.ssr`](/configure/app/server/ssr.md) to `true`:
```ts title="modern.config.ts"
import { defineConfig } from '@modern-js/app-tools';
export default defineConfig({
server: {
ssr: true, // Streaming rendering enabled by default
},
});
```
## Data Fetching
Modern.js provides Data Loader, enabling developers to fetch data isomorphically under both SSR and CSR. Each route module (such as `layout.tsx` and `page.tsx`) can define its own Data Loader:
:::tip Learn More
The following approach will not have streaming rendering effects. To achieve streaming rendering effects, refer to [Streaming SSR](/guides/basic-features/render/streaming-ssr.md).
:::
```ts title="src/routes/page.data.ts"
export const loader = () => {
return {
message: 'Hello World',
};
};
```
Access data in components through Hooks API:
```tsx
import { useLoaderData } from '@modern-js/runtime/router';
export default () => {
const data = useLoaderData();
return <div>{data.message}</div>;
};
```
### Using Client Loader
By default, in SSR applications, the `loader` function only executes on the server. However, in some scenarios, developers might want requests made on the client-side to bypass the SSR service and directly fetch data from the source. For example:
1. Reducing network consumption on the client-side by directly fetching from the data source.
2. The application has data cached on the client side and doesn't want to fetch data from the SSR service.
Modern.js supports adding a `.data.client` file, also named exported as `loader`, in SSR applications. If the Data Loader fails to execute on the server side, or when navigating on the client side, it will execute the `loader` function on the client side instead of sending a data request to the SSR service.
```ts title="page.data.client.ts"
import cache from 'my-cache';
export async function loader({ params }) {
if (cache.has(params.id)) {
return cache.get(params.id);
}
const res = await fetch(`URL_ADDRESS?id=${params.id}`);
const data = await res.json();
return {
message: data.message,
}
}
```
## SSR Fallback
In Modern.js, if an application encounters an error during SSR, it automatically falls back to CSR mode and re-fetches data, ensuring the page can display correctly. SSR fallback can occur for two main reasons:
1. Data Loader execution error.
2. React component rendering error on the server side.
### Data Loader Execution Error
By default, if the `loader` function for a route throws an error, the framework renders the `<ErrorBoundary>` component directly on the server, displaying the error message. This is the default behavior of most frameworks.
Modern.js also supports customizing the fallback strategy through the `loaderFailureMode` field in the [`server.ssr`](/configure/app/server/ssr.md) configuration. Setting this field to `clientRender` immediately falls back to CSR mode and re-fetches the data.
If a Client Loader is defined for the route, it will be used to re-fetch the data. If re-rendering fails again, the `<ErrorBoundary>` component will be displayed.
{/* Todo Add a diagram */}
### Component Rendering Error
If the Data Loader executes correctly but the component rendering fails, SSR rendering will partially or completely fail, as shown in the following code:
```tsx
import { Await, useLoaderData } from '@modern-js/runtime/router';
import { Suspense } from 'react';
const Page = () => {
const data = useLoaderData();
const isNode = typeof window === 'undefined';
const undefinedVars = data.unDefined;
const definedVars = data.defined;
return (
<div>
{isNode ? undefinedVars.msg : definedVars.msg}
</div>
);
};
export default Page;
```
In this case, Modern.js will fallback the page to CSR and use the existing data from the Data Loader to render. If the rendering still fails, the `<ErrorBoundary>` component will be rendered.
:::tip
The behavior of component rendering errors is unaffected by `loaderFailureMode` and will not execute the Client Loader on the browser side.
:::
{/* Todo Add a diagram */}
## Logging and Monitoring
:::tip
SSR monitoring has been integrated into the Monitors module, see [Monitors](/guides/advanced-features/server-monitor/monitors.md) for details.
:::
## Page Caching
Modern.js has built-in caching capabilities. Refer to [Rendering Cache](/guides/basic-features/render/ssr-cache.md) for details.
## Differences in Runtime Environment
SSR applications run on both the server and the client, with differing Web and Node APIs.
When enabling SSR, Modern.js uses the same entry to build both SSR and CSR bundles. Therefore, having Web APIs in the SSR bundle or Node APIs in the CSR bundle can lead to runtime errors. This usually happens in two scenarios:
- There are issues in the application's own code.
- The dependency package contains side effects.
### Issues with Own Code
This scenario often arises when migrating from CSR to SSR. CSR applications typically import Web APIs in the code. For example, an application might set up global event listeners:
```tsx
document.addEventListener('load', () => {
console.log('document load');
});
const App = () => {
return <div>Hello World</div>;
};
export default App;
```
In such cases, you can use Modern.js built-in environment variables `MODERN_TARGET` to remove unused code during the build:
```ts
if (process.env.MODERN_TARGET === 'browser') {
document.addEventListener('load', () => {
console.log('document load');
});
}
```
After packing in the development environment, the SSR and CSR bundles will compile as follows. Therefore, Web API errors will not occur in the SSR environment:
```ts
// SSR Bundle
if (false) {
}
// CSR Bundle
if (true) {
document.addEventListener('load', () => {
console.log('document load');
});
}
```
:::note
For more information, see [Environment Variables](/guides/basic-features/env-vars.md).
:::
### Side Effects in Dependencies
This scenario can occur at any time in SSR applications because not all community packages support running in both environments. Some packages only need to run in one. For instance, importing package A that has a side effect using Web APIs:
```ts title="packageA"
document.addEventListener('load', () => {
console.log('document load');
});
export const doSomething = () => {}
```
Directly referencing this in a component will cause SSR to throw errors, even if you use environment variables to conditionally load the code. The side effects in the dependency will still execute.
```tsx title="routes/page.tsx"
import { doSomething } from 'packageA';
export const Page = () => {
if (process.env.MODERN_TARGET === 'browser') {
doSomething();
}
return <div>Hello World</div>
}
```
Modern.js supports distinguishing between SSR and CSR bundles by using `.server.` suffix files. You can create `.ts` and `.server.ts` files with the same name to create a proxy:
```ts title="a.ts"
export { doSomething } from 'packageA';
```
```ts title="a.server.ts"
export const doSomething: any = () => {};
```
Import `./a` in the file, and the SSR bundle will prioritize the `.server.ts` files, while the CSR bundle will prioritize the `.ts` files.
```tsx title="routes/page.tsx"
import { doSomething } from './a'
export const Page = () => {
doSomething();
return <div>Hello World</div>
}
```
## Common Issues
### Ensuring Consistent Rendering
In SSR applications, it is crucial to ensure that the rendering results on the server are consistent with the hydration results in the browser. Inconsistent rendering may lead to unexpected outcomes. Here’s an example demonstrating issues when SSR and CSR render differently. Add the following code to your component:
```tsx
{
typeof window !== 'undefined' ? <div>browser content</div> : null;
}
```
After starting the application and visiting the page, you will notice a warning in the browser console:
```sh
Warning: Expected server HTML to contain a matching <div> in <div>.
```
This warning is caused by a mismatch between the React hydrate results and the SSR rendering results. Although the current page appears normal, complex applications may experience DOM hierarchy disruptions or style issues.
:::info
For more information on React hydrate logic, refer to [here](https://zh-hans.react.dev/reference/react-dom/hydrate).
:::
The application needs to maintain consistency between SSR and CSR rendering results. If inconsistencies occur, it indicates that some content should not be rendered by SSR. Modern.js provides the `<NoSSR>` utility component for such scenarios:
```ts
import { NoSSR } from '@modern-js/runtime/ssr';
```
Wrap elements that should not be server-side rendered with the `NoSSR` component:
```tsx
<NoSSR>
<div>browser content</div>
</NoSSR>
```
After modifying the code, refresh the page and notice that the previous warning has disappeared. Open the browser's developer tools and check the Network tab. The returned HTML document will not contain the content wrapped by the `NoSSR` component.
In practical scenarios, some UI displays might be affected by the user's device, such as [UA](https://developer.mozilla.org/en-US/docs/Web/HTTP/Headers/User-Agent) information. Modern.js also provides APIs like `use(RuntimeContext)`, allowing components to access complete request information and maintaining SSR and CSR rendering consistency. For detailed usage, please refer to [Runtime Context](/guides/basic-features/render/before-render.md#runtime-context).
### Attention to Memory Leaks
:::warning Alert
In SSR scenarios, developers need to pay special attention to memory leaks. Even minor memory leaks can significantly impact services after many requests.
:::
With SSR, each browser request triggers server-side component rendering. Therefore, you should avoid defining any data structures that continually grow globally, subscribing to global events, or creating non-disposable streams.
For example, when using [redux-observable](https://redux-observable.js.org/), developers accustomed to CSR might code as follows:
```tsx
/* Code is just an example and not executable */
import { createEpicMiddleware, combineEpics } from 'redux-observable';
const epicMiddleware = createEpicMiddleware();
const rootEpic = combineEpics();
export default function Test() {
epicMiddleware.run(rootEpic);
return <div>Hello Modern.js</div>;
}
```
In this case, the `epicMiddleware` instance is created outside the component, and `epicMiddleware.run` is called within the component.
This code does not cause issues on the client-side. However, in SSR, the Middleware instance remains non-disposable. Each time the component renders, calling `epicMiddleware.run(rootEpic)` adds new event bindings internally, causing the entire object to grow continuously, ultimately affecting application performance.
Such issues are not easily noticed in CSR. When transitioning from CSR to SSR, if you're unsure whether your application has such hidden pitfalls, consider stress testing the application.
---
url: /guides/basic-features/render/streaming-ssr.md
---
# Streaming Server-Side Rendering
Streaming rendering is an advanced rendering method that progressively returns content during the page rendering process, significantly improving user experience.
In traditional SSR rendering, the page is rendered all at once, requiring all data to be loaded before returning the complete HTML. In streaming rendering, the page is rendered progressively, allowing content to be returned as it renders, so users can see initial content faster.
:::info Default Mode
**Streaming SSR is the default rendering mode for Modern.js SSR**. When you enable SSR, streaming rendering is available without additional configuration.
If you need to switch to traditional SSR mode (waiting for all data to load before returning at once), you can configure `server.ssr.mode` to `'string'`. For detailed information, refer to the [Server-Side Rendering (SSR)](/guides/basic-features/render/ssr.md) documentation.
:::
Compared to traditional SSR rendering:
- **Faster Perceived Speed**: Streaming rendering can progressively display content, quickly rendering the home page.
- **Enhanced User Experience**: Users can see page content faster and interact without waiting for the entire page to render.
- **Better Performance Control**: Developers can better control the loading priority and order, optimizing performance and user experience.
- **Better Adaptability**: Streaming rendering adapts better to various network speeds and device performance, ensuring good performance across different environments.
## Enabling Streaming Rendering
Modern.js supports React 18+ streaming rendering. When you enable SSR, streaming rendering is enabled by default:
```ts title="modern.config.ts"
import { defineConfig } from '@modern-js/app-tools';
export default defineConfig({
server: {
ssr: true, // Streaming rendering enabled by default
},
});
```
If you need to explicitly specify streaming rendering mode, you can configure:
```ts title="modern.config.ts"
import { defineConfig } from '@modern-js/app-tools';
export default defineConfig({
server: {
ssr: {
mode: 'stream', // Explicitly specify streaming rendering mode
},
},
});
```
Modern.js streaming rendering is based on React Router and involves several key APIs:
- [`Await`](https://reactrouter.com/en/main/components/await): Used to render the asynchronous data returned by the Data Loader.
- [`useAsyncValue`](https://reactrouter.com/en/main/hooks/use-async-value): Used to fetch data from the nearest parent `Await` component.
## Fetching Data
```ts title="user/[id]/page.data.ts"
import { defer, type LoaderFunctionArgs } from '@modern-js/runtime/router';
interface User {
name: string;
age: number;
}
export interface Data {
data: User;
}
export const loader = ({ params }: LoaderFunctionArgs) => {
const userId = params.id;
const user = new Promise<User>(resolve => {
setTimeout(() => {
resolve({
name: `user-${userId}`,
age: 18,
});
}, 200);
});
return defer({ data: user });
};
```
Here, `user` is a Promise object representing asynchronously fetched data, processed using `defer`. Notice that `defer` must receive an object parameter; a direct Promise cannot be passed.
Additionally, `defer` can receive both asynchronous and synchronous data. In the example below, short-duration requests are returned using object data, while longer-duration requests are returned using a Promise:
```ts title="user/[id]/page.data.ts"
export const loader = async ({ params }: LoaderFunctionArgs) => {
const userId = params.id;
const user = new Promise<User>(resolve => {
setTimeout(() => {
resolve({
name: `user-${userId}`,
age: 18,
});
}, 2000);
});
const otherData = new Promise<string>(resolve => {
setTimeout(() => {
resolve('some sync data');
}, 200);
});
return defer({
data: user,
other: await otherData,
});
};
```
This way, the application can prioritize displaying partially available content without waiting for the most time-consuming data requests.
## Rendering Data
To render the asynchronous data returned by the Data Loader, use the `Await` component. For example:
```tsx title="user/[id]/page.tsx"
import { Await, useLoaderData } from '@modern-js/runtime/router';
import { Suspense } from 'react';
import type { Data } from './page.data';
const Page = () => {
const data = useLoaderData() as Data;
return (
<div>
User info:
<Suspense fallback={<div id="loading">loading user data ...</div>}>
<Await resolve={data.data}>
{user => {
return (
<div id="data">
name: {user.name}, age: {user.age}
</div>
);
}}
</Await>
</Suspense>
</div>
);
};
export default Page;
```
The `Await` component needs to be wrapped inside a `Suspense` component. The `resolve` prop of `Await` should be the asynchronously fetched data from the Data Loader. When the data is fetched, it will be rendered using the [Render Props](https://zh-hans.react.dev/reference/react/cloneElement#passing-data-with-a-render-prop) pattern. During data fetching, the content set by the `fallback` prop of `Suspense` is displayed.
:::warning Warning
When importing types from the `page.data.ts` file, use `import type` to ensure only type information is imported, preventing Data Loader code from being bundled into the frontend.
:::
In the component, you can also fetch asynchronous data returned by the Data Loader using `useAsyncValue`. For example:
```tsx title='page.tsx'
import { useAsyncValue } from '@modern-js/runtime/router';
const UserInfo = () => {
const user = useAsyncValue();
return (
<div>
name: {user.name}, age: {user.age}
</div>
);
};
const Page = () => {
const data = useLoaderData() as Data;
return (
<div>
User info:
<Suspense fallback={<div id="loading">loading user data ...</div>}>
<Await resolve={data.data}>
<UserInfo />
</Await>
</Suspense>
</div>
);
};
export default Page;
```
## Error Handling
The `errorElement` prop of the `Await` component handles errors in Data Loader or sub-component rendering. For example, intentionally throwing an error in the Data Loader function:
```ts title="page.loader.ts"
import { defer } from '@modern-js/runtime/router';
export default () => {
const data = new Promise((resolve, reject) => {
setTimeout(() => {
reject(new Error('error occurs'));
}, 200);
});
return defer({ data });
};
```
Then, fetch the error using `useAsyncError` and set a component to render the error message for the `errorElement` prop of the `Await` component:
```tsx title="page.ts"
import { Await, useAsyncError, useLoaderData } from '@modern-js/runtime/router';
import { Suspense } from 'react';
export default function Page() {
const data = useLoaderData();
return (
<div>
Error page
<Suspense fallback={<div>loading ...</div>}>
<Await resolve={data.data} errorElement={<ErrorElement />}>
{(data: any) => {
return <div>never displayed</div>;
}}
</Await>
</Suspense>
</div>
);
}
function ErrorElement() {
const error = useAsyncError() as Error;
return <p>Something went wrong! {error.message}</p>;
}
```
## Controlling When to Wait for Full HTML
Streaming improves perceived speed, but in some cases (SEO crawlers, A/B buckets, compliance pages) you may want to wait for all content before sending the response.
Modern.js decides the streaming mode with this priority:
1. Request header `x-should-stream-all` (set per-request in middleware).
2. Env `MODERN_JS_STREAM_TO_STRING` (forces full HTML).
3. [isbot](https://www.npmjs.com/package/isbot) check on `user-agent` (bots get full HTML).
4. Default: stream shell first.
Set the header in your middleware to choose the behavior dynamically:
```ts title="middleware example"
export const middleware = async (ctx, next) => {
const ua = ctx.req.header('user-agent') || '';
const shouldWaitAll = /Lighthouse|Googlebot/i.test(ua) || ctx.req.path === '/marketing';
// Write a boolean string: true -> onAllReady, false -> onShellReady
ctx.req.headers.set('x-should-stream-all', String(shouldWaitAll));
await next();
};
```
## Related Documentation
- [Rendering Mode Overview](/guides/basic-features/render/overview.md)
- [Server-Side Rendering (SSR)](/guides/basic-features/render/ssr.md)
- [Rendering Cache](/guides/basic-features/render/ssr-cache.md)
- [React Server Components (RSC)](/guides/basic-features/render/rsc.md) - Use with Streaming SSR
- [New Suspense SSR Architecture in React 18](https://github.com/reactwg/react-18/discussions/37) - React 18 Architecture Overview
---
url: /guides/basic-features/routes/config-routes.md
---
# Config Routes
By default, Modern.js recommends using [Convention Routes](/guides/basic-features/routes/routes.md) as the way to define routes. At the same time, Modern.js also provides a config-based routing capability that can be used together with convention routes or used separately.
## When to Use Config Routes
Config routes are particularly useful in the following scenarios:
- **Need flexible route control**: When the file structure cannot directly map to the desired URL structure
- **Multiple routes pointing to the same component**: Need to point different URL paths to the same page component
- **Conditional routes**: Dynamically configure routes based on different conditions
- **Legacy project migration**: Maintain the original routing structure when migrating from other routing systems
- **Complex route naming**: Need to customize route paths without being limited by file directory structure
## Basic Usage
In the `src` directory or each entry directory, you can define a `modern.routes.ts` file to configure routes:
```ts
import { defineRoutes } from '@modern-js/runtime/config-routes'
export default defineRoutes(({ route, layout, page, $ }, fileRoutes) => {
return [
route("home.tsx", "/"),
]
})
```
### Function Signature Description
`defineRoutes` accepts a callback function with two parameters:
1. `routeFunctions`: An object containing `route`, `layout`, `page`, `$` functions
2. `fileRoutes`: An array of route configurations generated by convention routes
Basic signature of route functions:
- First parameter: File path relative to `modern.routes.ts`
- Second parameter: Route path (optional, must be a string)
- Third parameter: Array of child routes (optional)
## Route Functions
Modern.js provides four main route configuration functions:
:::tip Path Description
The first parameter (path) of all route functions is a **relative path**, which will be concatenated with the parent path to generate the final route path:
- **Root path**: `"/"` or `""` represents the root path of the current level
- **Relative path**: Child route paths will be concatenated relative to the parent path
- **Dynamic path**: Use `:param` syntax to represent dynamic parameters
- **Wildcard path**: Use `"*"` syntax to match all paths
:::
:::info
- The first parameter (component file path) of functions like `route`, `layout`, `page`, `$` must point to real files in the current project. Files from `node_modules` and other repositories in Monorepo are not currently supported.
- Path aliases are not supported (such as `@/pages/...`, `~/pages/...`, etc.); please use relative paths relative to `modern.routes.ts`.
:::
### `route` Function
The `route` function is a general-purpose route configuration function that automatically determines whether to generate a page route or layout route based on whether there are child routes. It can replace `layout`, `page`, `$` and other functions.
```ts
export default defineRoutes(({ route }, fileRoutes) => {
return [
// When no child routes, automatically generates page route
route("home.tsx", "/"),
route("about.tsx", "about"),
// When has child routes, automatically generates layout route
// dashboard/layout.tsx needs to contain <Outlet> to render child routes
route("dashboard/layout.tsx", "dashboard", [
route("dashboard/overview.tsx", "overview"), // Generated path: /dashboard/overview
route("dashboard/settings.tsx", "settings"), // Generated path: /dashboard/settings
]),
// Dynamic routes
route("products/detail.tsx", "products/:id"),
// Multiple paths pointing to the same component
route("user/profile.tsx", "user"),
route("user/profile.tsx", "profile"),
]
})
```
**Use cases**:
- Quick route configuration without explicitly specifying page or layout
- Simplify the complexity of route configuration
### `layout` Function
The `layout` function is specifically used to configure layout routes, always generates layout components, and must contain child routes:
```ts
export default defineRoutes(({ layout, page }, fileRoutes) => {
return [
// Generate layout route with path "/auth", must contain child routes
layout("auth/layout.tsx", "auth", [
page("auth/login/page.tsx", "login"), // Generated path: /auth/login
page("auth/register/page.tsx", "register"), // Generated path: /auth/register
]),
]
})
```
**Use cases**:
- Need to explicitly specify a component as a layout component
- Provide common layout structure for multiple pages
- Need to share navigation, sidebar and other UI components across multiple routes
### `page` Function
The `page` function is specifically used to configure page routes, always generates page components:
```ts
export default defineRoutes(({ layout, page }, fileRoutes) => {
return [
layout("dashboard/layout.tsx", "dashboard", [
page("dashboard/overview.tsx", "overview"), // Generated path: /dashboard/overview
page("dashboard/settings.tsx", "settings"), // Generated path: /dashboard/settings
]),
]
})
```
**Use cases**:
- Need to explicitly specify a component as a page component
- Ensure the component does not contain `<Outlet>` child component rendering
- Provide clearer semantic expression
### `$` Function
The `$` function is specifically used to configure wildcard routes for handling unmatched routes:
```ts
export default defineRoutes(({ layout, page, $ }, fileRoutes) => {
return [
layout("blog/layout.tsx", "blog", [
page("blog/page.tsx", ""), // Generated path: /blog
page("blog/[id]/page.tsx", ":id"), // Generated path: /blog/:id
$("blog/$.tsx", "*"), // Wildcard route, matches all unmatched paths under /blog
]),
]
})
```
**Use cases**:
- Custom 404 pages
- Handle all unmatched requests under specific paths
:::tip
The `$` function has the same functionality as the `$.tsx` file in convention routes, used to catch unmatched route requests.
:::
## Configuring Routes
### Basic Example
```ts
export default defineRoutes(({ page }, fileRoutes) => {
return [
// Use page function to explicitly specify page route
page("home.tsx", "/"),
page("about.tsx", "about"),
page("contact.tsx", "contact"),
]
})
```
### Routes Without Path
When no path is specified, routes inherit the parent path:
```ts
export default defineRoutes(({ layout, page }, fileRoutes) => {
return [
// Use layout function to explicitly specify layout route
// auth/layout.tsx needs to contain <Outlet> to render child routes
layout("auth/layout.tsx", [
page("login/page.tsx", "login"),
page("register/page.tsx", "register"),
]),
]
})
```
The above configuration will generate:
- `/login` → `auth/layout.tsx` + `login/page.tsx`
- `/register` → `auth/layout.tsx` + `register/page.tsx`
### Multiple Paths Pointing to the Same Component
```ts
export default defineRoutes(({ page }, fileRoutes) => {
return [
page("user.tsx", "user"),
page("user.tsx", "profile"),
page("user.tsx", "account"),
]
})
```
### Dynamic Routes
Config routes support dynamic route parameters:
```ts
export default defineRoutes(({ page }, fileRoutes) => {
return [
// Required parameter
page("blog/detail.tsx", "blog/:id"),
// Optional parameter
page("blog/index.tsx", "blog/:slug?"),
]
})
```
## Automatic Route-Related File Discovery
Config routes automatically discover component-related files without manual configuration. For any component file specified in `modern.routes.ts`, Modern.js will automatically find the following related files:
```ts
// modern.routes.ts
export default defineRoutes(({ route }, fileRoutes) => {
return [
route("pages/profile.tsx", "profile"),
route("pages/user/detail.tsx", "user/:id"),
]
})
```
Modern.js will automatically find and load:
- `pages/profile.data.ts` → Data loader
- `pages/profile.config.ts` → Route configuration
- `pages/profile.error.tsx` → Error boundary
- `pages/profile.loading.tsx` → Loading component
### Discovery Rules
- **File location**: Related files must be in the same directory as the component file
- **File naming**: Related file names are the same as the component file name (excluding extension)
- **Auto-discovery**: Modern.js automatically discovers and loads these files
:::tip
For more detailed information about data fetching, please refer to the [Data Fetching](/guides/basic-features/data/data-fetch.md) documentation. For Loading component usage, please refer to [Convention Routes - Loading](/guides/basic-features/routes/routes.md#loading-experimental).
:::
## Route Merging
Config routes can be used together with convention routes. You can merge routes by modifying the `fileRoutes` parameter:
1. **Override routes**: You can actively remove convention routes and replace them with config routes
2. **Supplement routes**: You can add new config routes based on convention routes
3. **Mixed usage**: You can add config child routes under convention layout routes
:::info
Current route structure can be viewed through the [`modern routes`](#debugging-routes) command
:::
### Merging Examples
The following examples demonstrate how to merge config routes with convention routes:
```ts
// modern.routes.ts
import { defineRoutes } from '@modern-js/runtime/config-routes';
export default defineRoutes(({ page }, fileRoutes) => {
// Scenario 1: Override convention routes
// Remove the original shop route and replace with custom component
const shopPageIndex = fileRoutes[0].children?.findIndex(
route => route.id === 'three_shop/page',
);
fileRoutes[0].children?.splice(shopPageIndex!, 1);
fileRoutes[0].children?.push(page('routes/CustomShop.tsx', 'shop'));
// Scenario 2: Supplement convention routes
// Add config routes without corresponding convention routes
fileRoutes[0].children?.push(page('routes/Settings.tsx', 'settings'));
// Scenario 3: Mixed nested routes
// Add config child routes under convention layout routes
const userRoute = fileRoutes[0].children?.find(
(route: any) => route.path === 'user',
);
if (userRoute?.children) {
userRoute.children.push(page('routes/user/CustomTab.tsx', 'custom-tab'));
}
// Scenario 4: Automatic discovery of related files
// Product.tsx will automatically discover Product.data.ts and Product.error.tsx
fileRoutes[0].children?.push(page('routes/Product.tsx', 'product/:id'));
return fileRoutes;
});
```
## Debugging Routes
Since the final structure after route merging may not be intuitive, Modern.js provides debugging commands to help you view complete route information:
```bash
# Generate route structure analysis report
npx modern routes
```
This command will generate the final route structure in the `dist/routes-inspect.json` file, helping you understand the complete route information after merging.
### Report File Examples
#### Single Entry Scenario
```json title="dist/routes-inspect.json"
{
"routes": [
{
"path": "/",
"component": "@_modern_js_src/routes/page",
"data": "@_modern_js_src/routes/page.data",
"clientData": "@_modern_js_src/routes/page.data.client",
"error": "@_modern_js_src/routes/page.error",
"loading": "@_modern_js_src/routes/page.loading"
},
{
"path": "/dashboard",
"component": "pages/admin",
"config": "pages/admin.config",
"error": "pages/admin.error"
},
{
"path": "/user",
"component": "layouts/user",
"children": [
{
"path": "/user/profile",
"component": "@_modern_js_src/routes/user/profile",
"data": "@_modern_js_src/routes/user/profile.data"
}
]
},
{
"path": "@_modern_js_src/routes/blog/:id",
"component": "blog/detail",
"params": ["id"],
"data": "blog/detail.data",
"loading": "blog/detail.loading"
},
{
"path": "/files/*",
"component": "@_modern_js_src/routes/files/list"
}
]
}
```
#### Multi-entry Scenario
In multi-entry projects, the report file will be grouped by entry name, where the key is entryName:
```json title="dist/routes-inspect.json"
{
"main": {
"routes": [
{
"path": "/",
"component": "@_modern_js_src/routes/page",
"data": "@_modern_js_src/routes/page.data",
"error": "@_modern_js_src/routes/page.error",
"loading": "@_modern_js_src/routes/page.loading"
},
{
"path": "/dashboard",
"component": "@_modern_js_src/routes/dashboard",
"config": "@_modern_js_src/routes/dashboard.config"
}
]
},
"admin": {
"routes": [
{
"path": "/",
"component": "@_modern_js_src/routes/dashboard",
"data": "@_modern_js_src/routes/dashboard.data",
"clientData": "@_modern_js_src/routes/dashboard.data.client",
"config": "@_modern_js_src/routes/dashboard.config"
},
{
"path": "/users",
"component": "@_modern_js_src/routes/users",
"data": "@_modern_js_src/routes/users.data",
"error": "@_modern_js_src/routes/users.error",
"loading": "@_modern_js_src/routes/users.loading"
}
]
}
}
```
#### Route-Related File Field Descriptions
In addition to basic route information, the report also displays related files found for each route:
- **`data`**: Server-side data loading file (`.data.ts`), used to fetch data on the server
- **`clientData`**: Client-side data loading file (`.data.client.ts`), used to refetch data on the client
- **`error`**: Error boundary file (`.error.tsx`), used to handle route rendering errors
- **`loading`**: Loading state component file (`.loading.tsx`), used to display data loading state
- **`config`**: Route configuration file (`.config.ts`), used to configure route metadata
These fields are optional and will only be displayed in the report when corresponding files are found. By viewing these fields, you can quickly understand the complete file structure for each route.
---
url: /guides/basic-features/routes/routes.md
---
# Routing
Modern.js routing is based on [React Router v7](https://reactrouter.com/en/main), offering file convention-based routing capabilities and supporting the industry-popular **nested routing** pattern. When an entry is recognized as [conventional routing](/guides/concept/entries.md#conventional-routing), Modern.js automatically generates the corresponding routing structure based on the file system.
:::note
The routing mentioned in this section all refers to conventional routing.
:::
## What is Nested Routing
Nested routing is a pattern that couples URL segments with the component hierarchy and data. Typically, URL segments determine:
- The layouts to render on the page
- The data dependencies of those layouts
Therefore, when using nested routing, the page's routing and UI structure are in correspondence. We will introduce this routing pattern in detail.
```bash
/user/johnny/profile /user/johnny/posts
+------------------+ +-----------------+
| User | | User |
| +--------------+ | | +-------------+ |
| | Profile | | +------------> | | Posts | |
| | | | | | | |
| +--------------+ | | +-------------+ |
+------------------+ +-----------------+
```
## Routing File Conventions
In the `routes/` directory, subdirectory names are mapped to route URLs. Modern.js has two file conventions: `layout.tsx` and `page.tsx`. These files determine the layout hierarchy of the application:
- `page.tsx`: This is the content component. When this file exists in a directory, the corresponding route URL is accessible.
- `layout.tsx`: This is the layout component and controls the layout of all sub-routes in its directory by using `<Outlet>` to represent child components.
:::tip
`.ts`, `.js`, `.jsx`, or `.tsx` file extensions can be used for the above convention files.
:::
### Page
The `<Page>` component refers to all `page.tsx` files in the `routes/` directory and is the leaf component for all routes. All routes should end with a `<Page>` component except for wildcard routes.
```tsx title=routes/page.tsx
export default () => {
return <div>Hello world</div>;
};
```
When the application has the following directory structure:
```bash
.
└── routes
├── page.tsx
└── user
└── page.tsx
```
The following two routes will be produced:
- `/`
- `/user`
### Layout
The `<Layout>` component refers to all `layout.tsx` files in the `routes/` directory. These represent the layout of their respective route segments, using `<Outlet>` for child components.
```tsx title=routes/layout.tsx
import { Link, Outlet, useLoaderData } from '@modern-js/runtime/router';
export default () => {
return (
<>
<Outlet></Outlet>
</>
);
};
```
:::note
`<Outlet>` is an API provided by React Router v7. For more details, see [Outlet](https://reactrouter.com/en/main/components/outlet#outlet).
:::
Under different directory structures, the components represented by `<Outlet>` are also different. To illustrate the relationship between `<Layout>` and `<Outlet>`, let's consider the following directory structure:
```bash
.
└── routes
├── blog
│ └── page.tsx
├── layout.tsx
├── page.tsx
└── user
├── layout.tsx
└── page.tsx
```
1. When the route is `/`, the `<Outlet>` in `routes/layout.tsx` represents the component exported from `routes/page.tsx`. The UI structure of the route is:
```tsx
<Layout>
<Page />
</Layout>
```
2. When the route is `/blog`, the `<Outlet>` in `routes/layout.tsx` represents the component exported from `routes/blog/page.tsx`. The UI structure of the route is:
```tsx
<Layout>
<BlogPage />
</Layout>
```
3. When the route is `/user`, the `<Outlet>` in `routes/layout.tsx` represents the component exported from `routes/user/layout.tsx`. The `<Outlet>` in `routes/user/layout.tsx` represents the component exported from `routes/user/page.tsx`. The UI structure of the route is:
```tsx
<Layout>
<UserLayout>
<UserPage />
</UserLayout>
</Layout>
```
In summary, if there is a `layout.tsx` in the sub-route's directory, the `<Outlet>` in the parent `layout.tsx` corresponds to the `layout.tsx` in the sub-route's directory. Otherwise, it corresponds to the `page.tsx` in the sub-route's directory.
## Dynamic Routes
Files and directories named with `[]` are turned into dynamic routes. For instance, consider the following directory structure:
```bash
.
└── routes
├── [id]
│ └── page.tsx
├── blog
│ └── page.tsx
└── page.tsx
```
The `routes/[id]/page.tsx` file will be converted to the `/:id` route. Apart from the `/blog` route that can be exactly matched, all `/xxx` paths will match this route.
In the component, you can use [useParams](/apis/app/runtime/router/router.md#useparams) to get parameters named accordingly.
```tsx
import { useParams } from '@modern-js/runtime/router';
function Blog() {
const { id } = useParams();
return <div>current blog ID is: {id}</div>;
}
export default Blog;
```
## Optional Dynamic Routes
Files and directories named with `[$]` are turned into optional dynamic routes. For example, the following directory structure:
```bash
.
└── routes
├── blog
│ └── [id$]
│ └── page.tsx
└── page.tsx
```
The `routes/blog/[id$]/page.tsx` file will be converted to the `/blog/:id?` route. All routes under `/blog` will match this route, and the `id` parameter is optional. This route can be used to distinguish between **create** and **edit** actions.
```tsx
import { useParams } from '@modern-js/runtime/router';
function Blog() {
const { id } = useParams();
if (id) {
return <div>current blog ID is: {id}</div>;
}
return <div>create new blog</div>;
}
export default Blog;
```
## Wildcard Routes
If there is a `$.tsx` file in a subdirectory, it acts as a wildcard route component and will be rendered when no other routes match.
:::note
`$.tsx` can be thought of as a special `<Page>` component. If no routes match, `$.tsx` will be rendered as a child component of the `<Layout>`.
:::
:::warning
If there is no `<Layout>` component in the current directory, `$.tsx` will not have any effect.
:::
For example, consider the following directory structure:
```bash
.
└── routes
├── blog
│ ├── $.tsx
│ └── layout.tsx
├── layout.tsx
└── page.tsx
```
When you visit `/blog/a` and no routes match, the page will render the `routes/blog/$.tsx` component. The UI structure of the route is:
```tsx
<RootLayout>
<BlogLayout>
<$></$>
</BlogLayout>
</RootLayout>
```
If you want `/blog` to match the `blog/$.tsx` file as well, you need to remove the `blog/layout.tsx` file from the same directory and ensure there are no other sub-routes under `blog`.
Similarly, you can use [useParams](/apis/app/runtime/router/router.md#useparams) to capture the remaining part of the URL in the `$.tsx` component.
```ts title="$.tsx"
import { useParams } from '@modern-js/runtime/router';
function Blog() {
// When the path is `/blog/aaa/bbb`
const params = useParams();
console.log(params); // ---> { '*': 'aaa/bbb' }
return <div>current blog URL is {params['*']}</div>;
}
export default Blog;
```
### Custom 404 Page
Wildcard routes can be added to any subdirectory in the `routes/` directory. A common use case is to customize a 404 page at any level using a `$.tsx` file.
For instance, if you want to show a 404 page for all unmatched routes, you can add a `routes/$.tsx` file:
```bash
.
└── routes
├── $.tsx
├── blog
│ └── [id$]
│ └── page.tsx
├── layout.tsx
└── page.tsx
```
```tsx
function Page404() {
return <div>404 Not Found</div>;
}
export default Page404;
```
At this point, when accessing routes other than `/` or `/blog/*`, they will match the `routes/$.tsx` component and display a 404 page.
## Route Handle Configuration
In some scenarios, each route might have its own data which the application needs to access in other components. A common example is retrieving breadcrumb information for the matched route.
Modern.js provides a convention where each `Layout`, `$`, or `Page` file can define its own `config` file such as `page.config.ts`. In this file, we conventionally export a named export `handle`, in which you can define any properties:
```ts title="routes/page.config.ts"
export const handle = {
breadcrumbName: 'profile',
};
```
These defined properties can be accessed using the [`useMatches`](https://reactrouter.com/en/main/hooks/use-matches) hook.
```ts title="routes/layout.ts"
export default () => {
const matches = useMatches();
const breadcrumbs = matches.map(
matchedRoute => matchedRoute?.handle?.breadcrumbName,
);
return <Breadcrumb names={breadcrumbs}></Breadcrumb>;
};
```
## Pathless Layouts
When a directory name starts with `__`, the corresponding directory name will not be converted into an actual route path, for example:
```bash
.
└── routes
├── __auth
│ ├── layout.tsx
│ ├── login
│ │ └── page.tsx
│ └── sign
│ └── page.tsx
├── layout.tsx
└── page.tsx
```
Modern.js will generate `/login` and `/sign` routes, and the `__auth/layout.tsx` component will serve as the layout for `login/page.tsx` and `sign/page.tsx`, but `__auth` will not appear as a path segment in the URL.
This feature is useful when you need to create independent layouts or categorize routes without adding additional path segments.
## Pathless File Segments
In some cases, a project may need complex routes that do not have independent UI layouts. Creating these routes as regular directories can lead to deeply nested directories.
Modern.js supports replacing directory names with `.` to divide route segments. For example, to create a route like `/user/profile/2022/edit`, you can create the following file:
```bash
└── routes
├── user.profile.[id].edit
│ └── page.tsx
├── layout.tsx
└── page.tsx
```
When accessed, the resulting route will have the following UI structure:
```tsx
<RootLayout>
{/* routes/user.profile.[id].edit/page.tsx */}
<UserProfileEdit />
</RootLayout>
```
## Route Redirections
In some applications, you may need to redirect to another route based on user identity or other data conditions. In Modern.js, you can use a [`Data Loader`](/guides/basic-features/data/data-fetch.md) file to fetch data or use traditional React components with `useEffect`.
### Redirecting in Data Loader
Create a `page.data.ts` file in the same directory as `page.tsx`. This file is the Data Loader for that route. In the Data Loader, you can call the `redirect` API to perform route redirections.
```ts title="routes/user/page.data.ts"
import { redirect } from '@modern-js/runtime/router';
export const loader = async () => {
const user = await getUser();
if (!user) {
return redirect('/login');
}
return null;
};
```
### Redirecting in a Component
To perform a redirection within a component, use the `useNavigate` hook as shown below:
```ts title="routes/user/page.ts"
import { useNavigate } from '@modern-js/runtime/router';
import { useEffect } from 'react';
export default () => {
const navigate = useNavigate();
useEffect(() => {
getUser().then(user => {
if (!user) {
navigate('/login');
}
});
});
return <div>Hello World</div>;
};
```
## Error Handling
In each directory under `routes/`, developers can define an `error.tsx` file that exports an `<ErrorBoundary>` component. When this component is present, rendering errors in the route directory will be caught by the `ErrorBoundary` component.
`<ErrorBoundary>` can return the UI view when an error occurs. If the current level does not declare an `<ErrorBoundary>` component, errors will bubble up to higher-level components until they are caught or thrown. Additionally, when an error occurs within a component, it only affects the route component and its children, leaving the state and view of other components unaffected and interactive.
{/* Todo API Routes */}
In the `<ErrorBoundary>` component, you can use [useRouteError](/apis/app/runtime/router/router.md#userouteerror) to obtain specific error information:
```tsx
import { useRouteError } from '@modern-js/runtime/router';
const ErrorBoundary = () => {
const error = useRouteError();
return (
<div>
<h1>{error.status}</h1>
<h2>{error.message}</h2>
</div>
);
};
export default ErrorBoundary;
```
## Loading (Experimental)
:::info Experimental
This feature is currently experimental, and its API may change in the future.
:::
In conventional routing, Modern.js automatically splits routes into chunks (each route loads as a separate JS chunk). When users visit a specific route, the corresponding chunk is automatically loaded, effectively reducing the first-screen load time. However, this can lead to a white screen if the route's chunk is not yet loaded.
Modern.js supports solving this issue with a `loading.tsx` file. Each directory under `routes/` can create a `loading.tsx` file that exports a `<Loading>` component.
:::warning
If there is no `<Layout>` component in the current directory, `loading.tsx` will not have any effect. To ensure a good user experience, Modern.js recommends adding a root Loading component to each application.
:::
When both this component and a `layout` component exist in the route directory, all child routes under this level will first display the UI from the exported `<Loading>` component until the corresponding JS chunk is fully loaded. For example, with the following file structure:
```bash
.
└── routes
├── blog
│ ├── [id]
│ │ └── page.tsx
│ └── page.tsx
├── layout.tsx
├── loading.tsx
└── page.tsx
```
When defining a `loading.tsx`, if the route transitions from `/` to `/blog` or from `/blog` to `/blog/123`, and the JS chunk for the route is not yet loaded, the UI from the `<Loading>` component will be displayed first. This results in the following UI structure:
```tsx title=When the route is "/"
<Layout>
<Suspense fallback={<Loading />}>
<Page />
</Suspense>
</Layout>
```
```tsx title=When the route is "/blog"
<Layout>
<Suspense fallback={<Loading />}>
<BlogPage />
</Suspense>
</Layout>
```
```tsx title=When the route is "/blog/123"
<Layout>
<Suspense fallback={<Loading />}>
<BlogIdPage />
</Suspense>
</Layout>
```
## Prefetching
Most white screens during route transitions can be optimized by defining a `<Loading>` component. Modern.js also supports preloading static resources and data with the `prefetch` attribute on `<Link>` components.
For applications with higher performance requirements, prefetching can further enhance the user experience by reducing the time spent displaying the `<Loading>` component:
```tsx
<Link prefetch="intent" to="page">
```
:::tip
Data preloading currently only preloads data returned by the [Data Loader](/guides/basic-features/data/data-fetch.md) in SSR projects.
:::
The `prefetch` attribute has three optional values:
- `none`: The default value. No prefetching, no additional behavior.
- `intent`: This is the recommended value for most scenarios. When you hover over the Link, it will automatically start loading the corresponding chunk and the data defined in the Data Loader. If the mouse moves away, the loading is automatically canceled. In our tests, even quick clicks can reduce load time by approximately 200ms.
- `render`: When the `<Link>` component is rendered, it begins loading the corresponding chunk and data defined in the Data Loader.
:::details Difference Between "render" and Not Using Route Splitting
- `render` allows you to control the timing of route splitting, triggering only when the `<Link>` component enters the viewport. You can control the loading timing of the split by adjusting the rendering position of the `<Link>` component.
- `render` loads static resources only during idle times, thus not occupying the loading time of critical modules.
- Besides preloading route splits, `render` will also initiate data prefetching in SSR projects.
:::
## FAQ
1. Why is there `@modern-js/runtime/router` to re-export React Router API?
Notice that all the code examples in the documentation uses APIs exported from the `@modern-js/runtime/router` package instead of directly using the API exported from the React Router package. So, what is the difference?
The API exported from `@modern-js/runtime/router` is the same as the API from the React Router package. If you encounter issues while using an API, check the React Router documentation and issues first.
Additionally, when using conventional routing, make sure to use the API from `@modern-js/runtime/router` instead of directly using the React Router API. Modern.js internally installs React Router, and using the React Router API directly in your application may result in two versions of React Router being present, causing unexpected behavior.
:::note
If you must directly use the React Router package's API (e.g., route behavior wrapped in a unified npm package), you can set [`source.alias`](/configure/app/source/alias.md) to point `react-router` and `react-router-dom` to the project's dependencies, avoiding the issue of two versions of React Router.
:::
---
url: /guides/basic-features/static-assets.md
---
# Import Static Assets
Modern.js supports import static assets, including images, fonts, and medias.
:::tip What is Static Assets
Static assets are files that are part of a web application and do not change, even when the application is being used. Examples of static assets include images, fonts, medias, stylesheets, and JavaScript files. These assets are typically stored on a web server or CDN, and delivered to the user's web browser when the Web application is accessed. Because they do not change, static assets can be cached by the browser, which helps to improve the performance of the Web application.
:::
## Assets Format
The following are the formats supported by Modern.js by default:
- **Image**: png, jpg, jpeg, gif, svg, bmp, webp, ico, apng, avif, tiff.
- **Fonts**: woff, woff2, eot, ttf, otf, ttc.
- **Media**: mp4, webm, ogg, mp3, wav, flac, aac, mov.
If you need to import assets in other formats, please refer to [Extend Asset Types](#extend-asset-types).
:::tip SVG images
SVG image is a special case. Modern.js support convert SVG to React components, so SVG is processed separately. For details, see [Import SVG Assets](/guides/basic-features/static-assets/svg-assets.md).
:::
## Import Assets in JS file
In JS files, you can directly import static assets in relative paths:
```tsx
// Import the logo.png image in the static directory
import logo from './static/logo.png';
export default () => <img src={logo} />;
```
Import with [alias](/guides/basic-features/alias.md) are also supported:
```tsx
import logo from '@/static/logo.png';
export default () => <img src={logo} />;
```
## Import Assets in CSS file
In CSS files, you can reference static assets in relative paths:
```css
.logo {
background-image: url('../static/logo.png');
}
```
Import with [alias](/guides/basic-features/alias.md) are also supported:
```css
.logo {
background-image: url('@/static/logo.png');
}
```
## Import Results
The result of importing static assets depends on the file size:
- When the file size is greater than 10KB, a URL will be returned, and the file will be output to the dist directory.
- When the file size is less than 10KB, it will be automatically inlined to Base64 format.
```js
import largeImage from './static/largeImage.png';
import smallImage from './static/smallImage.png';
console.log(largeImage); // "/static/largeImage.6c12aba3.png"
console.log(smallImage); // "data:image/png;base64,iVBORw0KGgo..."
```
For a more detailed introduction to asset inlining, please refer to the [Static Asset Inlining](/guides/advanced-features/page-performance/inline-assets.md) chapter.
## Output Files
When static assets are imported, they will be output to the dist directory. You can:
- Modify the output filename through [output.filename](/configure/app/output/filename.md).
- Modify the output path through [output.distPath](/configure/app/output/dist-path.md).
Please read [Output Files](/guides/basic-features/output-files.md) for details.
## URL Prefix
The URL returned after importing a asset will automatically include the path prefix:
- In development, using [dev.assetPrefix](/configure/app/dev/asset-prefix.md) to set the path prefix.
- In production, using [output.assetPrefix](/configure/app/output/asset-prefix.md) to set the path prefix.
For example, you can set `output.assetPrefix` to `https://modern.com`:
```js
import logo from './static/logo.png';
console.log(logo); // "https://modern.com/static/logo.6c12aba3.png"
```
## Add Type Declaration
When you import static assets in TypeScript code, TypeScript may prompt that the module is missing a type definition:
```
TS2307: Cannot find module './logo.png' or its corresponding type declarations.
```
To fix this, you need to add a type declaration file for the static assets, please create a `src/global.d.ts` file, and add the corresponding type declaration. Taking png images as an example, you need to add the following declarations:
```ts title="src/global.d.ts"
declare module '*.png' {
const content: string;
export default content;
}
```
After adding the type declaration, if the type error still exists, you can try to restart the current IDE, or adjust the directory where `global.d.ts` is located, making sure the TypeScript can correctly identify the type definition.
## Extend Asset Types
If the built-in asset types in Modern.js cannot meet your requirements, you can modify the built-in webpack/Rspack configuration and extend the asset types you need using [tools.bundlerChain](/configure/app/tools/bundler-chain.md).
For example, if you want to treat `*.pdf` files as assets and directly output them to the dist directory, you can add the following configuration:
```ts
export default {
tools: {
bundlerChain(chain) {
chain.module
.rule('pdf')
.test(/\.pdf$/)
.type('asset/resource');
},
},
};
```
After adding the above configuration, you can import `*.pdf` files in your code, for example:
```js
import myFile from './static/myFile.pdf';
console.log(myFile); // "/static/myFile.6c12aba3.pdf"
```
For more information about asset modules, please refer to:
- [Rspack Documentation - Asset modules](https://rspack.rs/guide/asset-module.html#asset-modules)
- [webpack Documentation - Asset modules](https://webpack.js.org/guides/asset-modules/)
## Image Format
When using image assets, you can choose a appropriate image format according to the pros and cons in the table below.
| Format | Pros | Cons | Scenarios |
| ------ | --------------------------------------------------------------------------------------------------------- | ----------------------------------------------------------------------------------- | ------------------------------------------------------------------------------------------------------------------------------------------------------ |
| PNG | Lossless compression, no loss of picture details, no distortion, support for translucency | Not suitable for pictures with complex color tables | Suitable for pictures with few colors and well-defined borders, suitable for logos, icons, transparent images and other scenes |
| JPG | Rich colors | Lossy compression, which will cause image distortion, does not support transparency | Suitable for pictures with a large number of colors, gradients, and overly complex pictures, suitable for portrait photos, landscapes and other scenes |
| WebP | Supports both lossy and lossless compression, supports transparency, and is much smaller than PNG and JPG | iOS compatibility is not good | Pixel images of almost any scene, and the hosting environment that supports WebP, should prefer WebP image format |
| SVG | Lossless format, no distortion, supports transparency | Not suitable for complex graphics | Suitable for vector graphics, suitable for icons |
---
url: /guides/basic-features/static-assets/json-files.md
---
# Import JSON Files
Modern.js supports import JSON files in code by default. You can use Rsbuild plugins to support importing [YAML](https://yaml.org/) and [Toml](https://toml.io/en/) files and converting them to JSON format.
## JSON file
You can import JSON files directly in JavaScript files.
### Example
```json title="example.json"
{
"name": "foo",
"items": [1, 2]
}
```
```js title="index.js"
import example from './example.json';
console.log(example.name); // 'foo';
console.log(example.items); // [1, 2];
```
### Named Import
Modern.js does not support importing JSON files via named import yet:
```js
import { name } from './example.json';
```
## YAML file
YAML is a data serialization language commonly used for writing configuration files.
You can configure the [YAML plugin](https://github.com/rspack-contrib/rsbuild-plugin-yaml) in `modern.config.ts` to support importing `.yaml` or `.yml` files, they will be automatically converted to JSON format.
```ts
import { defineConfig } from '@modern-js/app-tools';
import { pluginYaml } from '@rsbuild/plugin-yaml';
export default defineConfig({
plugins: [pluginYaml()],
});
```
### Example
```yaml title="example.yaml"
---
hello: world
foo:
bar: baz
```
```js
import example from './example.yaml';
console.log(example.hello); // 'world';
console.log(example.foo); // { bar: 'baz' };
```
### Add type declaration
When you import a YAML file in your TypeScript code, please create a `src/global.d.ts` file in your project and add the corresponding type declaration:
```ts title="src/global.d.ts"
declare module '*.yaml' {
const content: Record<string, any>;
export default content;
}
declare module '*.yml' {
const content: Record<string, any>;
export default content;
}
```
## Toml file
Toml is a semantically explicit, easy-to-read configuration file format.
You can configure the [TOML plugin](https://github.com/rspack-contrib/rsbuild-plugin-toml) in `modern.config.ts` to support importing `.toml` files, it will be automatically converted to JSON format.
```ts
import { defineConfig } from '@modern-js/app-tools';
import { pluginToml } from '@rsbuild/plugin-toml';
export default defineConfig({
plugins: [pluginToml()],
});
```
### Example
```toml title="example.toml"
hello = "world"
[foo]
bar = "baz"
```
```js
import example from './example.toml';
console.log(example.hello); // 'world';
console.log(example.foo); // { bar: 'baz' };
```
### Add type declaration
When you import Toml files in TypeScript code, please create a `src/global.d.ts` file in your project and add the corresponding type declarations:
```ts title="src/global.d.ts"
declare module '*.toml' {
const content: Record<string, any>;
export default content;
}
```
---
url: /guides/basic-features/static-assets/svg-assets.md
---
# Import SVG Assets
Modern.js supports import SVG assets and transform SVG into React components or URLs.
:::tip What is SVG
SVG stands for Scalable Vector Graphics. It is a type of image format that uses vector graphics to represent images. Vector graphics are different from raster graphics, which are made up of pixels. Instead, vector graphics use geometric shapes, lines, and curves to represent images. Because vector graphics are not made up of pixels, they can be scaled to any size without losing resolution or quality.
:::
## Import SVG in JS file
### Default Import
If you use the default import to reference SVG, it will be treated as a static asset and you will get a URL string:
```tsx title="src/component/Logo.tsx"
import logoURL from './static/logo.svg';
console.log(logoURL); // => "/static/logo.6c12aba3.png"
```
### Transform to React Component
When referencing SVG assets in JS files, if the import path includes the `?react` suffix, Modern.js will call SVGR to transform the SVG image into a React component:
```tsx title="src/component/Logo.tsx"
import Logo from './logo.svg?react';
export default () => <Logo />;
```
Modern.js also supports the following usage, transforming SVG into a React component by named import `ReactComponent`:
```tsx title="src/component/Logo.tsx"
import { ReactComponent as Logo } from './static/logo.svg';
export default () => <Logo />;
```
## Modify the Default Export
You can modify the default export of SVG files through the [output.svgDefaultExport](/configure/app/output/svg-default-export.md) config. For example, set the default export as a React component:
```ts
export default {
output: {
svgDefaultExport: 'component',
},
};
```
Then import the SVG, you'll get a React component instead of a URL:
```tsx title="src/component/Logo.tsx"
import Logo from './static/logo.svg';
export default () => <Logo />;
```
## Import SVG in CSS file
When import an SVG in a CSS file, the SVG is treated as a normal static asset and you will get a URL:
```css
.logo {
background-image: url('../static/logo.svg');
}
```
## Assets Processing
When SVG is imported not as a React component but as a normal static asset, it is processed exactly the same as other static assets, and it is also affected by rules such as assets inlining and URL prefixing.
Please read the [Import Static Assets](/guides/basic-features/static-assets.md) section to understand the processing rules for static assets.
## Disable SVGR Processing
By default, when an SVG resource is referenced in a JS file, Modern.js will call SVGR to convert the SVG into a React component. If you are sure that all SVG resources in your project are not being used as React components, you can turn off this conversion by setting [disableSvgr](/configure/app/output/disable-svgr.md) to true to improve build performance.
```js
export default {
output: {
disableSvgr: true,
},
};
```
## Add type declaration
When you reference an SVG asset in TypeScript code, TypeScript may prompt that the module is missing a type definition:
```
TS2307: Cannot find module './logo.svg' or its corresponding type declarations.
```
To fix this, you need to add a type declaration file for the SVG asset, please create a `src/global.d.ts` file, and add the following type declaration:
```ts
declare module '*.svg' {
export const ReactComponent: React.FunctionComponent<
React.SVGProps<SVGSVGElement>
>;
const content: string;
export default content;
}
declare module '*.svg?react' {
const ReactComponent: React.FunctionComponent<React.SVGProps<SVGSVGElement>>;
export default ReactComponent;
}
```
If you set `svgDefaultExport` to `'component'`, then change the type declaration to:
```ts
declare module '*.svg' {
export const ReactComponent: React.FunctionComponent<
React.SVGProps<SVGSVGElement>
>;
export default ReactComponent;
}
```
After adding the type declaration, if the type error still exists, you can try to restart the current IDE, or adjust the directory where `global.d.ts` is located, making sure the TypeScript can correctly identify the type definition.
## Modify the SVGR configuration
When SVGR is enabled, its default configuration is as follows:
```js
{
svgo: true,
svgoConfig: {
plugins: [
{
name: 'preset-default',
params: {
overrides: {
removeViewBox: false,
},
},
},
'prefixIds',
],
},
}
```
If you need to modify the SVGR configuration, you can do the following:
```js
export default {
tools: {
bundlerChain: (chain, { CHAIN_ID }) => {
chain.module
.rule(CHAIN_ID.RULE.SVG)
.oneOf(CHAIN_ID.ONE_OF.SVG)
.use(CHAIN_ID.USE.SVGR)
.tap(options => {
// modify svgoConfig
options.svgoConfig.plugins[0].params.overrides.removeUselessDefs = false;
return options;
});
},
},
};
```
---
url: /guides/basic-features/static-assets/wasm-assets.md
---
# Import Wasm Assets
Modern.js supports import WebAssembly assets in code.
:::tip What is WebAssembly
WebAssembly (Wasm) is a portable, high-performance binary format designed to execute CPU-intensive computing tasks in modern web browsers, bringing performance and reliability similar to native compiled code to the web platform.
:::
## Import
You can import a WebAssembly module via named import in a JavaScript file:
```js title="index.js"
import { add } from './add.wasm';
console.log(add); // [native code]
console.log(add(1, 2)); // 3
```
WebAssembly modules can also be imported via dynamic import:
```js title="index.js"
import('./add.wasm').then(({ add }) => {
console.log('---- Async Wasm Module');
console.log(add); // [native code]
console.log(add(1, 2)); // 3
});
```
You can also get the path of a WebAssembly module using the `new URL` syntax:
```js title="index.js"
const wasmURL = new URL('./add.wasm', import.meta.url);
console.log(wasmURL).pathname; // "/static/wasm/[hash].module.wasm"
```
## Output Directory
When a `.wasm` asset is imported, it will be output by Modern.js to the `dist/static/wasm` directory by default.
You can change the output directory of `.wasm` files via [output.distPath](/configure/app/output/dist-path.md) config.
```ts
export default {
output: {
distPath: {
wasm: 'resource/wasm',
},
},
};
```
## Add Type Declaration
When you import a Wasm file in TypeScript code, you usually need to add the corresponding type declaration.
For example, the `add.wasm` file exports an `add()` method, then you can create an `add.wasm.d.ts` file in the same directory and add the corresponding type declaration:
```ts title="add.wasm.d.ts"
export const add = (num1: number, num2: number) => number;
```
---
url: /guides/basic-features/testing/cypress.md
---
# Cypress
Cypress is a framework for E2E testing and component testing.
To use Cypress in Modern.js, you need to install the dependencies first. You can run the following commands:
```sh [npm]
npm install -D cypress
```
```sh [yarn]
yarn add -D cypress
```
```sh [pnpm]
pnpm install -D cypress
```
Next, create a `cypress.config.ts` file and add the following content:
```ts
import { defineConfig } from 'cypress'
export default defineConfig({
e2e: {
setupNodeEvents(on, config) {},
},
})
```
## Writing Test Cases
Now, use Cypress to write an E2E test case by first creating two Modern.js pages.
```tsx title="routes/page.tsx"
import { Link } from '@modern-js/runtime/router';
const Index = () => (
<div>
<h1>Home</h1>
<Link to="/about">About</Link>
</div>
);
export default Index;
```
```tsx title="routes/about/page.tsx"
import { Link } from '@modern-js/runtime/router';
const Index = () => (
<div>
<h1>About</h1>
<Link to="/">Home</Link>
</div>
);
export default Index;
```
Next, create the test case file:
```ts title="cypress/e2e/app.cy.ts"
describe('Navigation', () => {
it('should navigate to the about page', () => {
// Start from the index page
cy.visit('http://localhost:8080/')
// Find a link with an href attribute containing "about" and click it
cy.get('a[href*="about"]').click()
// The new url should include "/about"
cy.url().should('include', '/about')
// The new page should contain an h1 with "About"
cy.get('h1').contains('About')
})
})
```
The test file may lack type definitions for the API. You can refer to the [Cypress - Typescript](https://docs.cypress.io/guides/tooling/typescript-support#Configure-tsconfigjson) documentation to resolve this.
You can add the command to your `package.json`:
```json title="package.json"
{
"scripts": {
"test": "cypress open"
}
}
```
## Run Test Cases
Execute the above `test` command to run the test cases:
```bash
DevTools listening on ws://127.0.0.1:55203/devtools/browser/xxxxx
```
Cypress will open a headless browser. Following the prompts, you can find the corresponding test files and automatically run the E2E tests:
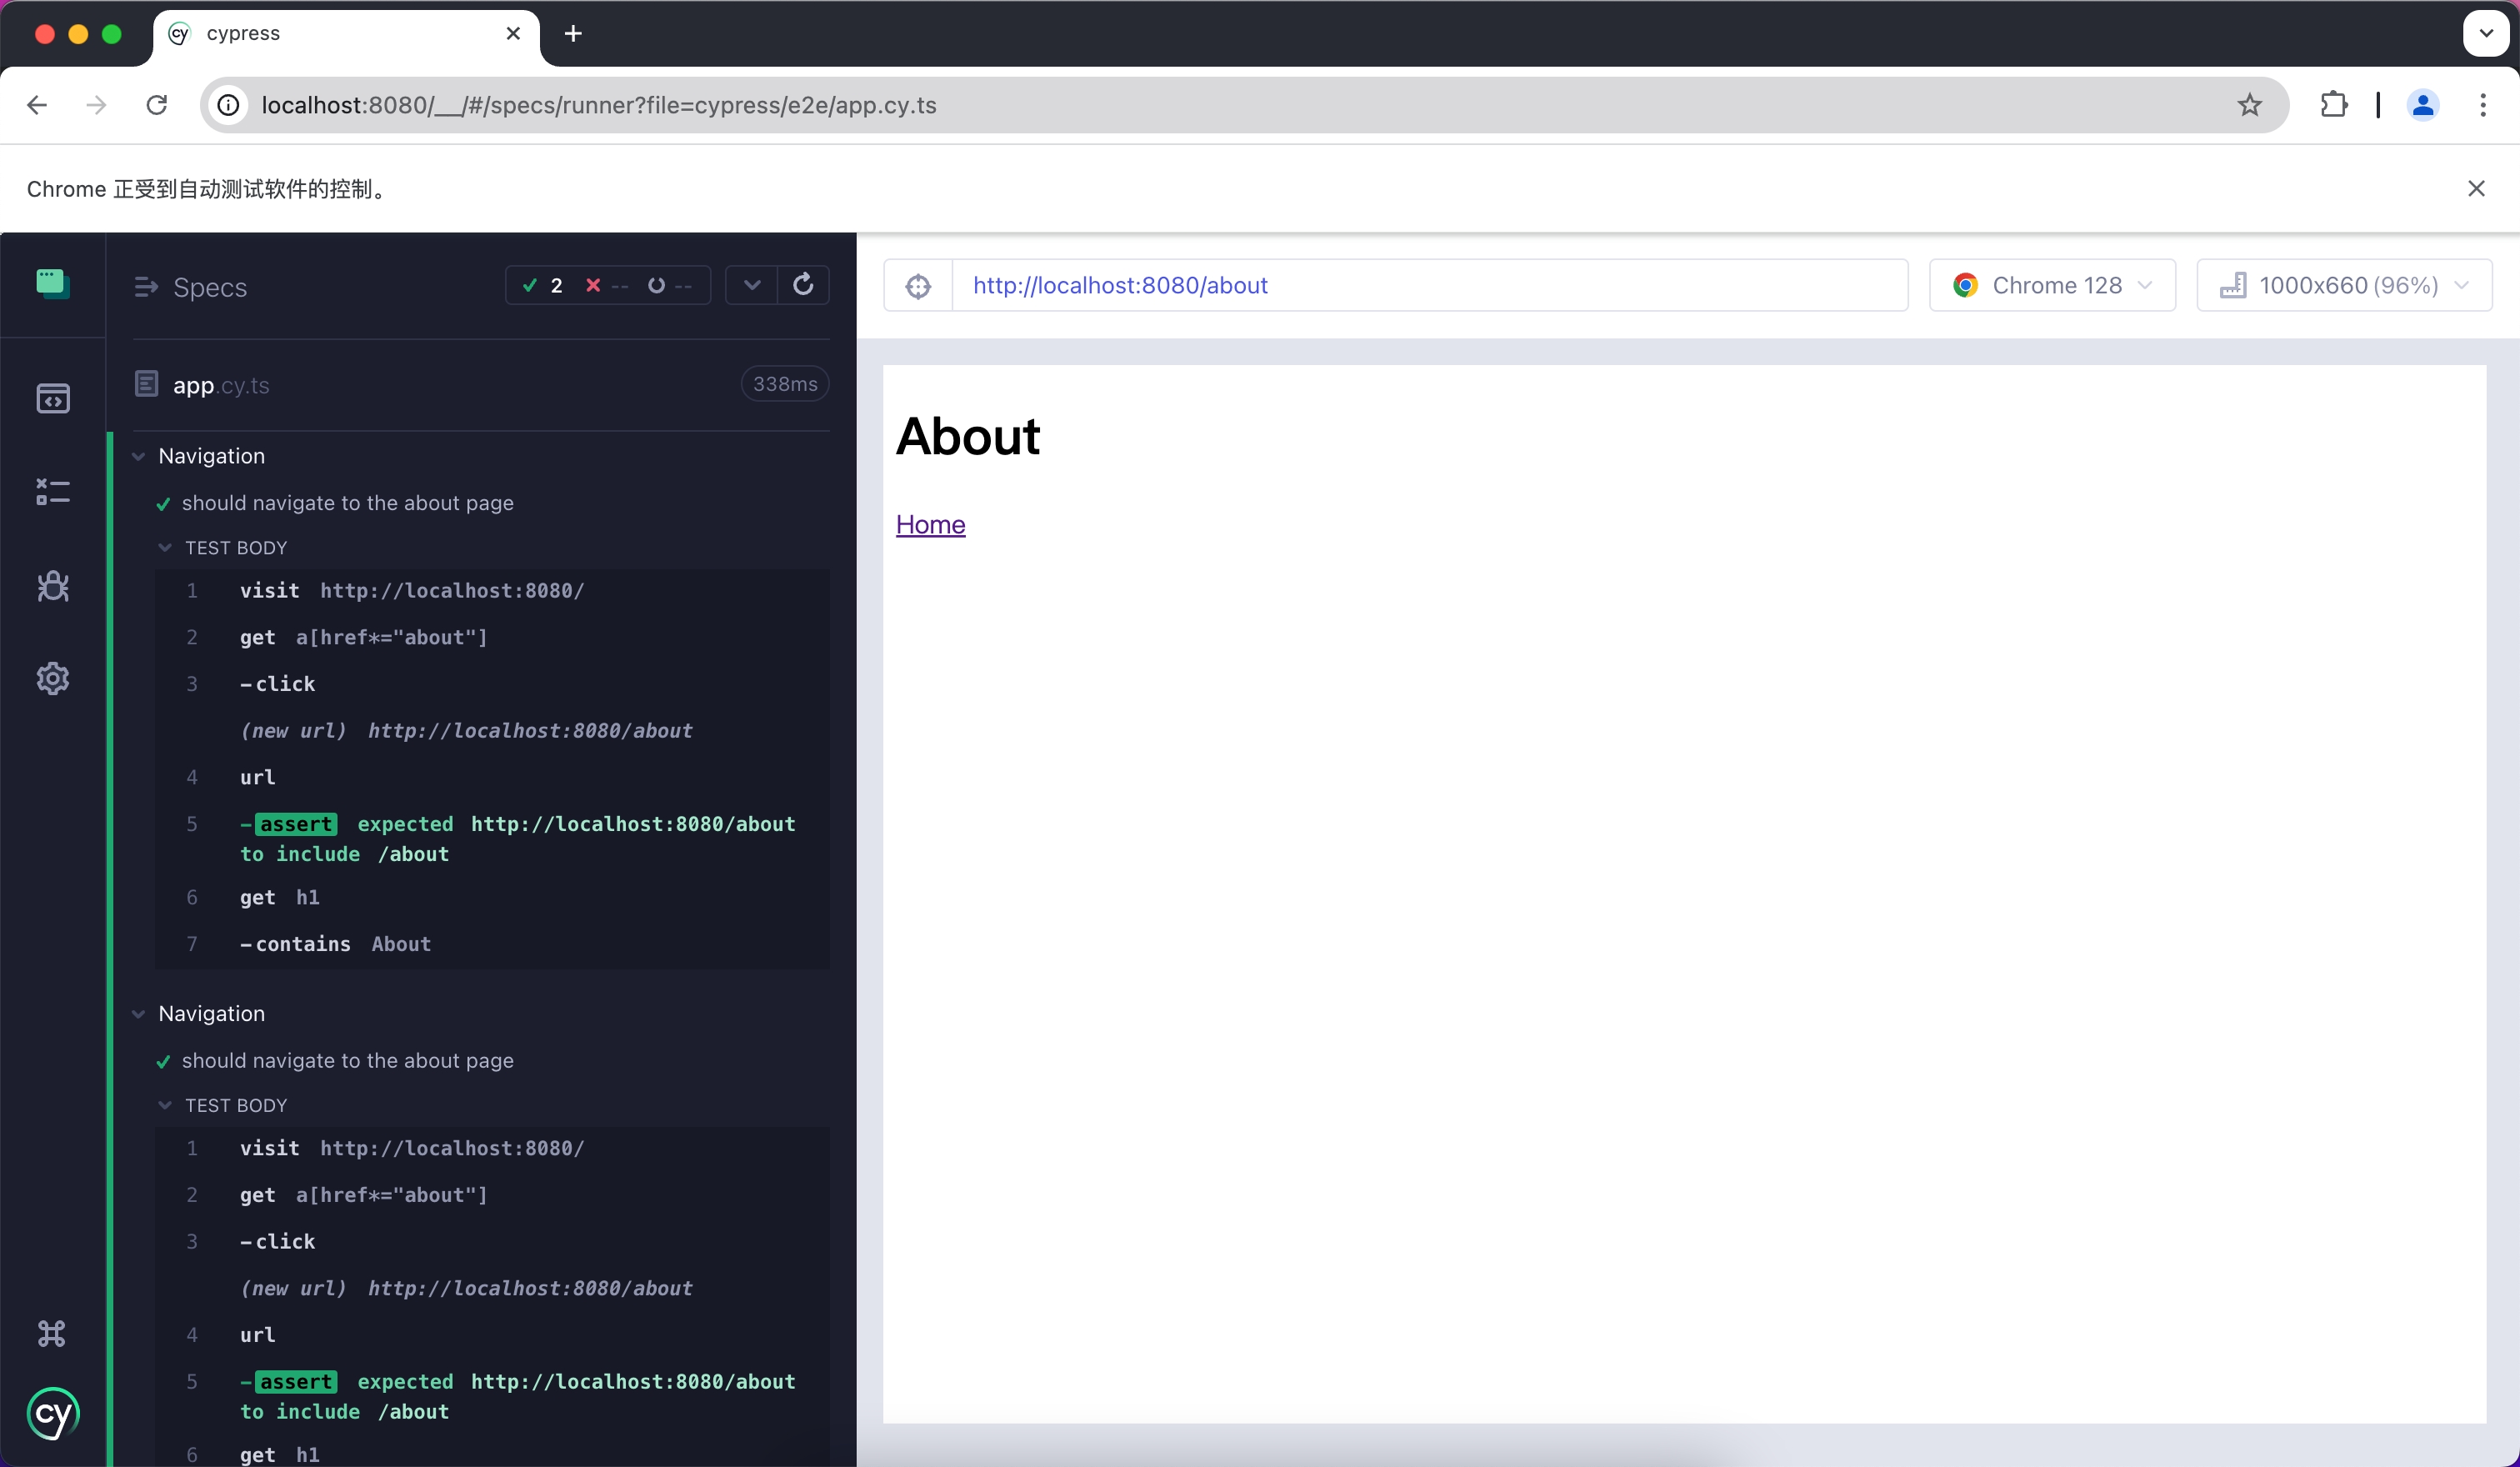
---
url: /guides/basic-features/testing/jest.md
---
# Jest
Jest is a JavaScript testing framework that is primarily used with React Testing Library for unit testing and Snapshot testing.
To use Jest in Modern.js, you need to install the dependencies first. You can run the following commands:
```sh [npm]
npm install -D jest jest-environment-jsdom @testing-library/react @testing-library/dom @testing-library/jest-dom
```
```sh [yarn]
yarn add -D jest jest-environment-jsdom @testing-library/react @testing-library/dom @testing-library/jest-dom
```
```sh [pnpm]
pnpm install -D jest jest-environment-jsdom @testing-library/react @testing-library/dom @testing-library/jest-dom
```
Next, you can run the following commands to automatically initialize Jest in your project and generate a basic `jest.config.ts` configuration:
```sh [npm]
npm init jest@latest
```
```sh [yarn]
yarn create jest@latest
```
```sh [pnpm]
pnpm create jest@latest
```
## Configuration File
:::note
This section will use `.ts` files for Jest testing.
:::
Compared to other testing frameworks, Jest requires more configuration at the build level, such as handling JSX and ESM syntax. Therefore, you need to install some additional dependencies:
```sh [npm]
npm install -D babel-jest @babel/core @babel/preset-env @babel/preset-react @babel/preset-typescript
```
```sh [yarn]
yarn add -D babel-jest @babel/core @babel/preset-env @babel/preset-react @babel/preset-typescript
```
```sh [pnpm]
pnpm install -D babel-jest @babel/core @babel/preset-env @babel/preset-react @babel/preset-typescript
```
### Configure Jest
You need to further configure the `jest.config.ts` file to allow Jest to correctly compile and run test cases. Here is a basic configuration:
```ts title="jest.config.ts"
import type { Config } from 'jest';
const config: Config = {
coverageProvider: 'babel',
setupFilesAfterEnv: ['<rootDir>/jest.setup.ts'],
testEnvironment: 'jsdom',
transform: {
'^.+\\.(js|jsx|ts|tsx)$': 'babel-jest',
},
transformIgnorePatterns: [],
};
export default config;
```
In the configuration, the `transformIgnorePatterns` is set to an empty array, meaning that all files will be compiled. If you want to speed up the test run, you can configure it as needed.
The `setupFilesAfterEnv` will be executed at startup. In `jest.setup.ts`, you can import `@testing-library/jest-dom`, which includes a set of convenient custom matchers, such as `.toBeInTheDocument()`, to make writing tests easier:
```ts title="jest.setup.ts"
import '@testing-library/jest-dom';
```
### Configure Babel
You need to configure Babel to allow Jest to automatically compile JSX and other syntax. Here is a basic configuration:
```js title="babel.config.js"
module.exports = {
presets: [
['@babel/preset-env', { targets: { node: 'current' } }],
['@babel/preset-react', { runtime: 'automatic' }],
'@babel/preset-typescript',
],
};
```
## Writing Test Cases
Now, you can start writing tests. First, add a `test` command in `package.json`:
```json title="package.json"
{
"scripts": {
"test": "jest"
}
}
```
Create a simple page for testing:
```tsx title="routes/page.tsx"
import { Link } from '@modern-js/runtime/router';
const Index = () => (
<div>
<h1>Home</h1>
<Link to="/about">About</Link>
</div>
);
export default Index;
```
Add a test case to check if the page has the expected text:
```tsx title="__tests__/page.test.tsx"
import '@testing-library/jest-dom';
import { render, screen } from '@testing-library/react';
import { BrowserRouter as Router } from '@modern-js/runtime/router';
import Page from '../routes/page';
describe('Page', () => {
it('renders a heading', () => {
render(
<Router>
<Page />
</Router>,
);
const heading = screen.getByRole('heading', { level: 1 });
expect(heading).toBeInTheDocument();
});
});
```
In the above test case, we imported the `<Router>` component from `@modern-js/runtime/router` because React Router requires the corresponding context when rendering some route-related components.
:::note
When running directly in the Modern.js application, the `<Router>` component will be automatically injected.
:::
## Run Test Cases
Execute the above `test` command to run the test cases:
```bash
PASS src/__tests__/page.test.tsx
Page
✓ renders a heading (31 ms)
Test Suites: 1 passed, 1 total
Tests: 1 passed, 1 total
Snapshots: 0 total
Time: 0.959 s, estimated 1 s
```
---
url: /guides/basic-features/testing/playwright.md
---
# Playwright
Playwright is a testing framework that allows you to run tests automatically in Chromium, Firefox, and WebKit environments using a single API. You can use it to **write E2E tests**.
To use Playwright in Modern.js, you need to install the dependencies first. You can run the following commands:
```sh [npm]
npm init playwright
```
```sh [yarn]
yarn create playwright
```
```sh [pnpm]
pnpm create playwright
```
The above commands will automatically install Playwright dependencies and help you install and configure it in your project through a series of prompts, including adding a `playwright.config.ts` file.
:::info
Refer to the official Playwright documentation at [Install Playwright](https://playwright.dev/docs/intro#installation) for a more detailed guide.
:::
After creating with the default configuration, you can see the following files in your project:
```ts title="tests/example.spec.ts"
import { test, expect } from '@playwright/test';
test('has title', async ({ page }) => {
await page.goto('https://playwright.dev/');
// Expect a title "to contain" a substring.
await expect(page).toHaveTitle(/Playwright/);
});
test('get started link', async ({ page }) => {
await page.goto('https://playwright.dev/');
// Click the get started link.
await page.getByRole('link', { name: 'Get started' }).click();
// Expects page to have a heading with the name of Installation.
await expect(
page.getByRole('heading', { name: 'Installation' }),
).toBeVisible();
});
```
This is the default test file. Now create some new pages and test them.
## Create E2E Tests
First, create two Modern.js pages.
```tsx title="routes/page.tsx"
import { Link } from '@modern-js/runtime/router';
const Index = () => (
<div>
<h1>Home</h1>
<Link to="/about">About</Link>
</div>
);
export default Index;
```
```tsx title="routes/about/page.tsx"
import { Link } from '@modern-js/runtime/router';
const Index = () => (
<div>
<h1>About</h1>
<Link to="/">Home</Link>
</div>
);
export default Index;
```
Next, add test cases to ensure the links on your pages work properly.
```ts title="tests/example.spec.ts"
import { test, expect } from '@playwright/test'
test('should navigate to the about page', async ({ page }) => {
// Start from the index page (the baseURL is set via the webServer in the playwright.config.ts)
await page.goto('http://localhost:8080/')
// Find an element with the text 'About' and click on it
await page.click('text=About')
// The new URL should be "/about" (baseURL is used there)
await expect(page).toHaveURL('http://localhost:8080/about')
// The new page should contain an h1 with "About"
await expect(page.locator('h1')).toContainText('About')
})
```
## Run Test Cases
Playwright requires your Modern.js server to be running. We recommend running your test cases under production builds; you can run `pnpm run build` and `pnpm run serve` to simulate the production environment locally.
```bash
info Starting production server...
> Local: http://localhost:8080/
> Network: http://10.94.59.30:8080/
```
After the project is successfully built and running, you can run Playwright cases in another terminal by executing `npx playwright test`:
```bash
Running 3 tests using 3 workers
3 passed (2.0s)
To open last HTML report run:
npx playwright show-report
```
---
url: /guides/basic-features/testing/rstest.md
---
# Rstest
[Rstest](https://rstest.rs) is a testing framework developed by the Rspack team and built on top of Rspack for fast test execution.
This guide explains how to integrate Rstest with Modern.js for web app testing.
## Quick Start
Install the base dependencies first:
```sh [npm]
npm add @rstest/core @modern-js/adapter-rstest -D
```
```sh [yarn]
yarn add @rstest/core @modern-js/adapter-rstest -D
```
```sh [pnpm]
pnpm add @rstest/core @modern-js/adapter-rstest -D
```
```sh [bun]
bun add @rstest/core @modern-js/adapter-rstest -D
```
```sh [deno]
deno add npm:@rstest/core npm:@modern-js/adapter-rstest -D
```
Then create `rstest.config.ts`:
```ts title="rstest.config.ts"
import { defineConfig } from '@rstest/core';
import { withModernConfig } from '@modern-js/adapter-rstest';
export default defineConfig({
extends: withModernConfig(),
});
```
`@modern-js/adapter-rstest` lets Rstest inherit your existing Modern.js config so your test setup stays aligned with your app.
For more configuration details, refer to the [Rstest configuration documentation](https://rstest.rs/config).
You can run tests with `npx rstest`, or add a script in `package.json`:
```json title="package.json"
{
"scripts": {
"test": "rstest"
}
}
```
## Testing Web UI
For web UI tests in Modern.js, there are two common approaches:
- Use Rstest browser mode, which runs tests in a real browser. This is the recommended option in most cases, although it is currently experimental.
- Use a simulated DOM environment with `happy-dom` and Testing Library. This matches the default web test environment provided by `@modern-js/adapter-rstest`.
We generally recommend browser mode because it uses real browser APIs and behavior, supports cases that simulated DOM environments cannot fully cover, and offers a better debugging experience when UI behavior does not match expectations.
### Browser mode (experimental)
If you want to test in a real browser instead of a simulated DOM, install the browser mode dependencies:
```sh [npm]
npm add @rstest/browser @rstest/browser-react playwright -D
```
```sh [yarn]
yarn add @rstest/browser @rstest/browser-react playwright -D
```
```sh [pnpm]
pnpm add @rstest/browser @rstest/browser-react playwright -D
```
```sh [bun]
bun add @rstest/browser @rstest/browser-react playwright -D
```
```sh [deno]
deno add npm:@rstest/browser npm:@rstest/browser-react npm:playwright -D
```
Then enable browser mode in `rstest.config.ts`:
```ts title="rstest.config.ts"
import { defineConfig } from '@rstest/core';
import { withModernConfig } from '@modern-js/adapter-rstest';
export default defineConfig({
extends: withModernConfig(),
browser: {
enabled: true,
provider: 'playwright',
},
});
```
Example test:
```tsx title="__tests__/page.browser.test.tsx"
import { BrowserRouter as Router } from '@modern-js/runtime/router';
import { page } from '@rstest/browser';
import { render } from '@rstest/browser-react';
import { expect, test } from '@rstest/core';
import Page from '../routes/page';
test('Page', async () => {
await render(
<Router>
<Page />
</Router>,
);
await expect.element(
page.getByRole('heading', { level: 1, name: 'Home' }),
).toBeVisible();
});
```
For more browser mode setup, Locator APIs, and assertions, refer to the [Rstest documentation](https://rstest.rs/guide/browser-testing/).
### DOM simulation with `happy-dom`
Install the DOM testing dependencies:
```sh [npm]
npm add happy-dom @testing-library/react @testing-library/dom -D
```
```sh [yarn]
yarn add happy-dom @testing-library/react @testing-library/dom -D
```
```sh [pnpm]
pnpm add happy-dom @testing-library/react @testing-library/dom -D
```
```sh [bun]
bun add happy-dom @testing-library/react @testing-library/dom -D
```
```sh [deno]
deno add npm:happy-dom npm:@testing-library/react npm:@testing-library/dom -D
```
Update `rstest.config.ts` to use `happy-dom`:
```ts title="rstest.config.ts"
import { defineConfig } from '@rstest/core';
import { withModernConfig } from '@modern-js/adapter-rstest';
export default defineConfig({
extends: withModernConfig(),
testEnvironment: 'happy-dom',
});
```
First, create a simple page for testing:
```tsx title="routes/page.tsx"
import { Link } from '@modern-js/runtime/router';
const Page = () => (
<div>
<h1>Home</h1>
<Link to="/about">About</Link>
</div>
);
export default Page;
```
Then add a test case:
```tsx title="__tests__/page.test.tsx"
import { BrowserRouter as Router } from '@modern-js/runtime/router';
import { expect, test } from '@rstest/core';
import { render, screen } from '@testing-library/react';
import Page from '../routes/page';
test('Page', () => {
render(
<Router>
<Page />
</Router>,
);
expect(screen.getByRole('heading', { level: 1, name: 'Home' })).toBeDefined();
});
```
## Running Test Cases
Execute the `test` command above to run your tests:
```bash
✓ __tests__/page.test.tsx (1)
✓ Page
Test Files 1 passed
Tests 1 passed
Duration 510ms (build 145ms, tests 365ms)
```
## Node Mode
If you need node mode tests for server-side logic such as `bff`, refer to the [Rstest documentation](https://rstest.rs) directly.
Modern.js mainly targets web apps, so this guide focuses on web UI testing and browser mode.
---
url: /guides/basic-features/testing/vitest.md
---
# Vitest
Vitest is a testing framework driven by Vite, which can be used for unit testing in combination with React Testing Library.
To use Vitest in Modern.js, you need to install the dependencies first. You can run the following commands:
```sh [npm]
npm install -D vitest @vitejs/plugin-react jsdom @testing-library/react @testing-library/dom
```
```sh [yarn]
yarn add -D vitest @vitejs/plugin-react jsdom @testing-library/react @testing-library/dom
```
```sh [pnpm]
pnpm install -D vitest @vitejs/plugin-react jsdom @testing-library/react @testing-library/dom
```
```sh [bun]
bun add -D vitest @vitejs/plugin-react jsdom @testing-library/react @testing-library/dom
```
Next, you need to create a Vitest configuration file `vitest.config.ts` with the following content:
```ts title="vitest.config.ts"
import { defineConfig } from 'vitest/config'
import react from '@vitejs/plugin-react'
export default defineConfig({
plugins: [react()],
test: {
environment: 'jsdom',
},
})
```
For more information about Vitest configuration, you can refer to the [Vitest configuration documentation](https://vitest.dev/config/#configuration).
You can optionally add the `vitest` command to `package.json`:
```json title="package.json"
{
"scripts": {
"test": "vitest"
}
}
```
After running this command, Vitest will automatically watch your file changes and rerun the test cases.
## Create Unit Tests
First, create a simple page for testing:
```tsx title="routes/page.tsx"
import { Link } from '@modern-js/runtime/router';
const Index = () => (
<div>
<h1>Home</h1>
<Link to="/about">About</Link>
</div>
);
export default Index;
```
Add a test case to check if the page has the expected text:
```tsx title="__tests__/page.test.tsx"
import { expect, test } from 'vitest';
import { render, screen } from '@testing-library/react';
import { BrowserRouter as Router } from '@modern-js/runtime/router';
import Page from '../routes/page';
test('Page', () => {
render(
<Router>
<Page />
</Router>,
);
expect(screen.getByRole('heading', { level: 1, name: 'Home' })).toBeDefined();
});
```
In the above test case, we imported the `<Router>` component from `@modern-js/runtime/router` because React Router requires the corresponding context when rendering some route-related components.
:::note
When running directly in the Modern.js application, the `<Router>` component will be automatically injected.
:::
## Run Test Cases
Execute the above `test` command to run the test cases:
```bash
✓ src/__tests__/page.test.tsx (1)
✓ Page
Test Files 1 passed (1)
Tests 1 passed (1)
Start at 15:37:12
Duration 999ms (transform 119ms, setup 0ms, collect 365ms, tests 33ms, environment 421ms, prepare 44ms)
PASS Waiting for file changes...
```
---
url: /guides/concept/builder.md
---
# Build Engine
Modern.js internally encapsulates [Rsbuild](https://v2.rsbuild.rs/), using Rspack as the bundler.
::: tip What is Rsbuild?
Rsbuild is a build tool based on Rspack. It is an enhanced Rspack CLI, easy-to-use, and ready-to-use out of the box.
:::
## Build Architecture
From the building perspective, Modern.js can be divided into three-layers, from top to bottom:
- Upper-level framework: Modern.js.
- Build tool: Rsbuild.
- Bundler: Rspack.
## Build Documentation
The documentation address of Rsbuild is: [https://v2.rsbuild.rs/](https://v2.rsbuild.rs/)
In this documentation, you can learn about the detailed introduction of Rsbuild, and you can also find complete usage guides for various building capabilities.
If you want to understand the use of build configurations, it is recommended that you read the Modern.js documentation first, because the build configurations and defaults in Modern.js are not exactly the same as Rsbuild.
## Build Plugins
In Modern.js, you can register Rspack plugins or Rsbuild plugins:
- Rspack plugins: Configured through [tools.bundlerChain](/configure/app/tools/bundler-chain.md).
- Rsbuild plugins: Configured through [builderPlugins](/configure/app/builder-plugins.md).
## Build Capabilities
Rsbuild provides rich build capabilities, including JavaScript compilation, CSS compilation, static assets processing, code hot update, code compression, TS type checking, and dozens of other capabilities.
We recommend that you read [「Rsbuild - All Features」](https://v2.rsbuild.rs/guide/start/features) to learn about all the features provided by Rsbuild.
---
url: /guides/concept/entries.md
---
# Page Entry
Through this chapter, you can understand the entry conventions in Modern.js and how to customize entries.
## What is Entry
**Entry refers to the starting module of a page.**
In a Modern.js application, each entry corresponds to an independent page and a server-side route. By default, Modern.js automatically determines page entries based on directory conventions, and also supports customizing entries through configuration options.
Many configuration options provided by Modern.js are divided by entry, such as page title, HTML template, page meta information, whether to enable SSR/SSG, server-side routing rules, etc. If you want to learn more about the technical details of entries, please refer to the [In-Depth](#in-depth) chapter.
## Single Entry and Multiple Entries
The application initialized by Modern.js is a single-entry application with the following structure:
```
.
├── src
│ └── routes
│ ├── index.css
│ ├── layout.tsx
│ └── page.tsx
├── package.json
├── modern.config.ts
└── tsconfig.json
```
In a Modern.js application, you can easily switch from single entry to multiple entries. To manually create multiple entries, follow these steps:
1. **Move the original entry code to a directory named after the `name` field in `package.json`**
Assuming the `name` in `package.json` is `myapp`, you need to move the `src/routes/` directory to `src/myapp/routes/`:
```bash
# Create new directory
mkdir -p src/myapp
# Move original entry code
mv src/routes src/myapp/routes
```
2. **Create a new entry directory**
Create a new entry directory, for example `new-entry`:
```bash
# Create new entry directory
mkdir -p src/new-entry/routes
```
3. **Create necessary files in the new entry directory**
Create basic files in the `routes/` directory of the new entry:
```bash
# Create basic files (adjust content as needed)
touch src/new-entry/routes/index.css
touch src/new-entry/routes/layout.tsx
touch src/new-entry/routes/page.tsx
```
After completing the above steps, the `src/` directory structure will be as follows:
```bash
.
├── myapp # Original entry
│ └── routes
│ ├── index.css
│ ├── layout.tsx
│ └── page.tsx
└── new-entry # New entry
└── routes
├── index.css
├── layout.tsx
└── page.tsx
```
Modern.js will use the entry with the same name as the `name` field in `package.json` as the main entry. The route of the main entry is `/`, and the route of other entries is `/{entryName}`. For example, when the `name` in `package.json` is `myapp`, `src/myapp` will be the main entry of the application.
You can execute `pnpm run dev` to start the development server. At this time, you can see that a new route named `/new-entry` has been added, and the routes of the original pages have not changed.
:::note
The concepts of **single entry/multiple entry** and **SPA/MPA** are not equivalent. The former is about how to configure and package the application, while the latter is a pattern for organizing front-end applications. Each entry can be SPA or non-SPA.
:::
## Entry Types
Modern.js supports three entry types, each with different use cases and characteristics. Choosing the appropriate entry type can help you better organize your code.
### How to Identify Entries
Modern.js automatically scans directories to identify entries that meet the criteria. A directory is recognized as an entry if it meets **one of the following three conditions**:
1. **Has a `routes/` directory** → Convention routing entry
2. **Has an `App.tsx?` file** → Self-controlled routing entry
3. **Has an `entry.tsx?` file** → Custom entry
:::tip 入口扫描逻辑
- 如果 `src/` 本身满足入口条件 → 单入口应用
- 如果 `src/` 不满足条件 → 扫描 `src/` 下的子目录 → 多入口应用
- 单入口应用中,默认入口名为 `index`
:::
:::tip Custom scanning directory
You can modify the directory for identifying entries through [source.entriesDir](/configure/app/source/entries-dir.md).
:::
Next, we will introduce the usage of each entry type in detail.
### Convention Routing
If there is a `routes/` directory in the entry, we call this entry a convention routing entry. Modern.js will scan the files under `routes/` during startup and automatically generate client-side routes (react-router) based on file conventions. For example:
```bash
src/
└── routes/
├── layout.tsx # Layout component (optional)
├── page.tsx # Homepage component (/ route)
├── about/
│ └── page.tsx # About page (/about route)
└── blog/
├── page.tsx # Blog list page (/blog route)
└── [id]/
└── page.tsx # Blog detail page (/blog/:id route)
```
Component correspondence
| File | Route | Description |
| --------------------------- | ------------- | ----------------------------- |
| `routes/layout.tsx` | Global layout | Outer container for all pages |
| `routes/page.tsx` | `/` | Homepage |
| `routes/about/page.tsx` | `/about` | About page |
| `routes/blog/[id]/page.tsx` | `/blog/:id` | Dynamic route page |
For more details, please refer to [Routing Solution](/guides/basic-features/routes/routes.md#convention-routing).
### Self-controlled Routing
If there is an `App.tsx?` file in the entry, this entry is a self-controlled routing entry. This method gives developers complete routing control.
```bash
.
├── src
│ └── App.tsx
```
For the entry defined as `src/App.tsx`, Modern.js does not perform additional routing operations. Developers can use the [React Router v7](https://reactrouter.com/en/main) API to set up client-side routes, or not set up client-side routes. For example, the following code sets up client-side routes in the application:
```tsx title="src/App.tsx"
import { BrowserRouter, Route, Routes } from '@modern-js/runtime/router';
export default () => {
return (
<BrowserRouter>
<Routes>
<Route index element={<div>index</div>} />
<Route path="about" element={<div>about</div>} />
</Routes>
</BrowserRouter>
);
};
```
:::note
We recommend developers use convention routing. Modern.js provides a series of optimizations in resource loading and rendering for convention routing by default and offers built-in SSR capabilities. When using self-controlled routing, these capabilities need to be encapsulated by developers themselves.
:::
### Custom Entry
By default, when using convention routing or self-controlled routing, Modern.js will automatically handle rendering. If you want to customize this behavior, you can implement it through a custom entry file.
:::tip
Custom entries can coexist with convention routing and self-controlled routing entries, customizing the application initialization logic.
:::
If there is an `entry.tsx` file in the entry, Modern.js will no longer control the application's rendering process. You can call the `createRoot` and `render` functions in the `entry.tsx` file to complete the application entry logic.
```tsx title="src/entry.tsx"
import { createRoot } from '@modern-js/runtime/react';
import { render } from '@modern-js/runtime/browser';
// Create root component
const ModernRoot = createRoot();
// Render to DOM
render(<ModernRoot />);
```
In the code above, the component returned by the `createRoot` function is the component generated from the `routes/` directory or exported by `App.tsx`. The `render` function is used to handle rendering and mounting components. For example, if you want to execute some asynchronous tasks before rendering, you can implement it like this:
```tsx
import { createRoot } from '@modern-js/runtime/react';
import { render } from '@modern-js/runtime/browser';
const ModernRoot = createRoot();
async function beforeRender() {
// some async request
}
beforeRender().then(() => {
render(<ModernRoot />);
});
```
If you don't want to use any of Modern.js's runtime capabilities, you can also mount the component to the DOM node yourself, for example:
```js title=src/entry.tsx
import React from 'react';
import { createRoot } from 'react-dom/client';
import App from './App';
const container = document.getElementById('root');
if (container) {
const root = createRoot(container);
root.render(<App />);
}
```
In this mode, **you will not be able to use Modern.js framework's runtime capabilities**, such as:
- Convention routing, i.e., routing based on files under `src/routes`
- Server-Side Rendering (SSR)
- Internationalization (i18n)
- Module Federation
## Specifying Entries in Configuration File
In some cases, you may need to customize the entry configuration instead of using the entry conventions provided by Modern.js.
For example, if you need to migrate a non-Modern.js application to Modern.js, and it is not structured according to Modern.js's directory structure, there might be some migration costs involved in changing it to the conventional structure. In such cases, you can use custom entries.
Modern.js provides the following configuration options that you can set in [modern.config.ts](/configure/app/usage.md):
- [source.entries](/configure/app/source/entries.md): Used to set custom entry objects.
- [source.disableDefaultEntries](/configure/app/source/disable-default-entries.md): Used to disable Modern.js's default entry scanning behavior. When you use custom entries, parts of your project structure might coincidentally match the Modern.js conventional directory structure, but you may not want Modern.js to generate entry configurations for them. Enabling this option can help avoid this issue.
### Example
Here is an example of a custom entry. You can also refer to the documentation of the corresponding configuration options for more usage.
```ts title="modern.config.ts"
export default defineConfig({
source: {
entries: {
// Specify an entry named 'my-entry'
'my-entry': {
// Path to the entry module
entry: './src/my-page/index.tsx',
// Disable automatic generation of entry code by Modern.js
disableMount: true,
},
},
// Disable entry scanning behavior
disableDefaultEntries: true,
},
});
```
## In-Depth
The concept of page entry is derived from the concept of [Entrypoint](https://webpack.js.org/concepts/entry-points/) in webpack. It is mainly used to configure JavaScript or other modules to be executed during application startup. webpack's [best practice](https://webpack.docschina.org/concepts/entry-points/#multi-page-application) for web applications usually corresponds entries to HTML output files, meaning each additional entry will eventually generate a corresponding HTML file in the output. The modules imported by the entry will be compiled and packaged into multiple Chunk outputs. For example, JavaScript modules may ultimately generate several file outputs similar to `dist/static/js/index.ea39u8.js`.
It's important to distinguish the relationships between concepts such as entry and route:
- **Entry**: Contains multiple modules used for startup execution.
- **Client Router**: In Modern.js, it is usually implemented by `react-router`, using the History API to determine which React component to load and display based on the browser's current URL.
- **Server Router**: The server can mimic [devServer behavior](https://webpack.docschina.org/configuration/dev-server/#devserverhistoryapifallback), returning the index.html page instead of all 404 responses to implement client-side routing, or it can implement any routing logic as needed.
Their corresponding relationships are as follows:
- Each website project can contain multiple entries
- Each entry contains several modules (source code files)
- Each entry usually corresponds to one HTML file output and several other outputs
- Each HTML file can contain multiple client-side routing solutions (for example, using both `react-router` and `@tanstack/react-router` in the same page)
- Each HTML file can be mapped to multiple server-side routes
- Each HTML file can contain multiple client-side routing solutions, and when accessing different routes of a single-entry application, the same HTML file is actually used
## Common Issues
1. **Does each client route defined by `react-router` generate a separate HTML file?**
No. Each entry usually only generates one HTML file. If multiple client routing systems are defined in a single entry, they will share this one HTML file.
2. **Does each `page.tsx` file in the `routes/` directory of convention routing generate an HTML file?**
No. Convention routing is a client-side routing solution implemented based on `react-router`. Its convention is that each `page.tsx` file under the `routes/` directory corresponds to a client-side route of `react-router`. `routes/` itself serves as a page entry, corresponding to one HTML file in the final output.
3. **Do Server-Side Rendering (SSR) projects build multiple HTML outputs?**
When using server-side rendering applications, it is not necessary to generate an HTML output at build time. It can only include server-side JavaScript output for rendering. At this time, `react-router` will run and schedule routes on the server side, rendering and responding with HTML content on each request.
However, Modern.js will still generate a complete client-side output containing HTML files for each entry at build time, which can be used to downgrade to client-side rendering when server-side rendering fails.
Another special case is a project using Static Site Generation (SSG). Even if it is a single-entry SSG application built with convention routing, Modern.js will generate a separate HTML file for each `page.tsx` file outside the Rspack process.
It should be noted that even when server-side rendering is enabled, React usually still needs to execute the hydration phase and run `react-router` routing on the frontend.
4. **Are there exceptions where single-entry applications output multiple HTML files?**
You can configure [html-rspack-plugin](https://rspack.rs/zh/plugins/rspack/html-rspack-plugin#%E7%94%9F%E6%88%90%E5%A4%9A%E4%B8%AA-html-%E6%96%87%E4%BB%B6) to generate multiple HTML outputs for each entry, or have multiple entries share one HTML output.
5. **What is a Multi-Page Application (Multi-Page Application)?**
The "page" in a Multi-Page Application refers to a static HTML file.
Generally, any web application that contains multiple entries and multiple HTML file outputs can be called a multi-page application.
In a narrow sense, a multi-page application may not contain client-side routing and only navigates between static HTML pages through elements like `<a>` tags. However, in practice, multi-page applications often need to configure client-side routing for their entries to meet different needs.
Conversely, a single-entry application that defines multiple routes through `react-router` is called a Single Page Application because it only generates one HTML file output.
---
url: /guides/concept/server.md
---
# Web Server
Modern.js provides an integrated Web server for applications that can run in any container environment with Node.js. Whether executing the `dev` command in a local development environment, running the `build && serve` commands in a production environment, or using the official deployment solution, it all runs through this Web server to host the application.
## Underlying Dependencies
Modern.js builds its Web server based on the [Hono framework](https://hono.dev/). Hono is a small, simple, and ultra-fast web standard-based framework that can run on any JavaScript runtime.
## Development & Production
The Web server flow in both Modern.js development and production environments is entirely isomorphic, so you don't need to worry about differences between them.
As mentioned in the [Build Tools](/guides/concept/builder.md) section, Modern.js' underlying build capability is provided by Rsbuild, and some server-side capabilities in the development environment are coupled with the build tools, such as HMR. Modern.js needs to reuse these capabilities of the Rsbuild Dev Server.
In the development environment, Modern.js directly uses the middlewares provided by Rsbuild, which includes capabilities needed during the development stage such as HMR and Proxy. Additionally, Modern.js provides capabilities such as Mock, routing, and rendering on top of this:
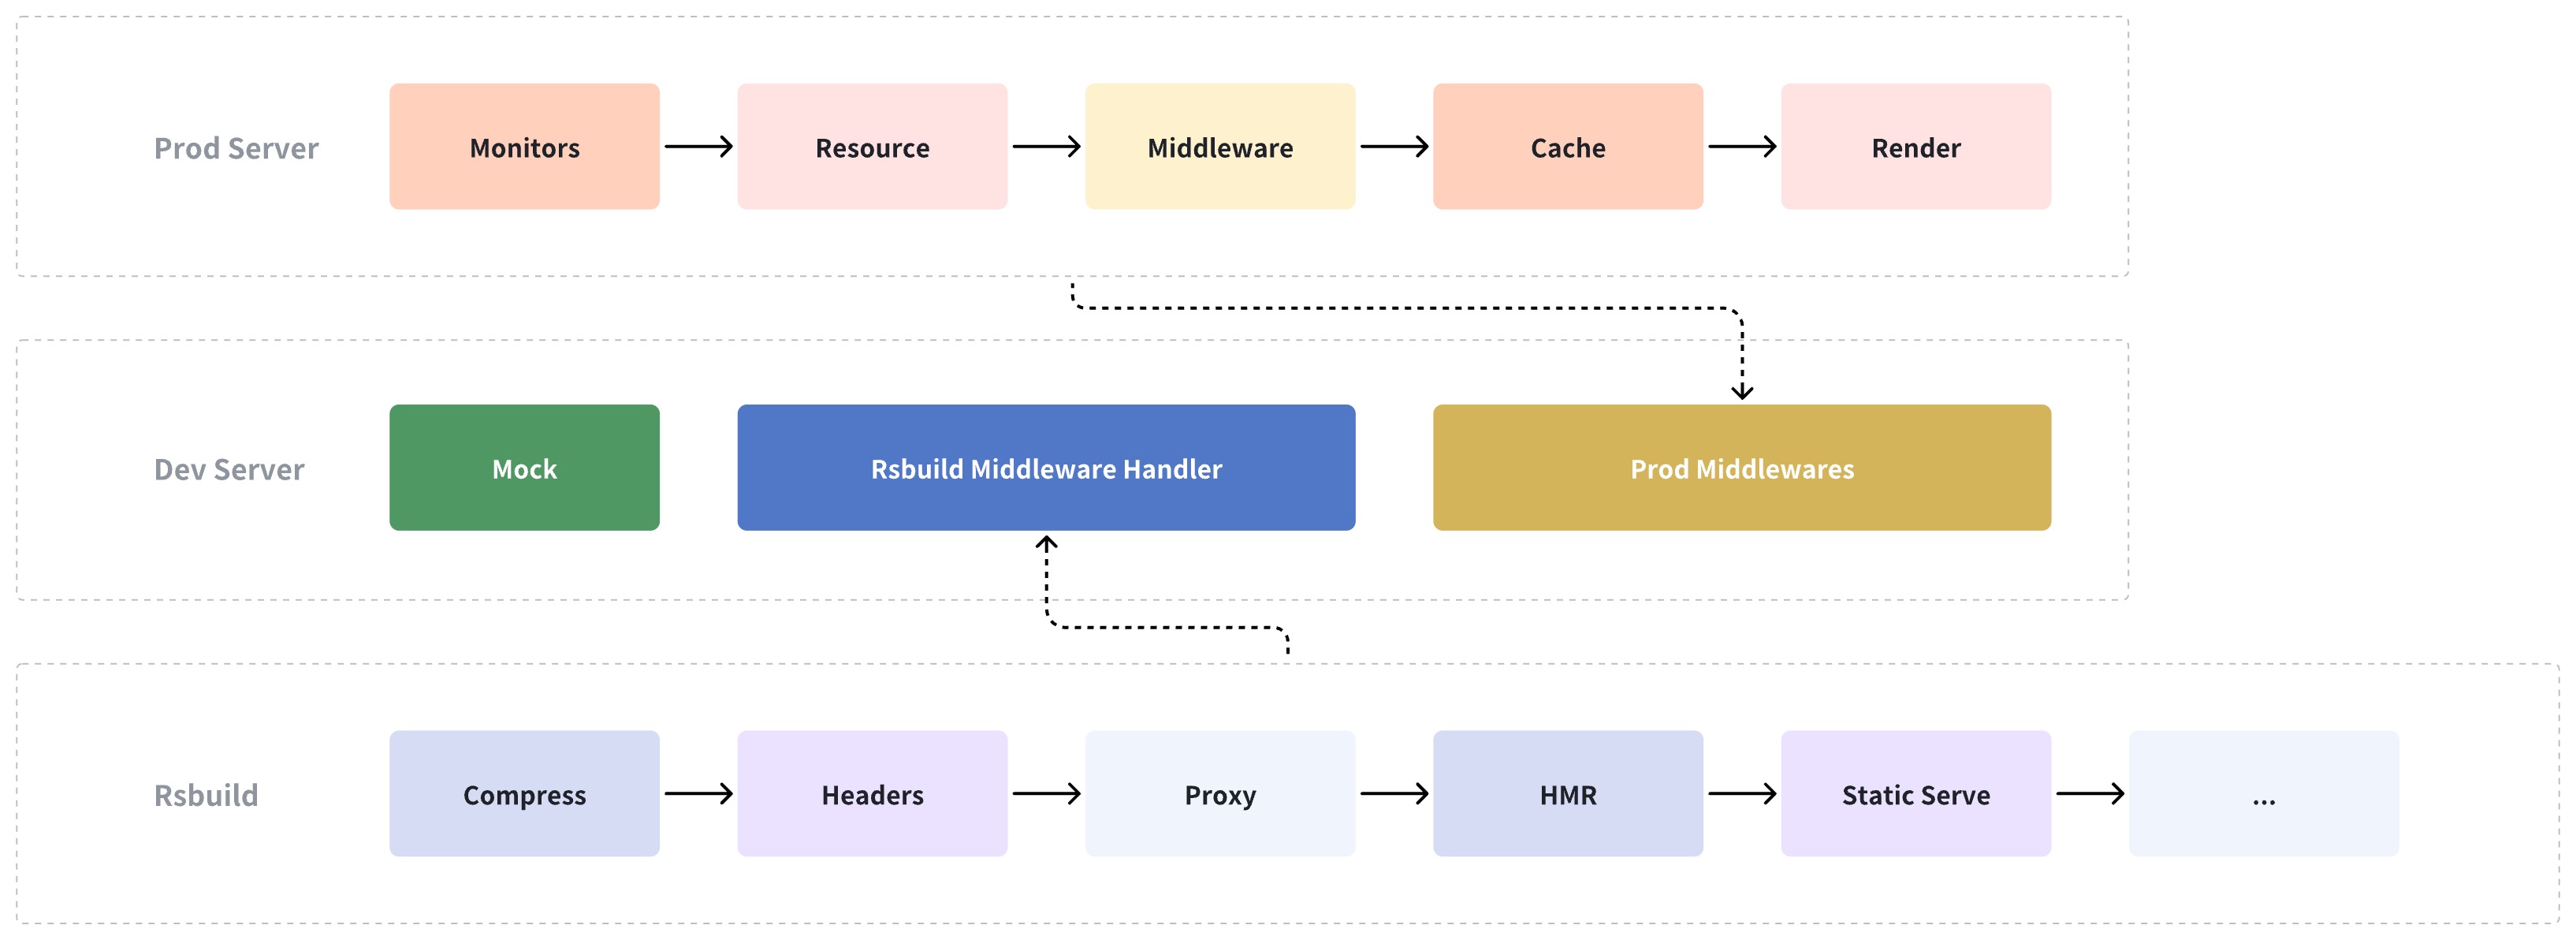
Therefore, in Modern.js, the development environment merely adds middleware to the production environment. All capabilities of the production environment are also applicable in the development environment, ensuring no fragmentation between the two.
:::tip
Static asset files can be directly hosted by Modern.js' server, but it is highly recommended to upload these files to a CDN in a production environment.
:::
## Running in CI Environments
Modern.js supports running built artifacts in any Node.js environment. Typically, the CI environment has already installed all application dependencies.
You can run the [`modern build`](/apis/app/commands.md#modern-build) command to build the application and the [`modern serve`](/apis/app/commands.md#modern-serve) command to run the Web server, starting the Modern.js application.
## Running in Production Environments
When deploying to production, the artifact size should be as small as possible. The aforementioned method for running in CI environments keeps all artifacts from the original project. Therefore, it is not recommended to run the application using the above commands in a production environment.
Modern.js offers a standalone deployment solution. When running the [`modern deploy`](/apis/app/commands.md#modern-deploy) command, the artifacts will include an entry file for running the Web server.
---
url: /guides/get-started/glossary.md
---
# Glossary
## BFF
BFF is short for "Backend For Frontend". It is an architecture pattern that involves creating a backend service for frontend applications.
The BFF service acts as an intermediary between the frontend application and the server API, and can provide customized APIs for the frontend to use. This allows frontend developers to have more control over the data and functionality they need, without relying on the backend service to provide the corresponding capabilities.
## Bundler
Refers to module bundlers such as [Rspack](https://rspack.rs/).
The main goal of bundlers is to bundle JavaScript, CSS and other files together, and the bundled files can be used in the browser, Node.js or other environments. When bundler processes the Web application, it builds a dependency graph and then combines every module into one or more bundles.
## CSR
CSR stands for "Client-Side Rendering". It means that the page is rendered in the browser using JavaScript, and logic such as data fetching, templates, and routing is completed on the client side rather than the server.
In CSR, the server sends an empty HTML shell and some JavaScript scripts to the browser, and the browser fetching data from the server's API and renders dynamic content to the page.
## Module Federation
Module Federation (MF) is a technology solution that allows multiple JavaScript applications to share code and resources. Similar to microservices architecture on the server side, it allows you to split large applications into multiple independent smaller applications that can be developed, tested, and deployed independently, while dynamically loading modules from other applications at runtime.
Module Federation solves the problem of code duplication across multiple frontend applications. In the traditional approach, if multiple applications need to use the same components or utility functions, you would need to duplicate this code in each application, leading to code duplication, high maintenance costs, and larger application sizes. With Module Federation, you can place common code in one application and have other applications load it dynamically as needed, enabling code sharing and reducing duplication.
Module Federation 2.0 supports [Rspack](https://rspack.rs/) build tools, and provides enhanced features such as dynamic type hints, Manifest, Federation Runtime, runtime plugin system, and Chrome Devtools support for better development experience and debugging capabilities. You can visit the [Module Federation official documentation](https://module-federation.io/) to learn more.
Modern.js provides an example project for Module Federation. Please refer to [module-federation-examples - modernjs](https://github.com/module-federation/module-federation-examples/tree/db5bdbeee56f779999a2c591fc553eb94eb20b36/modernjs).
## Rsbuild
[Rsbuild](https://v2.rsbuild.rs/) is an Rspack-based build tool for the web. The main goal of Rsbuild is to provide out-of-the-box build capabilities for Rspack users, allowing developers to start a web project with zero configuration.
Rsbuild integrates high-performance Rust-based tools from the community, including Rspack and SWC, to provide first-class build speed and development experience.
## Rspack
[Rspack](https://rspack.rs/) is a high performance JavaScript bundler written in Rust. It offers strong compatibility with the webpack ecosystem, allowing for seamless replacement of webpack, and provides lightning fast build speeds.
Compared to webpack, Rspack has significantly improved build performance, thanks not only to the language advantages brought by Rust, but also to its parallel architecture and incremental compilation features. Benchmarking has shown that Rspack can provide 5-10 times better compilation performance.
## SSR
SSR stands for "Server-Side Rendering". It means that the HTML of the web page is generated by the server and sent to the client, rather than sending only an empty HTML shell and relying on JavaScript to generate the page content.
In traditional client-side rendering, the server sends an empty HTML shell and some JavaScript scripts to the client, and then fetching data from the server's API and fills the page with dynamic content. This leads to slow initial page loading times and is not conducive to user experience and SEO.
With SSR, the server generates HTML that already contains dynamic content and sends it to the client. This makes the initial page loading faster and more SEO-friendly, as search engines can crawl the rendered page.
## SSG
SSG stands for "Static Site Generation". It means that web pages are pre-rendered as static HTML and served directly to the client, without the need for the server to generate HTML in real-time.
In traditional SSR, the server generates HTML in real-time every time a user requests a page. With SSG, HTML can be generated in advance during the build process and hosted on a CDN or other static assets service.
Compared to traditional SSR, SSG can provide faster loading speeds and less server-side overhead, as there is no need to maintain a server to generate HTML in real-time. However, SSG is not suitable for websites that require dynamic content, as the HTML is generated during the build process and does not support real-time updates.
## SWC
[SWC](https://SWC.rs/) (Speedy Web Compiler) is a transformer and minimizer for JavaScript and TypeScript based on `Rust`. SWC can provide the same abilities with Babel, and it's more than 10x faster than Babel.
Modern.js has a out-of-box plugin for SWC, power your Web application with Polyfill and minification, we also port some common used Babel plugins to SWC.
---
url: /guides/get-started/introduction.md
---
# Introduction to Modern.js
**Modern.js is a progressive web framework based on React**. At ByteDance, we use Modern.js to build upper-level frameworks that have supported the development of thousands of web applications.
Modern.js can provide developers with an ultimate **Development Experience** and enable applications to have better **User Experience**.
In the process of developing React applications, developers usually need to design implementation plans for certain features or use other libraries and frameworks to solve these problems. Modern.js supports all configurations and tools needed by React applications, and has built-in **additional features and optimizations**. Developers can use React to build the UI of the application, and then gradually adopt the features of Modern.js to solve common application requirements, such as routing, data acquisition, and state management.
It mainly includes the following features:
- 🚀 **Rust Bundler**: Modern.js uses Rsbuild/Rspack as the build tool, providing blazing fast compilation.
- 🪜 **Progressive**: Create projects with the most streamlined templates, gradually enable plugin features through the generator, and customize solutions.
- 🏠 **Integration**: Development and production environment web server are unique, CSR and SSR are isomorphic development, and API service calls are functions as interfaces.
- 🕸 **Convention Routing**: Using file-based routing helps developers quickly set up applications.
## Comparison with Others
### Next.js
Next.js is one of the most popular React frameworks in the community. It is developed by Vercel.
If you want to build a single-page application (SPA) and render it on the client side, Next.js may not be the best choice because many of its features are designed around server-first principles. If you need to use client-side rendering, you can only use limited functionality through Next.js's "static exports" feature.
Modern.js considers both client-side rendering (CSR) and server-side rendering (SSR) to be equally important. When you build a Modern.js application, it defaults to client-side rendering. You can also enable SSR or Server Components whenever you need it, and even enable SSR for specific pages. The whole process is fully progressive.
### Umi
Umi is the underlying frontend framework for the Ant Group. Modern.js and Umi share many similarities, such as support for plugin system, convention-based routing, and micro-generators.
**The main difference between Modern.js and Umi is their approach to optimizing build speed**. Umi uses MFSU technology to improve build speed, while Modern.js uses Rspack to achieve 5 to 10 times faster build speed. From our perspective, Rust tools like Rspack are more in line with the long-term evolution of the front-end toolchain, as they can strike a good balance between performance, stability, and ecosystem compatibility.
In addition, Modern.js provides richer server-side features, including comprehensive SSR capabilities, integrated BFF development capabilities, and support for custom web servers. These capabilities have been extensively validated by ByteDance in numerous online applications and can be directly used in production environments.
### Remix
Pelease refer to [Modern.js vs Remix](https://github.com/web-infra-dev/modern.js/discussions/4872).
---
url: /guides/get-started/quick-start.md
---
# Quick Start
## Environment
### Node.js
Before getting started, you will need to install [Node.js](https://nodejs.org/), and ensure that your Node.js version is not lower than v20.19.5. **We recommend using the LTS version of Node.js 22.**
You can check the currently used Node.js version with the following command:
```bash
node -v
```
If you do not have Node.js installed in your current environment, or the installed version is lower than v20.19.5, you can use [nvm](https://github.com/nvm-sh/nvm) or [fnm](https://github.com/Schniz/fnm) to install the required version.
Here is an example of how to install the Node.js 22 LTS version via nvm:
```bash
# Install the long-term support version of Node.js 22
nvm install 22 --lts
# Make the newly installed Node.js 22 as the default version
nvm alias default 22
# Switch to the newly installed Node.js 22
nvm use 22
```
:::tip nvm and fnm
Both nvm and fnm are Node.js version management tools. Relatively speaking, nvm is more mature and stable, while fnm is implemented using Rust, which provides better performance than nvm.
:::
Additionally, after installing nvm or fnm, when there is a `.nvmrc` file containing `lts/jod` in the repository's root directory, the system will automatically install or switch to the correct Node.js version upon entering the repository.
### pnpm
It is recommended to use [pnpm](https://pnpm.io/installation) to manage dependencies:
```bash
npm install -g pnpm@10
```
:::note
Modern.js also supports dependency management with `yarn` and `npm`.
:::
## Installation
## Initialize
Modern.js provides the `@modern-js/create` tool to create projects. It does not require global installation and can be run on-demand using `npx`.
You can create a project in an existing empty directory:
```bash
mkdir myapp && cd myapp
npx @modern-js/create@latest
```
You can also create a project directly in a new directory:
```bash
npx @modern-js/create@latest myapp
```
`@modern-js/create` will directly create the application without providing an interactive Q & A interface:
```bash
🚀 Welcome to Modern.js
📦 Creating project "myapp"...
✨ Project created successfully! 🎉
📋 Next, you can run the following commands:
📁 Enter the project directory:
cd myapp
🔧 Initialize Git repository:
git init
📥 Install project dependencies:
pnpm install
⚡ Start the development server:
pnpm start
```
Now, the project structure is as follows:
```
.
├── biome.json
├── modern.config.ts
├── package.json
├── README.md
├── src
│ ├── modern-app-env.d.ts
│ ├── modern.runtime.ts
│ └── routes
│ ├── index.css
│ ├── layout.tsx
│ └── page.tsx
└── tsconfig.json
```
## Development
Run `pnpm run dev` in the project to start the project:
```bash
$ pnpm run dev
> modern dev
Modern.js Framework
ready Client compiled in 0.86 s
> Local: http://localhost:8080/
> Network: http://192.168.0.1:8080/
```
Open `http://localhost:8080/` in your browser to see the page content.
## Configuration
In a Modern.js project created using `@modern-js/create`, a `modern.config.ts` file is generated by default.
You can modify the configuration through this file to override the default behavior of Modern.js. For example, to enable SSR, add the following configuration:
```ts title="modern.config.ts"
import { appTools, defineConfig } from '@modern-js/app-tools';
export default defineConfig({
server: {
ssr: true,
},
plugins: [appTools()],
});
```
After running `pnpm run dev` again, you can find that the project has completed page rendering on the server in the browser's Network menu.
## Core npm Package
In a newly created project, the `@modern-js/app-tools` npm package is installed by default. It is the core package of the Modern.js framework and provides the following capabilities:
- It offers commonly used CLI commands such as `modern dev`, `modern build`, and more.
- It integrates Rsbuild, providing build capabilities.
- It integrates Modern.js Server, providing capabilities for development and production servers.
`@modern-js/app-tools` is implemented based on the plugin system of Modern.js. Essentially, it is a plugin. Therefore, you need to register `appTools` in the `plugins` field of the configuration file:
```ts title="modern.config.ts"
import { appTools, defineConfig } from '@modern-js/app-tools';
export default defineConfig({
plugins: [appTools()],
});
```
## Build the project
To build the production artifacts of the project, run `pnpm run build` in the project:
```bash
$ pnpm run build
> modern build
Modern.js Framework
info Starting production build...
info Type checker is enabled. It may take some time.
ready Client compiled in 6.19 s
info Production file sizes:
File Size Gzipped
dist/routes-manifest.json 0.74 kB 0.28 kB
dist/static/css/async/page.d7915515.css 1.4 kB 0.69 kB
dist/static/js/main.5ae469e7.js 3.0 kB 1.3 kB
dist/html/index/index.html 6.0 kB 2.6 kB
dist/static/js/async/page.ddc8a4c1.js 19.2 kB 6.7 kB
dist/static/js/34.171fffdb.js 21.3 kB 7.1 kB
dist/static/js/lib-router.8995a55e.js 55.3 kB 18.1 kB
dist/static/js/lib-lodash.53ec3384.js 71.4 kB 24.8 kB
dist/static/js/lib-react.b5856db9.js 140.0 kB 45.2 kB
dist/static/js/lib-polyfill.86c452b3.js 213.3 kB 69.9 kB
Total size: 531.8 kB
Gzipped size: 176.7 kB
```
By default, the build artifacts are generated in `dist/`, with the following directory structure:
```
dist
├── html
│ └── index
├── modern.config.json
├── route.json
├── routes-manifest.json
└── static
├── css
└── js
```
> If you need to customize the directory of the build artifacts, please refer to [Output files](/guides/basic-features/output-files.md).
## Verify
Run `pnpm run serve` in the project to verify whether the build artifacts run normally locally:
```bash
$ pnpm run serve
Modern.js Framework
info Starting production server...
> Local: http://localhost:8080/
> Network: http://192.168.0.1:8080/
```
Open `http://localhost:8080/` in the browser, and the content should be consistent with that of `pnpm run dev`.
## Deployment
After local develop, you can refer to the [Deployment](/guides/basic-features/deploy.md) section to deploy the project to the server.
---
url: /guides/get-started/tech-stack.md
---
# Tech Stack
The Modern.js framework comes with built-in popular libraries and development tools from the community.
In this document, you can learn about the main technology stack involved in the Modern.js framework, as well as some optional libraries and tools.
## UI Library
Modern.js uses [React 18](https://react.dev/) to build user interfaces and is also compatible with React 17.
Rsbuild supports building Vue applications. If you need to use Vue, you can refer to ["Rsbuild - Vue"](https://v2.rsbuild.rs/guide/framework/vue).
## Routing
Modern.js uses [React Router v7](https://reactrouter.com/en/main) for routing.
Modern.js supports conventional routing, self-controlled routing, or other routing schemes. Please refer to ["Routing"](/guides/basic-features/routes/routes.md) to make your choice.
## Package Manager
Modern.js can be used with any community package manager, such as [npm](https://www.npmjs.com/package/npm), [yarn](https://classic.yarnpkg.com/lang/en/), [pnpm](https://pnpm.io/), or [Bun](https://bun.sh/).
We recommend using pnpm for faster installation speed.
## Bundler
Modern.js uses [Rspack](https://rspack.rs/) to bundle your web applications.
## Transpiler
Modern.js uses [SWC](https://swc.rs/) as JavaScript transpiler to transform TypeScript or JSX into JavaScript code that can run in browsers and perform syntax downgrades.
When using Rspack for building, `babel-loader` is not enabled by default. If you need to add [Babel](https://babeljs.io/) plugins, you can configure them through [`babel plugin`](https://v2.rsbuild.rs/plugins/list/plugin-babel#babel-plugin), which will generate additional compilation overhead and slow down Rspack build speed to some extent.
## Minimizer
During production builds, Modern.js uses [SWC](https://swc.rs/) to minify JS code.
## CSS Transformer
Modern.js uses [PostCSS](https://postcss.org/) to transform CSS code and enables [autoprefixer](https://github.com/postcss/autoprefixer) by default to add CSS prefixes.
Modern.js supports enabling ["Lightning CSS"](/configure/app/tools/lightningcss-loader.md), which uses Lightning CSS to downgrade CSS syntax.
Modern.js supports enabling ["Tailwind CSS"](/guides/basic-features/css/tailwindcss.md) and is compatible with both Tailwind CSS v3 and v4.
## CSS Preprocessors
Modern.js supports three CSS preprocessors: [Sass](https://sass-lang.com/), [Less](https://lesscss.org/), and [Stylus](https://stylus-lang.com/):
- Sass and Less are supported by default and ready to use.
- Stylus is optional and can be used by referring to the ["Stylus Plugin"](https://v2.rsbuild.rs/plugins/list/plugin-stylus).
## CSS Modules
Modern.js provides out-of-the-box support for [CSS Modules](https://github.com/css-modules/css-modules), which is implemented internally based on [css-loader](https://www.npmjs.com/package/css-loader).
Please refer to ["Use CSS Modules"](/guides/basic-features/css/css-modules.md) for usage instructions.
## CSS-in-JS
Modern.js supports the use of [styled-components](https://styled-components.com/). Please refer to ["Using CSS-in-JS"](/guides/basic-features/css/css-in-js.md) for usage instructions.
If you need to use other CSS-in-JS solutions, you can integrate them into your project on your own.
## UI Components
Modern.js can be used with any React UI component library from the community, such as [MUI](https://mui.com/), [Ant Design](https://ant.design/), [Arco Design](https://github.com/arco-design/arco-design), [Semi Design](https://semi.design/), [Radix UI](https://www.radix-ui.com/), and more.
## Component Development
Modern.js supports the use of [Storybook](https://storybook.js.org/) for developing UI components. This feature is optional. Please refer to ["Using Storybook"](/guides/basic-features/debug/using-storybook.md) to enable it.
## Node.js Framework
Modern.js Server and BFF use [Hono.js](https://hono.dev/) as the runtime framework, and you can extend the Server based on the Hono.js ecosystem. Please refer to [Custom Web Server](/guides/advanced-features/web-server.md).
---
url: /guides/get-started/upgrade.md
---
# Upgrading
## Manual Upgrade
All Modern.js official packages are released with a **uniform version number**, so when upgrading, you need to update all `@modern-js/**` packages to the target version uniformly.
### Upgrade Steps
1. **Check the latest version**
You can check the latest version of Modern.js through the following methods:
- Visit [npm](https://www.npmjs.com/package/@modern-js/app-tools) to check the latest version of `@modern-js/app-tools`
- Check [GitHub Releases](https://github.com/web-infra-dev/modern.js/releases)
<ReleaseNote />
2. **Update package.json**
In the project's `package.json`, update all `@modern-js/**` packages to the target version. For example:
```json title="package.json"
{
"dependencies": {
"@modern-js/app-tools": "3.0.0",
"@modern-js/runtime": "3.0.0"
},
"devDependencies": {
"@modern-js/types": "3.0.0"
}
}
```
3. **Reinstall dependencies**
After updating `package.json`, reinstall dependencies:
<PackageManagerTabs command="install" />
:::tip
When upgrading, you need to upgrade all packages provided by Modern.js uniformly, rather than upgrading individual dependencies. Ensure that all `@modern-js/**` packages have the same version number.
:::
## Version Management Strategy
In Modern.js projects, we recommend that all officially provided dependencies use fixed version, and avoid using `^` or `~` for range declarations. For example:
```json
{
"dependencies": {
"@modern-js/app-tools": "x.y.z"
}
}
```
This ensures that the versions of dependencies are fully determined, thereby guaranteeing build consistency and predictability.
## Lock nested dependency
When a nested dependency of the project has a problem and Modern.js cannot be updated immediately, you can use the package manager to lock the version of the nested dependency.
### pnpm
For projects using pnpm, add the following configuration to the `package.json` in the **root directory** of the project, and then run `pnpm install` again:
```json title="package.json"
{
"pnpm": {
"overrides": {
"package-name": "^1.0.0"
}
}
}
```
### Yarn
For projects using Yarn, add the following configuration to the `package.json` in the **root directory** of the project, and then run `yarn install` again:
```json title="package.json"
{
"resolutions": {
"package-name": "^1.0.0"
}
}
```
### Npm
For projects using Npm, add the following configuration to the `package.json` in the **root directory** of the project, and then run `npm install` again:
```json title="package.json"
{
"overrides": {
"package-name": "^1.0.0"
}
}
```
:::info
For Monorepo repositories, you can only lock dependency versions in the `package.json` in the root directory of the project, and it will affect all packages in the Monorepo.
:::
---
url: /guides/topic-detail/module-federation/application.md
---
# Application-Level Modules
Modern.js provides runtime APIs to quickly export application-level Module Federation modules from your application.
We use the application created in [Using Module Federation](/guides/topic-detail/module-federation/usage.md) as an example to further explain how to import application-level modules.
## Exporting Modules from Producer
Unlike directly exporting component-level modules, we need to create a separate entry for application-level modules to be exported via `Module Federation`.
We create the `src/export-App.tsx` file:
:::note
The filename can be arbitrary; Modern.js does not enforce a specific naming convention.
:::
```ts title="src/export-App.tsx"
import '@modern-js/runtime/registry/index'; // This line must be included, it will import micro frontend runtime dependencies by default
import { render } from '@modern-js/runtime/browser';
import { createRoot } from '@modern-js/runtime/react';
import { createBridgeComponent } from '@module-federation/modern-js-v3/react-v19';
const ModernRoot = createRoot();
export const provider = createBridgeComponent({
rootComponent: ModernRoot,
render: (Component, dom) => render(Component, dom),
});
export default provider;
```
:::note
Please select the corresponding import path based on the React version used in your project:
- **React 19**: Use `@module-federation/modern-js-v3/react-v19`
- **React 18**: Use `@module-federation/modern-js-v3/react-v18`
You can check the React version in your project's `package.json` file to determine which import path to use.
:::
This file will pass the root component of the `main` entry application to the Bridge API and render it to the specified node via Bridge's render function.
Next, we configure `module-federation.config.ts` to modify the export to `src/export-App.tsx`:
```ts title="module-federation.config.ts"
import { createModuleFederationConfig } from '@module-federation/modern-js-v3';
export default createModuleFederationConfig({
name: 'remote',
manifest: {
filePath: 'static',
},
filename: 'static/remoteEntry.js',
exposes: {
'./app': './src/export-App.tsx',
},
shared: {
react: { singleton: true },
'react-dom': { singleton: true },
},
});
```
:::info
[`createBridgeComponent`](https://module-federation.io/practice/bridge/react-bridge/export-app.html#createbridgecomponent-api-reference) is used to export application-level modules. Modern.js related APIs can be found at [createRoot](/apis/app/runtime/core/create-root.md) and [render](/apis/app/runtime/core/render.md).
:::
## Using Modules in Consumer
We then modify the consumer configuration by removing the previously created `src/routes/remote/page.tsx` route file.
We want all routes that access `/remote` to enter the aforementioned application-level module, so we add `src/routes/remote/$.tsx` instead.
:::note
If you are not familiar with the capabilities of `$.tsx`, please read [Wildcard Routes](/guides/basic-features/routes/routes.md#wildcard-routes).
:::
```tsx title="src/routes/remote/$.tsx"
import { createRemoteAppComponent } from '@module-federation/modern-js-v3/react';
import { loadRemote } from '@module-federation/modern-js-v3/runtime';
const ErrorBoundary = (info?: { error: { message: string } }) => {
return (
<div>
<h2>This is ErrorBoundary Component, Something went wrong:</h2>
<pre style={{ color: 'red' }}>{info?.error.message}</pre>
</div>
);
};
const Loading = <div>loading...</div>;
const RemoteApp = createRemoteAppComponent({
loader: () => loadRemote('remote/app'),
fallback: ErrorBoundary,
loading: Loading,
});
export default RemoteApp;
```
:::info
[`createRemoteAppComponent`](https://module-federation.io/zh/practice/bridge/react-bridge/load-app.html#%E4%BB%80%E4%B9%88%E6%98%AF-createremoteappcomponent) is used to load application-level modules.
:::
## Start the Application
Now, both the producer and consumer applications are set up. We can run `modern dev` locally to start both applications.
After startup, when the consumer application accesses the `/remote` route, it will enter the producer application. Accessing `http://localhost:8080/remote` will display a complete page of the producer's remote module in the browser.
You can create new route files in the producer application and add route navigation in the code. These functionalities will also work as expected.
You can refer to the example here: [Modern.js & Module Federation Application-Level Modules](https://github.com/web-infra-dev/modern-js-examples/tree/main/examples/module-federation/app-export).
## Related Documentation
- [Module Federation Bridge](https://module-federation.io/zh/practice/bridge/index.html)
---
url: /guides/topic-detail/module-federation/deploy.md
---
# Deployment
In general, when deploying a Module Federation application, there are two key points to consider:
1. Ensure that the remote module addresses in the consumer's configuration file are correct, and that the consumer can correctly access the producer's `manifest` file.
2. Ensure that all resources in the producer's `manifest` file can be accessed correctly.
We recommend using Modern.js's [Node Server](/guides/basic-features/deploy.md#using-modernjs-built-in-nodejs-server) to deploy Module Federation applications for an out-of-the-box experience.
## Consumer
For the consumer of Module Federation, its connection with the producer is the remote module address in the configuration file.
For example, if the producer is deployed under the domain `https://my-remote-module`, the developer needs to modify the consumer's configuration file:
```ts title="module-federation.config.ts"
import { createModuleFederationConfig } from '@module-federation/modern-js-v3';
export default createModuleFederationConfig({
name: 'host',
remotes: {
remote: 'remote@https://my-remote-module/static/mf-manifest.json',
},
shared: {
react: { singleton: true },
'react-dom': { singleton: true },
},
});
```
At this point, the consumer will load the `manifest` configuration file of the remote module production environment.
:::note
In the above code, the address of the remote module is `/static/mf-manifest.json`, which is just an example using the default output path of Modern.js. In actual projects, developers need to configure according to the actual access path.
:::
## Producer
For the producer of Module Federation, developers need to correctly configure the [`output.assetPrefix`](/configure/app/output/asset-prefix.md) configuration, which affects:
1. The `publicPath` defined in `mf-manifest.json`, which determines the access path of other resources of the remote module.
2. The access path of the `mf-manifest.json` file when hosted directly by the Modern.js server.
In the production environment, developers need to configure `output.assetPrefix` as the access path of the production environment. For example, if we deploy the producer under the domain `https://my-remote-module`, we need to configure `output.assetPrefix` as `https://my-remote-module`.
```ts title="modern.config.ts"
import { defineConfig } from '@modern-js/app-tools';
export default defineConfig({
output: {
assetPrefix: 'https://my-remote-module',
},
});
```
At this point, the `publicPath` defined in the producer's build output `mf-manifest.json` is `https://my-remote-module`, for example:
```json
{
"id": "remote",
"name": "remote",
"metaData": {
"name": "remote",
"publicPath": "https://my-remote-module/"
},
"shared": [ /* xxx */ ],
"remotes": [],
"exposes": [ /* xxx */ ]
}
```
When the consumer accesses the remote module, it will automatically prepend the `publicPath` to the resource path of the remote module.
This configuration will also affect the access path of the producer's `mf-manifest.json`. For example, if this value is set to `MyDomain/module-a`, the hosting path of `mf-manifest.json` becomes `MyDomain/module-a/static/mf-manifest.json`.
At this point, the consumer needs to configure the following address when configuring the remote module:
```ts title="module-federation.config.ts"
import { createModuleFederationConfig } from '@module-federation/modern-js-v3';
export default createModuleFederationConfig({
name: 'host',
remotes: {
remote: 'remote@MyDomain/module-a/static/mf-manifest.json',
},
});
```
## Local Deployment Verification
Modern.js provides the `modern deploy` command, which can easily generate products that can run in a Node.js environment.
```bash
modern deploy
```
After executing the command, you can see the following output in the console:
```bash
Static directory: .output/static
You can preview this build by node .output/index
```
At this point, the developer only needs to run `node .output/index` to preview the effect locally. Whether it is a CSR or an SSR application, all Module Federation files can be accessed correctly.
---
url: /guides/topic-detail/module-federation/i18n.md
---
# Integrating Internationalization
Modern.js provides the **@modern-js/plugin-i18n** plugin to support internationalization. When using Module Federation, you need to provide corresponding i18n integration solutions for different scenarios (components or applications).
## Prerequisites
Before you begin, make sure you have:
- Understood [Module Federation Basic Usage](/guides/topic-detail/module-federation/usage.md)
- Understood [Basic Usage of the Internationalization Plugin](/guides/advanced-features/international/quick-start.md)
- Created producer and consumer applications
## Solution Overview
In Module Federation scenarios, producers and consumers need to share or independently manage i18n instances. Based on different use cases, we provide two solutions:
1. **Shared I18n Instance**: Producers and consumers use the same i18n instance, and language switching will be synchronized
2. **Independent I18n Instance**: Producers and consumers maintain their own independent i18n instances and can switch languages independently
:::tip
For component scenarios, we recommend using a shared I18n instance, because components are ultimately rendered on the same React tree, and sharing an instance ensures consistency in language switching.
:::
:::info
For detailed usage of the i18n plugin, please refer to the [Internationalization Documentation](/guides/advanced-features/international/quick-start.md).
:::
## Enabling I18n Capability
Both producers and consumers need to enable i18n capability first.
### Install Dependencies
In Module Federation scenarios, you need to install both the i18n plugin and the Module Federation plugin:
```bash
pnpm add i18next react-i18next @modern-js/plugin-i18n @module-federation/modern-js-v3
```
:::info
`i18next` and `react-i18next` are peer dependencies and need to be installed manually.
:::
### Configure Plugins
Configure both the i18n plugin and the Module Federation plugin in `modern.config.ts`:
```ts title="modern.config.ts"
import { appTools, defineConfig } from '@modern-js/app-tools';
import { i18nPlugin } from '@modern-js/plugin-i18n';
import { moduleFederationPlugin } from '@module-federation/modern-js-v3';
export default defineConfig({
plugins: [appTools(), i18nPlugin(), moduleFederationPlugin()],
});
```
:::info
For detailed configuration options of the i18n plugin, please refer to the [Configuration Documentation](/guides/advanced-features/international/configuration.md).
:::
## Scenario 1: Producer - Component
When the producer exports component-level modules, you can use the following two solutions to integrate i18n.
### Shared I18n Instance (Recommended)
For component scenarios, producers and consumers are ultimately on the same React tree, so you only need to share the `i18next` and `react-i18next` dependencies.
:::note
Both producers and consumers need to configure `shared` in `module-federation.config.ts` to ensure that `i18next` and `react-i18next` use singleton mode.
:::
#### Configure Module Federation
```ts title="module-federation.config.ts"
import { createModuleFederationConfig } from '@module-federation/modern-js-v3';
export default createModuleFederationConfig({
// The name parameter must be unique and cannot be the same as other applications (including different remotes)
name: 'i18nComponentProvider',
filename: 'remoteEntry.js',
exposes: {
'./Text': './src/components/Text.tsx',
},
shared: {
react: { singleton: true },
'react-dom': { singleton: true },
'react-i18next': {
singleton: true,
},
i18next: {
singleton: true,
},
},
});
```
#### Using Translation
Use the `useTranslation` hook from `react-i18next` in components to perform translation:
```tsx title="src/components/Text.tsx"
import { useTranslation } from 'react-i18next';
export default () => {
const { t } = useTranslation();
return (
<div>
<p>{t('about')}</p>
</div>
);
};
```
When using a shared instance, remote components will use the consumer's i18n instance, and when the main application switches languages, the corresponding remote components will automatically update.
### Independent I18n Instance
If the producer needs to maintain its own I18n instance (for example, it needs independent language resources or language switching logic), you can avoid configuring `shared` for `i18next` and `react-i18next`, but you need to:
1. Create an independent i18n instance
2. Wrap the exported component with `I18nextProvider`
3. Export a language switching Hook for consumers to use
#### Create an Independent I18n Instance
```ts title="src/i18n.ts"
import originalI18next from 'i18next';
const i18next = originalI18next.createInstance();
i18next.init({
lng: 'en',
fallbackLng: 'en',
resources: {
en: {
translation: {
key: 'Hello World(provider)',
about: 'About(provider)',
},
},
zh: {
translation: {
key: '你好,世界(provider)',
about: '关于(provider)',
},
},
},
});
export default i18next;
```
#### Wrap Component with I18nextProvider
```tsx title="src/components/Text.tsx"
import { I18nextProvider, useTranslation } from 'react-i18next';
import i18next from '../i18n';
const Text = () => {
const { t } = useTranslation();
return <p>{t('about')}</p>;
};
export default () => {
return (
<I18nextProvider i18n={i18next}>
<Text />
</I18nextProvider>
);
};
```
#### Export Language Switching Hook
Export a `changeLanguage` hook that allows consumers to switch the language of the corresponding producer:
```ts title="src/hooks/useSwitchLanguage.ts"
import i18next from '../i18n';
const useSwitchLanguage = () => {
return (languageId: string) => i18next.changeLanguage(languageId);
};
export default useSwitchLanguage;
```
:::note
When using an independent I18n instance, the producer maintains its own language state. Consumers need to manually call the language switching hook to synchronize language changes between the main application and the remote component. This approach is useful when the producer needs to maintain its own language resources or has independent language switching logic.
:::
#### Configure Module Federation
```ts title="module-federation.config.ts"
import { createModuleFederationConfig } from '@module-federation/modern-js-v3';
export default createModuleFederationConfig({
// The name parameter must be unique and cannot be the same as other applications (including different remotes)
name: 'i18nComponentProvider',
filename: 'remoteEntry.js',
exposes: {
'./Text': './src/components/Text.tsx',
'./hooks/useSwitchLanguage': './src/hooks/useSwitchLanguage',
},
shared: {
react: { singleton: true },
'react-dom': { singleton: true },
},
});
```
## Scenario 2: Consumer - Component
When consumers need to load remote components, they need to configure accordingly based on the solution used by the producer.
### Configure Module Federation
First, configure the remote module in the consumer's `module-federation.config.ts`:
```ts title="module-federation.config.ts"
import { createModuleFederationConfig } from '@module-federation/modern-js-v3';
export default createModuleFederationConfig({
// The name parameter must be unique and cannot be the same as other applications (including different remotes)
name: 'consumer',
remotes: {
componentRemote:
'i18nComponentProvider@http://localhost:3006/mf-manifest.json',
},
shared: {
react: { singleton: true },
'react-dom': { singleton: true },
'react-i18next': { singleton: true },
i18next: { singleton: true },
},
});
```
:::note
If the producer uses a shared I18n instance, the consumer must configure `shared` for `i18next` and `react-i18next`. If the producer uses an independent instance, there is no need to configure `shared` for these two dependencies.
:::
### Shared I18n Instance
When the producer uses a shared I18n instance, the consumer can directly load the remote component without additional configuration:
```tsx title="src/routes/page.tsx"
import { createLazyComponent } from '@module-federation/modern-js-v3/react';
import { getInstance } from '@module-federation/modern-js-v3/runtime';
const RemoteComponent = createLazyComponent({
instance: getInstance(),
loader: () => import('componentRemote/Text'),
loading: 'loading...',
export: 'default',
});
export default () => {
return (
<div>
<RemoteComponent />
</div>
);
};
```
The i18n resources and i18n instance used here are from the main application. When the main application switches languages, the corresponding remote components will automatically update.
### Independent I18n Instance
When the producer uses an independent I18n instance, the consumer needs to handle the language switching logic for both the main application and the remote component:
```tsx title="src/routes/layout.tsx"
import { useModernI18n } from '@modern-js/plugin-i18n/runtime';
import { Outlet } from '@modern-js/runtime/router';
import useSwitchComponentLanguage from 'componentRemote/hooks/useSwitchLanguage';
export default function Layout() {
const { changeLanguage } = useModernI18n();
const switchComponentLanguage = useSwitchComponentLanguage();
const handleSwitchLanguage = (language: string) => {
// Switch language for the main application
changeLanguage(language);
// Switch language for the remote component with independent instance
switchComponentLanguage(language);
};
return (
<div>
<div>
<button onClick={() => handleSwitchLanguage('zh')}>zh</button>
<button onClick={() => handleSwitchLanguage('en')}>en</button>
</div>
<Outlet />
</div>
);
}
```
:::info
For detailed API documentation of the `useModernI18n` Hook, please refer to the [API Reference Documentation](/guides/advanced-features/international/api.md).
:::
:::note
When using an independent I18n instance:
- The producer and consumer maintain separate language states
- Language switching must be synchronized manually by calling both the main application's `changeLanguage` and the remote component's language switching hook
- This approach is recommended when the producer needs independent language resources or custom language switching logic
- For component scenarios, we generally recommend using a shared I18n instance for better consistency
:::
## Scenario 3: Producer - Application
When the producer exports application-level modules, you need to use the Bridge API to export the application. For detailed information about application-level modules, please refer to [Application-Level Modules](/guides/topic-detail/module-federation/application.md).
:::warning
Producers do not support enabling path redirection (`localePathRedirect`). Route and language switching need to be managed uniformly in the consumer.
:::
:::info
For detailed information about routing integration, please refer to the [Routing Integration Documentation](/guides/advanced-features/international/routing.md).
:::
### Export Application
First, you need to create an entry file to export the application:
```tsx title="src/export-app.tsx"
import '@modern-js/runtime/registry/index';
import { render } from '@modern-js/runtime/browser';
import { createRoot } from '@modern-js/runtime/react';
import { createBridgeComponent } from '@module-federation/modern-js-v3/react-v19';
import type { ReactElement } from 'react';
const ModernRoot = createRoot();
export const provider = createBridgeComponent({
rootComponent: ModernRoot,
render: (Component, dom) =>
render(Component as ReactElement<{ basename: string }>, dom),
});
export default provider;
```
### Shared I18n Instance
#### Configure Module Federation
```ts title="module-federation.config.ts"
import { createModuleFederationConfig } from '@module-federation/modern-js-v3';
export default createModuleFederationConfig({
// The name parameter must be unique and cannot be the same as other applications (including different remotes)
name: 'i18nAppProvider',
filename: 'remoteEntry.js',
exposes: {
'./export-app': './src/export-app.tsx',
},
shared: {
react: { singleton: true },
'react-dom': { singleton: true },
'react-i18next': { singleton: true },
i18next: { singleton: true },
},
});
```
#### Configure Runtime to Use Shared Instance
Configure the use of a shared i18n instance in `modern.runtime.tsx`:
```ts title="modern.runtime.tsx"
import { defineRuntimeConfig } from '@modern-js/runtime';
import i18next from 'i18next';
if (!i18next.isInitialized) {
i18next.init({
fallbackLng: 'en',
resources: {
en: {
translation: {
key: 'Hello World(provider)',
about: 'About(provider)',
},
},
zh: {
translation: {
key: '你好,世界(provider)',
about: '关于(provider)',
},
},
},
});
}
export default defineRuntimeConfig({
i18n: {
i18nInstance: i18next,
},
});
```
:::note
When using a shared instance, `i18next` here does not need to call `init`. You can directly use the default exported i18next instance initialized by the consumer.
:::
:::tip
For applications with multiple entries, `defineRuntimeConfig` can accept a function that receives the `entryName` parameter, allowing you to return different configurations for different entries:
```ts title="modern.runtime.tsx"
import { defineRuntimeConfig } from '@modern-js/runtime';
import i18nextCustom from './custom/i18n';
import i18nextMfAppProvider from './i18n-mf-app-provider/i18n';
export default defineRuntimeConfig((entryName: string) => {
return {
i18n: {
i18nInstance:
entryName === 'custom' ? i18nextCustom : i18nextMfAppProvider,
},
};
});
```
This is useful when you need different i18n instances for different entry points.
:::
:::info
For detailed information about the `i18nInstance` configuration, please refer to the [Configuration Documentation](/guides/advanced-features/international/configuration.md#i18ninstance-配置).
:::
### Independent I18n Instance (Recommended)
For an independent I18n instance, no additional operations are needed. The producer will use its own i18n instance. The i18n plugin will automatically initialize the i18n instance.
## Scenario 4: Consumer - Application
When consumers need to load remote applications, they need to use the Bridge API to load application-level modules.
### Configure Module Federation
First, configure the remote application in the consumer's `module-federation.config.ts`:
```ts title="module-federation.config.ts"
import { createModuleFederationConfig } from '@module-federation/modern-js-v3';
export default createModuleFederationConfig({
// The name parameter must be unique and cannot be the same as other applications (including different remotes)
name: 'consumer',
remotes: {
AppRemote: 'i18nAppProvider@http://localhost:3005/mf-manifest.json',
},
shared: {
react: { singleton: true },
'react-dom': { singleton: true },
'react-i18next': { singleton: true },
i18next: { singleton: true },
},
});
```
:::note
If the producer uses a shared I18n instance, the consumer must configure `shared` for `i18next` and `react-i18next`. If the producer uses an independent instance, there is no need to configure `shared` for these two dependencies.
:::
### Define Component to Load Remote Application
Create a component for loading the remote application:
```tsx title="src/components/RemoteApp.tsx"
import { createRemoteAppComponent } from '@module-federation/modern-js-v3/react';
import { loadRemote } from '@module-federation/modern-js-v3/runtime';
import React from 'react';
const FallbackErrorComp = (info: any) => {
return (
<div
style={{ padding: '20px', border: '1px solid red', borderRadius: '4px' }}
>
<h3>Loading Failed</h3>
<p>{info?.error?.message}</p>
<button onClick={() => info.resetErrorBoundary()}>Retry</button>
</div>
);
};
const FallbackComp = (
<div style={{ padding: '20px', textAlign: 'center' }}>
<div>Loading remote application...</div>
</div>
);
const RemoteApp = createRemoteAppComponent({
loader: () => loadRemote('AppRemote/export-app'),
export: 'provider' as any,
fallback: FallbackErrorComp,
loading: FallbackComp,
});
export default RemoteApp;
```
:::tip
The `export` parameter in `createRemoteAppComponent` specifies which export to use from the remote module:
- When the producer uses `export default`, you can omit this parameter
- When the producer uses named exports (e.g., `export const provider`), you must specify the export name
:::
### Using Remote Application in Routes
Use the remote application component in route files. The `basename` parameter is used to specify the base path of the remote application and needs to be determined based on whether path redirection (`localePathRedirect`) is enabled:
#### When Path Redirection is Enabled
If the consumer has enabled path redirection (`localePathRedirect: true`), the route will include a `[lang]` dynamic parameter. You need to get the language information from the route parameters and pass it to `basename`:
```tsx title="src/routes/[lang]/remote/$.tsx"
import { useParams } from '@modern-js/runtime/router';
import React from 'react';
import RemoteApp from '../../../components/RemoteApp';
export default (props: Record<string, any>) => {
const { lang } = useParams();
return (
<div>
<h2>Remote Application Page</h2>
{/* basename needs to include the language prefix, e.g., zh/remote or en/remote */}
<RemoteApp {...props} basename={`${lang}/remote`} />
</div>
);
};
```
#### When Path Redirection is Not Enabled
If the consumer has not enabled path redirection (`localePathRedirect: false` or not configured), the route does not include a language parameter, and `basename` only needs to include the route path:
```tsx title="src/routes/remote/$.tsx"
import React from 'react';
import RemoteApp from '../../components/RemoteApp';
export default (props: Record<string, any>) => {
return (
<div>
<h2>Remote Application Page</h2>
{/* When path redirection is not enabled, basename does not need to include the language prefix */}
<RemoteApp {...props} basename="remote" />
</div>
);
};
```
:::note
Rules for calculating `basename`:
- **When `localePathRedirect` is enabled**: `basename` needs to include the language prefix in the format `${lang}/${routePath}` (e.g., `zh/remote`, `en/remote`)
- **When `localePathRedirect` is not enabled**: `basename` only needs to include the route path in the format `${routePath}` (e.g., `remote`), without adding a language prefix
:::
### Shared I18n Instance
When the producer uses a shared I18n instance, the consumer needs to create a custom i18n instance and use it in the runtime configuration.
#### Create Custom I18n Instance
Create a custom i18n instance using the default exported instance from i18next:
```ts title="src/i18n.ts"
import i18next from 'i18next';
i18next.init({
lng: 'en',
fallbackLng: 'en',
resources: {
en: {
translation: {
key: 'Hello World(consumer)',
about: 'About(consumer)',
},
},
zh: {
translation: {
key: '你好,世界(consumer)',
about: '关于(consumer)',
},
},
},
});
export default i18next;
```
#### Configure Runtime to Use Custom Instance
Pass the custom i18n instance into the application:
```ts title="modern.runtime.tsx"
import { defineRuntimeConfig } from '@modern-js/runtime';
import i18next from './i18n';
export default defineRuntimeConfig({
i18n: {
i18nInstance: i18next,
},
});
```
:::info
For detailed information about the `i18nInstance` configuration, please refer to the [Configuration Documentation](/guides/advanced-features/international/configuration.md#i18ninstance-配置).
:::
### Independent I18n Instance
For an independent I18n instance, no additional operations are needed. The remote application will use its own i18n instance.
## Summary
Key points for integrating i18n with Module Federation:
1. **Component Scenarios**: It is recommended to use a shared I18n instance. Producers and consumers share `i18next` and `react-i18next`, and language switching will be automatically synchronized
2. **Application Scenarios**: You can choose to share or use an independent I18n instance based on business requirements
3. **Configuration Points**: Ensure that the `shared` configuration of producers and consumers is consistent, especially the singleton configuration of `i18next` and `react-i18next`
4. **Route Management**: Producers do not support path redirection (`localePathRedirect`). Route and language switching need to be managed uniformly in the consumer
5. **Dependency Sharing**: When using a shared instance, you must configure `i18next` and `react-i18next` as singletons in both the producer's and consumer's `module-federation.config.ts`
6. **Name Uniqueness**: The `name` parameter of `createModuleFederationConfig` must be unique for each application and cannot be the same for different remotes
## Related Documentation
- [Module Federation Basic Usage](/guides/topic-detail/module-federation/usage.md)
- [Application-Level Modules](/guides/topic-detail/module-federation/application.md)
- [Internationalization Quick Start](/guides/advanced-features/international/quick-start.md)
- [Internationalization Configuration](/guides/advanced-features/international/configuration.md)
- [Internationalization Routing Integration](/guides/advanced-features/international/routing.md)
---
url: /guides/topic-detail/module-federation/introduce.md
---
# Introduction
Module Federation is an architectural pattern for dividing JavaScript applications, allowing you to share code and resources among multiple JavaScript applications.
In this divided model, it can help improve application performance, enhance code maintainability, and more.
## Module Federation 2.0
Module Federation, a highlight feature introduced with Webpack 5, has been around for more than five years. This year, ByteDance, along with the author of Module Federation, [@Zack Jackson](https://github.com/ScriptedAlchemy), and community members jointly launched **Module Federation 2.0**.
Module Federation 2.0 is based on internal practices at ByteDance and the existing community ecosystem of Module Federation, addressing many issues in the previous version.
Within ByteDance, frameworks based on Modern.js have already deeply integrated with Module Federation 2.0. We are gradually integrating these features into Modern.js and hope to explore the future together with community developers.
:::info
Refer to [Module Federation 2.0 Announcement](https://module-federation.io/zh/blog/announcement.html) for more related content.
:::
## Modern.js MF Plugin
Based on internal practices at ByteDance, the Module Federation team officially provides the [Modern.js Plugin](https://www.npmjs.com/package/@module-federation/modern-js-v3) to help developers use Module Federation more easily.
The plugin injects the Module Federation plugin into Modern.js applications and automatically handles build configurations and adds runtime code.
Moreover, the plugin also supports the use of Module Federation in Modern.js SSR applications, providing a better performance experience.
For more details, refer to [Using Module Federation](/guides/topic-detail/module-federation/usage.md) and [Module Federation Server-Side Rendering](/guides/topic-detail/module-federation/ssr.md).
## Application-Level Modules
**Application-level modules** possess the application's framework rendering capabilities and routing capabilities, allowing them to operate like applications. Application-level modules are a crucial capability in **micro-frontend frameworks**, providing the ability to load and render across application frameworks (React, Vue) and supporting the loading of modules with routing.
Module Federation 2.0 offers the [Bridge](https://module-federation.io/practice/bridge/overview.html) capability to load application-level modules.
Modern.js, based on Bridge and its internal implementation, provides APIs to easily export application-level modules. For more details, refer to [Application-Level Modules](/guides/topic-detail/module-federation/application.md).
---
url: /guides/topic-detail/module-federation/ssr.md
---
# Server-Side Rendering
`@module-federation/modern-js-v3` offers powerful capabilities, enabling developers to easily combine Module Federation with server-side rendering (SSR) in Modern.js applications.
## Enable SSR
Using the application created in [Using Module Federation](/guides/topic-detail/module-federation/usage.md) as an example, you only need to add the `server.ssr` configuration to both the producer and the consumer:
```ts title="modern.config.ts"
import { appTools, defineConfig } from '@modern-js/app-tools';
export default defineConfig({
server: {
ssr: {
mode: 'stream',
},
},
});
```
For better performance, we only support using this capability combination in Streaming SSR scenarios.
:::warning
Application-level modules (modules using `createBridgeComponent` and `createRemoteAppComponent`) do not support server-side rendering (SSR). If you need to use SSR functionality, please use component-level module export methods instead.
:::
## Data Fetching
:::tip
Currently, this feature is experimental and has not been fully practiced. Please use it with caution.
:::
Module Federation now supports [data fetching](https://module-federation.io/zh/guide/basic/data-fetch/index.html#%E7%AE%80%E4%BB%8B) capabilities. Each producer file can have a corresponding data fetching file, with the file name format of `[name].data.ts`.
In Modern.js, data fetching can be used with SSR. Using the example in the previous chapter, create a data fetching file:
```ts title="src/components/Button.data.ts"
import type { DataFetchParams } from '@module-federation/modern-js-v3/react';
export type Data = {
data: string;
};
export const fetchData = async (params: DataFetchParams): Promise<Data> => {
return new Promise(resolve => {
setTimeout(() => {
resolve({
data: `data: ${new Date()}`,
});
}, 1000);
});
};
```
In Button, we get the data from the `Props`:
```ts title="src/components/Button.tsx"
import React from 'react';
import type { Data } from './Button.data';
export const Button = (props: { mfData: Data }) => {
const { mfData } = props;
return (
<button type="button" className="test">
Remote Button {mfData?.data}
</button>
);
};
```
## Consuming Components
Consumers must use [`createLazyComponent`](https://module-federation.io/practice/bridge/react-bridge/load-component.html#what-is-createlazycomponent) to load remote components and specify the export as the component name.
```tsx title="src/routes/page.tsx"
import type { JSX } from 'react';
import { getInstance } from '@module-federation/modern-js-v3/runtime';
import {
ERROR_TYPE,
lazyLoadComponentPlugin,
} from '@module-federation/modern-js-v3/react';
const instance = getInstance();
instance!.registerPlugins([lazyLoadComponentPlugin()]);
const Button = instance!.createLazyComponent({
loader: () => {
return import('remote/Button');
},
loading: 'loading...',
export: 'Button', // Configure this as the export name of the remote component
fallback: ({ error, errorType, dataFetchMapKey }) => {
console.error(error);
if (errorType === ERROR_TYPE.LOAD_REMOTE) {
return <div>load remote failed</div>;
}
if (errorType === ERROR_TYPE.DATA_FETCH) {
return (
<div>
data fetch failed, the dataFetchMapKey key is: {dataFetchMapKey}
</div>
);
}
return <div>error type is unknown</div>;
},
});
const Index = (): JSX.Element => {
return (
<div>
<h1>Basic usage with data fetch</h1>
<Button />
</div>
);
};
export default Index;
```
---
url: /guides/topic-detail/module-federation/usage.md
---
# Getting Started
To use Module Federation in Modern.js, we recommend using the official plugin `@module-federation/modern-js-v3`.
This section will introduce how to set up both producer and consumer applications using the official plugin. First, create two applications by following the [Modern.js Quick Start](/guides/get-started/quick-start.md).
## Install the Plugin
After creating the applications, install the plugin for both projects:
```sh [npm]
npm add @module-federation/modern-js-v3
```
```sh [yarn]
yarn add @module-federation/modern-js-v3
```
```sh [pnpm]
pnpm add @module-federation/modern-js-v3
```
```sh [bun]
bun add @module-federation/modern-js-v3
```
```sh [deno]
deno add npm:@module-federation/modern-js-v3
```
## Register the Plugin
After installing the plugin, you need to register it in the `modern.config.js` file:
```ts
import { appTools, defineConfig } from '@modern-js/app-tools';
import { moduleFederationPlugin } from '@module-federation/modern-js-v3';
export default defineConfig({
plugins: [appTools(), moduleFederationPlugin()],
});
```
## Export Modules from Producer
Next, modify the producer's code to export the Module Federation module.
Create the `src/components/Button.tsx` file and export a Button component:
```tsx title="src/components/Button.tsx"
import React from 'react';
export const Button = () => {
return <button type="button">Remote Button</button>;
};
```
Then, add the `module-federation.config.ts` file at the project root to configure the Module Federation module's name, shared dependencies, and exports:
```ts title="module-federation.config.ts"
import { createModuleFederationConfig } from '@module-federation/modern-js-v3';
export default createModuleFederationConfig({
name: 'remote',
manifest: {
filePath: 'static',
},
filename: 'static/remoteEntry.js',
exposes: {
'./Button': './src/components/Button.tsx',
},
shared: {
react: { singleton: true },
'react-dom': { singleton: true },
},
});
```
:::tip
In the above code block, we have prefixed both the manifest and remoteEntry.js exported by Module Federation with `static`. This is because Modern.js requires all resources that need to be exposed to be placed in the `static/` directory, and Modern.js's server will only host the `static/` directory in production environments.
:::
Additionally, modify `modern.config.ts` to provide a development environment port for the producer, allowing the consumer to access the producer's resources through this port:
```ts title="modern.config.ts"
import { appTools, defineConfig } from '@modern-js/app-tools';
import { moduleFederationPlugin } from '@module-federation/modern-js-v3';
export default defineConfig({
server: {
port: 3051,
},
plugins: [appTools(), moduleFederationPlugin()],
});
```
## Use Modules in Consumer
Now, modify the consumer's code to use the module exported by the producer.
Add the `module-federation.config.ts` file at the project root to configure the Module Federation module's name, shared dependencies, and the remote module to use:
```ts title="module-federation.config.ts"
import { createModuleFederationConfig } from '@module-federation/modern-js-v3';
export default createModuleFederationConfig({
name: 'host',
remotes: {
remote: 'remote@http://localhost:3051/static/mf-manifest.json',
},
shared: {
react: { singleton: true },
'react-dom': { singleton: true },
},
});
```
`mf-manifest.json` is the file produced by the producer after packaging, containing all the information about the modules exported by the producer.
Create a new route file `src/routes/remote/page.tsx` and import the producer module:
```tsx title="src/routes/remote/page.tsx"
import React, { Suspense, type JSX } from 'react';
import { Button } from 'remote/Button';
const Index = (): JSX.Element => {
return (
<div>
<Suspense fallback={<div>Loading...</div>}>
<Button />
</Suspense>
</div>
);
};
export default Index;
```
At this point, importing `remote/Button` will result in a type error because the local environment doesn't have the type for the remote module. Module Federation 2.0 provides [type hints](https://module-federation.io/zh/guide/basic/type-prompt.html), which will automatically generate type definitions for remote modules during the producer's build and download them during the consumer's build.
To ensure the types take effect, add a new `path` in `tsconfig.json`:
```json title="tsconfig.json"
{
"compilerOptions": {
"paths": {
"*": ["./@mf-types/*"]
}
}
}
```
:::tip
In the consumer, we reference the remote module using `remote/Button`. Here's a brief explanation of what this path specifically represents. You can abstract it as `[remoteAlias]/[remoteExpose]`.
The first part, `remoteAlias`, is the alias of the producer in the consumer. It is the `key` configured in the `remotes` field of the consumer's `module-federation.config.ts`:
```ts
{
remotes: {
[remoteAlias]: '[remoteModuleName]@[URL_ADDRESS]',
}
}
```
Here, we also abstract the remote address as `[remoteModuleName]@[URL_ADDRESS]`. The part before `@` must correspond to the module name of the producer.
The second part, `remoteExpose`, is the `key` configured in the `exposes` field of the producer's `module-federation.config.ts`.
:::
## Start the Applications
Now, both the producer and consumer applications are set up. You can run `modern dev` locally to start both applications.
Once started, the imports of the producer's modules in the consumer will no longer throw errors, and the types will be downloaded to the consumer application.
:::note
After modifying the producer's code, the consumer will automatically fetch the producer's types.
:::
Access `http://localhost:8080/remote`, and you will see that the page includes the `Button` component from the producer's remote module.
We can also execute `modern serve` locally to simulate the production environment.
Because the Module Federation plugin will automatically read Modern.js's `output.assetPrefix` configuration as the access address for remote modules, and this value defaults to `/` after building in the production environment.
If we want to simulate the production environment in local, but not configure `output.assetPrefix`, consumers will pull the entry file of the remote module from their own domain. So We can add the following configuration:
```ts
import { appTools, defineConfig } from '@modern-js/app-tools';
import { moduleFederationPlugin } from '@module-federation/modern-js-v3';
// https://modernjs.dev/en/configure/app/usage
export default defineConfig({
server: {
port: 3051,
},
output: {
// Now this configuration is only used in the local when you run modern serve command.
// If you want to deploy the application to the platform, use your own domain name.
// Module federation will automatically write it to mf-manifest.json, which influences consumer to fetch remoteEntry.js.
assetPrefix: 'http://127.0.0.1:3051',
},
plugins: [appTools(), moduleFederationPlugin()],
});
```
Now, in the producer, run `modern build && MODERN_MF_AUTO_CORS=true modern serve`, and in the consumer, run `modern build && modern serve` to simulate the production environment locally and access the remote modules.
:::tip
When using the `modern serve` command, you need to set the `MODERN_MF_AUTO_CORS=true` environment variable when starting the producer project to automatically handle CORS issues and ensure that consumers can properly access the producer's remote module resources.
:::
You can refer to this example: [Modern.js & Module Federation Basic Example](https://github.com/web-infra-dev/modern-js-examples/tree/main/examples/module-federation/base).
## Related Documentation
- [Module Federation Official Documentation](https://module-federation.io/zh/guide/framework/modernjs.html)
---
url: /guides/troubleshooting/builder.md
---
# Build FAQ
If you encounter any build-related issues, you can refer to the current document for troubleshooting.
***
### Rsbuild FAQ
Modern.js is internally based on [Rsbuild](https://v2.rsbuild.rs/) and encapsulates its own build tool, so you can directly refer to the FAQ document of Rsbuild:
- [Rsbuild - Features FAQ](https://v2.rsbuild.rs/guide/faq/features)
- [Rsbuild - Exceptions FAQ](https://v2.rsbuild.rs/guide/faq/exceptions)
- [Rsbuild - HMR FAQ](https://v2.rsbuild.rs/guide/faq/hmr)
***
### How to view the final generated Rspack configuration?
Modern.js provides [inspect command](https://modernjs.dev/en/apis/app/commands.html) to view the final Modern.js configuration and Rspack configuration generated by the project.
```bash
➜ npx modern inspect
Inspect config succeed, open following files to view the content:
- Builder Config: /root/my-project/dist/rsbuild.config.mjs
- Rspack Config (web): /root/my-project/dist/rspack.config.web.mjs
```
***
### Failed import other modules in Monorepo?
Due to considerations of compilation performance, by default, the Modern.js does not compile files under `node_modules` or files outside the current project directory.
Therefore, when you reference the source code of other sub-projects, you may encounter an error similar to `You may need an additional loader to handle the result of these loaders.`
There are several solutions to this problem:
1. You can enable the source code build mode to compile other sub-projects within the monorepo. Please refer to [Source Code Build Mode](/guides/advanced-features/source-build.md) for more information.
2. You can add the `source.include` configuration option to specify the directories or modules that need to be additionally compiled. Please refer to [Usage of source.include](/configure/app/source/include.md) for more information.
3. You can pre-build the sub-projects that need to be referenced, generate the corresponding build artifacts, and then reference the build artifacts in the current project instead of referencing the source code.
***
### Find `exports is not defined` runtime error?
If the compilation is succeed, but the `exports is not defined` error appears after opening the page, it is usually because a CommonJS module is compiled by Babel.
Under normal circumstances, Modern.js will not use Babel to compile CommonJS modules. If the [source.include](/configure/app/source/include.md) configuration option is used in the project, some CommonJS modules may be added to the Babel compilation.
There are two workarounds for this problem:
1. Avoid adding CommonJS modules to Babel compilation.
2. Set Babel's `sourceType` configuration to `unambiguous`.
***
### Compile error "Error: ES Modules may not assign module.exports or exports.\*, Use ESM export syntax"?
If the following error occurs during compilation, it is usually because a CommonJS module is compiled with Babel in the project, and the solution is same as the above `exports is not defined` problem.
```bash
Error: ES Modules may not assign module.exports or exports.*, Use ESM export syntax, instead: 581
```
For more information, please refer to issue: [babel#12731](https://github.com/babel/babel/issues/12731).
***
### The compilation progress bar is stuck, but there is no Error log in the terminal?
When the compilation progress bar is stuck, but there is no Error log on the terminal, it is usually because an exception occurred during the compilation. In some cases, when Error is caught by the build tool or other modules, the error log can not be output correctly. The most common scenario is that there is an exception in the Babel config, which is caught by the build tool, and the build tool swallows the Error in some cases.
**Solution:**
If this problem occurs after you modify the Babel config, it is recommended to check for the following incorrect usages:
1. You have configured a plugin or preset that does not exist, maybe the name is misspelled, or it is not installed correctly.
2. Whether multiple babel-plugin-imports are configured, but the name of each babel-plugin-import is not declared in the third item of the array.
***
### Compilation error after referencing a type from lodash
If the `@types/lodash` package is installed in your project, you may import some types from `lodash`, such as the `DebouncedFunc` type:
```ts
import { debounce, DebouncedFunc } from 'lodash';
```
Modern.js will throw an error after compiling the above code:
```bash
Syntax error: /project/src/index.ts: The lodash method `DebouncedFunc` is not a known module.
Please report bugs to https://github.com/lodash/babel-plugin-lodash/issues.
```
The reason is that Modern.js has enabled the [babel-plugin-lodash](https://github.com/lodash/babel-plugin-lodash) plugin by default to optimize the bundle size of lodash, but Babel cannot distinguish between "value" and "type", which resulting in an exception in the compiled code.
The solution is to use TypeScript's `import type` syntax to explicitly declare the `DebouncedFunc` type:
```ts
import { debounce } from 'lodash';
import type { DebouncedFunc } from 'lodash';
```
:::tip
In any case, it is recommended to use `import type` to import types, this will help the compiler to identify the type.
:::
---
url: /guides/troubleshooting/cli.md
---
# CLI FAQ
### Unable to pass command line arguments correctly when using pnpm?
When using pnpm to call the commands in `package.json`, you need to pay attention to how parameters are passed:
- **If you need to pass parameters to pnpm**, you need to put the parameters before the command.
For example, using the pnpm `--filter` parameter to run the prepare command:
```bash
pnpm run --filter "./packages/**" prepare
```
- **If you need to pass parameters to the command**, you need to put the parameters after the command.
For example, in the following `package.json` configuration:
```json
{
"scripts": {
"command": "modern command"
}
}
```
The way to pass parameters when running the command is:
```bash
pnpm run command --options
```
:::tip
Modern.js requires Node.js >= 20.19.5, and pnpm v6 does not support Node.js 20, so please use pnpm v7 or higher.
:::
---
url: /guides/troubleshooting/dependencies.md
---
# Dependencies FAQ
### How to check the actual installed version of a dependency in the project?
You can use the `ls` command provided by the package manager to view the version of the dependency in the project.
Here are some basic examples. For detailed usage, please refer to the documentation of each package manager.
**npm / yarn**
For projects using npm or yarn, you can use the `npm ls` command.
For example, running `npm ls @modern-js/plugin` will show the following result:
```
project
└─┬ @modern-js/app-tools@x.y.z
└── @modern-js/plugin@x.y.z
```
**pnpm**
For projects using pnpm, you can use the `pnpm ls` command.
For example, running `pnpm ls @modern-js/plugin --depth Infinity` will show the following result:
```
devDependencies:
@modern-js/app-tools x.y.z
└── @modern-js/plugin x.y.z
```
***
### Getting "The engine "node" is incompatible" error during dependency installation?
If you encounter the following error message during dependency installation, it means that the current environment is using a Node.js version that is too low, and you need to upgrade Node.js to a higher version.
```bash
The engine "node" is incompatible with this module.
Expected version ">=20.19.5". Got "16.20.1"
```
Modern.js requires Node.js version >= 20.19.5. We strongly recommend using the latest LTS version (such as [Node.js 22 LTS](https://nodejs.org/)) for the best experience.
If the Node.js version of the current environment is lower than the above requirement, you can use tools such as [nvm](https://github.com/nvm-sh/nvm) or [fnm](https://github.com/Schniz/fnm) to switch versions.
Here is an example of using nvm:
```bash
# Install Node.js 22 LTS
nvm install 22 --lts
# Switch to Node.js 22
nvm use 22
# Set Node.js 22 as the default version
nvm alias default 22
```
For local development environments, it is recommended to use [fnm](https://github.com/Schniz/fnm), which has better performance than nvm and has similar usage.
***
### Getting a ReactNode type error after upgrading dependencies?
After upgrading the dependencies of the project, if the following type error occurs, it means that the wrong version of `@types/react` is installed in the project.
```bash
The types returned by 'render()' are incompatible between these types.
Type 'React.ReactNode' is not assignable to type 'import("/node_modules/@types/react/index").ReactNode'.
Type '{}' is not assignable to type 'ReactNode'.
```
The reason for this problem is that the ReactNode type definition in React 18/19 is different from that in React 16/17. If there are multiple different versions of `@types/react` in the project, a ReactNode type conflict will occur, resulting in the above error.
The solution is to lock the `@types/react` and `@types/react-dom` in the project to a unified version, such as `v17`.
```json
{
"@types/react": "^19",
"@types/react-dom": "^19"
}
```
For methods of locking dependency versions, please refer to [Lock nested dependency](/guides/get-started/upgrade.md#lock-nested-dependency).
***
### Getting peer dependencies warnings in the console after running `pnpm install`?
The reason for this warning is that the version range of peer dependencies declared by some third-party npm packages is inconsistent with the version range installed in Modern.js.
In most cases, peer dependencies warnings will not affect the project operation and do not need to be processed separately. Please ignore the relevant warnings.
***
### What is the minimum supported version of React for the Modern.js framework?
**Modern.js framework requires React version >= 18.0.0**.
- **If you are using Modern.js runtime capabilities** (including SSR, Streaming SSR, data loading, routing, etc.), you must use React 18 or higher. React 16 and React 17 are no longer supported.
- **If you are only using Modern.js build capabilities** (without runtime), React 16 or React 17 may theoretically work, but it is strongly recommended to upgrade to React 18 or higher for the best experience and full feature support.
***
### Type error in Modern.js configuration file?
```bash
Type 'CliPlugin<{}, {}, {}, {}>' is not assignable to type 'CliPlugin<any, {}, {}, {}>'.
Types of property 'setup' are incompatible.
```
When you use the Modern.js framework, the above error occurs in the configuration file, it may be due to the inconsistent versions of Modern.js related packages. You need to manually update all `@modern-js/**` packages to the same version.
In the monorepo, the above error may also occur due to inconsistent versions of the Modern.js framework used by different sub-projects.
For information on how to unify and upgrade dependency versions, please refer to the [Upgrading](/guides/get-started/upgrade.md) documentation.
---
url: /guides/troubleshooting/hmr.md
---
# HMR FAQ
### How to troubleshooting HMR ineffective issues?
There are several possible reasons why HMR may not be work. This document will cover most common causes and provide guidance for troubleshooting. Please refer to the following content for troubleshooting.
Before starting the troubleshooting process, it is helpful to have a basic understanding of how HMR works:
:::tip HMR Principle
1. The browser establishes a WebSocket connection with the development server for real-time communication.
2. Whenever the development server finishes recompiling, it sends a notification to the browser via the WebSocket. The browser then sends a `hot-update.xxx` request to the development server to load the newly compiled module.
3. After receiving the new module, if it is a React project, React Refresh, an official React tool, is used to update React components. Other frameworks have similar tools.
:::
After understanding the principle of HMR, you can follow these steps for basic troubleshooting:
#### 1. Check the WebSocket Connection
Open the browser console and check for the presence of the `[HMR] connected.` log.
- If it is present, the WebSocket connection is working correctly. You can continue with the following steps.
- If it is not present, open the Network panel in Chrome and check the status of the `ws://[host]:[port]/webpack-hmr` request. If the request is failed, this indicates that the HMR failed because the WebSocket connection was not successfully established.
There can be various reasons why the WebSocket connection fails to establish, such as using a network proxy that prevents the WebSocket request from reaching the development server. You can check whether the WebSocket request address matches your development server address. If it does not match, you can configure the WebSocket request address using [tools.devServer.client](/configure/app/tools/dev-server.md#client).
#### 2. Check the hot-update Requests
When you modify the code of a module and trigger a recompilation, the browser sends several `hot-update.json` and `hot-update.js` requests to the development server to fetch the updated code.
You can try modifying a module and inspect the content of the `hot-update.xxx` requests. If the content of the request is the latest code, it indicates that the hot update request is working correctly.
If the content of the request is incorrect, it is likely due to a network proxy. Check whether the address of the `hot-update.xxx` request matches your development server address. If it does not match, you need to adjust the proxy rules to route the `hot-update.xxx` request to the development server address.
#### 3. Check for Other Causes
If the above two steps do not reveal any issues, it is possible that other factors are causing the HMR to fail. For example, it could be that the code does not meet React's requirements for HMR. You can refer to the following questions for further troubleshooting.
***
### HMR not working when external React?
To ensure that HMR works properly, we need to use the development builds of React and ReactDOM.
If you exclude React via `externals` when bundling, the production build of React is usually injected through CDN, and this can cause HMR to fail.
```js
export default {
output: {
externals: {
react: 'React',
'react-dom': 'ReactDOM',
},
},
};
```
To solve this problem, you need to reference the development builds of React or not configure `externals` in the development environment.
If you are unsure about the type of React build you are using, you can refer to the [React documentation - Use the Production Build](https://legacy.reactjs.org/docs/optimizing-performance.html#use-the-production-build).
***
### HMR not working when setting filename hash in development mode?
Usually, we only set the filename hash in the production mode (i.e., when `process.env.NODE_ENV === 'production'`).
If you set the filename hash in the development mode, it may cause HMR to fail (especially for CSS files). This is because every time the file content changes, the hash value changes, preventing tools like [mini-css-extract-plugin](https://www.npmjs.com/package/mini-css-extract-plugin) from reading the latest file content.
- Correct usage:
```js
export default {
output: {
filename: {
css:
process.env.NODE_ENV === 'production'
? '[name].[contenthash:8].css'
: '[name].css',
},
},
};
```
- Incorrect usage:
```js
export default {
output: {
filename: {
css: '[name].[contenthash:8].css',
},
},
};
```
***
### HMR not working when updating React components?
Modern.js uses React's official [Fast Refresh](https://github.com/pmmmwh/react-refresh-webpack-plugin) capability to perform component hot updates.
If there is a problem that the hot update of the React component cannot take effect, or the state of the React component is lost after the hot update, it is usually because your React component uses an anonymous function. In the official practice of React Fast Refresh, it is required that the component cannot be an anonymous function, otherwise the state of the React component cannot be preserved after hot update.
Here are some examples of wrong usage:
```tsx
// bad
export default function () {
return <div>Hello World</div>;
}
// bad
export default () => <div>Hello World</div>;
```
The correct usage is to declare a name for each component function:
```tsx
// good
export default function MyComponent() {
return <div>Hello World</div>;
}
// good
const MyComponent = () => <div>Hello World</div>;
export default MyComponent;
```
***
### HMR not working when use https?
If https is enabled, the HMR connection may fail due to a certificate issue, and if you open the console, you will get an HMR connect failed error.

The solution to this problem is to click on "Advanced" -> "Proceed to xxx (unsafe)" on the Chrome problem page.
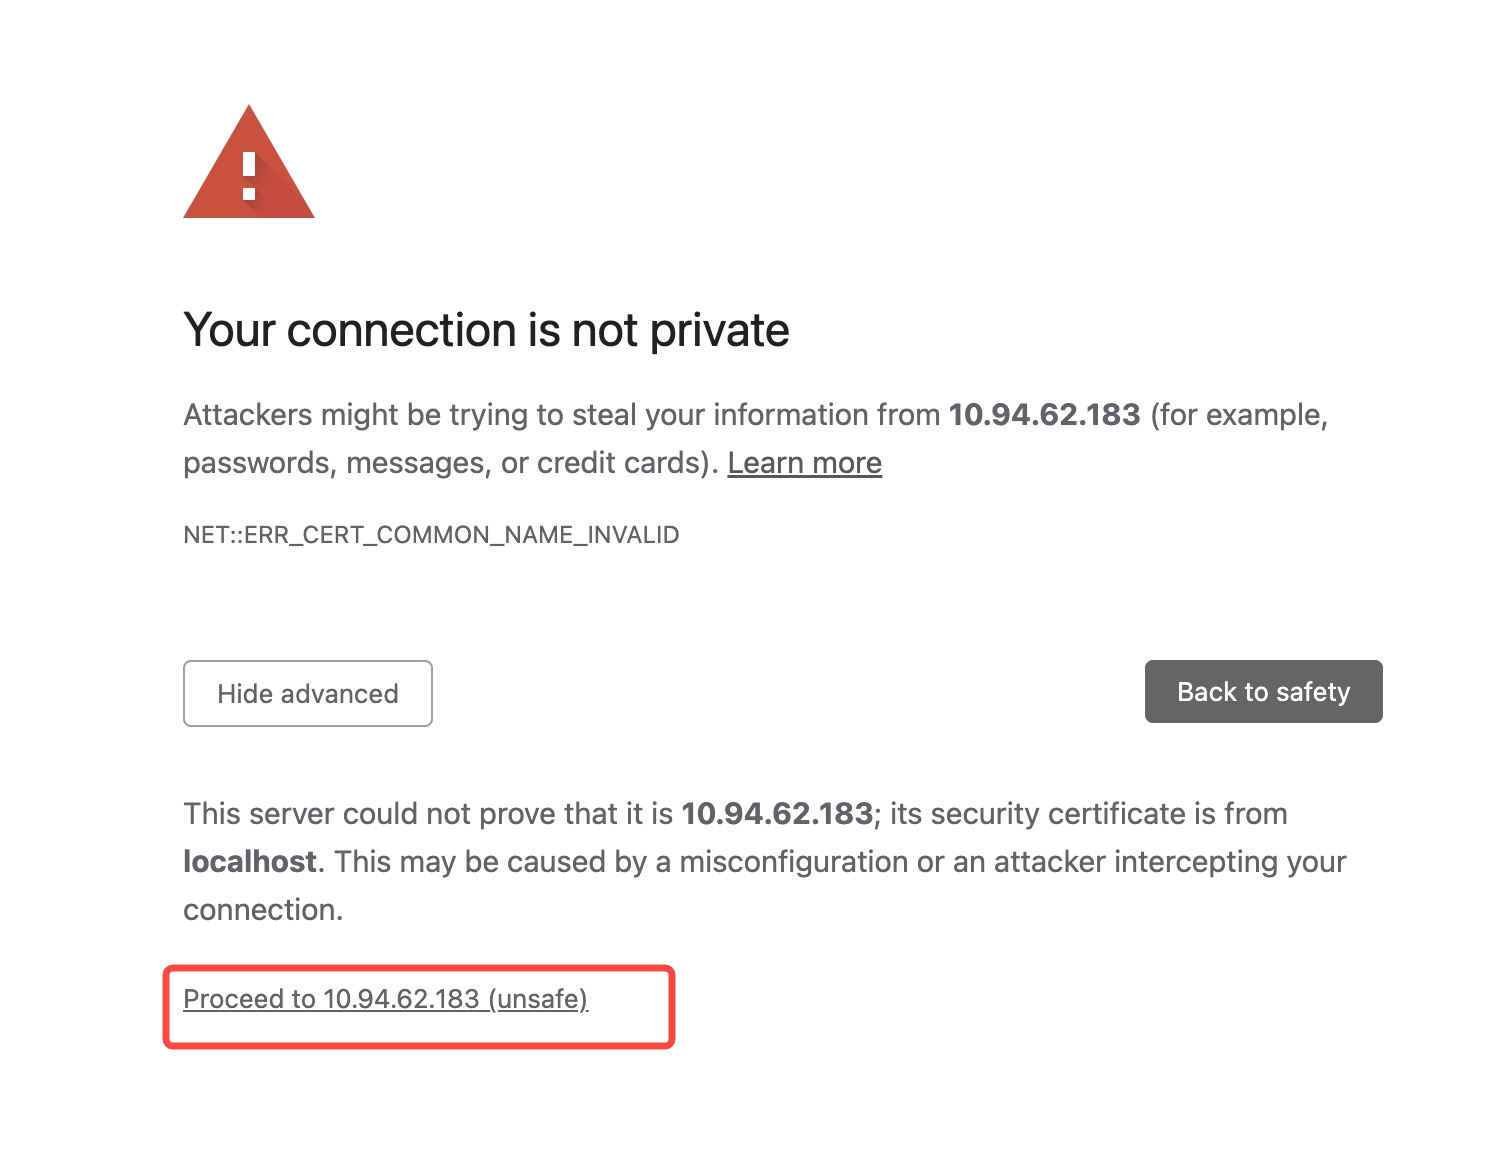
> Tips: When accessing the page through Localhost, the words "Your connection is not private" may not appear and can be handled by visiting the Network domain.
---
url: /guides/upgrade/config.md
---
# Configuration Changes
This document mainly introduces incompatible configuration changes and recommended migration methods when upgrading from Modern.js 2.0 to 3.0.
## dev
### dev.port
**Change**: This configuration has been removed and replaced with `server.port`.
**Migration Example**:
```typescript
// Before
dev: {
port: 8080;
}
// After
server: {
port: process.env.NODE_ENV === 'development' ? 8080 : undefined;
}
```
## html
### html.appIcon
**Change**: String format is no longer supported, object format must be used.
**V2 Type**:
```typescript
type AppIconItem = {
src: string;
size: number;
target?: 'apple-touch-icon' | 'web-app-manifest';
};
type AppIcon =
| string
| {
name?: string;
icons: AppIconItem[];
filename?: string;
};
```
**V3 Type**:
```typescript
type AppIconItem = {
src: string;
size: number;
target?: 'apple-touch-icon' | 'web-app-manifest';
};
type AppIcon = {
name?: string;
icons: AppIconItem[];
filename?: string;
};
```
**Migration Example**:
```typescript
// v2
export default {
html: {
appIcon: './src/assets/icon.png',
},
};
// v3
export default {
html: {
appIcon: {
icons: [
{
src: './src/assets/icon.png',
size: 180,
},
],
},
},
};
```
### html.xxxByEntries
**Change**: Configurations such as `metaByEntries`, `templateParametersByEntries`, `injectByEntries`, `tagsByEnties`, `faviconByEntries`, `templateByEnties`, `titleByEntries` have been deprecated and need to be replaced with function syntax.
**Migration Steps**:
1. Remove related configurations
2. Use the function syntax of `html.xxx` instead
**Migration Example**:
```typescript
// v2
export default {
html: {
metaByEntries: {
foo: {
description: 'TikTok',
},
// Other configurations...
},
},
};
// v3
export default {
html: {
meta({ entryName }) {
switch (entryName) {
case 'foo':
return {
description: 'TikTok',
};
// Other configurations...
}
},
},
};
```
### html.disableHtmlFolder
**Change**: This configuration has been deprecated, use `html.outputStructure` instead.
**Migration Example**:
```typescript
// v2 - equivalent to html.outputStructure configured as nested
export default {
html: {
disableHtmlFolder: true,
},
};
// v3
export default {
html: {
outputStructure: 'flat',
},
};
```
## tools
### toos.postcss
**Change**: The object configuration will override the built-in PostCSS configuration of Modern.js. If you need to extend based on the built-in configuration, please use the function configuration.
```typescript
// v2
export default {
tools: {
postcss: {
postcssOptions: {
plugins: [tailwindcssPlugin],
},
},
},
};
```
```typescript
// v3
export default {
tools: {
postcss: (opts, { addPlugins }) => {
addPlugins(tailwindcssPlugin);
},
},
};
```
### tools.esbuild
**Change**: This configuration has been deprecated, you need to manually switch to esbuild minification.
```typescript
// This configuration has been deprecated, please refer to [Switching Minifier](https://v2.rsbuild.rs/config/output/minify#switching-minifier) to manually switch to esbuild minification
// tools: {
// esbuild: { /* configuration */ }
// },
```
### tools.terser
**Change**: This configuration has been deprecated, you need to manually switch to Terser minification.
```typescript
// This configuration has been deprecated, please refer to [Switching Minifier](https://v2.rsbuild.rs/config/output/minify#switching-minifier) to manually switch to Terser minification
// tools: {
// terser: { /* configuration */ }
// },
```
### tools.devServer
**Change 1**: `after`, `before`, `devMiddleware` configurations have been deprecated, use `dev.setupDevMiddlewares` configuration instead.
**Migration Example**:
```typescript
// v2
export default {
tools: {
devServer: {
before: [...],
after: [...],
devMiddleware: {
writeToDisk: true
}
}
}
};
// v3
export default {
dev: {
setupMiddlewares: [...],
writeToDisk: true
}
};
```
**Change 2**: `client`, `https`, `liveReload` configurations have been deprecated, use corresponding `dev.client`, `dev.https`, `dev.liveReload` configurations instead.
**Migration Example**:
```typescript
// v2
export default {
tools: {
devServer: {
client: {
port: 8081,
},
},
},
};
// v3
export default {
dev: {
client: {
port: 8081,
},
},
};
```
**Change 3**: `hot` configuration has been deprecated, use `dev.hmr` configuration instead.
**Migration Example**:
```typescript
// v2
export default {
tools: {
devServer: {
hot: false,
},
},
};
// v3
export default {
dev: {
hmr: false,
},
};
```
**Change 4**: `compress`, `headers`, `historyApiFallback`, `watch` configurations have been deprecated, use `dev.server.compress`, `dev.server.headers`, `dev.server.historyApiFallback`, `dev.server.watch` configurations instead.
**Migration Example**:
```typescript
// v2
export default {
tools: {
devServer: {
compress: true,
headers: {
'X-Custom-Header': 'custom-value',
},
historyApiFallback: true,
watch: true,
},
},
};
// v3
export default {
dev: {
server: {
compress: true,
headers: {
'X-Custom-Header': 'custom-value',
},
historyApiFallback: true,
watch: true,
},
},
};
```
### tools.pug
**Change**: This configuration has been deprecated, use Rsbuild's [Pug plugin](https://github.com/rspack-contrib/rsbuild-plugin-pug) to enable support.
**Migration Example**:
```typescript
// v2
tools: {
pug: true,
},
// v3
import { pluginPug } from "@rsbuild/plugin-pug";
export default {
builderPlugins: [pluginPug()],
};
```
### tools.rsdoctor
**Change**: This configuration has been deprecated, please refer to the [Rsdoctor documentation](/guides/basic-features/debug/rsdoctor.md) and use Rspack's [Rsdoctor plugin](https://rsdoctor.dev/) to enable support.
**Migration Example**:
```typescript
// v2
tools: {
rsdoctor: {
disableClientServer: true,
features: ['bundle', 'loader', 'plugins', 'resolver'],
},
},
// v3
import { RsdoctorRspackPlugin } from '@rsdoctor/rspack-plugin';
export default {
// ...
tools: {
bundlerChain(chain) {
// Only register the plugin when RSDOCTOR is true, as the plugin will increase build time
if (process.env.RSDOCTOR) {
chain.plugin('rsdoctor').use(RsdoctorRspackPlugin, [
{
// Plugin options
disableClientServer: true,
features: ['bundle', 'loader', 'plugins', 'resolver'],
},
]);
}
},
},
};
```
### tools.babel
**Change**: This configuration has been deprecated, the framework no longer includes Babel by default. Please use [Rsbuild's Babel plugin](https://v0.rsbuild.rs/plugins/list/plugin-babel) to enable support.
**Migration Example**:
```typescript
// v2
tools: {
babel: {
plugins: [
[
'babel-plugin-import',
{
libraryName: 'xxx-components',
libraryDirectory: 'es',
style: true,
},
],
],
},
}
// v3
import { pluginBabel } from '@rsbuild/plugin-babel';
export default {
// ...
builderPlugins: [
pluginBabel({
babelLoaderOptions: {
plugins: [
[
'babel-plugin-import',
{
libraryName: 'my-components',
libraryDirectory: 'es',
style: true,
},
],
],
},
})
];
}
```
### tools.tailwindcss
**Change**: This configuration has been deprecated, please refer to [Tailwind Plugin Changes](/guides/upgrade/tailwindcss.md) and use Rsbuild's approach to integrate Tailwind CSS.
### tools.tsLoader
**Change**: Since Rspack does not support `tsLoader`, this configuration has been deprecated. The [Rspack experiments.typeReexportsPresence configuration](https://rspack.rs/config/experiments#experimentstypereexportspresence) can be used to improve recognition of TypeScript type exports, which can assist with ts-loader migration.
```typescript
// This configuration has been deprecated
// tools: {
// tsLoader: { /* configuration */ }
// },
```
### tools.webpackChain
**Change**: This configuration has been deprecated, please migrate to `tools.bundlerChain`.
```typescript
// v2
tools: {
webpackChain: (chain, { env }) => {
if (env === 'development') {
chain.devtool('cheap-module-eval-source-map');
}
};
}
// v3
tools: {
bundlerChain: (chain, { env }) => {
if (env === 'development') {
chain.devtool('cheap-module-eval-source-map');
}
};
}
```
### tools.webpack
**Change**: This configuration has been deprecated, please migrate webpack configuration to `tools.rspack`.
```typescript
// v2
tools: {
webpack: (chain, { env }) => {
{
/* configuration */
}
};
}
// v3
tools: {
rspack: (chain, { env }) => {
{
/* configuration */
}
};
}
```
## source
### source.resolveMainFields
**Change**: This configuration has been deprecated, use `resolve.mainFields` instead.
**Migration Example**:
```typescript
// v2
source: {
resolveMainFields: ['custom', 'module', 'main'];
}
// v3
resolve: {
mainFields: ['custom', 'module', 'main'];
}
```
### source.resolveExtensionPrefix
**Change**: This configuration has been deprecated, use `resolve.extensions` instead.
**Migration Example**:
```typescript
// v2
source: {
resolveExtensionPrefix: ['.ts', '.tsx', '.js'];
}
// v3
resolve: {
extensions: ['.ts', '.tsx', '.js'];
}
```
### source.moduleScopes
**Change**: This configuration has been deprecated, remove it directly.
### source.enableCustomEntry
**Change**: This configuration has been deprecated, remove it directly.
### source.disableEntryDirs
**Change**: This configuration has been deprecated, remove it directly.
### source.alias
**Change**: This configuration no longer applies to code in custom Server and BFF. Aliases configured for server-side code need to be migrated to tsconfig.json.
**Migration Example**:
```typescript
// v2
source: {
alias: {
'@api/*': './api/*',
},
},
// v3 tsconfig.json
{
"compilerOptions": {
"paths": {
"@api/*": ["./api/*"]
},
},
}
```
### server.routes
**Change**: The default route has changed from `main` to `index`. If `index` exists in the `server.routes` configuration, migrate as follows.
**Migration Example**:
```typescript
// v2
server: {
routes: {
main: '/new',
},
},
// v3
server: {
routes: {
index: '/new',
},
},
```
## output
### output.overrideBrowserslist
**Change**: Needs to be handled based on the project's existing configuration.
**Migration Steps**:
1. Check if there is a `.browserslistrc` file in the project
2. Check if `output.overrideBrowserslist` is configured in `modern.config.[ts|js]`
3. Check if browserslist is configured in package.json
If none of the above exist, create a `.browserslistrc` file with the following content for browsers supporting ES6:
```yaml title=".browserslistrc"
chrome >= 87
edge >= 88
firefox >= 78
safari >= 14
```
### output.enableAssetFallback
**Change**: This configuration has been deprecated, comment it out and add a note.
```typescript
// This configuration has been deprecated, if you encounter issues please contact oncall for resolution
// output: {
// enableAssetFallback: true,
// },
```
### output.cssModuleLocalIdentName
**Change**: This configuration has been deprecated, use `output.cssModules.localIdentName` instead.
**Migration Example**:
```typescript
// v2
export default {
output: {
cssModuleLocalIdentName: '[path][name]__[local]-[hash:base64:6]',
},
};
// v3
export default {
output: {
cssModules: {
localIdentName: '[path][name]__[local]-[hash:base64:6]',
},
},
};
```
### output.disableCssExtract
**Change**: This configuration has been deprecated, use `output.injectStyles` instead.
**Migration Example**:
```typescript
// v2
export default {
output: {
disableCssExtract: true,
},
};
// v3
export default {
output: {
injectStyles: true,
},
};
```
### output.disableFilenameHash
**Change**: This configuration has been deprecated, use `output.filenameHash` instead.
**Migration Example**:
```typescript
// v2
export default {
output: {
disableFilenameHash: true,
},
};
// v3
export default {
output: {
filenameHash: false,
},
};
```
### output.disableMinimize
**Change**: This configuration has been deprecated, use `output.minify` instead.
**Migration Example**:
```typescript
// v2
export default {
output: {
disableMinimize: true,
},
};
// v3
export default {
output: {
minify: false,
},
};
```
### output.disableSourceMap
**Change**: This configuration has been deprecated, use `output.sourceMap` instead.
**Migration Example**:
```typescript
// v2
export default {
output: {
disableSourceMap: true,
},
};
// v3
export default {
output: {
sourceMap: false,
},
};
```
### output.enableInlineScripts
**Change**: This configuration has been deprecated, use `output.inlineScripts` instead.
**Migration Example**:
```typescript
// v2
export default {
output: {
enableInlineScripts: true,
},
};
// v3
export default {
output: {
inlineScripts: true,
},
};
```
### output.enableInlineStyles
**Change**: This configuration has been deprecated, use `output.inlineStyles` instead.
**Migration Example**:
```typescript
// v2
export default {
output: {
enableInlineStyles: true,
},
};
// v3
export default {
output: {
inlineStyles: true,
},
};
```
### output.enableLatestDecorators
**Change**: This configuration has been deprecated, use `source.decorators` instead.
**Migration Example**:
```typescript
// v2
export default {
output: {
enableLatestDecorators: true,
},
};
// v3
export default {
source: {
decorators: {
version: '2022-03',
},
},
};
```
### output.disableNodePolyfill
**Change**: This configuration has been deprecated, use `pluginNodePolyfill` plugin instead.
**Migration Example**:
```typescript
// v2
export default {
output: {
disableNodePolyfill: false,
},
};
// v3
import { pluginNodePolyfill } from '@rsbuild/plugin-node-polyfill';
export default {
builderPlugins: [pluginNodePolyfill()],
};
```
## plugins
### app-tools plugin
**Change**: This plugin does not require any parameters.
**Migration Example**:
```typescript
// v2
plugins: [
appTools({
bundler: 'rspack'
})
],
// v3
plugins: [
appTools()
],
```
## security
### security.sri
**Change**: `security.sri.hashLoading` is no longer needed and can be removed directly.
## runtime
### runtime.router
**Change**: No longer needed, can be removed directly. This configuration has been moved to the router configuration in modern.runtime.ts.
**Migration Example**:
```typescript
// v2
// modern.config.ts
export default {
runtime: {
router: {
// Router configuration
},
},
};
// v3
// modern.runtime.ts
import { defineRuntimeConfig } from '@modern-js/runtime';
export default defineRuntimeConfig({
router: {
// Router configuration
},
});
```
### runtime.state
**Change**: This configuration has been deprecated, it is recommended to use a third-party state management library.
### runtime.masterApp
**Change**: This configuration has been deprecated, move this configuration to the masterApp configuration in modern.runtime.ts.
**Migration Example**:
```typescript
// v2
// modern.config.ts
export default {
runtime: {
masterApp: {
apps: [
{
name: 'Table',
entry: 'http://localhost:8081',
},
{
name: 'Dashboard',
entry: 'http://localhost:8082',
},
],
},
},
};
// v3
// modern.runtime.ts
import { defineRuntimeConfig } from '@modern-js/runtime';
export default defineRuntimeConfig({
masterApp: {
apps: [
{
name: 'Table',
entry: 'http://localhost:8081',
},
{
name: 'Dashboard',
entry: 'http://localhost:8082',
},
],
},
});
```
## performance
### performance.bundleAnalyze
**Change**: This configuration has been deprecated, it is recommended to use [Rsdoctor](https://v2.rsbuild.rs/guide/debug/rsdoctor) to analyze bundle size.
### performance.transformLodash
**Change**: No longer needed, can be removed directly.
**Migration Example**:
```typescript
// v2
export default {
performance: {
transformLodash: true,
},
};
// v3 - Remove this configuration directly
export default {
// Configuration...
};
```
## experiments
### experiments.lazyCompilation
**Change**: This configuration has been deprecated, changed to `dev.lazyCompilation`.
**Migration Example**:
```typescript
// v2
experiments: {
lazyCompilation: true;
}
// v3
dev: {
lazyCompilation: true;
}
```
---
url: /guides/upgrade/entry.md
---
# Entry Changes
This chapter introduces changes related to page entries when upgrading from Modern.js 2.0 to 3.0.
## Overview
Modern.js 3.0 has optimized and simplified the entry mechanism. The main changes include:
- **Entry File Naming Change**: Custom entry files changed from `index.tsx` to `entry.tsx`
- **Bootstrap Function Replacement**: Use the new `createRoot` and `render` APIs
- **Runtime Configuration Migration**: `App.config` and `config` exports from `routes/layout` need to be migrated
- **Initialization Logic Migration**: `App.init` and `init` exports from `routes/layout` need to be changed to runtime plugins
## Entry Type Identification
Before starting migration, first identify the entry type used in your project.
### Entry Identification Conditions
Modern.js scans directories and identifies entries that meet **any** of the following conditions:
1. **Has a `routes/` directory** → Convention-based routing entry
2. **Has an `App.tsx?` file** → Self-controlled routing entry
3. **Has an `index.tsx?` file (2.0) or `entry.tsx?` file (3.0)** → Custom entry
### Single Entry vs Multiple Entries
**Single Entry Application**: Scans the `src/` directory by default
```bash
src/
├── routes/ # or
├── App.tsx # or
└── index.tsx # 2.0 version
```
**Multiple Entry Application**: Scans first-level subdirectories under `src/`
```bash
src/
├── entry1/
│ └── routes/ # Each subdirectory is an entry
└── entry2/
└── App.tsx
```
:::tip
You can modify the entry scanning directory through the [source.entriesDir](/configure/app/source/entries-dir.md) configuration.
:::
## Migration Steps
The migration operations in this section only need to be performed when the corresponding usage actually exists in the project, such as `bootstrap` function, `App.config/App.init`, `config/init` functions in `routes/layout.tsx`, etc.
### 1. Custom Entry File Rename
If your project uses a custom entry file (`index.tsx`), you need to rename it to `entry.tsx`.
**2.0 Version:**
```bash
src/
└── index.tsx
```
**3.0 Version:**
```bash
src/
└── entry.tsx
```
### 2. Bootstrap Function Migration
If your entry file exports a function that receives `App` and `bootstrap` parameters, you need to use the new API instead.
**2.0 Version:**
```tsx title="src/index.tsx"
export default (App: React.ComponentType, bootstrap: () => void) => {
// Perform initialization operations
initSomething().then(() => {
bootstrap();
});
};
```
**3.0 Version:**
```tsx title="src/entry.tsx"
import { createRoot } from '@modern-js/runtime/react';
import { render } from '@modern-js/runtime/browser';
// Create root component
const ModernRoot = createRoot();
// Perform initialization operations
async function beforeRender() {
await initSomething();
}
// Render application
beforeRender().then(() => {
render(<ModernRoot />);
});
```
:::info Note
- The component returned by `createRoot()` corresponds to the component generated by the `routes/` directory or exported by `App.tsx`
- The `render()` function is used to handle rendering and mounting components
:::
### 3. App.config Migration
If you defined `App.config` in `App.tsx`, you need to migrate it to the runtime configuration file.
**2.0 Version:**
```tsx title="src/App.tsx"
const App = () => {
return <div>Hello</div>;
};
App.config = {
router: {
supportHtml5History: true,
},
};
export default App;
```
**3.0 Version:**
Create `modern.runtime.ts` in the same directory as the entry:
```ts title="src/modern.runtime.ts"
import { defineRuntimeConfig } from '@modern-js/runtime';
export default defineRuntimeConfig({
router: {
supportHtml5History: true,
},
});
```
:::warning Note
Modern.js 3.0 no longer supports configuring runtime in `modern.config.ts`, you must use the `modern.runtime.ts` file.
:::
### 4. App.init Migration
If you defined `App.init` in `App.tsx`, you need to change it to a runtime plugin.
**2.0 Version:**
```tsx title="src/App.tsx"
const App = () => {
return <div>Hello</div>;
};
App.init = context => {
context.store = createStore();
context.request = (url: string) => fetch(url);
};
export default App;
```
**3.0 Version:**
```ts title="src/modern.runtime.ts"
import type { RuntimePlugin } from '@modern-js/runtime';
import { defineRuntimeConfig } from '@modern-js/runtime';
const initPlugin = (): RuntimePlugin => ({
name: 'init-plugin',
setup: api => {
return {
init({ context }) {
context.store = createStore();
context.request = (url: string) => fetch(url);
},
};
},
});
export default defineRuntimeConfig({
plugins: [initPlugin()],
});
```
### 5. config Export Migration from routes/layout.tsx
If you exported a `config` function in `routes/layout.tsx`, you need to migrate it to the runtime configuration file.
**2.0 Version:**
```tsx title="src/routes/layout.tsx"
export const config = () => {
return {
router: {
supportHtml5History: true,
},
};
};
export default function Layout() {
return <Outlet />;
}
```
**3.0 Version:**
```tsx title="src/routes/layout.tsx"
export default function Layout() {
return <Outlet />;
}
```
```ts title="src/modern.runtime.ts"
import { defineRuntimeConfig } from '@modern-js/runtime';
export default defineRuntimeConfig({
router: {
supportHtml5History: true,
},
});
```
### 6. init Export Migration from routes/layout.tsx
If you exported an `init` function in `routes/layout.tsx`, you need to change it to a runtime plugin.
**2.0 Version:**
```tsx title="src/routes/layout.tsx"
export const init = context => {
context.request = (url: string) => fetch(url);
};
export default function Layout() {
return <Outlet />;
}
```
**3.0 Version:**
```tsx title="src/routes/layout.tsx"
export default function Layout() {
return <Outlet />;
}
```
```ts title="src/modern.runtime.ts"
import type { RuntimePlugin } from '@modern-js/runtime';
import { defineRuntimeConfig } from '@modern-js/runtime';
const initPlugin = (): RuntimePlugin => ({
name: 'init-plugin',
setup: api => {
return {
init({ context }) {
context.request = (url: string) => fetch(url);
},
};
},
});
export default defineRuntimeConfig({
plugins: [initPlugin()],
});
```
## Multi-Entry Application Migration Notes
For multi-entry applications, you need to use function-form configuration in `src/modern.runtime.ts`, returning different runtime configurations based on entry names.
### Configuration Method
**Directory Structure:**
```bash
src/
├── modern.runtime.ts # Unified runtime configuration file
├── entry1/
│ └── routes/
└── entry2/
└── App.tsx
```
**Configuration Example:**
```ts title="src/modern.runtime.ts"
import { defineRuntimeConfig } from '@modern-js/runtime';
export default defineRuntimeConfig(entryName => {
// Common configuration
const commonConfig = {
plugins: [commonPlugin()],
};
// Return specific configuration based on entry name
if (entryName === 'entry1') {
return {
...commonConfig,
router: {
supportHtml5History: true,
},
plugins: [...commonConfig.plugins, entry1Plugin()],
};
}
if (entryName === 'entry2') {
return {
...commonConfig,
router: {
supportHtml5History: false,
},
plugins: [...commonConfig.plugins, entry2Plugin()],
};
}
// Default configuration
return commonConfig;
});
```
:::info Note
- The `entryName` parameter corresponds to the entry directory name
- Main entry (same name as `name` in `package.json`): the directory name is passed in
- Other entries: the entry directory name is passed in
:::
### Migration Notes
1. **Merge configurations for the same entry**: If both `App.config/App.init` and `config/init` from `routes/layout.tsx` exist for the same entry, you need to merge them into the corresponding entry configuration in the `src/modern.runtime.ts` file
2. **Multiple plugins in parallel**: Multiple runtime plugins can be configured in parallel in the `plugins` array
3. **Clean up old code**: After migration is complete, remember to delete from the original files:
- `App.config` property
- `App.init` method
- `config` export from `routes/layout.tsx`
- `init` export from `routes/layout.tsx`
### Migration Example
Assume you have a 2.0 version multi-entry application:
**2.0 Version Directory Structure:**
```bash
src/
├── main/
│ ├── routes/
│ │ └── layout.tsx # Contains config and init
│ └── App.tsx # Contains App.config and App.init
└── admin/
└── routes/
└── layout.tsx # Contains config and init
```
**2.0 Version Configuration:**
```tsx title="src/main/App.tsx"
const App = () => <div>Main App</div>;
App.config = {
router: { supportHtml5History: true },
};
App.init = context => {
context.mainData = 'main';
};
```
```tsx title="src/admin/routes/layout.tsx"
export const config = () => ({
router: { supportHtml5History: false },
});
export const init = context => {
context.adminData = 'admin';
};
```
**3.0 Version After Migration:**
```bash
src/
├── modern.runtime.ts # New unified configuration file
├── main/
│ ├── routes/
│ │ └── layout.tsx # Removed config and init
│ └── App.tsx # Removed App.config and App.init
└── admin/
└── routes/
└── layout.tsx # Removed config and init
```
```ts title="src/modern.runtime.ts"
import { defineRuntimeConfig } from '@modern-js/runtime';
import type { RuntimePlugin } from '@modern-js/runtime';
// Main entry initialization plugin
const mainInitPlugin = (): RuntimePlugin => ({
name: 'main-init-plugin',
setup: api => {
return {
init({ context }) {
context.mainData = 'main';
},
};
},
});
// Admin entry initialization plugin
const adminInitPlugin = (): RuntimePlugin => ({
name: 'admin-init-plugin',
setup: api => {
return {
init({ context }) {
context.adminData = 'admin';
},
};
},
});
export default defineRuntimeConfig(entryName => {
if (entryName === 'main') {
return {
router: {
supportHtml5History: true,
},
plugins: [mainInitPlugin()],
};
}
if (entryName === 'admin') {
return {
router: {
supportHtml5History: false,
},
plugins: [adminInitPlugin()],
};
}
return {};
});
```
## Related Links
- [Page Entries](/guides/concept/entries.md)
- [Runtime Configuration](/configure/app/runtime/0-intro.md)
- [Runtime Plugins](/plugin/introduction.md#runtime-插件)
- [source.entries Configuration](/configure/app/source/entries.md)
- [source.entriesDir Configuration](/configure/app/source/entries-dir.md)
---
url: /guides/upgrade/other.md
---
# Other Important Changes
This document introduces other important incompatible changes and related migration instructions when upgrading from Modern.js 2.0 to 3.0.
## Webpack Build No Longer Supported
Modern.js 3.0 no longer supports using webpack as a build tool, and uses Rspack as the default build bundler. Rspack is implemented in Rust, providing significant build speed improvements compared to webpack, while being highly compatible with webpack configuration, allowing most configurations to be migrated directly.
If your project previously used webpack-specific configurations or plugins, you need to check if there are webpack-related custom configurations in the project and confirm whether the webpack plugins used have corresponding Rspack versions.
:::tip
Rspack is highly compatible with webpack configuration, and in most cases it can be used without modification.
:::
## Entry Name Change
Modern.js 3.0 changed the default entry name to `index`, and the default built HTML file is `index.html`. `index.html` is the default homepage file for most web servers and requires no additional configuration.
If your project's deployment configuration specifies a particular entry file name, you need to update it to `index.html`.
## API Import Paths
Modern.js 3.0 has adjusted some runtime paths, and related import paths need to be updated. The path mapping is as follows:
| Old Path | New Path | Description |
| --------------------------- | ------------------------------- | ------------------------ |
| `@modern-js/runtime/bff` | `@modern-js/plugin-bff/runtime` | BFF runtime path |
| `@modern-js/runtime/server` | `@modern-js/server-runtime` | Server-side runtime path |
## useRuntimeContext Deprecated
In Modern.js 3.0, the `useRuntimeContext` Hook has been deprecated. It is recommended to use `use(RuntimeContext)` or `useContext(RuntimeContext)` instead.
**Migration Example**:
```tsx
// Modern.js 2.0
import { useRuntimeContext } from '@modern-js/runtime';
function App() {
const { context } = useRuntimeContext();
// isBrowser is inside context
if (context.isBrowser === true) {
console.log('browser render');
}
}
```
```tsx
// Modern.js 3.0
import { use } from 'react';
import { RuntimeContext } from '@modern-js/runtime';
function App() {
const { context, isBrowser } = use(RuntimeContext);
if (isBrowser === true) {
console.log('browser render');
}
}
```
**Main Changes**:
- API changed from `useRuntimeContext()` to `use(RuntimeContext)` or `useContext(RuntimeContext)`
- `isBrowser` moved from `context.isBrowser` to the top level of the return value
- `context` structure simplified: only contains `request` and `response`, no longer includes `logger`, `metrics`, etc.
- Return value includes new properties: `initialData`, `routes`, etc.
For detailed API documentation, please refer to the [RuntimeContext documentation](/apis/app/runtime/core/runtime-context.md).
## Pages Directory Convention-Based Routing No Longer Supported
Modern.js 3.0 no longer supports the `pages` directory convention-based routing introduced in Modern.js 1.0, and now uniformly uses the `routes` directory convention-based routing.
If your project uses the `pages` directory, you need to rename the `src/pages` directory to `src/routes` and update all import paths in the project that reference the `pages` directory. For detailed migration steps, please refer to the [Convention-Based Routing documentation](/guides/basic-features/routes/routes.md).
## SSR Mode Default Value Change
Modern.js 3.0 changed the default value of `server.ssr.mode` from `'string'` to `'stream'`. This means that when SSR is enabled, streaming rendering is used by default instead of traditional string rendering.
For React 18 and above projects, changing the value of `ssr.mode` from `'stream'` to `'string'` has no impact on the rendering result if you don't modify the code in Data Loader or use Suspense. If your project depends on React 17, please manually set the value of `ssr.mode` to `'string'`.
## Using React Router v7
Modern.js 3.0 uses React Router v7 as the default routing library. React Router v7 has only a few [incompatible changes](https://reactrouter.com/upgrading/v6) compared to v6.
If you need to use React Router v5 or React Router v6, you need to use **self-controlled routing** mode. Self-controlled routing allows you to fully control routing configuration without being limited by Modern.js convention-based routing.
## Using @modern-js/create to Create Monorepo and Modern.js Module
Modern.js 3.0 no longer supports creating Monorepo projects and Modern.js Module projects through `@modern-js/create`.
**Changes**:
- In [v2.53.0](https://github.com/web-infra-dev/modern.js/releases/tag/v2.53.0), the functionality to create Monorepo projects using `@modern-js/create` was removed
- In [v2.61.0](https://github.com/web-infra-dev/modern.js/releases/tag/v2.61.0), the functionality to create Modern.js Module projects using `@modern-js/create` and `modern new` commands was removed
**Handling**:
- **Monorepo Projects**: The Monorepo solution previously provided by Modern.js was based on [pnpm Workspace](https://pnpm.io/workspaces) and did not provide substantial Monorepo management capabilities. It is recommended to directly use community-provided Monorepo solutions such as [Turborepo](https://turbo.build/), [Nx](https://nx.dev/), etc.
- **Modern.js Module Projects**: It is recommended to use [Rslib](https://rslib.rs/) to create and manage JavaScript library and UI component projects. Rslib is a library development tool based on Rsbuild, providing a simple and intuitive way to create JavaScript libraries. For detailed usage, please refer to the [Rslib official documentation](https://rslib.rs/).
## new and upgrade Commands Removed
Modern.js 3.0 removed the `modern new` and `modern upgrade` commands, and you need to perform operations manually according to the documentation.
**Changes**:
- The `modern new` command is no longer supported in Modern.js 3.0, and you cannot add entries or enable features through commands
- The `modern upgrade` command is no longer supported in Modern.js 3.0, and you cannot automatically upgrade dependencies through commands
**Handling**:
- **Adding Entries**: You need to manually create entry directories and files according to the documentation. For detailed steps, please refer to the [Page Entries documentation](/guides/concept/entries.md).
- **Enabling Features**: You need to manually install dependencies and configure according to the corresponding feature documentation. For example, to enable BFF functionality, you need to install the `@modern-js/plugin-bff` plugin and configure it in `modern.config.ts`.
- **Upgrading Dependencies**: You need to manually update the versions of all `@modern-js/**` packages in `package.json`, then reinstall dependencies. For detailed steps, please refer to the [Version Upgrade documentation](/guides/get-started/upgrade.md).
:::info Note
The purpose of removing these commands is to make the documentation more aligned with the default implementation approach of AI Agents, not encapsulating operations, so that developers can more clearly understand the specific steps of each operation, and it is also convenient for AI Agents to directly execute corresponding operations according to the documentation.
:::
## Built-in Arco/Antd Support Removed
Modern.js 2.0 had built-in support for on-demand imports of [Arco Design](https://arco.design/) and [Ant Design](https://ant.design/). This built-in support has been removed in 3.0, and users need to configure `source.transformImport` manually.
If your project uses Arco Design or Ant Design, please add the corresponding `source.transformImport` configuration manually.
**Arco Design Migration Example**:
```typescript
export default {
source: {
transformImport: [
{
libraryName: '@arco-design/web-react',
libraryDirectory: 'es',
camelToDashComponentName: false,
style: 'css',
},
{
libraryName: '@arco-design/web-react/icon',
libraryDirectory: 'react-icon',
camelToDashComponentName: false,
},
],
},
};
```
**Ant Design Migration Example** (antd v4 and below):
```typescript
export default {
source: {
transformImport: [
{
libraryName: 'antd',
libraryDirectory: 'es',
style: 'css',
},
],
},
};
```
:::tip
antd v5 uses a CSS-in-JS solution and natively supports on-demand loading, so `source.transformImport` is not needed.
For more details, refer to [Rsbuild - source.transformImport](https://v2.rsbuild.rs/config/source/transform-import).
:::
## `node_modules` Resolution Behavior Removed
In Modern.js v1, there was an internal workaround that redirected `node_modules` module resolution to the project root directory. This behavior has been removed in Modern.js 3.0.
This workaround was not a standard practice and could lead to unpredictable dependency resolution — for example, packages not explicitly declared in a project's `package.json` might still resolve successfully, masking missing dependency declarations.
If your project relied on this behavior, ensure that all required dependencies are explicitly declared in your `package.json` and installed locally.
## ESLint Rule Sets
Modern.js previously provided complete ESLint rule sets, covering @modern-js (Lint rules for Node.js projects) and @modern-js-app (Lint rules for frontend projects). In [v2.60.0](https://github.com/web-infra-dev/modern.js/releases/tag/v2.60.0), we officially removed these rule sets. We encourage developers to choose appropriate code specification tools according to their needs, directly use ESLint combined with community-recommended rules, or use Biome to improve code formatting performance.
---
url: /guides/upgrade/overview.md
---
# Overview
This guide will help you upgrade from Modern.js 2.0 to Modern.js 3.0.
## Upgrade Overview
Modern.js 3.0 brings significant improvements and changes, including:
- **Build Tool Upgrade**: Default use of [Rspack](https://rspack.dev) for building, no longer supporting Webpack. Build configuration is aligned with [Rsbuild](https://v2.rsbuild.rs).
- **React Ecosystem Upgrade**: Full support for [React 19](https://react.dev/blog/2024/04/25/react-19) and [React Router v7](https://reactrouter.com).
- **Plugin System Refactoring**: Redesigned plugin API, supporting custom plugins at CLI, Runtime, and Server layers to extend framework capabilities.
- **React Server Component**: Support for using React Server Component in [CSR](/guides/get-started/glossary.md#csr) and [SSR](/guides/basic-features/render/ssr.md) projects.
- **Internationalization Enhancement**: Provides out-of-the-box [i18n plugin](/guides/advanced-features/international.md) to simplify internationalization development workflow.
- **SSG Capability Improvement**: Provides complete [Static Site Generation (SSG)](/guides/basic-features/render/ssg.md) support.
- **Route Configuration Enhancement**: Supports [config-based routing](/guides/basic-features/routes/config-routes.md), which can be used alone or combined with [convention-based routing](/guides/basic-features/routes/routes.md), providing more flexible route definition.
## Pre-upgrade Checklist
Before starting the upgrade, please confirm:
1. Your current project is using Modern.js 2.0
2. The React version is 17 or higher
3. The Node.js version is 18.20.8 or higher. We recommend using Node.js 22 or higher
## Getting Help
If you encounter any issues during the upgrade process, you can get help through the following channels:
- Check the [Modern.js official documentation](https://modernjs.dev)
- Search for related issues or submit a new issue in [GitHub Issues](https://github.com/web-infra-dev/modern.js/issues)
- Join the [Modern.js Discord community](https://discord.gg/modernjs) to communicate with other developers
We recommend providing as much detail as possible when submitting an issue, including error logs, configuration files, and reproduction steps, to help resolve issues faster.
---
url: /guides/upgrade/tailwindcss.md
---
# Tailwind Plugin Changes
Modern.js 3.0 recommends integrating Tailwind CSS through Rsbuild's native approach, no longer relying on the `@modern-js/plugin-tailwindcss` plugin, to fully utilize Rsbuild's more flexible configuration capabilities and better build experience.
## Migration Steps
The migration operations in this section are only required if the project uses the `@modern-js/plugin-tailwindcss` plugin and the `tailwindcss` version is v2 or v3.
### 1. Remove Old Plugin
Remove the `@modern-js/plugin-tailwindcss` dependency and configuration.
**2.0 Version:**
```ts title="modern.config.ts"
import { defineConfig } from '@modern-js/app-tools';
import tailwindcssPlugin from '@modern-js/plugin-tailwindcss';
export default defineConfig({
plugins: [tailwindcssPlugin()],
});
```
**3.0 Version:**
```ts title="modern.config.ts"
import { defineConfig } from '@modern-js/app-tools';
export default defineConfig({
plugins: [],
});
```
Also remove the `@modern-js/plugin-tailwindcss` dependency from `package.json`.
### 2. Configure PostCSS
Create or update the `postcss.config.cjs` file.
```js title="postcss.config.cjs"
module.exports = {
plugins: {
tailwindcss: {},
},
};
```
### 3. Tailwind CSS Configuration Migration
**Single Configuration Case**:
- If only configured in `tailwind.config.{ts,js}`, no additional processing is needed
- If only configured in `modern.config.ts`, you need to migrate Tailwind-related configurations to `tailwind.config.{ts,js}`
**Dual Configuration Case**:
If both `tailwind.config.{ts,js}` and `modern.config.ts` have configurations, you need to merge the configurations from both and migrate the merged configuration to `tailwind.config.{ts,js}`.
**Special Directory Handling**:
If the project has storybook or config/html directories, you need to add them to the `content` in `tailwind.config.{ts,js}`:
```ts title="tailwind.config.ts"
export default {
content: [
'./src/**/*.{js,jsx,ts,tsx}',
'./storybook/**/*', // If storybook directory exists
'./config/html/**/*.{html,ejs,hbs}', // If config/html directory exists
],
};
```
### 4. CSS Style Import
Change the CSS import method to the `@tailwind` directive approach.
**2.0 Version:**
```css
@import 'tailwindcss/base.css';
@import 'tailwindcss/components.css';
@import 'tailwindcss/utilities.css';
```
**3.0 Version:**
```css
@tailwind base;
@tailwind components;
@tailwind utilities;
```
---
url: /guides/upgrade/web-server.md
---
# Custom Web Server Changes
This chapter covers upgrades for two types of legacy custom Server APIs:
- **unstableMiddleware**
- **Hook**
These two approaches are mutually exclusive in the legacy version. When migrating, please choose the corresponding path based on the capabilities actually used in the project.
## unstableMiddleware
### Core Differences
- **File Structure**: `server/index.ts` → `server/modern.server.ts`
- **Export Method**: `unstableMiddleware` array → `defineServerConfig`
- **Context API**: Modern.js Server Context → Hono Context (`c.req`/`c.res`)
- **Middleware Execution**: Legacy version could skip calling `next()`, new version must call it for subsequent chain execution
- **Response Method**: `c.response.raw()` → `c.text()` / `c.json()`
### File and Export
```typescript
// Legacy - server/index.ts
export const unstableMiddleware: UnstableMiddleware[] = [middleware1, middleware2];
// New - server/modern.server.ts
import { defineServerConfig } from '@modern-js/server-runtime';
export default defineServerConfig({
middlewares: [
{ name: 'middleware1', handler: middleware1 },
{ name: 'middleware2', handler: middleware2 },
],
});
```
### Type and next Call
```typescript
// Legacy
import type { UnstableMiddleware, UnstableMiddlewareContext } from '@modern-js/server-runtime';
const middleware: UnstableMiddleware = async (c: UnstableMiddlewareContext, next) => {
return c.response.raw('response'); // Will continue rendering even without calling next
};
// New
import { defineServerConfig, type MiddlewareHandler } from '@modern-js/server-runtime';
const middleware: MiddlewareHandler = async (c, next) => {
await next(); // Must call
return c.text('response');
};
```
### Context API Comparison
| Legacy API | New API | Description |
| -------------------- | ---------------------- | -------------------- |
| `c.request.cookie` | `getCookie(c, 'key')` | Cookie reading |
| `c.req.cookie()` | `getCookie(c, 'key')` | Hono v4 deprecated |
| `c.request.pathname` | `c.req.path` | Request path |
| `c.request.host` | `c.req.header('Host')` | Request host |
| `c.request.query` | `c.req.query()` | Query parameters |
| `c.request.headers` | `c.req.header()` | Request headers |
| `c.response.status` | `c.status()` | Response status code |
| `c.response.set` | `c.res.headers.set` | Set response headers |
| `c.response.raw` | `c.text` / `c.json` | Response body |
## afterRender Hook
The `afterRender` Hook is used to process HTML after page rendering is complete. In the new version, you need to use `renderMiddlewares` to achieve the same functionality.
### Core Differences
- **File Structure**: `server/index.ts` → `server/modern.server.ts`
- **Export Method**: `afterRender` in `hook` object → `renderMiddlewares` in `defineServerConfig`
- **Processing Method**: Direct HTML string modification → Get and modify response through middleware
### Migration Example
```typescript
// Legacy - server/index.ts
export const afterRender = (ctx, next) => {
ctx.template = ctx.template
.replace('<head>', '<head><meta name="author" content="ByteDance">')
.replace('<body>', '<body><div id="loading">Loading...</div>')
.replace('</body>', '<script>console.log("Page loaded")</script></body>');
next();
};
// New - server/modern.server.ts
import { defineServerConfig, type MiddlewareHandler } from '@modern-js/server-runtime';
const renderMiddleware: MiddlewareHandler = async (c, next) => {
await next(); // Wait for page rendering first
const { res } = c;
const html = await res.text();
const modified = html
.replace('<head>', '<head><meta name="author" content="ByteDance">')
.replace('<body>', '<body><div id="loading">Loading...</div>')
.replace('</body>', '<script>console.log("Page loaded")</script></body>');
c.res = c.body(modified, { status: res.status, headers: res.headers });
};
export default defineServerConfig({
renderMiddlewares: [{ name: 'custom-content-injection', handler: renderMiddleware }],
});
```
---
url: /configure/app/bff/cross-project.md
---
# bff.crossProject
- **Type:** `boolean`
- **Default:** `false`
:::tip
Please refer to the [Enable BFF](/guides/advanced-features/bff/function.md#enable-bff) section in Basic Usage to enable BFF functionality first.
:::
This configuration is used to enable BFF cross-project invocation functionality. When enabled, the current project can be used as a BFF producer, generating an SDK that can be directly called by other projects.
```ts title="modern.config.ts"
export default defineConfig({
bff: {
crossProject: true,
},
});
```
For detailed configuration and usage of BFF cross-project invocation, please refer to the [BFF Cross-Project Invocation Guide](/guides/advanced-features/bff/cross-project.md).
---
url: /configure/app/bff/prefix.md
---
# bff.prefix
- **Type:** `string`
- **Default:** `/api`
:::tip
Please refer to the [Enable BFF](/guides/advanced-features/bff/function.md#enable-bff) section in Basic Usage to enable BFF functionality first.
:::
By default, the prefix for accessing routes in the BFF API directory is `/api`, as shown in the following directory structure:
```bash
api
└── hello.ts
```
The route corresponding to `api/hello.ts` when accessed is `localhost:8080/api/hello`.
This configuration option can modify the default route prefix:
```ts title="modern.config.ts"
export default defineConfig({
bff: {
prefix: '/api-demo',
},
});
```
The corresponding route for `api/hello.ts` when accessed is `localhost:8080/api-demo/hello`.
---
url: /configure/app/builder-plugins.md
---
# builderPlugins
- **Type:** `RsbuildPlugin[]`
- **Default:** `[]`
Used to configure the Rsbuild plugin.
Rsbuild is the build tool of Modern.js, please read [Build Engine](/guides/concept/builder.md) for background. If you want to know how to write Rsbuild plugins, you can refer to [Rsbuild - Plugin System](https://v2.rsbuild.rs/plugins/dev/index).
## Precautions
This option **is used to configure the Rsbuild plugins**. If you need to configure other types of plugins, please select the corresponding configs:
- Use [plugins](/configure/app/plugins.md) to configure Modern.js framework plugins.
- Use [tools.bundlerChain](/configure/app/tools/bundler-chain.md) to configure Rspack plugins.
## When to use
In most scenarios, we recommend you to use the Modern.js framework plugin, which can be registered through the [plugins](/configure/app/plugins.md) config. Because the API provided by the framework plugin is richer and more capable, while the API provided by the Rsbuild plugin can only be used to build scenes.
When you need to reference some existing Rsbuild plugins (and there is no related capability in Modern.js), or reuse Rsbuild plugins between different frameworks, you can use the `builderPlugins` field to register them.
## Example
Below is an example of using the Rsbuild plugin.
### Using plugins on npm
To use a plugin on npm, you need to install the plugin through the package manager and import it.
```ts title="modern.config.ts"
import myRsbuildPlugin from 'my-rsbuild-plugin';
export default defineConfig({
builderPlugins: [myRsbuildPlugin()],
});
```
### Using local plugins
Use the plugin in the local code repository, you can import it directly through the relative path import.
```ts title="modern.config.ts"
import myRsbuildPlugin from './plugin/myRsbuildPlugin';
export default defineConfig({
builderPlugins: [myRsbuildPlugin()],
});
```
### Plugin configuration options
If the plugin provides some custom configuration options, you can pass in the configuration through the parameters of the plugin function.
```ts title="modern.config.ts"
import myRsbuildPlugin from 'my-rsbuild-plugin';
export default defineConfig({
builderPlugins: [
myRsbuildPlugin({
foo: 1,
bar: 2,
}),
],
});
```
---
url: /configure/app/dev/asset-prefix.md
---
# dev.assetPrefix
- **Type:** `boolean | string | 'auto'`
- **Default:** `'/'`
This configuration item is used to set the URL prefix of static resources in **development mode**.
:::info
The usage of this configuration item is exactly the same as that of Rsbuild. For detailed information, please refer to [Rsbuild - dev.assetPrefix](https://v2.rsbuild.dev/config/dev/asset-prefix).
:::
:::warning
Please note that this configuration item is only applicable in development mode. In production mode, please use the [output.assetPrefix](/configure/app/output/asset-prefix.md) configuration item for setting.
:::
---
url: /configure/app/dev/before-start-url.md
---
# dev.beforeStartUrl
- **Type:** `() => Promise<void> | void`
- **Default:** `undefined`
`dev.beforeStartUrl` is used to execute a callback function before opening the `startUrl`, this config needs to be used together with `dev.startUrl`.
```js
export default {
dev: {
startUrl: true,
beforeStartUrl: async () => {
await doSomeThing();
},
},
};
```
---
url: /configure/app/dev/client.md
---
# dev.client
- **Type:**
```ts
type Client = {
// The protocol name for the WebSocket request
protocol?: 'ws' | 'wss';
// The path for the WebSocket request
path?: string;
// The port number for the WebSocket request
port?: string | number;
// The host for the WebSocket request
host?: string;
// The maximum number of reconnection attempts after a WebSocket request is disconnected.
reconnect?: number;
// Whether to display an error overlay in the browser when a compilation error occurs
overlay?: boolean;
};
```
- **Default:**
```js
const defaultConfig = {
path: '/webpack-hmr',
port: '<port>',
// By default it is set to "location.hostname"
host: '',
// By default it is set to "location.protocol === 'https:' ? 'wss' : 'ws'""
protocol: undefined,
reconnect: 100,
overlay: false,
};
```
Configure the client code injected by Modern.js during the development process. This can be used to set the WebSocket URL for HMR.
:::info
The usage of this configuration item is exactly the same as that of Rsbuild. For detailed information, please refer to [Rsbuild - dev.client](https://v2.rsbuild.dev/config/dev/client).
:::
---
url: /configure/app/dev/hmr.md
---
# dev.hmr
- **Type:** `boolean`
- **Default:** `true`
Whether to enable Hot Module Replacement.
:::info
The usage of this configuration item is exactly the same as that of Rsbuild. For detailed information, please refer to [Rsbuild - dev.hmr](https://v2.rsbuild.dev/config/dev/hmr).
:::
---
url: /configure/app/dev/host.md
---
# dev.host
- **Type:** `string`
- **Default:** `0.0.0.0`
Specify the host that the dev server listens to.
By default, the dev server will listen to `0.0.0.0`, which means listening to all network interfaces, including `localhost` and public network addresses.
If you want the dev server to listen only on `localhost`, you can set it to:
```ts
export default {
dev: {
host: 'localhost',
},
};
```
---
url: /configure/app/dev/https.md
---
# dev.https
- **Type:** `boolean | { key: string; cert: string }`
- **Default:** `false`
After configuring this option, you can enable HTTPS Dev Server, and disabling the HTTP Dev Server.
HTTP:
```bash
> Local: http://localhost:8080/
> Network: http://192.168.0.1:8080/
```
HTTPS:
```bash
> Local: https://localhost:8080/
> Network: https://192.168.0.1:8080/
```
#### Automatically generate certificates
You can directly set `https` to `true`, Modern.js will automatically generate the HTTPS certificate based on [devcert](https://github.com/davewasmer/devcert).
When using this method, you need to manually install the [devcert](https://github.com/davewasmer/devcert) dependency in your project:
```bash
# npm
npm install devcert@1.2.2 -D
# yarn
yarn add devcert@1.2.2 -D
# pnpm
pnpm add devcert@1.2.2 -D
```
Then configure `dev.https` to `true`:
```ts
export default {
dev: {
https: true,
},
};
```
The devcert has some limitations, it does not currently support IP addresses yet.
:::tip
The https proxy automatically installs the certificate and needs root authority, please enter the password according to the prompt.
**The password is only used to trust the certificate, and will not be leaked or be used elsewhere**.
:::
#### Manually set the certificate
You can also manually pass in the certificate and the private key required in the `dev.https` option. This parameter will be directly passed to the createServer method of the https module in Node.js.
For details, please refer to [https.createServer](https://nodejs.org/api/https.html#https_https_createserver_options_requestlistener).
```ts
import fs from 'fs';
export default {
dev: {
https: {
key: fs.readFileSync('certificates/private.pem'),
cert: fs.readFileSync('certificates/public.pem'),
},
},
};
```
#### Clean up cert cache
The certificate created by devcert is saved in `~/Library/Application\ Support/devcert`. You may do some cleanup if needed.
---
url: /configure/app/dev/lazy-compilation.md
---
# dev.lazyCompilation
- **Type:**
```ts
type LazyCompilationOptions =
| boolean
| {
/**
* Enable lazy compilation for entries.
*/
entries?: boolean;
/**
* Enable lazy compilation for dynamic imports.
*/
imports?: boolean;
/**
* Specify which imported modules should be lazily compiled.
*/
test?: RegExp | ((m: Module) => boolean);
/**
* The path to a custom runtime code that overrides the default lazy compilation client.
*/
client?: string;
/**
* Tells the client the server URL that needs to be requested.
*/
serverUrl?: string;
};
```
- **Default:** `false`
Enable lazy compilation (compilation on demand), implemented based on Rspack's [lazy compilation](https://rspack.rs/guide/features/lazy-compilation) feature.
:::info
The usage of this configuration item is exactly the same as that of Rsbuild. For detailed information, please refer to [Rsbuild - dev.lazyCompilation](https://v2.rsbuild.dev/config/dev/lazy-compilation)。
In Rspack build mode,
:::
---
url: /configure/app/dev/live-reload.md
---
# dev.liveReload
- **Type:** `boolean`
- **Default:** `true`
Whether to reload the page when source files are changed.
:::info
The usage of this configuration item is exactly the same as that of Rsbuild. For detailed information, please refer to [Rsbuild - dev.liveReload](https://v2.rsbuild.dev/config/dev/live-reload).
:::
---
url: /configure/app/dev/progress-bar.md
---
# dev.progressBar
- **Type:**
```ts
type ProgressBar =
| boolean
| {
id?: string;
};
```
- **Default:** true
Whether to display progress bar during compilation.
:::info
The usage of this configuration item is exactly the same as that of Rsbuild. For detailed information, please refer to [Rsbuild - dev.progressBar](https://v2.rsbuild.dev/config/dev/progress-bar).
:::
---
url: /configure/app/dev/server.md
---
# dev.server
- **Type:** `Object`
- **Default:** `{}`
The config of DevServer can be modified through `dev.server`.
### compress
- **Type:** `boolean`
- **Default:** `true`
Whether to enable gzip compression for served static assets.
If you want to disable the gzip compression, you can set `compress` to `false`:
```ts
export default {
dev: {
server: {
compress: false,
},
},
};
```
For more details, please refer to the [Rsbuild - server.compress](https://v2.rsbuild.rs/config/server/compress) documentation.
### headers
- **Type:** `Record<string, string>`
- **Default:** `undefined`
Adds headers to all responses.
```js
export default {
dev: {
server: {
headers: {
'X-Custom-Foo': 'bar',
},
},
},
};
```
For more details, please refer to the [Rsbuild - server.headers](https://v2.rsbuild.rs/config/server/headers) documentation.
### historyApiFallback
- **Type:** `boolean | ConnectHistoryApiFallbackOptions`
- **Default:** `false`
The index.html page will likely have to be served in place of any 404 responses. Enable `dev.server.historyApiFallback` by setting it to `true`:
```js
export default {
dev: {
server: {
historyApiFallback: true,
},
},
};
```
For more configuration options, please refer to the [Rsbuild - server.historyApiFallback](https://v2.rsbuild.rs/config/server/history-api-fallback) documentation.
### watch
- **Type:** `boolean`
- **Default:** `true`
Whether to watch files change in directories such as `mock/`, `server/`, `api/`.
For more details, please refer to the [Rsbuild - dev.watchFiles](https://v2.rsbuild.rs/config/dev/watch-files) documentation.
### cors
- **Type:** `boolean | import('cors').CorsOptions`
Configure CORS (Cross-Origin Resource Sharing) for the development server.
The default configuration for `cors` in Modern.js follows Rsbuild's defaults:
```ts
const defaultAllowedOrigins =
/^https?:\/\/(?:(?:[^:]+\.)?localhost|127\.0\.0\.1|\[::1\])(?::\d+)?$/;
const defaultOptions = {
// Default allowed:
// - localhost
// - 127.0.0.1
// - [::1]
origin: defaultAllowedOrigins,
};
```
For more configuration options and detailed usage, please refer to the [Rsbuild - server.cors](https://v2.rsbuild.rs/config/server/cors) documentation.
### proxy
- **Type:** `ProxyOptions[] | Record<string, string | ProxyOptions>`
- **Default:** `undefined`
Configure proxy rules for the dev server, and forward requests to the specified service.
```js
export default {
dev: {
server: {
proxy: {
// http://localhost:8080/api -> https://example.com/api
// http://localhost:8080/api/foo -> https://example.com/api/foo
'/api': 'https://example.com',
},
},
},
};
```
:::tip
This option is the same as Rsbuild's `server.proxy` option, see [Rsbuild - server.proxy](https://v2.rsbuild.rs/config/server/proxy) for detailed usage.
:::
---
url: /configure/app/dev/setup-middlewares.md
---
# dev.setupMiddlewares
- **Type:**
```ts
type RequestHandler = (req: any, res: any, next: () => void) => void;
type ExposeServerApis = {
sockWrite: (
type: string,
data?: string | boolean | Record<string, any>,
) => void;
};
type SetupMiddlewares = Array<
(
middlewares: {
unshift: (...handlers: RequestHandler[]) => void;
push: (...handlers: RequestHandler[]) => void;
},
server: ExposeServerApis,
) => void
>;
```
- **Default:** `undefined`
Provides the ability to execute a custom function and apply custom middlewares.
:::info
The usage of this configuration item is exactly the same as that of Rsbuild. For detailed information, please refer to [Rsbuild - dev.setupMiddlewares](https://v2.rsbuild.dev/config/dev/setup-middlewares).
:::
---
url: /configure/app/dev/start-url.md
---
# dev.startUrl
- **Type:** `boolean | string | string[] | undefined`
- **Default:** `undefined`
`dev.startUrl` is used to set the URL of the page that automatically opens in the browser when Dev Server starts.
By default, no page will be opened.
You can set it to the following values:
```js
export default {
dev: {
// Open the project's default preview page, equivalent to `http://localhost:<port>`
startUrl: true,
// Open the specified page
startUrl: 'http://localhost:8080',
// Open multiple pages
startUrl: ['http://localhost:8080', 'http://localhost:8080/about'],
},
};
```
### Port placeholder
Since the port number may change, you can use the `<port>` placeholder to refer to the current port number, and Modern.js will automatically replace the placeholder with the actual listening port number.
```js
export default {
dev: {
startUrl: 'http://localhost:<port>/home',
},
};
```
### Open the specified browser
On MacOS, you can open the specified browser when Dev Server starts, by set environment variable `BROWSER`, support values:
- Google Chrome Canary
- Google Chrome Dev
- Google Chrome Beta
- Google Chrome
- Microsoft Edge
- Brave Browser
- Vivaldi
- Chromium
---
url: /configure/app/dev/watch-files.md
---
# dev.watchFiles
- **Type:**
```ts
type WatchFiles =
| {
paths: string | string[];
type?: 'reload-page';
// watch options for chokidar
options?: WatchOptions;
}
| {
paths: string | string[];
type?: 'reload-server';
};
type WatchFilesConfig = WatchFiles | WatchFiles[];
```
- **Default:** `undefined`
Watch specified files and directories for changes. When a file change is detected, it can trigger a page reload or restart the dev server.
:::info
The usage of this configuration item is exactly the same as that of Rsbuild. For detailed information, please refer to [Rsbuild - dev.watchFiles](https://v2.rsbuild.dev/config/dev/watch-files).
:::
---
url: /configure/app/dev/write-to-disk.md
---
# dev.writeToDisk
- **Type:** `boolean | ((filename: string) => boolean)`
- **Default:** `(file) => !file.includes('.hot-update.')`
Controls whether the build output from development mode is written to disk.
:::info
The usage of this configuration item is exactly the same as that of Rsbuild. For detailed information, please refer to [Rsbuild - dev.writeToDisk](https://v2.rsbuild.dev/config/dev/write-to-disk).
:::
---
url: /configure/app/experiments/source-build.md
---
# sourceBuild
- **Type:** `boolean | PluginSourceBuildOptions`
- **Default:** `false`
Used to enable the ability for source code building. When this configuration option is enabled, Modern.js will read the source code files corresponding to the `source` field in the sub-project's package.json and compile them.
```ts
export default {
experiments: {
sourceBuild: true,
},
};
```
More detail can see ["Source Code Build Mode"](https://modernjs.dev/en/guides/advanced-features/source-build.html)。
### Options
`experiments.sourceBuild` is implemented based on [@rsbuild/plugin-source-build](https://github.com/rspack-contrib/rsbuild-plugin-source-build?tab=readme-ov-file#options). You can pass plugin options like this:
```ts
export default {
experiments: {
sourceBuild: {
sourceField: 'my-source',
resolvePriority: 'output',
},
},
};
```
---
url: /configure/app/html/app-icon.md
---
# html.appIcon
- **Type:**
```ts
type AppIconItem = {
src: string;
size: number;
target?: 'apple-touch-icon' | 'web-app-manifest';
};
type AppIcon = {
name?: string;
icons: AppIconItem[];
filename?: string;
};
```
- **Default:** `undefined`
Set the web application icons to display when added to the home screen of a mobile device:
- Generate the web app manifest file and its `icons` field.
- Generate the `apple-touch-icon` and `manifest` tags in the HTML file.
:::info
The usage of this configuration item is exactly the same as that of Rsbuild. For detailed information, please refer to [Rsbuild - html.appIcon](https://v2.rsbuild.dev/config/html/app-icon).
:::
---
url: /configure/app/html/crossorigin.md
---
# html.crossorigin
- **Type:** `boolean | 'anonymous' | 'use-credentials'`
- **Default:** `false`
Set the [crossorigin](https://developer.mozilla.org/en-US/docs/Web/HTML/Attributes/crossorigin) attribute of the `<script>` and `<style>` tags.
:::info
The usage of this configuration item is exactly the same as that of Rsbuild. For detailed information, please refer to [Rsbuild - html.crossorigin](https://v2.rsbuild.dev/config/html/crossorigin).
:::
---
url: /configure/app/html/favicon.md
---
# html.favicon
- **Type:** `string | Function`
- **Default:** `undefined`
Set the favicon icon path for all pages, can be set as:
- a URL.
- an absolute path to the file.
- a relative path relative to the project root directory.
After config this option, the favicon will be automatically copied to the dist directory during the compilation, and the corresponding `link` tag will be added to the HTML.
:::info
The usage of this configuration item is exactly the same as that of Rsbuild. For detailed information, please refer to [Rsbuild - html.favicon](https://v2.rsbuild.dev/config/html/favicon).
:::
---
url: /configure/app/html/inject.md
---
# html.inject
- **Type:** `'head' | 'body' | boolean | Function`
- **Default:** `'head'`
Set the inject position of the `<script>` tag.
:::info
The usage of this configuration item is exactly the same as that of Rsbuild. For detailed information, please refer to [Rsbuild - html.inject](https://v2.rsbuild.dev/config/html/inject).
:::
---
url: /configure/app/html/meta.md
---
# html.meta
- **Type:** `Object | Function`
- **Default:**
```js
const defaultMeta = {
charset: { charset: 'utf-8' },
viewport:
'width=device-width, initial-scale=1.0, shrink-to-fit=no, viewport-fit=cover, minimum-scale=1.0, maximum-scale=1.0, user-scalable=no',
'http-equiv': { 'http-equiv': 'x-ua-compatible', content: 'ie=edge' },
renderer: 'webkit',
layoutmode: 'standard',
imagemode: 'force',
'wap-font-scale': 'no',
'format-detection': 'telephone=no',
};
```
Configure the `<meta>` tag of the HTML.
:::info
The usage of this configuration item is exactly the same as that of Rsbuild. For detailed information, please refer to [Rsbuild - html.meta](https://v2.rsbuild.dev/config/html/meta).
:::
---
url: /configure/app/html/mount-id.md
---
# html.mountId
- **Type:** `string`
- **Default:** `'root'`
By default, the `root` element is included in the HTML template for component mounting, and the element id can be modified through `mountId`.
:::info
The usage of this configuration item is exactly the same as that of Rsbuild. For detailed information, please refer to [Rsbuild - html.mountId](https://v2.rsbuild.dev/config/html/mount-id).
:::
---
url: /configure/app/html/output-structure.md
---
# html.outputStructure
- **Type:** `'flat' | 'nested'`
- **Default:** `'nested'`
Define the directory structure of the HTML output files.
:::info
The usage of this configuration item is exactly the same as that of Rsbuild. For detailed information, please refer to [Rsbuild - html.outputStructure](https://v2.rsbuild.dev/config/html/output-structure).
:::
---
url: /configure/app/html/script-loading.md
---
# html.scriptLoading
- **Type:** `'defer' | 'blocking' | 'module'`
- **Default:** `'defer'`
Used to set how `<script>` tags are loaded.
:::info
The usage of this configuration item is exactly the same as that of Rsbuild. For detailed information, please refer to [Rsbuild - html.scriptLoading](https://v2.rsbuild.dev/config/html/script-loading).
:::
---
url: /configure/app/html/tags.md
---
# html.tags
- **Type:**
```ts
type TagsConfig = HtmlTag | HtmlTagHandler | Array<HtmlTag | HtmlTagHandler>;
```
- **Default:** `undefined`
Modifies the tags that are injected into the HTML page.
:::info
The usage of this configuration item is exactly the same as that of Rsbuild. For detailed information, please refer to [Rsbuild - html.tags](https://v2.rsbuild.dev/config/html/tags).
:::
---
url: /configure/app/html/template-parameters.md
---
# html.templateParameters
- **Type:** `Record<string, unknown> | Function`
- **Default:**
```ts
type DefaultParameters = {
mountId: string; // the value of `html.mountId` config
entryName: string; // entry name
assetPrefix: string; // the value of dev.assetPrefix or output.assetPrefix configs
compilation: Compilation; // Compilation object of Rspack
rspackConfig: Rspack.Configuration; // Rspack config object
// generated by html-rspack-plugin
htmlPlugin: {
tags: {
headTags: HtmlTagObject[];
bodyTags: HtmlTagObject[];
};
files: {
publicPath: string;
js: Array<string>;
css: Array<string>;
favicon?: string;
};
};
};
```
Define the parameters in the HTML template, corresponding to the `templateParameters` config of [html-rspack-plugin](https://github.com/rspack-contrib/html-rspack-plugin). You can use the config as an object or a function.
:::info
The usage of this configuration item is exactly the same as that of Rsbuild. For detailed information, please refer to [Rsbuild - html.templateParameters](https://v2.rsbuild.dev/config/html/template-parameters).
:::
---
url: /configure/app/html/template.md
---
# html.template
- **Type:** `string | Function`
- **Default:**
Specifies the file path for the HTML template, which can be a relative or absolute path.
:::info
The usage of this configuration item is exactly the same as that of Rsbuild. For detailed information, please refer to [Rsbuild - html.template](https://v2.rsbuild.dev/config/html/template).
:::
---
url: /configure/app/html/title.md
---
# html.title
- **Type:** `string | Function`
- **Default:** `''`
Set the title tag of the HTML page, for example:
```js
export default {
html: {
title: 'example',
},
};
```
:::info
The usage of this configuration item is exactly the same as that of Rsbuild. For detailed information, please refer to [Rsbuild - html.title](https://v2.rsbuild.dev/config/html/title).
:::
---
url: /configure/app/output/asset-prefix.md
---
# output.assetPrefix
- **Type:** `string | 'auto'`
- **Default:** `'/'`
In production mode, use this option to set the URL prefix for static assets, such as setting it to a CDN URL.
:::info
The usage of this configuration item is exactly the same as that of Rsbuild. For detailed information, please refer to [Rsbuild - output.assetPrefix](https://v2.rsbuild.dev/config/output/asset-prefix).
:::
---
url: /configure/app/output/assets-retry.md
---
# output.assetsRetry
- **Type:** `Object`
`output.assetsRetry` is used to configure the retry of assets.The type of `AssetsRetryOptions` is as follows:
```ts
export type AssetsRetryHookContext = {
times: number;
domain: string;
url: string;
tagName: string;
};
export type AssetsRetryOptions = {
type?: string[];
domain?: string[];
max?: number;
test?: string | ((url: string) => boolean);
crossOrigin?: boolean | 'anonymous' | 'use-credentials';
inlineScript?: boolean;
onRetry?: (options: AssetsRetryHookContext) => void;
onSuccess?: (options: AssetsRetryHookContext) => void;
onFail?: (options: AssetsRetryHookContext) => void;
};
```
- **Default:** `undefined`
- Since this feature injects some runtime code into your HTML and [Rspack Runtime](https://rspack.rs/api/runtime-api/module-variables), it is disabled by default. To enable it, provide an object for the option, for example:
```js
export default {
output: {
assetsRetry: {},
},
};
```
When you enable this feature, the default configuration for `assetsRetry` is:
```ts
export const defaultAssetsRetryOptions: AssetsRetryOptions = {
type: ['script', 'link', 'img'],
domain: [],
max: 3,
test: '',
crossOrigin: false,
inlineScript: false,
onRetry: () => {},
onSuccess: () => {},
onFail: () => {},
};
```
### Example
You can also customize your retry logic using the `assetsRetry` options.
For example, setting `assetsRetry.domain` to specify the retry domain when assets fail to load.
As an example, you can specify a list of fallback domains via `assetsRetry.domain`. The first domain in the list should match the domain used in your [`assetsPrefix`](/configure/app/output/asset-prefix.md) configuration:
```js
export default {
output: {
assetsRetry: {
domain: ['cdn1.com', 'cdn2.com', 'cdn3.com'],
},
assetsPrefix: 'https://cdn1.com', // or '//cdn1.com'
},
};
```
With the configuration above, if an asset fails to load from `cdn1.com`, requests will automatically fall back to `cdn2.com`. If `cdn2.com` also fails, the request will continue to `cdn3.com`.
`assetsRetry` is implemented based on the Assets Retry plugin of Rsbuild and provides the same configuration options. You can refer to [Rsbuild - Assets Retry Plugin](https://github.com/rstackjs/rsbuild-plugin-assets-retry) to understand all available configuration options.
---
url: /configure/app/output/charset.md
---
# output.charset
- **Type:** `'ascii' | 'utf8'`
- **Default:** `'ascii'`
The `charset` config allows you to specify the [character encoding](https://developer.mozilla.org/en-US/docs/Glossary/Character_encoding) for output files to ensure they are displayed correctly in different environments.
:::info
The usage of this configuration item is exactly the same as that of Rsbuild. For detailed information, please refer to [Rsbuild - output.charset](https://v2.rsbuild.dev/config/output/charset).
:::
---
url: /configure/app/output/clean-dist-path.md
---
# output.cleanDistPath
- **Type:** `boolean`
- **Default:** `true`
Whether to clean all files in the dist path before starting compilation.
By default, Modern.js will automatically clean up the files in the dist directory, you can disable this behavior by setting `cleanDistPath` to `false`.
```js
export default {
output: {
cleanDistPath: false,
},
};
```
---
url: /configure/app/output/convert-to-rem.md
---
# output.convertToRem
- **Type:** `boolean | object`
- **Default:** `false`
By setting `output.convertToRem`, Modern.js can do the following things:
- Convert px to rem in CSS.
- Insert runtime code into the HTML template to set the fontSize of the root element.
### Boolean Type
If `output.convertToRem` is set to `true`, Rem processing capability will be turned on.
```js
export default {
output: {
convertToRem: true,
},
};
```
At this point, the rem configuration defaults as follows:
```js
{
enableRuntime: true,
rootFontSize: 50,
screenWidth: 375,
rootFontSize: 50,
maxRootFontSize: 64,
widthQueryKey: '',
excludeEntries: [],
supportLandscape: false,
useRootFontSizeBeyondMax: false,
pxtorem: {
rootValue: 50,
unitPrecision: 5,
propList: ['*'],
}
}
```
### Object Type
When the value of `output.convertToRem` is `object` type, Modern.js will perform Rem processing based on the current configuration.
options:
| Name | Type | Default | Description |
| ------------------------ | ---------- | ---------------------------------------------------------------------------------------------------------------------- | ---------------------------------------------------------------------------------------------------------------------------------------------------------------------------------- |
| enableRuntime | `boolean` | `true` | Whether to generate runtime code to calculate and set the font size of the root element |
| inlineRuntime | `boolean` | `true` | Whether to inline the runtime code to HTML. If set to `false`, the runtime code will be extracted into a separate `convert-rem.[version].js` file and output to the dist directory |
| rootFontSize | `number` | `50` | The root element font size |
| maxRootFontSize | `number` | `64` | The root element max font size |
| widthQueryKey | `string` | `'' ` | Get clientWidth from the url query based on widthQueryKey |
| screenWidth | `number` | `375` | The screen width for UI design drawings (Usually, `fontSize = (clientWidth * rootFontSize) / screenWidth`) |
| excludeEntries | `string[]` | `[]` | To exclude some page entries from injecting runtime code, it is usually used with `pxtorem.exclude` |
| supportLandscape | `boolean` | `false` | Use height to calculate rem in landscape |
| useRootFontSizeBeyondMax | `boolean` | `false` | Whether to use rootFontSize when large than maxRootFontSize |
| pxtorem | `object` | <ul><li>rootValue (Default is the same as rootFontSize) </li><li>unitPrecision: 5 </li><li>propList: \['\*']</li></ul> | [postcss-pxtorem](https://github.com/cuth/postcss-pxtorem#options) options |
### Example
```js
export default {
output: {
convertToRem: {
rootFontSize: 30,
excludeEntries: ['404', 'page2'],
pxtorem: {
propList: ['font-size'],
},
},
},
};
```
For detailed usage, please refer to [rsbuild-plugin-rem](https://github.com/rspack-contrib/rsbuild-plugin-rem).
---
url: /configure/app/output/copy.md
---
# output.copy
- **Type:**`Rspack.CopyRspackPluginOptions | Rspack.CopyRspackPluginOptions['patterns']`
- **Default:** `undefined`
Copies the specified file or directory to the dist directory, implemented based on [rspack.CopyRspackPlugin](https://rspack.rs/zh/plugins/rspack/copy-rspack-plugin).
:::info
The usage of this configuration item is exactly the same as that of Rsbuild. For detailed information, please refer to [Rsbuild - output.copy](https://v2.rsbuild.dev/config/output/copy).
:::
---
url: /configure/app/output/css-modules.md
---
# output.cssModules
- **Type:**
```ts
type CssModules = {
auto?:
| boolean
| RegExp
| ((
resourcePath: string,
resourceQuery: string,
resourceFragment: string,
) => boolean);
exportLocalsConvention?:
| 'asIs'
| 'camelCase'
| 'camelCaseOnly'
| 'dashes'
| 'dashesOnly';
exportGlobals?: boolean;
localIdentName?: string;
mode?:
| 'local'
| 'global'
| 'pure'
| 'icss'
| ((resourcePath: string) => 'local' | 'global' | 'pure' | 'icss');
namedExport?: boolean;
};
```
- **Default:**
```ts
const defaultCssModules = {
auto: true,
namedExport: false,
exportGlobals: false,
exportLocalsConvention: 'camelCase',
};
```
For custom CSS Modules configuration.
:::info
The usage of this configuration item is exactly the same as that of Rsbuild. For detailed information, please refer to [Rsbuild - output.cssModules](https://v2.rsbuild.dev/config/output/css-modules).
:::
---
url: /configure/app/output/data-uri-limit.md
---
# output.dataUriLimit
- **Type:**
```ts
type DataUriLimitConfig =
| number
| {
svg?: number;
font?: number;
image?: number;
media?: number;
};
```
- **Default:**
```js
const defaultDatUriLimit = 10000;
```
Set the size threshold to inline static assets such as images and fonts.
:::info
The usage of this configuration item is exactly the same as that of Rsbuild. For detailed information, please refer to [Rsbuild - output.dataUriLimit](https://v2.rsbuild.dev/config/output/data-uri-limit).
:::
---
url: /configure/app/output/disable-css-module-extension.md
---
# output.disableCssModuleExtension
- **Type:** `boolean`
- **Default:** `false`
Whether to treat all `.css` files in the source directory as CSS Modules.
By default, only the `*.module.css` files are treated as CSS Modules. After enabling this config, all `*.css` style files in the source directory will be regarded as CSS Modules.
`.sass`, `.scss` and `.less` files are also affected by `disableCssModuleExtension`.
:::tip
We do not recommend enabling this config, because after enabling `disableCssModuleExtension`, CSS Modules files and ordinary CSS files cannot be clearly distinguished, which is not conducive to long-term maintenance.
:::
### Example
```js
export default {
output: {
disableCssModuleExtension: true,
},
};
```
### Detailed
The following is a detailed explanation of the CSS Modules rules:
#### disableCssModuleExtension is false (default)
The following files are treated as CSS Modules:
- all `*.module.css` files
The following files are treated as normal CSS:
- all `*.css` files (excluding `.module`)
- all `*.global.css` files
#### disableCssModuleExtension is true
The following files are treated as CSS Modules:
- `*.css` and `*.module.css` files in the source directory
- `*.module.css` files under node\_modules
The following files are treated as normal CSS:
- all `*.global.css` files
- `*.css` files under node\_modules (without `.module`)
:::tip
For CSS Modules files inside node\_modules, please always use the `*.module.css` suffix.
:::
---
url: /configure/app/output/disable-inline-runtime-chunk.md
---
# output.disableInlineRuntimeChunk
- **Type:** `boolean`
- **Default:** `false`
Used to control whether to inline the bundler's runtime code into HTML.
:::tip What is runtimeChunk
Modern.js will generate a `builder-runtime.js` file in the dist directory, which is the runtime code of Rspack.
runtimeChunk is a piece of runtime code, which is provided by Rspack, that contains the necessary module processing logic, such as module loading, module parsing, etc. See [Runtime Chunk](https://rspack.rs/config/optimization#optimizationruntimechunk) for details.
:::
In the production environment, Modern.js will inline the runtimeChunk file into the HTML file by default instead of writing it to the dist directory. This is done to reduce the number of file requests.
### Disable Inlining
If you don't want the runtimeChunk file to be inlined into the HTML file, you can set `disableInlineRuntimeChunk` to `true` and a separate `builder-runtime.js` file will be generated.
```js
export default {
output: {
disableInlineRuntimeChunk: true,
},
};
```
### Merge Into Page Chunk
If you don't want to generate a separate runtimeChunk file, but want the runtimeChunk code to be bundled into the page chunk, you can set the config like this:
```js
export default {
tools: {
bundlerChain(chain) {
chain.optimization.runtimeChunk(false);
},
},
};
```
---
url: /configure/app/output/disable-svgr.md
---
# output.disableSvgr
- **Type:** `boolean`
- **Default:** `false`
Whether to transform SVGs into React components. If true, will treat all .svg files as assets.
By default, when an SVG resource is referenced in a JS file, Modern.js will call SVGR to convert the SVG into a React component. If you are sure that all SVG resources in your project are not being used as React components, you can turn off this conversion by setting `disableSvgr` to true to improve build performance.
```js
export default {
output: {
disableSvgr: true,
},
};
```
---
url: /configure/app/output/disable-ts-checker.md
---
# output.disableTsChecker
- **Type:** `boolean`
- **Default:** `false`
Whether to disable TypeScript type checker during compilation.
By default, Modern.js will run the TypeScript type checker in a separate process during the build process. Its checking logic is consistent with TypeScript's native `tsc` command. You can use `tsconfig.json` or `tools.tsChecker` config to customize the checking behavior.
### Blocking Compilation
- In development build, type errors will not block the compilation process.
- In production build, type errors will cause the build to fail to ensure the stability of the production code.
### Example
Disable TypeScript type checker:
```js
export default {
output: {
disableTsChecker: true,
},
};
```
Disable type checker in development:
```js
export default {
output: {
disableTsChecker: process.env.NODE_ENV === 'development',
},
};
```
Disable type checker in production:
```js
export default {
output: {
disableTsChecker: process.env.NODE_ENV === 'production',
},
};
```
:::tip
It is not recommended to disable type checker in production, which will reduce the stability of the production code, please use it with caution.
:::
---
url: /configure/app/output/dist-path.md
---
# output.distPath
- **Type:**
```ts
type DistPathConfig = {
root?: string;
html?: string;
js?: string;
css?: string;
svg?: string;
font?: string;
wasm?: string;
image?: string;
media?: string;
worker?: string;
assets?: string;
};
```
- **Default:**
```js
const defaultDistPath = {
root: 'dist',
css: 'static/css',
svg: 'static/svg',
font: 'static/font',
html: 'html',
wasm: 'static/wasm',
image: 'static/image',
media: 'static/media',
js: 'static/js',
assets: 'static/assets',
};
```
Set the directory of the dist files. Modern.js will output files to the corresponding subdirectory according to the file type.
:::info
The usage of this configuration item is exactly the same as that of Rsbuild. For detailed information, please refer to [Rsbuild - output.distPath](https://v2.rsbuild.dev/config/output/dist-path).
:::
---
url: /configure/app/output/enable-asset-manifest.md
---
# output.enableAssetManifest
- **Type:** `boolean`
- **Default:** `false`
Whether to generate a manifest file that contains information of all assets.
### Example
Enable asset manifest:
```js
export default {
output: {
enableAssetManifest: true,
},
};
```
After compiler, there will be a `dist/manifest.json` file:
```json
{
"files": {
"main.css": "/static/css/main.45b01211.css",
"main.js": "/static/js/main.52fd298f.js",
"html/main/index.html": "/html/main/index.html"
},
"entrypoints": ["static/css/main.45b01211.css", "static/js/main.52fd298f.js"]
}
```
If the current project has multiple types of build artifacts, such as including SSR build artifacts, multiple manifest.json files will be generated.
- web artifact: `asset-manifest.json`
- node artifact: `asset-manifest-node.json`
---
url: /configure/app/output/enable-css-module-tsdeclaration.md
---
# output.enableCssModuleTSDeclaration
- **Type:** `boolean`
- **Default:** `false`
Whether to generate a TypeScript declaration file for CSS modules.
### Example
Enable CSS module TypeScript declaration:
```js
export default {
output: {
enableCssModuleTSDeclaration: true,
},
};
```
After building, there will be a `.d.ts` file for each CSS module file. For example
```ts
interface CssExports {
title: string;
}
export const cssExports: CssExports;
export default cssExports;
```
---
url: /configure/app/output/enable-inline-route-manifests.md
---
# output.disableInlineRouteManifests
- **Type:** `boolean`
- **Default:** `false`
When using convention-based routing, the framework injects routing information into the client for optimization purposes. By default, routing information is injected into the html, but when this is configured to `true`, routing information is injected into a separate JS file.
Example:
```ts
export default {
output: {
disableInlineRouteManifests: true,
},
};
```
---
url: /configure/app/output/externals.md
---
# output.externals
- **Type:**
```ts
type Externals =
| string
| object
| function
| RegExp
| Array<string | object | function | RegExp>;
```
- **Default:** `undefined`
At build time, prevent some `import` dependencies from being packed into bundles in your code, and instead fetch them externally at runtime.
:::info
The usage of this configuration item is exactly the same as that of Rsbuild. For detailed information, please refer to [Rsbuild - output.externals](https://v2.rsbuild.dev/config/output/externals).
:::
---
url: /configure/app/output/filename-hash.md
---
# output.filenameHash
- **Type:** `boolean | string`
- **Default:** `true`
Whether to add a hash value to the filename after the production build.
:::info
The usage of this configuration item is exactly the same as that of Rsbuild. For detailed information, please refer to [Rsbuild - output.filenameHash](https://v2.rsbuild.dev/config/output/filename-hash).
:::
---
url: /configure/app/output/filename.md
---
# output.filename
:::warning
In Modern.js `dev` command or use Modern.js server deployment, don't modify the html output filename. This will cause the page to be 404.
:::
- **Type:**
```ts
type FilenameConfig = {
js?:
| string
| ((pathData: Rspack.PathData, assetInfo: Rspack.JsAssetInfo) => string);
css?: string;
svg?: string;
font?: string;
image?: string;
media?: string;
assets?: string;
};
```
- **Default:**
```js
// Development mode
const devDefaultFilename = {
js: '[name].js',
css: '[name].css',
svg: '[name].[contenthash:8].svg',
font: '[name].[contenthash:8][ext]',
image: '[name].[contenthash:8][ext]',
media: '[name].[contenthash:8][ext]',
assets: '[name].[contenthash:8][ext]',
};
// Production mode
const prodDefaultFilename = {
js: output.target === 'node' ? '[name].js' : '[name].[contenthash:8].js',
css: '[name].[contenthash:8].css',
svg: '[name].[contenthash:8].svg',
font: '[name].[contenthash:8][ext]',
image: '[name].[contenthash:8][ext]',
media: '[name].[contenthash:8][ext]',
assets: '[name].[contenthash:8][ext]',
};
```
Sets the filename of dist files.
:::info
The usage of this configuration item is exactly the same as that of Rsbuild. For detailed information, please refer to [Rsbuild - output.filename](https://v2.rsbuild.dev/config/output/filename).
:::
---
url: /configure/app/output/inject-styles.md
---
# output.injectStyles
- **Type:** `boolean`
- **Default:** `false`
Whether to inject styles into DOM.
:::info
The usage of this configuration item is exactly the same as that of Rsbuild. For detailed information, please refer to [Rsbuild - output.injectStyles](https://v2.rsbuild.dev/config/output/inject-styles).
:::
---
url: /configure/app/output/inline-scripts.md
---
# output.inlineScripts
- **Type:**
```ts
type InlineScriptsTest =
| RegExp
| ((params: { size: number; name: string }) => boolean);
type InlineScripts =
| boolean
| InlineScriptsTest
| {
enable?: boolean | 'auto';
test: InlineScriptsTest;
};
```
- **Default:** `/builder-runtime([.].+)?\.js$/`
Whether to inline output scripts files (.js files) into HTML with `<script>` tags.
:::tip
When using convention-based routing, you need to set [output.splitRouteChunks](/configure/app/output/split-route-chunks.md) to false if this option is turned on.
:::
:::info
The usage of this configuration item is exactly the same as that of Rsbuild. For detailed information, please refer to [Rsbuild - output.inlineScripts](https://v2.rsbuild.dev/config/output/inline-scripts).
:::
---
url: /configure/app/output/inline-styles.md
---
# output.inlineStyles
- **Type:**
```ts
type InlineStylesTest =
| RegExp
| ((params: { size: number; name: string }) => boolean);
type InlineStyles =
| boolean
| InlineStylesTest
| {
enable?: boolean | 'auto';
test: InlineStylesTest;
};
```
- **Default:** `false`
Whether to inline output style files (.css files) into HTML with `<style>` tags.
:::tip
When using convention-based routing, you need to set [output.splitRouteChunks](/configure/app/output/split-route-chunks.md) to false if this option is turned on.
:::
:::info
The usage of this configuration item is exactly the same as that of Rsbuild. For detailed information, please refer to [Rsbuild - output.inlineStyles](https://v2.rsbuild.dev/config/output/inline-styles).
:::
---
url: /configure/app/output/legal-comments.md
---
# output.legalComments
- **Type:** `'linked' | 'inline' | 'none'`
- **Default:** `'linked'`
Configure how to handle the legal comment.
A "legal comment" is considered to be any statement-level comment in JS or rule-level comment in CSS that contains `@license` or `@preserve` or that starts with `//!` or `/*!`. These comments are preserved in output files by default since that follows the intent of the original authors of the code.
This behavior can be configured by using one of the following options:
- `linked`: Extract all legal comments to a .LEGAL.txt file and link to them with a comment.
- `inline`: Preserve all legal comments in original position.
- `none`: Remove all legal comments.
:::info
The usage of this configuration item is exactly the same as that of Rsbuild. For detailed information, please refer to [Rsbuild - output.legalComments](https://v2.rsbuild.dev/config/output/legal-comments).
:::
---
url: /configure/app/output/minify.md
---
# output.minify
- **Type:**
```ts
type Minify =
| boolean
| {
js?: boolean;
jsOptions?: SwcJsMinimizerRspackPluginOptions;
css?: boolean;
cssOptions?: LightningCssMinimizerRspackPluginOptions;
};
```
- **Default:** `true`
Configure whether to enable code minification in production mode, or to configure minimizer options.
:::info
The usage of this configuration item is exactly the same as that of Rsbuild. For detailed information, please refer to [Rsbuild - output.minify](https://v2.rsbuild.dev/config/output/minify).
:::
---
url: /configure/app/output/override-browserslist.md
---
# output.overrideBrowserslist
- **Type:** `string[] | undefined`
- **Default:**
```ts
const defaultBrowserListMap: Record<RsbuildTarget, string[]> = {
web: ['chrome >= 87', 'edge >= 88', 'firefox >= 78', 'safari >= 14'],
node: ['node >= 14'],
'web-worker': ['chrome >= 87', 'edge >= 88', 'firefox >= 78', 'safari >= 14'],
};
```
Specifies the range of target browsers that the project is compatible with.
This value will be used by [SWC](https://github.com/swc-project/swc) and [autoprefixer](https://github.com/postcss/autoprefixer) to identify the JavaScript syntax that need to be transformed and the CSS browser prefixes that need to be added.
For other configuration methods and configuration priorities, please refer to the [Browserslist configuration](/guides/advanced-features/compatibility.md).
:::info
The usage of this configuration item is exactly the same as that of Rsbuild. For detailed information, please refer to [Rsbuild - output.overrideBrowserslist](https://v2.rsbuild.dev/config/output/override-browserslist).
:::
---
url: /configure/app/output/polyfill.md
---
# output.polyfill
- **Type:** `'entry' | 'usage' | 'ua' | 'off'`
- **Default:** `'entry'`
Via `output.polyfill` you can configure how the polyfill is injected.
Modern.js also provides a runtime Polyfill solution based on browser [UA](https://developer.mozilla.org/zh-CN/docs/Web/HTTP/Headers/User-Agent) information. For detailed usage instructions, please refer to [Polyfill At Runtime](https://modernjs.dev/en/guides/advanced-features/compatibility.html#polyfill-at-runtime).
:::info
The usage of this configuration item is exactly the same as that of Rsbuild. For detailed information, please refer to [Rsbuild - output.polyfill](https://v2.rsbuild.dev/config/output/polyfill).
:::
---
url: /configure/app/output/source-map.md
---
# output.sourceMap
- **Type:**
```ts
type SourceMap =
| boolean
| {
js?: Rspack.Configuration['devtool'];
css?: boolean;
};
```
- **Default:**
```ts
const defaultSourceMap = {
js: isDev ? 'cheap-module-source-map' : 'hidden-source-map',
css: isDev,
};
```
When `output.sourceMap` is not configured, the source map generation rules of Modern.js are different from Rsbuild:
- In the development mode, JS and CSS source maps are generated for development debugging.
- In the production mode, JS source maps are generated for stack trace backtracking, and CSS source maps are not generated to provide the best build performance.
:::info
The usage of this configuration item is exactly the same as that of Rsbuild. For detailed information, please refer to [Rsbuild - output.sourceMap](https://v2.rsbuild.dev/config/output/source-map).
:::
---
url: /configure/app/output/split-route-chunks.md
---
# output.splitRouteChunks
- **Type:** `boolean`
- **Default:** `true`
When using convention-based routing, the framework will split js and css based on the route to load on demand. If your project does not want to split js and css based on routes, you can set this option to `false`.
Example:
```ts
export default {
output: {
splitRouteChunks: false,
},
}
```
---
url: /configure/app/output/ssg.md
---
# output.ssg
- **Type:** `boolean | object`
- **Default Value:** `undefined`
Configuration to enable the application’s SSG (Static Site Generation) feature.
:::tip Enabling SSG
This configuration takes effect only when SSG is enabled. Please read the [Static Site Generation](/guides/basic-features/render/ssg.md) documentation to understand how to enable SSG and its use cases.
:::
:::info Recommended Reading
The SSG feature is closely related to routing. It is recommended to understand the [routing solution](/guides/basic-features/routes/routes.md) before using SSG.
:::
:::info
- Use `output.ssg` for single-entry apps.
- For multi-entry apps, prefer `output.ssgByEntries`.
- If `output.ssg` is `true` and `output.ssgByEntries` is not set, all routes under all entries are treated as SSG routes.
:::
## Boolean Type
When this configuration is set to `true`, the SSG feature will be enabled for all entries by default. For **manual routing**, the root route of the entry will be rendered. For **conventional routing**, each route in the entry will be rendered.
```js
export default defineConfig({
output: {
ssg: true,
},
});
```
## Object Type
When the value type is `Object`, the following attributes can be configured.
### Configuration Type
```ts
type SSGRouteOptions =
| string
| {
url: string;
headers?: Record<string, any>;
};
type SSGOptions = {
headers?: Record<string, any>;
routes?: SSGRouteOptions[];
};
```
### Example
In the example configuration below, SSG will render the pages corresponding to the `/`, `/about`, and `/user/:id` routes.
For the `/user/:id` route, `cookies` will be added to the request headers.
```ts title="modern.config.ts"
export default defineConfig({
output: {
ssg: {
routes: [
'/',
'/about',
{
url: '/user/modernjs',
headers: {
cookies: 'name=modernjs',
},
},
],
},
},
});
```
---
url: /configure/app/output/ssgByEntries.md
---
# output.ssgByEntries
- **Type:** `Record<string, boolean | object>`
- **Default Value:** `undefined`
Configure SSG per entry for multi-entry applications.
:::info
- Use `output.ssg` for single-entry apps.
- For multi-entry apps, prefer `output.ssgByEntries`.
- If `output.ssg` is `true` and `output.ssgByEntries` is not set, all routes under all entries are treated as SSG routes.
:::
## Configuration Type
```ts
type SSGRouteOptions =
| string
| {
url: string;
headers?: Record<string, any>;
};
type SSGOptions = {
headers?: Record<string, any>;
routes?: SSGRouteOptions[];
};
// ssgByEntries type
type SSGMultiEntryOptions = Record<string, boolean | SSGOptions>;
```
## Examples
### Enable SSG for some entries
```ts title="modern.config.ts"
export default defineConfig({
output: {
ssgByEntries: {
home: true,
admin: false,
},
},
});
```
### Configure routes per entry
```ts title="modern.config.ts"
export default defineConfig({
output: {
ssgByEntries: {
home: {
routes: ['/', '/about', '/user/modernjs'],
},
admin: {
routes: ['/', '/dashboard'],
},
},
},
});
```
### Configure headers per entry or route
```ts title="modern.config.ts"
export default defineConfig({
output: {
ssgByEntries: {
home: {
headers: {
'x-tt-env': 'ppe_modernjs',
},
routes: [
'/',
{
url: '/about',
headers: {
from: 'modern-website',
},
},
],
},
},
},
});
```
---
url: /configure/app/output/svg-default-export.md
---
# output.svgDefaultExport
- **Type:** `'url' | 'component'`
- **Default:** `'url'`
`output.svgDefaultExport` is used to configure the default export type of SVG files.
When `output.svgDefaultExport` is set to `url` , the default export of SVG files is the URL of the file. For example:
```js
import logo from './logo.svg';
console.log(logo); // => asset url
```
When `output.svgDefaultExport` is set to `component` , the default export of SVG files is the React component of the file. For example:
```js
import Logo from './logo.svg';
console.log(Logo); // => React Component
```
At this time, you can also specify the `?url` query to import the URL, for example:
```js
import logo from './logo.svg?url';
console.log(logo); // => asset url
```
---
url: /configure/app/output/temp-dir.md
---
# output.tempDir
- **Type:** `string`
- **Default:** `''`
When developing or building a project, Modern.js generates real Rspack entries and HTML templates, placing them in a temporary directory.
If you want to start a project with multiple configurations at the same time, you can use this configuration to generate files in different temporary directories to avoid interference with each other.
The configuration can be a relative or absolute path, but paths outside the project should be avoided.
Example:
```ts
export default {
output: {
tempDir: path.join('node_modules', '.temp-dir'),
},
};
```
---
url: /configure/app/performance/build-cache.md
---
# performance.buildCache
- **Type:**
```ts
type BuildCacheConfig =
| {
/**
* Base directory for the filesystem cache.
*/
cacheDirectory?: string;
/**
* Set different cache names based on cacheDigest content.
*/
cacheDigest?: Array<string | undefined>;
/**
* An arrays of additional code dependencies for the build.
* Rspack will use a hash of each of these items and all dependencies to invalidate the filesystem cache.
*/
buildDependencies?: string[];
}
| boolean;
```
Controls the caching behavior during the build process.
Modern.js will enable build cache by default to improve the compile speed. You can disable the build cache by setting it to `false`:
```js
export default {
performance: {
buildCache: false,
},
};
```
:::info
The usage of this configuration item is exactly the same as that of Rsbuild. For detailed information, please refer to [Rsbuild - performance.buildCache](https://v2.rsbuild.dev/config/performance/build-cache).
:::
---
url: /configure/app/performance/chunk-split.md
---
# performance.chunkSplit
- **Type:** `Object`
- **Default:** `{ strategy: 'split-by-experience' }`
`performance.chunkSplit` is used to configure the chunk splitting strategy. The type of `ChunkSplit` is as follows:
```ts
type ForceSplitting = RegExp[] | Record<string, RegExp>;
interface BaseChunkSplit {
strategy?:
| 'split-by-module'
| 'split-by-experience'
| 'all-in-one'
| 'single-vendor';
override?: SplitChunks;
forceSplitting?: ForceSplitting;
}
interface SplitBySize {
strategy?: 'split-by-size';
minSize?: number;
maxSize?: number;
override?: SplitChunks;
forceSplitting?: ForceSplitting;
}
interface SplitCustom {
strategy?: 'custom';
splitChunks?: SplitChunks;
forceSplitting?: ForceSplitting;
}
export type ChunkSplit = BaseChunkSplit | SplitBySize | SplitCustom;
```
:::info
The usage of this configuration item is exactly the same as that of Rsbuild. For detailed information, please refer to [Rsbuild - performance.chunkSplit](https://v2.rsbuild.dev/config/performance/chunk-split).
:::
---
url: /configure/app/performance/dns-prefetch.md
---
# performance.dnsPrefetch
- **Type:** `undefined | string[]`
- **Default:** `undefined`
Specifies that the user agent should preemptively perform DNS resolution for the target resource's origin, refer to [dns-prefetch](https://developer.mozilla.org/en-US/docs/Web/HTML/Attributes/rel/dns-prefetch).
After this property is set, the domain name can be resolved before the resource is requested, reducing request latency and improving loading performance.
See [Using dns-prefetch](https://developer.mozilla.org/en-US/docs/Web/Performance/dns-prefetch) for more details.
:::info
The usage of this configuration item is exactly the same as that of Rsbuild. For detailed information, please refer to [Rsbuild - performance.dnsPrefetch](https://v2.rsbuild.dev/config/performance/dns-prefetch).
:::
---
url: /configure/app/performance/preconnect.md
---
# performance.preconnect
- **Type:** `undefined | Array<string | PreconnectOption>`
```ts
interface PreconnectOption {
href: string;
crossorigin?: boolean;
}
```
- **Default:** `undefined`
:::info
The usage of this configuration item is exactly the same as that of Rsbuild. For detailed information, please refer to [Rsbuild - performance.preconnect](https://v2.rsbuild.dev/config/performance/preconnect).
:::
---
url: /configure/app/performance/prefetch.md
---
# performance.prefetch
- **Type:** `undefined | true | PrefetchOption`
```ts
type IncludeType = 'async-chunks' | 'initial' | 'all-assets' | 'all-chunks';
type Filter = Array<string | RegExp> | ((filename: string) => boolean);
interface PrefetchOption {
type?: IncludeType;
include?: Filter;
exclude?: Filter;
}
```
- **Default:** `undefined`
:::info
The usage of this configuration item is exactly the same as that of Rsbuild. For detailed information, please refer to [Rsbuild - performance.prefetch](https://v2.rsbuild.dev/config/performance/prefetch).
:::
---
url: /configure/app/performance/preload.md
---
# performance.preload
- **Type:** `undefined | true | PreloadOption`
```ts
type IncludeType = 'async-chunks' | 'initial' | 'all-assets' | 'all-chunks';
type Filter = Array<string | RegExp> | ((filename: string) => boolean);
interface PreloadOption {
type?: IncludeType;
include?: Filter;
exclude?: Filter;
}
```
- **Default:** `undefined`
Inject the [`<link rel="preload">`](https://developer.mozilla.org/zh-CN/docs/Web/HTML/Attributes/rel/preload) tags for the static assets generated by Rsbuild.
:::info
The usage of this configuration item is exactly the same as that of Rsbuild. For detailed information, please refer to [Rsbuild - performance.preload](https://v2.rsbuild.dev/config/performance/preload).
:::
---
url: /configure/app/performance/print-file-size.md
---
# performance.printFileSize
- **Type:**
```ts
type PrintFileSizeOptions =
| {
/**
* whether to print total size
*/
total?: boolean;
/**
* whether to print size of each file
*/
detail?: boolean;
/**
* whether to print gzip-compressed size
*/
compressed?: boolean;
}
| boolean;
```
- **Default:** `true`
Whether to print the file sizes after production build.
```bash
info Production file sizes:
File Size Gzipped
dist/static/js/lib-react.09721b5c.js 152.6 kB 49.0 kB
dist/html/main/index.html 5.8 kB 2.5 kB
dist/static/js/main.3568a38e.js 3.5 kB 1.4 kB
dist/static/css/main.03221f72.css 1.4 kB 741 B
```
:::info
The usage of this configuration item is exactly the same as that of Rsbuild. For detailed information, please refer to [Rsbuild - performance.printFileSize](https://v2.rsbuild.dev/config/performance/print-file-size).
:::
---
url: /configure/app/performance/profile.md
---
# performance.profile
- **Type:** `boolean`
- **Default:** `false`
Whether capture timing information for each module, same as the [profile](https://rspack.rs/config/other-options#profile) config of Rspack.
:::info
The usage of this configuration item is exactly the same as that of Rsbuild. For detailed information, please refer to [Rsbuild - performance.profile](https://v2.rsbuild.dev/config/performance/profile).
:::
---
url: /configure/app/performance/remove-console.md
---
# performance.removeConsole
- **Type:** `boolean | ConsoleType[]`
- **Default:** `false`
Whether to remove `console.[methodName]` in production build.
:::info
The usage of this configuration item is exactly the same as that of Rsbuild. For detailed information, please refer to [Rsbuild - performance.removeConsole](https://v2.rsbuild.dev/config/performance/remove-console).
:::
---
url: /configure/app/performance/remove-moment-locale.md
---
# performance.removeMomentLocale
- **Type:** `boolean`
- **Default:** `false`
Whether to remove the locales of [moment.js](https://momentjs.com/).
:::info
The usage of this configuration item is exactly the same as that of Rsbuild. For detailed information, please refer to [Rsbuild - performance.removeMomentLocale](https://v2.rsbuild.dev/config/performance/remove-moment-locale).
:::
---
url: /configure/app/plugins.md
---
# plugins
- **Type:** `CliPlugin[]`
- **Default:** `[]`
Used to configure custom Modern.js framework CLI plugins. For information on how to create custom CLI plugins, please refer to [How to Write CLI Plugins](/plugin/introduction.md#cli-plugins).
## Note
This option is **specifically for configuring framework CLI plugins**. If you need to configure other types of plugins, use the appropriate configuration method:
- Use [builderPlugins](/configure/app/builder-plugins.md) for Rsbuild plugins.
- Use [tools.bundlerChain](/configure/app/tools/bundler-chain.md) for Rspack plugins.
- Use the [plugins field in runtime config](/configure/app/runtime/plugins.md) for framework Runtime plugins.
## Examples
Below are examples of using CLI plugins:
### Using plugins from npm
To use plugins from the npm registry, first install the plugins and then import them in your configuration:
```ts title="modern.config.ts"
import { myPlugin } from 'my-plugin';
export default defineConfig({
plugins: [myPlugin()],
});
```
### Using local plugins
To use plugins from your local repository, import them directly using a relative path:
```ts title="modern.config.ts"
import { myPlugin } from './config/plugin/myPlugin';
export default defineConfig({
plugins: [myPlugin()],
});
```
### Plugin configuration
If a plugin provides custom configuration options, pass them as parameters to the plugin function:
```ts title="modern.config.ts"
import { myPlugin } from 'my-plugin';
export default defineConfig({
plugins: [
myPlugin({
foo: 1,
bar: 2,
}),
],
});
```
---
url: /configure/app/resolve/alias-strategy.md
---
# resolve.aliasStrategy
- **Type:** `'prefer-tsconfig' | 'prefer-alias'`
- **Default:** `'prefer-tsconfig'`
Set the strategy for path alias resolution, to control the priority relationship between the paths option in `tsconfig.json` and the [resolve.alias](https://v2.rsbuild.rs/config/resolve/alias) option of Rsbuild.
:::info
该配置项的使用方式与 Rsbuild 完全一致。详细信息请参考 [Rsbuild - resolve.aliasStrategy](https://v2.rsbuild.dev/config/resolve/alias-strategy)。
:::
---
url: /configure/app/resolve/alias.md
---
# resolve.alias
- **Type:** `string[]`
Create aliases for module paths to simplify import paths or redirect module references.
:::info
The usage of this configuration item is exactly the same as that of Rsbuild. For detailed information, please refer to [Rsbuild - resolve.alias](https://v2.rsbuild.dev/config/resolve/alias).
:::
---
url: /configure/app/resolve/condition-names.md
---
# resolve.conditionNames
- **Type:** `string[]`
- **Default:** Same as Rspack's `resolve.conditionNames`
Specifies the condition names used to match entry points in the [exports](https://nodejs.org/api/packages.html#packages_exports) of a package.
:::info
The usage of this configuration item is exactly the same as that of Rsbuild. For detailed information, please refer to [Rsbuild - resolve.extensions](https://v2.rsbuild.dev/config/resolve/extensions).
:::
:::warning
Do not enable this configuration option for SSR applications, as it will cause SSR rendering to fail.
:::
---
url: /configure/app/resolve/dedupe.md
---
# resolve.dedupe
- **Type:** `string[]`
Force Rsbuild to resolve the specified packages from project root, which is useful for deduplicating packages and reducing the bundle size. same as the [resolve.dedupe](https://v2.rsbuild.rs/config/resolve/dedupe) config of Rsbuild.
:::info
The usage of this configuration item is exactly the same as that of Rsbuild. For detailed information, please refer to [Rsbuild - resolve.dedupe](https://v2.rsbuild.dev/config/resolve/dedupe).
:::
---
url: /configure/app/resolve/extensions.md
---
# resolve.extensions
- **Type:** `string[]`
- **Default:** `['.ts', '.tsx', '.mjs', '.js', '.jsx', '.json']`
Automatically resolve file extensions when importing modules. This means you can import files without explicitly writing their extensions.
:::info
The usage of this configuration item is exactly the same as that of Rsbuild. For detailed information, please refer to [Rsbuild - resolve.extensions](https://v2.rsbuild.dev/config/resolve/extensions).
:::
:::warning
Do not enable this configuration option for SSR applications, as it will cause SSR rendering to fail.
:::
---
url: /configure/app/runtime/0-intro.md
---
# Introduce
Modern.js runtime configuration should be centralized in the `src/modern.runtime.ts` file.
:::info
If this file doesn't exist in your project yet, create it with the following command:
```bash
touch src/modern.runtime.ts
```
:::
## Basic Configuration
```tsx
import { defineRuntimeConfig } from '@modern-js/runtime';
export default defineRuntimeConfig({
router: {
// Router configuration
},
// Other runtime modules...
});
```
## Multi-Entry Configuration
For multi-entry applications, `defineRuntimeConfig` can accept a function that returns specific configurations based on the entry name:
```tsx
import { defineRuntimeConfig } from '@modern-js/runtime';
export default defineRuntimeConfig(entryName => {
if (entryName === 'main') {
return {
router: {
// Router configuration for "main" entry
},
};
}
// Configuration for other entries
return {
router: {
// Other entry router configuration
},
};
});
```
:::tip
Using the `src/modern.runtime.ts` configuration approach does not support exporting asynchronous functions, which is related to the rendering method of Modern.js. If you need to add asynchronous logic, please use the **[Runtime Plugin](/plugin/introduction.md#runtime-plugin)**.
:::
---
url: /configure/app/runtime/plugins.md
---
# plugins
- **Type:** `RuntimePlugin[]`
- **Default:** `[]`
Used to configure custom Modern.js Runtime plugins. For details on how to create custom Runtime plugins, please refer to [How to Write Runtime Plugins](/plugin/introduction.md#runtime-plugins).
:::info
Runtime plugins must be configured in the `plugins` array within the `src/modern.runtime.ts` file.
:::
## Examples
Here are examples demonstrating how to use Runtime plugins:
### Using plugins from npm packages
To use plugins published on npm, first install them via your package manager, then import them into your configuration.
```ts title="src/modern.runtime.ts"
import { defineRuntimeConfig } from '@modern-js/runtime';
import { myPlugin } from 'my-plugin';
export default defineRuntimeConfig({
plugins: [myPlugin()],
});
```
### Using local plugins
To use plugins from your local codebase, import them directly using relative paths.
```ts title="src/modern.runtime.ts"
import { defineRuntimeConfig } from '@modern-js/runtime';
import { myPlugin } from './config/plugin/myPlugin';
export default defineRuntimeConfig({
plugins: [myPlugin()],
});
```
### Plugin configuration
If a plugin supports custom configuration options, you can provide them as arguments to the plugin function.
```ts title="src/modern.runtime.ts"
import { defineRuntimeConfig } from '@modern-js/runtime';
import { myPlugin } from './config/plugin/myPlugin';
export default defineRuntimeConfig({
plugins: [myPlugin({
foo: 1,
bar: 2,
})],
});
```
---
url: /configure/app/runtime/router.md
---
# router
- **Type:** `Object`
- **Default:** `{}`
This configuration item is used to configure client-side routing, supporting the use of [conventional routing](/guides/concept/entries.md#convention-routing) provided by Modern.js for routing management.
:::note
The `router` configuration item **only takes effect when using conventional routing entries** (i.e., when there is a `routes/` directory in the entry). For controlled routing entries or custom entries, this configuration will not take effect.
In multi-entry applications, you can configure different routing behaviors for different entries using the function form of `defineRuntimeConfig`. For more details, see [Runtime Configuration Introduction](/configure/app/runtime/0-intro.md#multi-entry-configuration).
:::
## basename
- **Type:** `string`
- **Default:** `/`
Sets the `basename` for client-side routing, typically used when the application needs to be deployed under a non-root path of the domain.
:::tip
It is recommended to use [`server.baseUrl`](/configure/app/server/base-url.md) for configuration.
:::
## supportHtml5History
- **Type:** `boolean`
- **Default:** `true`
If the value of `supportHtml5History` is `true`, `BrowserRouter` would be used, otherwise `HashRouter` would be used. `BrowserRouter` is recommended.
:::warning
When SSR is enabled, `supportHtml5History` is not supported.
:::
---
url: /configure/app/security/check-syntax.md
---
# security.checkSyntax
- **Type:**
```ts
type CheckSyntax =
| boolean
| {
targets?: string[];
exclude?: RegExp | RegExp[];
ecmaVersion?: EcmaVersion;
};
```
- **Default:** `false`
Used to analyze whether there is incompatible advanced syntax in the build artifacts under the current browser scope. If any incompatible syntax is found, detailed information will be printed to the terminal.
### Enable Detection
You can set `checkSyntax` to `true` to enable syntax checking.
```ts
export default {
security: {
checkSyntax: true,
},
};
```
When you enable `checkSyntax`, Modern.js will perform the detection during production builds. If any incompatible advanced syntax is detected in the build artifacts, error logs will be printed to the terminal, and the current build process will be terminated.
### Error Logs
The format of the error logs is as follows, including the source file, artifact location, error reason, and source code:
```bash
error [Syntax Checker] Find some syntax errors after production build:
Error 1
source: /node_modules/foo/index.js:1:0
output: /dist/static/js/main.3f7a4d7e.js:2:39400
reason: Unexpected token (1:178)
code:
9 |
10 | var b = 2;
11 |
> 12 | console.log(() => {
13 | return a + b;
14 | });
15 |
```
:::tip
Currently, syntax checking is implemented based on AST parser. Each time it performs a check, it can only identify the first incompatible syntax found in the file. If there are multiple incompatible syntaxes in the file, you need to fix the detected syntax and re-run the check.
If the corresponding source location is not shown in the log, try setting **output.minify** to false and rebuild again.
:::
### Solutions
If a syntax error is detected, you can handle it in the following ways:
- If you want to downgrade this syntax to ensure good code compatibility, you can compile the corresponding module through the `source.include` config.
- If you don't want to downgrade the syntax, you can adjust the project's browserslist to match the syntax.
- If you do not want to check the syntax of certain products, you can use the `checkSyntax.exclude` configuration to exclude the files to be checked.
### Options
`security.checkSyntax` is implemented based on `@rsbuild/plugin-check-syntax`. For specific options, please refer to [@rsbuild/plugin-check-syntax](https://github.com/rspack-contrib/rsbuild-plugin-check-syntax).
---
url: /configure/app/security/nonce.md
---
# security.nonce
- **Type:**
```ts
type Nonce = string;
```
- **Default:** `undefined`
Adding a `nonce` attribute to the scripts resources introduced for HTML. This allows the browser to determine whether the script can be executed when it parses inline scripts with matching nonce values.
:::info
The usage of this configuration item is exactly the same as that of Rsbuild. For detailed information, please refer to [Rsbuild - security.nonce](https://v2.rsbuild.dev/config/security/nonce).
:::
---
url: /configure/app/security/sri.md
---
# security.sri
- **Type**
```ts
type SriOptions = {
hashFuncNames?: [string, ...string[]];
enabled?: 'auto' | true | false;
};
```
- **Default:** `undefined`
Adding an `integrity` attribute to `<script>` and `<link rel="stylesheet">` tags introduced by HTML allows the browser to verify the integrity of the introduced resource, thus preventing tampering with the downloaded resource.
:::info
For a specific introduction to SRI, you can refer to [Rsbuild security.sri](https://v2.rsbuild.rs/zh/config/security/sri).
This configuration type is not completely consistent with Rsbuild and will be automatically converted during the build process.
:::
---
url: /configure/app/server/base-url.md
---
# server.baseUrl
- **Type:** `string | string[]`
- **Default:** `undefined`
Uniformly set the prefix of server-side routes (commonly used in situations where multiple applications share the same domain name to distinguish traffic).
```ts title="modern.config.ts"
export default defineConfig({
server: {
// All generated routes will automatically have the prefix `/base`
// Generated server-side route file path: dist/route.json
baseUrl: '/base'
// Multiple baseUrl
baseUrl: ['/base-new', '/base-old']
}
})
```
After running `dev`, you will see that the route access will have the corresponding prefix added:
```bash
> Local: http://localhost:8080/base/
> Network: http://192.168.0.1:8080/base/
```
---
url: /configure/app/server/port.md
---
# server.port
- **Type:** `number`
- **Default:** `8080`
When running the `dev` and `serve` commands, Modern.js will start with `8080` as the default port and automatically increase the port number when the port is occupied. You can use this configuration to modify the port number that the Server starts with:
```js title="modern.config.ts"
export default defineConfig({
server: {
port: 3000,
},
});
```
:::info
The usage of this configuration item is exactly the same as that of Rsbuild. For detailed information, please refer to [Rsbuild - server.port](https://v2.rsbuild.dev/config/server/port).
:::
---
url: /configure/app/server/public-routes.md
---
# server.publicRoutes
- **Type:** `Object`
- **Default:** Server-side routing rules generated based on file conventions, with one route rule generated for each file.
This configuration option only applies to server-side routing and can customize the access route of resources under `config/public/`.
The `key` of the object is the relative file path of the `config/public/` (without using `./`), and the value can be a `string`.
```ts title="modern.config.ts"
export default defineConfig({
server: {
publicRoutes: {
// Set a long route
'index.json': '/user-config/card-info/extra/help.json',
// Set a route without a suffix
'robot.txt': '/app/authentication',
},
},
});
```
---
url: /configure/app/server/routes.md
---
# server.routes
- **Type:** `Object`
- **Default:** Server-side routing rules generated based on file conventions, with one route rule generated for each entry, and the entry name is equal to the route path.
This configuration option only applies to server-side routing and can customize the access route of application entries.
## Custom access routes
The `key` of the object is the name of the current application entry, and the value can be a `string | Array<string>`.
When the value type is `string`, the current value represents the route path for accessing the entry.
```ts title="modern.config.ts"
export default defineConfig({
server: {
routes: {
// Default route is /entryName1, customized to /p/test1
entryName1: '/p/test1'
// Supports dynamic server-side routing configuration
entryName2: '/detail/:id'
}
}
});
```
Multiple access routes can also be set for the entry through `Array<string>`:
```ts title="modern.config.ts"
export default defineConfig({
server: {
routes: {
'page-a': [`/a`, '/b'],
},
},
});
```
At this time, the `page-a` entry can be accessed through both the `/a` and `/b` routes.
After executing the `dev` command, you can view two route records for the `page-a` entry in `dist/route.json`:
```json
{
"routes": [
{
"urlPath": "/a",
"entryName": "page-a",
"entryPath": "html/page-a/index.html",
"isSPA": true,
"isSSR": false
},
{
"urlPath": "/b",
"entryName": "page-a",
"entryPath": "html/page-a/index.html",
"isSPA": true,
"isSSR": false
}
]
}
```
## Custom response headers
Response headers can be set by configuring the `resHeaders` of the entry:
```ts title="modern.config.ts"
export default defineConfig({
server: {
routes: {
'page-a': {
route: ['/a', '/b'],
resHeaders: {
'x-modern-test': '1',
},
},
},
},
});
```
:::note
This configuration takes effect in both the production and development environments, and different response headers can be set according to the NODE\_ENV to distinguish between environments. However, if you only need to set response headers in the development environment, it is recommended to use `tools.devServer.headers`.
:::
---
url: /configure/app/server/rsc.md
---
# server.rsc
- **Type:** `boolean`
- **Default:** `false`
Enable React Server Components (RSC) configuration.
When set to `true`, enables React Server Components support in Modern.js. This allows components to be rendered on the server, providing better performance and developer experience.
```ts title="modern.config.ts"
export default defineConfig({
server: {
rsc: true,
},
});
```
:::tip Prerequisites
Before enabling RSC, ensure:
1. React and React DOM are upgraded to version 19 (recommended 19.2.4 or above)
2. Install the `react-server-dom-rspack@0.0.1-beta.1` dependency
:::
For more information about using RSC, see the [React Server Components guide](/guides/basic-features/render/rsc.md).
---
url: /configure/app/server/ssr-by-entries.md
---
# server.ssrByEntries
- **Type:** `Object`
- **Default:** `undefined`
Set SSR options by entry, and the properties inside the option are the same as [ssr](/configure/app/server/ssr.md). The specified value will be replaced and merged with the content of the SSR attribute, for example:
:::info
The "entry name" defaults to the directory name. In a few cases, when defining an entry through `source.entries`, the entry name is the `key` of the `source.entries` object.
:::
```ts title="modern.config.ts"
export default defineConfig({
server: {
ssr: true,
ssrByEntries: {
// page-a does not enable SSR
'page-a': false,
},
},
});
```
In the above configuration, the project enables SSR as a whole, but the SSR rendering ability is disabled for the `page-a` entry.
---
url: /configure/app/server/ssr.md
---
# server.ssr
- **Type:** `boolean`
- **Default:** `false`
Enalbe SSR configuration.
### Boolean Type
When the value type is `boolean`, it indicates whether to enable SSR deployment mode. The default is `false` to disable it.
```ts title="modern.config.ts"
export default defineConfig({
server: {
ssr: true,
},
});
```
### Object Type
When the value type is `Object`, the following properties can be configured:
| Name | Type | Default | Description |
| ----------------- | ------------------------------- | --------------- | -------------------------------------------------------------------------------------------------------------------------------------------------------------------------------------------------------------------------------------------------------------------------------------------------------------------------------------------------------------------------------------------------------------------------------------------------------------------------------------- |
| mode | `string` | `stream` | which defaults to using streaming rendering. Configure `string` to use `renderToString` for rendering |
| forceCSR | `boolean` | `false` | which is off by default for forcing CSR rendering. Configure `true` to force CSR by adding `?csr=true` or adding `x-modern-ssr-fallback` header when accessing the page |
| unsafeHeaders | `string[]` | `[]` | For safety reasons, Modern.js does not add excessive content to SSR\_DATA. Developers can use this configuration to specify the headers that need to be injected |
| loaderFailureMode | `clientRender \| errorBoundary` | `errorBoundary` | The default configuration is `'errorBoundary'`, when an error occurs in [data loader](/guides/basic-features/data/data-fetch.md#data-loader-recommended), it will default to rendering the [`Error`](/guides/basic-features/routes/routes.md#error-handling) component of the route. When configured as `'clientRender'`, if a loader throws an error, it switch to client-side rendering,you can use it with [Client Loader](/guides/basic-features/data/data-fetch.md#client-loader) |
```ts title="modern.config.ts"
export default defineConfig({
server: {
ssr: {
forceCSR: true,
mode: 'stream',
unsafeHeaders: ['User-Agent']
},
},
});
```
### Active Fallback
In a production environment, there are scenarios where it is necessary to actively fallback an SSR project to CSR. Examples include
1. When the SSR fails, a fallback to the CSR is required to ensure product availability.
2. When the SSR is working normally, but there are rendering failures during csr, debugging is required.
3. When the SSR server is under heavy load, it may be necessary to fallback some traffic directly to the CSR to avoid service downtime.
By configuring `server.ssr.forceCSR` to `true` in the project, you can control this behavior through query strings or request headers.
For example, in a custom Web Server middleware, you can actively fallback when traffic exceeds a certain threshold:
```ts title="server/modern.server.ts"
import {
defineServerConfig,
type MiddlewareHandler,
} from '@modern-js/server-runtime';
export const handler: MiddlewareHandler = async (c, next) => {
if (condition) {
c.set('forceCSR', '1');
}
await next();
};
export default defineServerConfig({
middlewares: [
{
name: 'request-middleware',
handler,
},
],
});
```
---
url: /configure/app/source/alias-strategy.md
---
# source.aliasStrategy
:::warning Deprecation Warning
`source.aliasStrategy` is deprecated, please use [resolve.aliasStrategy](/configure/app/resolve/alias-strategy.md) instead.
:::
- **Type:** `'prefer-tsconfig' | 'prefer-alias'`
- **Default:** `'prefer-tsconfig'`
`source.aliasStrategy` is used to control the priority between the `paths` option in `tsconfig.json` and the `alias` option in the bundler.
:::info
The usage of this configuration item is exactly the same as that of Rsbuild. For detailed information, please refer to [Rsbuild - source.aliasStrategy](https://v2.rsbuild.dev/config/source/alias-strategy).
:::
---
url: /configure/app/source/alias.md
---
# source.alias
:::warning Deprecation Warning
`source.alias` is deprecated, please use [resolve.alias](/configure/app/resolve/alias.md) instead.
:::
- **Type:**
```ts
type Alias = Record<string, string | false | (string | false)[]> | Function;
```
- **Default:** `undefined`
Create aliases to import or require certain modules, same as the [resolve.alias](https://rspack.rs/config/resolve#resolvealias) config of Rspack.
:::tip
For TypeScript projects, you only need to configure [compilerOptions.paths](https://www.typescriptlang.org/tsconfig#paths) in the `tsconfig.json` file. The Rsbuild will automatically recognize it, so there is no need to configure the `source.alias` option separately. For more details, please refer to [Path Aliases](https://modernjs.dev/en/guides/basic-features/alias.html).
:::
:::info
The usage of this configuration item is exactly the same as that of Rsbuild. For detailed information, please refer to [Rsbuild - source.alias](https://v2.rsbuild.dev/config/source/alias).
:::
---
url: /configure/app/source/config-dir.md
---
# source.configDir
- **Type:** `string`
- **Default:** `'./config'`
Modern.js supports placing some files in the `./config` folder to customize HTML templates, icons, static assets, etc. For details, please refer to [File Convention](/apis/app/hooks/config/html.md).
This option allows you to customize the directory of the configuration files.
For example, adjust the assets directory to the `resources` directory:
```js title="modern.config.ts"
import { defineConfig } from '@modern-js/app-tools';
export default defineConfig({
source: {
configDir: './resources',
},
});
```
---
url: /configure/app/source/decorators.md
---
# source.decorators
- **Type:**
```ts
type Decorators = {
version?: 'legacy' | '2022-03';
};
```
- **Default:**
```ts
const defaultDecorators = {
version: 'legacy';
};
```
Used to configure the decorators syntax.
:::warning
The usage of this configuration item is exactly the same as that of Rsbuild, but the default value is different. For detailed information, please refer to [Rsbuild - source.decorators](https://v2.rsbuild.rs/config/source/decorators).
:::
We found that most projects still use the `legacy` version of the decorator syntax, so the default value is `legacy`.
---
url: /configure/app/source/define.md
---
# source.define
- **Type:** `Record<string, unknown>`
- **Default:**
```ts
const defaultDefine = {
'process.env.MODERN_TARGET': '"browser"',
};
```
Replaces variables in your code with other values or expressions at compile time. This can be useful for allowing different behavior between development builds and production builds.
:::info
The usage of this configuration item is exactly the same as that of Rsbuild. For detailed information, please refer to [Rsbuild - source.define](https://v2.rsbuild.dev/config/source/define).
:::
---
url: /configure/app/source/disable-default-entries.md
---
# source.disableDefaultEntries
- **Type:** `boolean`
- **Default:** `false`
Used to disable the functionality of automatically identifying page entry points based on directory structure.
:::info
By default, Modern.js automatically determines the entry points of pages based on directory conventions, as described in [Entries](/guides/concept/entries.md).
:::
To disable this default behavior, set the following:
```ts title="modern.config.ts"
export default defineConfig({
source: {
disableDefaultEntries: true,
},
});
```
After disabling the default behavior, you will need to use the [`source.entries`](/configure/app/source/entries.md) configuration to define custom entry points.
:::warning
We recommend organizing your code using the directory conventions provided by Modern.js to make better use of the framework's functionality and to avoid some redundant configurations.
:::
---
url: /configure/app/source/enable-async-entry.md
---
# source.enableAsyncEntry
- **Type:** `boolean`
- **Default:** `false`
This option is used for Rspack Module Federation scenario.
When this option is enabled, Modern.js will wrap the automatically generated entry files with dynamic import (Asynchronous Boundaries), allowing page code to consume remote modules generated by Module Federation.
## Background
Module Federation (MF) is a technology solution that allows multiple JavaScript applications to share code and resources. Similar to microservices architecture on the server side, it allows you to split large applications into multiple independent smaller applications that can be developed, tested, and deployed independently, while dynamically loading modules from other applications at runtime.
Module Federation solves the problem of code duplication across multiple frontend applications. In the traditional approach, if multiple applications need to use the same components or utility functions, you would need to duplicate this code in each application, leading to code duplication, high maintenance costs, and larger application sizes. With Module Federation, you can place common code in one application and have other applications load it dynamically as needed, enabling code sharing and reducing duplication.
Module Federation 2.0 supports [Rspack](https://rspack.rs/) build tools, and provides enhanced features such as dynamic type hints, Manifest, Federation Runtime, runtime plugin system, and Chrome Devtools support for better development experience and debugging capabilities. You can visit the [Module Federation official documentation](https://module-federation.io/) to learn more.
Modern.js provides an example project for Module Federation. Please refer to [module-federation-examples - modernjs](https://github.com/module-federation/module-federation-examples/tree/db5bdbeee56f779999a2c591fc553eb94eb20b36/modernjs).
## Example
First, enable this option in the configuration file:
```ts title="modern.config.ts"
export default defineConfig({
source: {
enableAsyncEntry: true,
},
});
```
Then run the `dev` or `build` command, and you will see that the files automatically generated by Modern.js have the following structure:
```bash
node_modules
└─ .modern-js
└─ main
├─ bootstrap.jsx # asynchronous entry file
├─ index.js # real entry code
└─ index.html
```
The contents of `bootstrap.js` are as follows:
```js
import('./index.jsx');
```
At this point, you can consume any remote module in the current page.
:::info
Modern.js does not have ModuleFederationPlugin plugin built in. Please configure the ModuleFederationPlugin yourself via [tools.bundlerChain](/configure/app/tools/bundler-chain.md).
:::
---
url: /configure/app/source/entries-dir.md
---
# source.entriesDir
- **Type:** `string`
- **Default:** `'./src'`
By default, Modern.js scans the `src` directory to identify page entries. You can customize the directory used for identifying page entries with this option.
For example, with the following configuration and directory structure:
```ts title="modern.config.ts"
export default defineConfig({
source: {
entriesDir: './src/pages',
},
});
```
```bash title="Project directory structure"
.
└── src
└── pages
├── a
│ └── App.tsx
└── b
└── App.tsx
```
Modern.js will generate the build entries `a` and `b` based on the `./src/pages` directory structure. The result is as follows:
```js
const entry = {
a: './src/pages/a/App.tsx',
b: './src/pages/b/App.tsx',
};
```
---
url: /configure/app/source/entries.md
---
# source.entries
- **Type:**
```ts
type Entries = Record<
string,
| string
| {
entry: string;
disableMount?: boolean;
}
>;
```
- **Default:** The entry object calculated based on the directory structure of the current project.
Used to configure custom page entries.
:::tip When to use
For most scenarios, the entry automatically generated by Modern.js based on the directory structure can meet the requirements. For details, please refer to [Entry](/guides/concept/entries.md).
If you need to customize page entries, you can set them through this option.
:::
## String
When the value of the `entries` object is of type `string`, it represents the file path of the entry module:
```ts title="modern.config.ts"
import { defineConfig } from '@modern-js/app-tools';
export default defineConfig({
source: {
entries: {
// Specify a new entry named 'my-entry'
'my-entry': './src/home/test/index.ts',
},
disableDefaultEntries: true,
},
});
```
By default, the configured entry is equivalent to `App.tsx`, which means that the specified entry file **only needs to export the root component of the application**.
For example, the following directory structure:
```bash
.
├── src
│ └── entry
│ ├── chat.tsx
│ └── home.tsx
└── package.json
```
The above directory does not conform to the directory structure convention of Modern.js, so Modern.js will not get any default entries when analyzing the directory structure.
If you do not want to change the directory structure (such as project migration), you can customize the entry through `source.entries`:
```ts title="modern.config.ts"
export default defineConfig({
source: {
entries: {
home: './src/entry/home.tsx',
chat: './src/entry/chat.tsx',
},
disableDefaultEntries: true,
},
});
```
## Object
When the value is `Object`, the following attributes can be configured:
- `entry`: `string`, the entry file path.
- `disableMount`: `boolean = false`, disable Modern.js's behavior of automatically generating entry code.
```ts title="modern.config.ts"
import { defineConfig } from '@modern-js/app-tools';
export default defineConfig({
source: {
entries: {
'my-entry': {
// entry file path
entry: './src/my-page/index.tsx',
disableMount: true,
},
},
// Disable default entry scanning
disableDefaultEntries: true,
},
});
```
### Disable entry file generation
By default, the configured entry is equivalent to `App.tsx`, and Modern.js will automatically generate an entry file to reference the entry you configured.
If you want to disable the logic of Modern.js automatically generating entry files, you can set the `disableMount` property to `true`.
```ts title="modern.config.ts"
export default defineConfig({
source: {
entries: {
'my-entry': {
entry: './src/my-page/index.tsx',
disableMount: true,
},
},
// Disable default entry scanning
disableDefaultEntries: true,
},
});
```
### Conventional Routing
If you need to enable conventional routing for a custom entry, you can set `entry` to a directory path:
```ts title="modern.config.ts"
import { defineConfig } from '@modern-js/app-tools';
export default defineConfig({
source: {
entries: {
// enable conventional routing
entry_spa: {
// The entry path of conventional routing must be set to a directory
entry: './src/about',
},
},
// Disable default entry scanning
disableDefaultEntries: true,
},
});
```
## Entry Merge Rules
After setting `source.entries`, if `disableDefaultEntries: true` is not set, Modern.js will merge the custom entry with the entry obtained by analyzing the directory structure.
The merge rule is:
- Compare the entry paths set by the custom entry setting and the default entry path. When the entry paths are the same, the custom entry will override the default entry.
For example, the following directory structure:
```bash
.
├── src
│ ├── chat
│ │ └── App.tsx
│ └── home
│ └── index.ts
└── package.json
```
Modern.js will analyze the `src/` directory and get the default entries `chat` and `home`. When the user configures as follows in the `modern.config.ts` file:
```ts title="modern.config.ts"
import { defineConfig } from '@modern-js/app-tools';
export default defineConfig({
source: {
entries: {
index: './src/home/index.ts',
},
},
};
```
It can be seen that the path of the custom entry `index` is the same as the path of the default entry `home`. During the merge process, `index` will override `home`, and the final entry is as follows:
- `chat -> ./src/chat/App.tsx`
- `index -> ./src/home/index.ts`
---
url: /configure/app/source/exclude.md
---
# source.exclude
- **Type:** [RuleSetCondition\[\]](https://rspack.rs/config/module#condition)
- **Default:** `[]`
Specifies JavaScript/TypeScript files that do not need to be compiled. The usage is consistent with [Rule.exclude](https://rspack.rs/config/module#ruleexclude) in Rspack, which supports passing in strings or regular expressions to match the module path.
:::info
The usage of this configuration item is exactly the same as that of Rsbuild. For detailed information, please refer to [Rsbuild - source.exclude](https://v2.rsbuild.dev/config/source/exclude).
:::
---
url: /configure/app/source/global-vars.md
---
# source.globalVars
- **Type:** `Record<string, JSONValue> | Function`
- **Default:**
```ts
const defaultGlobalVars = {
// The environment variable `process.env.NODE_ENV` will be added by default,
// so you don't need to set it in manually.
'process.env.NODE_ENV': JSON.stringify(process.env.NODE_ENV),
};
```
Used to define global variables. It can replace expressions like `process.env.FOO` in your code after compile. Such as:
```js
console.log(process.env.NODE_ENV);
// ⬇️ Turn into being...
console.log('development');
```
### Example
In the following example, the `ENABLE_VCONSOLE` and `APP_CONTEXT` are injected into the code:
```js
export default {
source: {
globalVars: {
ENABLE_VCONSOLE: true,
APP_CONTEXT: { answer: 42 },
},
},
};
```
You can use them directly in your code:
```js
if (ENABLE_VCONSOLE) {
// do something
}
console.log(APP_CONTEXT);
```
### Function Usage
- **Type:**
```ts
type GlobalVarsFn = (
obj: Record<string, JSONValue>,
utils: { env: NodeEnv; target: BuilderTarget },
) => Record<string, JSONValue> | void;
```
You can set `source.globalVars` to a function to dynamically setting some environment variables.
For example, dynamically set according to the build target:
```js
export default {
source: {
globalVars(obj, { target }) {
obj['MY_TARGET'] = target === 'node' ? 'server' : 'client';
},
},
};
```
### Difference with define
You can take `source.globalVars` as the syntax sugar of `source.define`, the only difference is that `source.globalVars` will automatically stringify the value, which makes it easier to set the value of global variables. The values of `globalVars` should be JSON-safe to ensure it can be serialized.
```js
export default {
source: {
globalVars: {
'process.env.BUILD_VERSION': '0.0.1',
'import.meta.foo': { bar: 42 },
'import.meta.baz': false,
},
define: {
'process.env.BUILD_VERSION': JSON.stringify('0.0.1'),
'import.meta': {
foo: JSON.stringify({ bar: 42 }),
baz: JSON.stringify(false),
},
},
},
};
```
### Precautions
`source.globalVars` injects environment variables through string replacement, so it cannot take effect on dynamic syntaxes such as destructuring.
When using destructuring assignment, Modern.js will not be able to determine whether the variable `NODE_ENV` is associated with the expression `process.env.NODE_ENV` to be replaced, so the following usage is invalid:
```js
const { NODE_ENV } = process.env;
console.log(NODE_ENV);
// ❌ Won't get a string.
```
---
url: /configure/app/source/include.md
---
# source.include
- **Type:** [RuleSetCondition\[\]](https://rspack.rs/config/module#condition)
- **Default value:**
```ts
const defaultInclude = [
[{ not: /[\\/]node_modules[\\/]/ }, /\.(?:ts|tsx|jsx|mts|cts)$/],
];
```
`source.include` is used to specify additional JavaScript files that need to be compiled. By default, the following files will be compiled:
- TypeScript and JSX files in any directory, with file extensions matching `.ts`, `.tsx`, `.jsx`, `.mts`, `.cts`.
- JavaScript files not in the `node_modules` directory, with file extensions matching `.js`, `.mjs`, `.cjs`.
:::tip
Before Rsbuild version 1.4, the default value of `source.include` was:
```ts
const defaultInclude = [
[
{
and: [APP_ROOT, { not: /[\\/]node_modules[\\/]/ }],
},
/\.(?:ts|tsx|jsx|mts|cts)$/,
],
];
```
The difference from the new version is that `.js`, `.mjs`, `.cjs` files only in the current directory will be compiled.
:::
:::info
该配置项的使用方式与 Rsbuild 完全一致。详细信息请参考 [Rsbuild - source.include](https://v2.rsbuild.dev/config/source/include)。
:::
---
url: /configure/app/source/main-entry-name.md
---
# source.mainEntryName
- **Type:** `string`
- **Default:** `'index'`
This option is used to configure the main entry name of Modern.js.
By default, the default main entry name of Modern.js is `index`. When using a single entry or the entry name is the same as the `name` field in `package.json`, the corresponding entry will be used as the main entry. This configuration can be used to modify the name of the main entry.
For example, change the main entry name to main:
```ts title="modern.config.ts"
export default defineConfig({
source: {
mainEntryName: 'main',
},
});
```
After building, the corresponding HTML output path will be changed to `dist/html/index/index.html`.
:::info
When the main entry name is modified, other `**ByEntries` configurations also need to be adjusted to use the modified entry name.
:::
---
url: /configure/app/source/pre-entry.md
---
# source.preEntry
- **Type:** `string | string[]`
- **Default:** `[]`
Add a script before the entry file of each page. This script will be executed before the page code. It can be used to execute global logics, such as injecting polyfills, setting global styles, etc.
:::info
The usage of this configuration item is exactly the same as that of Rsbuild. For detailed information, please refer to [Rsbuild - source.preEntry](https://v2.rsbuild.dev/config/source/pre-entry).
:::
---
url: /configure/app/source/transform-import.md
---
# source.transformImport
Transform the import path, which can be used to modularly import the subpath of third-party packages. The functionality is similar to [babel-plugin-import](https://www.npmjs.com/package/babel-plugin-import)。
- **Type:**
```ts
type TransformImport =
| false
| Array<{
libraryName: string;
libraryDirectory?: string;
style?: string | boolean;
styleLibraryDirectory?: string;
camelToDashComponentName?: boolean;
transformToDefaultImport?: boolean;
customName?: string;
customStyleName?: string;
}>
| Function;
```
- **Default:** `undefined`
:::info
The usage of this configuration item is exactly the same as that of Rsbuild. For detailed information, please refer to [Rsbuild - source.transformImport](https://v2.rsbuild.dev/config/source/transform-import).
:::
---
url: /configure/app/split-chunks.md
---
# splitChunks
- **Type:**
```ts
type SplitChunksConfig =
| (Rspack.OptimizationSplitChunksOptions & {
preset?: SplitChunksPreset;
})
| false;
```
`splitChunks` is used to configure Rsbuild's chunk splitting strategy.
:::info
The usage of this configuration item is exactly the same as that of Rsbuild. For detailed information, please refer to [Rsbuild - splitChunks](https://v2.rsbuild.dev/config/split-chunks).
:::
---
url: /configure/app/tools/autoprefixer.md
---
# tools.autoprefixer
- **Type:** `Object | Function`
- **Default:**
```js
{
flexbox: 'no-2009',
// Depends on the browserslist config in the project
// and the `output.overrideBrowserslist` (higher priority) config
overrideBrowserslist: browserslist,
}
```
You can modify the config of [autoprefixer](https://github.com/postcss/autoprefixer) by `tools.autoprefixer`.
### Object Type
When `tools.autoprefixer` is configured as `Object` type, it is merged with the default config through Object.assign. For example:
```js
export default {
tools: {
autoprefixer: {
flexbox: 'no-2009',
},
},
};
```
### Function Type
When `tools.autoprefixer` is a Function, the default config is passed as the first parameter and can be directly modified or returned as the final result. For example:
```js
export default {
tools: {
autoprefixer(config) {
// modify flexbox config
config.flexbox = 'no-2009';
},
},
};
```
---
url: /configure/app/tools/bundler-chain.md
---
# tools.bundlerChain
- **Type:**
```ts
type BundlerChainFn = (
chain: RspackChain,
utils: ModifyBundlerChainUtils,
) => Promise<void> | void;
```
- **Default:** `undefined`
You can modify the Rspack configuration by configuring `tools.bundlerChain` which is type of `Function`. The function receives two parameters, the first is the original bundler chain object, and the second is an object containing some utils.
:::tip What is BundlerChain
Bundler chain is a chainable configuration tool implemented based on the Rspack configuration API, which you can use to modify Rspack configuration.
Configurations modified via bundler chain will work on Rspack builds.
:::
> `tools.bundlerChain` is executed earlier than tools.rspack and thus will be overridden by changes in tools.rspack.
For more information, please refer to [Rsbuild#tools.bundlerChain](https://v2.rsbuild.rs/config/tools/bundler-chain).
---
url: /configure/app/tools/css-extract.md
---
# tools.cssExtract
- **Type:**
```ts
type CSSExtractOptions = {
pluginOptions?: Rspack.CssExtractRspackPluginOptions;
loaderOptions?: Rspack.CssExtractRspackLoaderOptions;
};
```
- **Default:**
```js
const defaultOptions = {
// The loader options
loaderOptions: {},
// The plugin options
pluginOptions: {
// The default value of cssPath is `static/css`
// while the default value of cssFilename is `[name].[contenthash:8].css`
filename: `${cssPath}/${cssFilename}`,
chunkFilename: `${cssPath}/async/${cssFilename}`,
ignoreOrder: true,
},
};
```
The config of [CssExtractRspackPlugin](https://rspack.rs/plugins/rspack/css-extract-rspack-plugin) can be modified through `tools.cssExtract`.
:::info
The usage of this configuration item is exactly the same as that of Rsbuild. For detailed information, please refer to [Rsbuild - tools.cssExtract](https://v2.rsbuild.dev/config/tools/css-extract).
:::
---
url: /configure/app/tools/css-loader.md
---
# tools.cssLoader
- **Type:** `Object | Function`
- **Default:**
```js
const defaultOptions = {
modules: rsbuildConfig.output.cssModules,
sourceMap: rsbuildConfig.output.sourceMap.css,
};
```
The config of [css-loader](https://github.com/webpack-contrib/css-loader) can be modified through `tools.cssLoader`.
:::info
The usage of this configuration item is exactly the same as that of Rsbuild. For detailed information, please refer to [Rsbuild - tools.cssLoader](https://v2.rsbuild.dev/config/tools/css-loader).
:::
---
url: /configure/app/tools/dev-server.md
---
# tools.devServer
- **Type:** `Object`
- **Default:** `{}`
The config of DevServer can be modified through `tools.devServer`.
:::tip
Modern.js does not directly use [webpack-dev-server](https://webpack.js.org/api/webpack-dev-server/) or [@rspack/dev-server](https://rspack.rs/guide/dev-server.html), but implement DevServer based on [webpack-dev-middleware](https://github.com/webpack/webpack-dev-middleware).
:::
### Options
#### compress
:::warning
**Deprecated**: This configuration is deprecated, please use [dev.server.compress](https://modernjs.dev/en/configure/app/dev/server) instead.
:::
- **Type:** `boolean`
- **Default:** `true`
Whether to enable gzip compression for served static assets.
If you want to disable the gzip compression, you can set `compress` to `false`:
```ts
export default {
tools: {
devServer: {
compress: false,
},
},
};
```
#### headers
:::warning
**Deprecated**: This configuration is deprecated, please use [dev.server.headers](https://modernjs.dev/en/configure/app/dev/server) instead.
:::
- **Type:** `Record<string, string>`
- **Default:** `undefined`
Adds headers to all responses.
```js
export default {
tools: {
devServer: {
headers: {
'X-Custom-Foo': 'bar',
},
},
},
};
```
#### historyApiFallback
:::warning
**Deprecated**: This configuration is deprecated, please use [dev.server.historyApiFallback](https://modernjs.dev/en/configure/app/dev/server) instead.
:::
- **Type:** `boolean | ConnectHistoryApiFallbackOptions`
- **Default:** `false`
The index.html page will likely have to be served in place of any 404 responses. Enable `devServer.historyApiFallback` by setting it to `true`:
```js
export default {
tools: {
devServer: {
historyApiFallback: true,
},
},
};
```
For more options and information, see the [connect-history-api-fallback](https://github.com/bripkens/connect-history-api-fallback) documentation.
#### proxy
:::warning
**Deprecated**: This configuration is deprecated, use [dev.server.proxy](https://modernjs.dev/en/configure/app/dev/server) instead.
:::
- **Type:** `ProxyOptions[] | Record<string, string | ProxyOptions>`
- **Default:** `undefined`
Configure proxy rules for the dev server, and forward requests to the specified service.
```js
export default {
tools: {
devServer: {
proxy: {
// http://localhost:8080/api -> https://example.com/api
// http://localhost:8080/api/foo -> https://example.com/api/foo
'/api': 'https://example.com',
},
},
},
};
```
#### watch
:::warning
**Deprecated**: This configuration is deprecated, please use [dev.server.watch](https://modernjs.dev/en/configure/app/dev/server) instead.
:::
- **Type:** `boolean`
- **Default:** `true`
Whether to watch files change in directories such as `mock/`, `server/`, `api/`.
---
url: /configure/app/tools/html-plugin.md
---
# tools.htmlPlugin
- **Type:** `boolean | Object | Function`
- **Default:**
```js
const defaultOptions = {
meta, // 对应 `html.meta` 配置
title, // 对应 `html.title` 配置
inject, // 对应 `html.inject` 配置
favicon, // 对应 `html.favicon` 配置
template, // 对应 `html.template` 配置
filename, // 基于 `output.distPath` 和 `entryName` 生成
templateParameters, // 对应 `html.templateParameters` 配置
chunks: [entryName],
minify: {
// generated based on `output.minify`
removeComments: false,
useShortDoctype: true,
keepClosingSlash: true,
collapseWhitespace: true,
removeRedundantAttributes: true,
removeScriptTypeAttributes: true,
removeStyleLinkTypeAttributes: true,
removeEmptyAttributes: true,
minifyJS, // generated based on `output.charset`, `output.legalComments` and `performance.removeConsole`
minifyCSS: true,
minifyURLs: true,
},
};
```
:::warning
SSR Application does not enable the `minify.removeComments` configuration, otherwise the SSR rendering will fail.
:::
The configs of [html-rspack-plugin](https://github.com/rspack-contrib/html-rspack-plugin) can be modified through `tools.htmlPlugin`.
:::info
The usage of this configuration item is exactly the same as that of Rsbuild. For detailed information, please refer to [Rsbuild - tools.htmlPlugin](https://v2.rsbuild.dev/config/tools/html-plugin).
:::
---
url: /configure/app/tools/less.md
---
# tools.less
- **Type:** `Object | Function`
- **Default:**
```js
const defaultOptions = {
lessOptions: {
javascriptEnabled: true,
},
// CSS Source Map enabled by default in development environment
sourceMap: isDev,
};
```
You can modify the config of [less-loader](https://github.com/webpack-contrib/less-loader) via `tools.less`.
### Object Type
When `tools.less` is configured as `Object` type, it is merged with the default config through Object.assign in a shallow way. It should be noted that `lessOptions` is merged through deepMerge in a deep way. For example:
```js
export default {
tools: {
less: {
lessOptions: {
javascriptEnabled: false,
},
},
},
};
```
### Function Type
When `tools.less` is a Function, the default config is passed as the first parameter, which can be directly modified or returned as the final result. The second parameter provides some utility functions that can be called directly. For example:
```js
export default {
tools: {
less(config) {
// Modify the config of lessOptions
config.lessOptions = {
javascriptEnabled: false,
};
},
},
};
```
### Modifying Less Version
In some scenarios, if you need to use a specific version of Less instead of the built-in Less v4 in Modern.js, you can install the desired Less version in your project and set it up using the `implementation` option of the `less-loader`.
```js
export default {
tools: {
less: {
implementation: require('less'),
},
},
};
```
### Util Function
#### addExcludes
- **Type:** `(excludes: RegExp | RegExp[]) => void`
Used to specify which files `less-loader` does not compile, You can pass in one or more regular expressions to match the path of less files, for example:
```js
export default {
tools: {
less(config, { addExcludes }) {
addExcludes(/node_modules/);
},
},
};
```
---
url: /configure/app/tools/lightningcss-loader.md
---
# tools.lightningcssLoader
- **Type:** `Rspack.LightningcssLoaderOptions | Function | boolean`
- **Default:** `Rspack.LightningcssLoaderOptions | Function | boolean`
You can configure [builtin:lightningcss-loader](https://rspack.rs/guide/features/builtin-lightningcss-loader) through `tools.lightningcssLoader`.
## Enable loader
Set `tools.lightningcssLoader` to `true` to enable Rsbuild's built-in `lightningcss-loader`:
```js
export default {
tools: {
lightningcssLoader: true,
},
};
```
At this time, the default configuration is as follows:
```js
const defaultOptions = {
// use current browserslist config
targets: browserslist,
// minify is enabled when output.injectStyles is true and in production mode
minify: config.mode === 'production' && config.output.injectStyles,
};
```
It should be noted that when `lightningcss-loader` is turned on, `postcss-loader` will be turned off by default.
:::info
The usage of this configuration item is exactly the same as that of Rsbuild. For detailed information, please refer to [Rsbuild - tools.lightningcssLoader](https://v2.rsbuild.dev/config/tools/lightningcss-loader).
:::
---
url: /configure/app/tools/minify-css.md
---
# tools.minifyCss
- **Type:** `Object | Function | undefined`
- **Default:**
```js
const defaultOptions = {
minimizerOptions: {
preset: [
'default',
{
mergeLonghand: false,
},
],
},
};
```
When building for production, Modern.js will minimize the CSS code through [css-minimizer-webpack-plugin](https://github.com/webpack-contrib/css-minimizer-webpack-plugin). The config of [css-minimizer-webpack-plugin](https://github.com/webpack-contrib/css-minimizer-webpack-plugin) can be modified via `tools.minifyCss`.
### Object Type
When `tools.minifyCss` is `Object` type, it will be merged with the default config via `Object.assign`.
For example, modify the `preset` config of [cssnano](https://cssnano.co/):
```js
export default {
tools: {
minifyCss: {
minimizerOptions: {
preset: require.resolve('cssnano-preset-simple'),
},
},
},
};
```
### Function Type
When `tools.minifyCss` is `Function` type, the default config is passed in as the first parameter, the config object can be modified directly, or a value can be returned as the final result.
```js
export default {
tools: {
minifyCss: options => {
options.minimizerOptions = {
preset: require.resolve('cssnano-preset-simple'),
},
}
}
};
```
---
url: /configure/app/tools/postcss.md
---
# tools.postcss
- **Type:** `Object | Function`
- **Default:**
```js
const defaultOptions = {
postcssOptions: {
plugins: [
// The following plugins are enabled by default
require('postcss-nesting'),
require('postcss-media-minmax'),
require('postcss-flexbugs-fixes'),
require('autoprefixer')({
flexbox: 'no-2009',
}),
// The following plugins are only enabled when compatible with legacy browsers
require('postcss-custom-properties'),
require('postcss-initial'),
require('postcss-page-break'),
require('postcss-font-variant'),
],
sourceMap: isDev,
},
};
```
Modern.js integrates PostCSS by default, you can configure [postcss-loader](https://github.com/webpack-contrib/postcss-loader) through `tools.postcss`.
It should be noted that when you enable the `tools.lightningcss` configuration, PostCSS will be disabled by default, including `postcss-loader` and its default plugins.
:::info
The usage of this configuration item is exactly the same as that of Rsbuild. For detailed information, please refer to [Rsbuild - tools.postcss](https://v2.rsbuild.dev/config/tools/postcss).
:::
---
url: /configure/app/tools/rspack.md
---
# tools.rspack
- **Type:** `Rspack.Configuration | Function | undefined`
- **Default:** `undefined`
`tools.rspack` is used to configure [Rspack](https://rspack.rs/).
:::info
The usage of this configuration item is exactly the same as that of Rsbuild. For detailed information, please refer to [Rsbuild - tools.rspack](https://v2.rsbuild.dev/config/tools/rspack).
:::
---
url: /configure/app/tools/sass.md
---
# tools.sass
- **Type:** `Object | Function`
- **Default:**
```js
const defaultOptions = {
// CSS Source Map enabled by default in development environment
sourceMap: isDev,
};
```
You can modify the config of [sass-loader](https://github.com/webpack-contrib/sass-loader) via `tools.sass`.
### Object Type
When `tools.sass` is `Object` type, it is merged with the default config through Object.assign. It should be noted that `sassOptions` is merged through deepMerge in a deep way.
For example:
```js
export default {
tools: {
sass: {
sourceMap: true,
},
},
};
```
### Function Type
When `tools.sass` is a Function, the default config is passed as the first parameter, which can be directly modified or returned as the final result. The second parameter provides some utility functions that can be called directly. For Example:
```js
export default {
tools: {
sass(config) {
// Modify sourceMap config
config.additionalData = async (content, loaderContext) => {
// ...
};
},
},
};
```
### Modifying Sass Version
In some scenarios, if you need to use a specific version of Sass instead of the built-in Dart Sass v1 in Modern.js, you can install the desired Sass version in your project and set it up using the `implementation` option of the `sass-loader`.
```js
export default {
tools: {
sass: {
implementation: require('sass'),
},
},
};
```
### Utility Function
#### addExcludes
- **Type:** `(excludes: RegExp | RegExp[]) => void`
Used to specify which files `sass-loader` does not compile, You can pass in one or more regular expressions to match the path of sass files, for example:
```js
export default {
tools: {
sass(config, { addExcludes }) {
addExcludes(/node_modules/);
},
},
};
```
---
url: /configure/app/tools/style-loader.md
---
# tools.styleLoader
- **Type:** `Object | Function`
- **Default:** `{}`
The config of [style-loader](https://github.com/webpack-contrib/style-loader) can be set through `tools.styleLoader`.
:::info
The usage of this configuration item is exactly the same as that of Rsbuild. For detailed information, please refer to [Rsbuild - tools.styleLoader](https://v2.rsbuild.dev/config/tools/style-loader).
:::
---
url: /configure/app/tools/swc.md
---
# tools.swc
- **Type:** `Object | Function`
- **Default:** `undefined`
## Introduction
[SWC](https://SWC.rs/) (Speedy Web Compiler) is a transformer and minimizer for JavaScript and TypeScript based on `Rust`. SWC can provide the same abilities with Babel, and it's more than 10x faster than Babel.
Modern.js has a out-of-box plugin for SWC, power your Web application with Polyfill and minification, we also port some common used Babel plugins to SWC.
:::tip
When using Rspack as the bundler, SWC will be used for transpiling and compression by default, so you don't need to install or configure the SWC plugin.
:::
## Used in Rspack mode
You can set the options of [builtin:swc-loader](https://rspack.rs/guide/features/builtin-swc-loader) through `tools.swc`.
```ts
import { defineConfig } from '@modern-js/app-tools';
export default defineConfig({
tools: {
swc: {
jsc: {
externalHelpers: false,
},
},
},
});
```
For more usage, please refer to [Rsbuild - tools.swc](https://v2.rsbuild.rs/config/tools/swc).
### Register SWC Plugin
Modern.js supports registering SWC's Wasm plugin through `tools.swc`, such as registering [@swc/plugin-styled-components](https://www.npmjs.com/package/@swc/plugin-styled-components):
```ts
export default {
tools: {
swc: {
jsc: {
experimental: {
plugins: [['@swc/plugin-styled-components', {}]],
},
},
},
},
};
```
Please note that the SWC plugin is still an experimental feature, and the SWC Wasm plugin is currently not backward compatible. The version of the SWC plugin is closely tied to the version of swc\_core that Rspack depends on.
This means that you must to choose an SWC plugin that matches the current version of swc\_core to ensure that it works properly. If the version of the SWC plugin you are using does not match the version of swc\_core that Rspack depends on, Rspack will throw the following error during the build process:
```
1: failed to run Wasm plugin transform. Please ensure the version of `swc_core`
used by the plugin is compatible with the host runtime.
```
If you encounter the above issues, a common solution is to upgrade both the Modern.js and SWC plugins to the latest versions.
For details, please refer to [Rsbuild - SWC Plugin Version](https://v2.rsbuild.rs/guide/configuration/swc#swc-plugin-version).
---
url: /configure/app/tools/ts-checker.md
---
# tools.tsChecker
- **Type:** `Object | Function`
- **Default:**
```js
const defaultOptions = {
typescript: {
// avoid OOM issue
memoryLimit: 8192,
// use tsconfig of user project
configFile: tsconfigPath,
// use typescript of user project
typescriptPath: require.resolve('typescript'),
},
issue: {
exclude: [
{ file: '**/*.(spec|test).ts' },
{ file: '**/node_modules/**/*' },
],
},
logger: {
log() {
// do nothing
// we only want to display error messages
},
error(message: string) {
console.error(message.replace(/ERROR/g, 'Type Error'));
},
},
},
```
By default, the [@rsbuild/plugin-type-check](https://github.com/rspack-contrib/rsbuild-plugin-type-check) is enabled for type checking. You can use `output.disableTsChecker` config to disable it.
## Example
When the value of `tsChecker` is of type Object, it will be deeply merged with the default configuration.
```ts
export default {
tools: {
tsChecker: {
issue: {
exclude: [({ file = '' }) => /[\\/]some-folder[\\/]/.test(file)],
},
},
},
};
```
> Please refer to [@rsbuild/plugin-type-check](https://github.com/rspack-contrib/rsbuild-plugin-type-check) for more details.
---
url: /configure/app/usage.md
---
# Configuration
There are three types of configurations in Modern.js: Compile configuration, Runtime configuration, and Server Runtime configuration.
**Compile configuration** can be configured in two locations:
- The `modern.config.(ts|js|mjs)` file at the root path
- The `package.json` file
:::info
Modern.js does not support configuring the same configuration item in both `package.json` and `modern.config.ts` simultaneously. It is recommended to configure it in `modern.config.ts`. If Modern.js detects conflicts due to duplicate configurations, it will throw a warning.
:::
**Runtime configuration** can be configured in the `src/modern.runtime.(ts|js|mjs)` file.
**Server Runtime configuration** can be configured in the `server/modern.server.(ts|js|mjs)` file.
## Compile Configuration
### Configuring in Configuration Files
The configuration files for Modern.js are defined in the root directory of the project and support `.ts`, `.js`, and `.mjs` formats:
- `modern.config.ts`
- `modern.config.js`
- `modern.config.mjs`
#### modern.config.ts (Recommended)
We recommend using the `.ts` format for configuration files as it provides friendly TypeScript type hints, helping you avoid errors in the configuration.
Import the `defineConfig` utility function from `@modern-js/app-tools`, which will assist you with type inference and type completion for the configuration:
```ts title="modern.config.ts"
import { defineConfig } from '@modern-js/app-tools';
export default defineConfig({
source: {
alias: {
'@common': './src/common',
},
},
});
```
#### modern.config.js
If you are developing a non-TypeScript project, you can use the `.js` format for the configuration file:
```js title="modern.config.js"
export default {
source: {
alias: opts => {
opts['@common'] = './src/common';
},
},
};
```
You can also configure different settings based on the environment using `process.env.NODE_ENV`:
```js title="modern.config.js"
export default {
server: {
ssr: process.env.NODE_ENV === 'development',
},
};
```
#### Exporting Configuration Functions
Modern.js supports exporting a function in the configuration file, where you can dynamically compute the configuration and return it to Modern.js.
```js title="modern.config.js"
import { defineConfig } from '@modern-js/app-tools';
export default defineConfig(({ env, command }) => ({
source: {
alias: {
'@foo': env === 'development' ? './src/foo.dev.ts' : './src/foo.prod.ts',
},
},
}));
```
This function accepts the following parameters:
- `env`: Corresponds to the value of `process.env.NODE_ENV`.
- When running `modern dev`, the value of `env` is `development`.
- When running `modern build` or `modern serve`, the value of `env` is `production`.
- `command`: Corresponds to the current command being run, such as `dev`, `build`, or `serve`.
#### Exporting Asynchronous Functions
Modern.js also supports exporting an asynchronous function in the configuration file, allowing you to perform some asynchronous operations:
```js title="modern.config.js"
import { defineConfig } from '@modern-js/app-tools';
export default defineConfig(async ({ env, command }) => {
const result = await someAsyncFunction();
return {
html: {
title: result,
},
};
});
```
#### Specifying Configuration Files
The Modern.js command line supports specifying the name of the configuration file using the `--config` option.
For example, if you need to use the `modern.prod.config.js` file when executing the `build` command, you can add the following configuration in `package.json`:
```json title="package.json"
{
"scripts": {
"dev": "modern dev",
"build": "modern build --config modern.prod.config.js"
}
}
```
You can also abbreviate the `--config` option as `-c`:
```bash
$ modern build -c modern.prod.config.js
```
### Configuring in package.json (Not Recommended)
In addition to configuration files, you can also set configuration items under the `modernConfig` field in `package.json`, such as:
```json title="package.json"
{
"modernConfig": {
"source": {
"alias": {
"@common": "./src/common"
}
}
}
}
```
Due to the limitations of the JSON file format, only simple types such as numbers, strings, booleans, and arrays can be defined in `package.json`. When we need to set function-type values, it is recommended to do so in the Modern.js configuration file.
#### Notes
- It is not recommended to use both `package.json` and `modern.config.js` for configuration simultaneously. If both are used and conflicts arise, Modern.js will prompt an error in the command line.
### Local Debugging Configuration
To facilitate local debugging of configurations, Modern.js supports creating a `modern.config.local.(ts|js|mjs)` file in the root directory to override the configuration options in `modern.config.(ts|js|mjs)`.
#### Example
For example, if the `modern.config.ts` file in your project is configured with a port number of `3000`:
```ts title="modern.config.ts"
import { defineConfig } from '@modern-js/app-tools';
export default defineConfig({
server: {
port: 3000,
},
});
```
If you need to change the port number to `3001` for local debugging but do not want to modify the current project's `modern.config.ts` file, you can create a `modern.config.local.ts` file and add the following configuration:
```ts title="modern.config.local.ts"
import { defineConfig } from '@modern-js/app-tools';
export default defineConfig({
server: {
port: 3001,
},
});
```
The configuration in the `modern.config.local.ts` file will be deeply merged with the configuration in `modern.config.ts`, overriding the options in `modern.config.ts`, so `server.port` will be changed to `3001`.
#### Notes
When using `modern.config.local.ts`, please note the following:
- The `modern.config.local.ts` file will only be loaded when executing the `modern dev` commands and will not be loaded during `modern build`.
- The priority of the `modern.config.local.ts` file is higher than both `modern.config.ts` and the `modernConfig` field in `package.json`.
- Since `modern.config.local.ts` is only used for local debugging, it is not recommended to commit it to the code repository. Ensure that the project's `.gitignore` file includes `modern.config.local.ts` and similar files.
```bash title=".gitignore"
modern.config.local.*
```
### Merging Multiple Configurations
In some cases, you may need to merge multiple configurations into one. You can use the `mergeConfig` utility function to merge multiple configurations.
The `mergeConfig` function accepts an array as a parameter, where each item in the array is a configuration object. `mergeConfig` will deeply merge each configuration object in the array, automatically merging multiple function items into an array, and finally returning a merged configuration object.
#### Example
```ts title="modern.config.ts"
import { mergeConfig } from '@modern-js/app-tools';
const config1 = {
dev: {
port: 3000,
},
tools: {
postcss: () => console.log('config1');
},
};
const config2 = {
dev: {
port: 3001,
},
tools: {
postcss: () => console.log('config2');
},
};
const mergedConfig = mergeConfig([config1, config2]);
```
In the above example, the merged configuration object will be:
```ts
const mergedConfig = {
dev: {
port: 3001,
},
tools: {
postcss: [() => console.log('config1'), () => console.log('config2')],
},
};
```
### Configuration Type Definitions
Modern.js exports the `AppUserConfig` type, which corresponds to the type of the Modern.js configuration object:
```ts title="modern.config.ts"
import type { AppUserConfig } from '@modern-js/app-tools';
const config: AppUserConfig = {
tools: {
rspack: {},
},
};
```
## Runtime Configuration
For detailed information on runtime configuration, please refer to the [Introduction to Runtime Configuration](/configure/app/runtime/0-intro.md).
:::tip
If the current Runtime configuration needs to be used both at compile time and runtime, please add the relevant configuration parameters at the plugin registration location.
```ts title="modern.config.ts"
import { defineConfig } from '@modern-js/app-tools';
import { xxPlugin } from '@modern-js/plugin-xx';
export default defineConfig({
plugins: [
xxPlugin({
/** Add parameters here */
}),
],
});
```
:::
---
url: /plugin/cli-plugins/api.md
---
# CLI Plugin API
Modern.js's CLI plugins allow you to extend and customize the functionality of Modern.js projects during the build and development process.
:::info
CLI plugins need to be configured via the [`plugins`](/configure/app/plugins.md) field in `modern.config.ts`.
:::
## Plugin Basic Structure
A typical CLI plugin structure is as follows:
```typescript
import type { CliPlugin, AppTools } from '@modern-js/app-tools';
const myCliPlugin = (): CliPlugin<AppTools> => ({
name: '@my-org/my-plugin', // Plugin name, ensure uniqueness
setup: api => {
// Use the API here to register hooks, add commands, etc.
api.onBeforeBuild(() => {
console.log('Build is about to start...');
});
},
});
export default myCliPlugin;
```
- `name`: A unique identifier for the plugin.
- The `setup` function receives an `api` object, which provides all available CLI plugin APIs.
## Information Retrieval
#### `api.getAppContext`
Gets the context information of the Modern.js application.
- **Returns:** An `AppContext` object containing the following fields:
| Field Name | Type | Description | When Available |
| ---------------------- | ------------------- | ---------------------------------------------------------------- | -------------------------- |
| `command` | `string` | The currently executing command (e.g., `dev`, `build`, `deploy`) | - |
| `port` | `number` | The development server port number | After `onPrepare` |
| `configFile` | `string` | The absolute path to the configuration file | - |
| `isProd` | `boolean` | Whether it is in production mode | - |
| `appDirectory` | `string` | The absolute path to the project root directory | - |
| `srcDirectory` | `string` | The absolute path to the project source code directory | - |
| `distDirectory` | `string` | The absolute path to the project output directory | In `onPrepare` (and later) |
| `sharedDirectory` | `string` | The absolute path to the shared modules directory | - |
| `nodeModulesDirectory` | `string` | The absolute path to the `node_modules` directory | - |
| `ip` | `string` | The IPv4 address of the current machine | - |
| `packageName` | `string` | The `name` field in the project's `package.json` | - |
| `plugins` | `object[]` | The list of currently registered plugins | - |
| `entrypoints` | `object[]` | Information about page entry points | - |
| `serverRoutes` | `object[]` | Server-side routing information | - |
| `bundlerType` | `webpack \| rspack` | The type of bundler currently in use (`webpack` or `rspack`) | After `onPrepare` |
| `metaName` | `string` | The internal name of the framework | - |
| `apiDirectory` | `string` | The absolute path to the API module directory (used by BFF) | - |
| `lambdaDirectory` | `string` | The absolute path to the Lambda module directory (used by BFF) | - |
| `runtimeConfigFile` | `string` | The name of the runtime configuration file | - |
| `checkedEntries` | `string[]` | Specified entry information | - |
| `apiOnly` | `boolean` | Whether it is in `apiOnly` mode | - |
- **Example:**
```typescript
api.onPrepare(() => {
const appContext = api.getAppContext();
console.log(
`The current project is running in ${
appContext.isProd ? 'production' : 'development'
} mode`,
);
console.log(`Bundler: ${appContext.bundlerType}`);
});
```
:::info
The context information returned by `getAppContext` is read-only and cannot be modified directly.
:::
***
#### `api.getConfig`
Gets the user-defined configuration from the `modern.config.ts` file.
- **Returns:** The user-defined configuration object.
- **Example:**
```typescript
api.onPrepare(() => {
const userConfig = api.getConfig();
if (userConfig.output) {
console.log('User has customized the output configuration');
}
});
```
***
#### `api.getNormalizedConfig`
Gets the final configuration after internal processing by Modern.js and modifications by plugins (normalized configuration).
- **Returns:** The normalized configuration object.
- **When Available:** Must be used in `onPrepare` (and later hooks, such as `onBeforeBuild`).
- **Example:**
```typescript
api.onPrepare(() => {
const finalConfig = api.getNormalizedConfig();
console.log('Final configuration:', finalConfig);
});
```
***
#### `api.isPluginExists`
Checks if a specified plugin is registered.
- **Parameters:**
- `pluginName: string`: The name of the plugin to check.
- **Returns:** A `boolean` value indicating whether the plugin exists.
- **Example:**
```typescript
if (api.isPluginExists('@modern-js/plugin-bff')) {
console.log('BFF plugin is enabled');
}
```
***
#### `api.getHooks`
Gets all registered hook functions.
- **Returns:** An object containing all hook functions.
- **Example:**
```typescript
const hooks = api.getHooks();
// Manually trigger the onPrepare hook
hooks.onPrepare.call();
```
:::warning
In custom plugins, you can only manually call the hooks registered by the corresponding plugin and cannot call official hooks to avoid affecting the normal execution order of the application.
:::
***
## Configuration Modification
#### `api.config`
Modify the initial configuration of Modern.js.
- **Type:** `api.config(configFn: () => UserConfig | Promise<UserConfig>)`
- **Parameters:**
- `configFn`: A function that returns a configuration object or a Promise.
- **Execution Phase:** After parsing the configuration in `modern.config.ts`.
- **Example:**
```typescript
api.config(() => {
return {
output: {
disableTsChecker: true, // Disable TypeScript type checking
},
};
});
```
**Configuration Merging Priority** (from highest to lowest):
1. Configuration defined by the user in the `modern.config.*` file.
2. Configuration registered by plugins via `api.config()`.
3. Default Modern.js configuration.
***
#### `api.modifyBundlerChain`
Modify Rspack configuration using the chain API.
- **Type:** `api.modifyBundlerChain(modifyFn: (chain: RspackChain, utils: RspackUtils) => void | Promise<void>)`
- **Parameters:**
- `modifyFn`: A modification function that receives a `RspackChain` instance and utility functions as parameters.
- **Execution Phase:** When generating the final Rspack configuration.
- **Corresponding Rsbuild Hook:** [modifyBundlerChain](https://v2.rsbuild.rs/plugins/dev/hooks#modifybundlerchain)
- **Example:**
```typescript
api.modifyBundlerChain((chain, utils) => {
if (utils.env === 'development') {
chain.devtool('eval');
}
chain.plugin('bundle-analyze').use(BundleAnalyzerPlugin);
});
```
#### `api.modifyRsbuildConfig`
Modify the Rsbuild configuration.
- **Type:** `api.modifyRsbuildConfig(modifyFn: (config: RsbuildConfig, utils: RsbuildUtils) => RsbuildConfig | Promise<RsbuildConfig> | void)`
- **Parameters:**
- `modifyFn`: A modification function that receives the Rsbuild configuration object and utility functions as parameters. It can return the modified configuration object, a Promise, or nothing (modifying the original object directly).
- **Execution Phase:** When generating the final Rsbuild configuration.
- **Corresponding Rsbuild Hook:** [modifyRsbuildConfig](https://v2.rsbuild.rs/plugins/dev/hooks#modifyrsbuildconfig)
- **Example:**
```typescript
api.modifyRsbuildConfig((config, utils) => {
// Add a custom Rsbuild plugin
config.plugins.push(myCustomRsbuildPlugin());
});
```
***
#### `api.modifyRspackConfig`
Modify the Rspack configuration (when using Rspack as the bundler).
- **Type:** `api.modifyRspackConfig(modifyFn: (config: RspackConfig, utils: RspackUtils) => RspackConfig | Promise<RspackConfig> | void)`
- **Parameters:**
- `modifyFn`: A modification function that receives the Rspack configuration object and utility functions as parameters. It can return the modified configuration object, a Promise, or nothing (modifying the original object directly).
- **Execution Phase:** When generating the final Rspack configuration.
- **Corresponding Rsbuild Hook:** [modifyRspackConfig](https://v2.rsbuild.rs/plugins/dev/hooks#modifyrspackconfig)
- **Example:**
```typescript
api.modifyRspackConfig((config, utils) => {
config.builtins.minify = {
enable: true,
implementation: utils.rspack.SwcJsMinimizerRspackPlugin,
};
});
```
***
**Build Configuration Modification Order**
```
modifyRsbuildConfig
modifyBundlerChain
tools.bundlerChain
modifyRspackConfig
tools.rspack
```
***
#### `api.modifyServerRoutes`
Modify the server routing configuration.
- **Type:** `api.modifyServerRoutes(transformFn: (routes: ServerRoute[]) => ServerRoute[])`
- **Parameters:**
- `transformFn`: A transformation function that receives the current server routes array as a parameter and returns the modified array.
- **Execution Phase:** Before generating the server route file (during the `prepare` phase).
- **Example:**
```typescript
api.modifyServerRoutes(routes => {
// Add a new API route
routes.push({
urlPath: '/api',
isApi: true,
entryPath: '',
isSPA: false,
isSSR: false,
});
return routes;
});
```
***
#### `api.modifyHtmlPartials`
Modify HTML template partials.
- **Type:** `api.modifyHtmlPartials(modifyFn: (partials: HtmlPartials, entrypoint: Entrypoint) => void)`
- **Parameters:**
- `modifyFn`: A modification function that receives the HTML template partials object and the current entry point information as parameters.
- `partials`: Contains `top`, `head`, and `body` sections, each with `append`, `prepend`, and `replace` methods.
- **Execution Phase:** Before generating the HTML file (during the `prepare` phase).
- **Example:**
```typescript
api.modifyHtmlPartials(({ entrypoint, partials }) => {
// Add a meta tag to the <head> section of all pages
if (partials.head && partials.head.append) {
partials.head.append(`<meta name="my-custom-meta" content="value">`);
}
});
```
:::warning
This hook function will not be executed when using a [completely custom HTML template](/guides/basic-features/html.md#completely-custom-html-template).
:::
***
## Build Process Control
#### `api.onPrepare`
Add additional logic during the Modern.js preparation phase.
- **Type:** `api.onPrepare(prepareFn: () => void | Promise<void>)`
- **Parameters:**
- `prepareFn`: A preparation function, without parameters, can be asynchronous.
- **Execution Phase:** After Modern.js has completed configuration validation.
- **Example:**
```typescript
api.onPrepare(async () => {
// Perform some initialization operations, such as checking the environment, downloading dependencies, etc.
await prepareMyCustomEnvironment();
});
```
***
#### `api.addCommand`
Add a custom CLI command.
- **Type:** `api.addCommand(commandFn: ({ program: Command }) => void)`
- **Parameters:**
- `commandFn`: Receives the `program` object from `commander` as a parameter, used to define new commands.
- **Execution Phase:** After the `prepare` hook has completed.
- **Example:**
```typescript
api.addCommand(({ program }) => {
program
.command('my-command')
.description('My custom command')
.action(async () => {
// Execute command logic
console.log('Executing custom command...');
});
});
```
***
#### `api.addWatchFiles`
Add additional files to the watch list (for development mode).
- **Type:** `api.addWatchFiles(watchFn: () => string[] | { files: string[]; isPrivate: boolean; })`
- **Parameters:**
- `watchFn`: Returns an array of file paths or an object containing `files` and `isPrivate` properties.
- `files`: An array of file paths to watch.
- `isPrivate`: Whether the files are framework-internal (affects behavior when files change).
- **Execution Phase:** After the `addCommand` hook has completed.
- **Example:**
```typescript
api.addWatchFiles(() => {
// Watch the .env file in the project root directory
return [path.resolve(api.getAppContext().appDirectory, '.env')];
});
```
***
#### `api.onFileChanged`
Add additional logic when a watched file changes (for development mode).
- **Type:** `api.onFileChanged(changeFn: (params: { filename: string; eventType: 'add' | 'change' | 'unlink'; isPrivate: boolean; }) => void)`
- **Parameters:**
- `changeFn`: A file change handler function that receives the following parameters:
- `filename`: The path of the changed file.
- `eventType`: The type of change (`add`, `change`, `unlink`).
- `isPrivate`: Whether the file is framework-internal.
- **Execution Phase:** After a watched file changes.
- **Example:**
```typescript
api.onFileChanged(({ filename, eventType }) => {
if (eventType === 'change' && filename.endsWith('.ts')) {
console.log('TypeScript file changed, may need to recompile...');
}
});
```
***
#### `api.onBeforeBuild`
Add additional logic before the build starts.
- **Type:** `api.onBeforeBuild(buildFn: () => void | Promise<void>)`
- **Parameters:**
- `buildFn`: A function to be executed before the build, without parameters, can be asynchronous.
- **Execution Phase:** Before executing the build process.
- **Corresponding Rsbuild Hook:** [onBeforeBuild](https://v2.rsbuild.rs/plugins/dev/hooks#onbeforebuild)
- **Example:**
```typescript
api.onBeforeBuild(() => {
// Perform some environment checks before building
});
```
***
#### `api.onAfterBuild`
Add additional logic after the build is complete.
- **Type:** `api.onAfterBuild(buildFn: () => void | Promise<void>)`
- **Parameters:**
- `buildFn`: A function to be executed after the build, without parameters, can be asynchronous.
- **Execution Phase:** After executing the build process.
- **Corresponding Rsbuild Hook:** [onAfterBuild](https://v2.rsbuild.rs/plugins/dev/hooks#onafterbuild)
- **Example:**
```typescript
api.onAfterBuild(() => {
// Upload sourceMap after building
});
```
***
#### `api.onDevCompileDone`
Add additional logic after the development server compilation is complete.
- **Type:** `api.onDevCompileDone(compileFn: () => void | Promise<void>)`
- **Parameters:**
- `compileFn`: A function to be executed after compilation is complete.
- **Execution Phase:** After the development server starts and the initial compilation is complete.
- **Corresponding Rsbuild Hook:** [onDevCompileDone](https://v2.rsbuild.rs/plugins/dev/hooks#ondevcompiledone)
- **Example:**
```typescript
api.onDevCompileDone(() => {
// Open the browser after the initial compilation is complete
});
```
***
#### `api.onBeforeCreateCompiler`
Add additional logic before creating the compiler instance.
- **Type:** `api.onBeforeCreateCompiler(createFn: () => void | Promise<void>)`
- **Parameters:**
- `createFn`: A function to be executed before creation, without parameters, can be asynchronous.
- **Execution Phase:** Before creating the Rspack compiler instance.
- **Corresponding Rsbuild Hook:** [onBeforeCreateCompiler](https://v2.rsbuild.rs/plugins/dev/hooks#onbeforecreatecompiler)
- **Example:**
```typescript
api.onBeforeCreateCompiler(() => {
// Can get compiler related configuration
});
```
***
#### `api.onAfterCreateCompiler`
Add additional logic after creating the compiler instance.
- **Type:** `api.onAfterCreateCompiler(createFn: () => void | Promise<void>)`
- **Parameters:**
- `createFn`: A function to be executed after creation, without parameters, can be asynchronous.
- **Execution Phase:** After creating the Rspack compiler instance.
- **Corresponding Rsbuild Hook:** [onAfterCreateCompiler](https://v2.rsbuild.rs/plugins/dev/hooks#onaftercreatecompiler)
- **Example:**
```typescript
api.onAfterCreateCompiler(() => {
// Can get the compiler instance
});
```
***
#### `api.onBeforeDev`
Add additional logic before starting the development server.
- **Type:** `api.onBeforeDev(devFn: () => void | Promise<void>)`
- **Parameters:**
- `devFn`: A function to be executed before starting the development server, without parameters, can be asynchronous.
- **Execution Phase:** Before executing the `dev` command to start the development server.
- **Example:**
```typescript
api.onBeforeDev(async () => {
// Check if the port is occupied
await checkPortAvailability(3000);
});
```
***
#### `api.onAfterDev`
Add additional logic after starting the development server.
- **Type:** `api.onAfterDev(devFn: () => void | Promise<void>)`
- **Parameters:**
- `devFn`: A function to be executed after the development server starts.
- **Execution Phase:** After the development server has successfully started.
- **Corresponding Rsbuild Hook:** [onAfterStartDevServer](https://v2.rsbuild.rs/plugins/dev/hooks#onafterstartdevserver)
- **Example:**
```typescript
api.onAfterDev(() => {
// Report dev related information
});
```
***
#### `api.onBeforeExit`
Add additional logic before the process exits.
- **Type:** `api.onBeforeExit(exitFn: () => void | Promise<void>)`
- **Parameters:**
- `exitFn`: A function to be executed before the process exits, without parameters, can be asynchronous.
- **Execution Phase:** When the Modern.js process is about to exit (for example, when the user presses Ctrl+C).
- **Example:**
```typescript
api.onBeforeExit(async () => {
// Perform some cleanup operations, such as closing database connections, deleting temporary files, etc.
await cleanupMyResources();
});
```
***
#### `api.onBeforePrintInstructions`
Add additional logic before printing success information.
- **Type:** `api.onBeforePrintInstructions(printFn: ({instructions: string}) => {instructions: string} | Promise<{instructions: string}>)`
- **Parameters:**
- `printFn`: Function to modify the printed information, returns the modified information.
- **Execution Phase:** Before printing success information.
- **Example:**
```typescript
api.onBeforePrintInstructions(({ instructions }) => {
// do something
return { instructions };
});
```
## Other Notes
- Refer to [CLI Plugin Lifecycle](/plugin/cli-plugins/life-cycle.md) to understand the execution order of plugin hooks.
---
url: /plugin/cli-plugins/life-cycle.md
---
# Life Cycle
---
url: /plugin/introduction.md
---
# Introduction
Modern.js provides a powerful plugin system that allows developers to extend the framework's functionality, customize the build process, and meet a variety of personalized development needs. Whether you want to add a custom command, optimize build output, or implement a unique deployment solution, Modern.js's plugin system provides robust support.
## Why Plugins?
In web application development, we often encounter needs that the framework itself cannot directly satisfy, such as:
- **I want to add a custom command-line tool to help me automate some tasks.**
- **I want to be able to handle a new file format, such as `.xyz`.**
- **I need to perform some initialization operations before the application starts.**
- **I want to perform special processing on the generated CSS files.**
- **I need to customize the application's routing logic or add some server-side middleware.**
Without a plugin system, these requirements might require modifying the framework's source code or resorting to cumbersome hacks. Modern.js's plugin system offers an elegant, flexible, and maintainable solution.
## When to Use Which Plugin?
Modern.js offers two main types of plugins: Modern.js framework plugins and Rsbuild build plugins. The choice of which plugin to use depends on your specific needs:
- **Rsbuild Build Plugins:** If your needs are closely related to the build process, especially involving modifications to Rspack configuration, then you should choose an Rsbuild plugin. For example:
- Modifying Rspack `loader` or `plugin` configurations.
- Handling new file types.
- Modifying or compiling file contents.
- Optimizing or processing build artifacts.
- **Modern.js Framework Plugins:** If your needs relate to the extension of Modern.js framework itself, runtime behavior, or server-side logic, then you should choose a Modern.js plugin. For example:
- Adding custom command-line commands.
- Modifying the application's routing configuration.
- Customizing the application's rendering process (e.g., SSR).
- Adding server-side middleware or handler functions.
In short, use Rsbuild plugins when you need to modify Rspack configurations; use Modern.js plugins for other framework-related extensions.
## Modern.js Framework Plugins
### Plugin Types
Modern.js framework plugins can be further divided into three categories:
#### CLI Plugins
CLI plugins are used to provide additional functionality when running `modern` commands in the application, such as adding commands, modifying configurations, and listening for file changes. Most build-related capabilities can be implemented through CLI plugins.
CLI plugins can be configured via the `plugins` field in `modern.config.ts`.
```ts title="modern.config.ts"
// an example for bff
import { appTools, defineConfig } from '@modern-js/app-tools';
import { bffPlugin } from '@modern-js/plugin-bff';
export default defineConfig({
plugins: [appTools(), bffPlugin()],
});
```
#### Runtime Plugins
Runtime plugins are used to provide additional functionality when the application is running React code, such as performing initialization behaviors and implementing React Higher-Order Component (HOC) encapsulation.
Runtime plugins are configured via the `plugins` field in `src/modern.runtime.ts`.
```ts title="src/modern.runtime.ts"
import { defineRuntimeConfig } from '@modern-js/runtime';
import { routerPlugin } from '@modern-js/runtime/router';
export default defineRuntimeConfig({
plugins: [routerPlugin()],
});
```
#### Server Plugins
Server plugins are used to provide additional functionality when the application receives requests, such as adding middleware and modifying request responses.
Server plugins are configured via the `plugins` field in `server/modern.server.ts`.
```ts title="server/modern.server.ts"
import { defineServerConfig } from '@modern-js/server-runtime';
export default defineServerConfig({
plugins: [
{
name: 'custom-plugin-in-config',
setup: api => {
api.onPrepare(() => {
const { middlewares } = api.getServerContext();
middlewares?.push({
name: 'server-plugin-middleware',
handler: async (c, next) => {
c.res.headers.set('x-render-middleware-plugin', 'ok');
await next();
},
});
});
},
},
],
});
```
### Developing Plugins
If you need to develop Modern.js framework plugins, please read [Modern.js Plugin System](/plugin/plugin-system.md) for more information.
## Rsbuild Build Plugins
Rsbuild is the underlying build tool for Modern.js. By adding Rsbuild plugins, you can modify the default build behavior and add various additional functionalities, including but not limited to:
- Modifying Rsbuild configuration
- Handling new file types
- Modifying or compiling files
- Deploying artifacts
You can register Rsbuild plugins in `modern.config.ts` via the `builderPlugins` option. See [builderPlugins](/configure/app/builder-plugins.md) for details.
:::info
You can read [Rsbuild Official Website - Plugins](https://v2.rsbuild.rs/plugins/list/index) to learn more about the Rsbuild plugin system.
:::
### Official Plugins
#### Built-in Plugins
The following are official Rsbuild plugins that are already built into Modern.js. They can be enabled without installation:
| Plugin | Description | Modern.js Link |
| -------------------------------------------------------------------------------------- | ----------------------------------------------------------------------------------------------------------------------------------------------- | --------------------------------------------------------------------------------------------------------------------------------------- |
| [React Plugin](https://v2.rsbuild.rs/plugins/list/plugin-react) | Provides support for React | - |
| [SVGR Plugin](https://v2.rsbuild.rs/plugins/list/plugin-svgr) | Supports converting SVG images into React components | [output.disableSvgr](/configure/app/output/disable-svgr.md)<br />[output.svgDefaultExport](/configure/app/output/svg-default-export.md) |
| [Assets Retry Plugin](https://github.com/rstackjs/rsbuild-plugin-assets-retry) | Automatically retries requests when static asset loading fails | [output.assetsRetry](/configure/app/output/assets-retry.md) |
| [Type Check Plugin](https://github.com/rspack-contrib/rsbuild-plugin-type-check) | Runs TypeScript type checking in a separate process | [output.disableTsChecker](/configure/app/output/disable-ts-checker.md)<br />[tools.tsChecker](/configure/app/tools/ts-checker.md) |
| [Source Build Plugin](https://github.com/rspack-contrib/rsbuild-plugin-source-build) | For monorepo scenarios, supports referencing source code from other subdirectories and completing builds and hot updates | [experiments.sourceBuild](/configure/app/experiments/source-build.md) |
| [Check Syntax Plugin](https://github.com/rspack-contrib/rsbuild-plugin-check-syntax) | Analyzes the syntax compatibility of the build artifacts to determine if there are any advanced syntax features that cause compatibility issues | [security.checkSyntax](/configure/app/security/check-syntax.md) |
| [CSS Minimizer Plugin](https://github.com/rspack-contrib/rsbuild-plugin-css-minimizer) | Used to customize the CSS compression tool, switch to [cssnano](https://cssnano.co/) or other tools for CSS compression | [tools.minifyCss](/configure/app/tools/minify-css.md) |
| [Rem Plugin](https://github.com/rspack-contrib/rsbuild-plugin-rem) | Implements rem adaptive layout for mobile pages | [output.convertToRem](/configure/app/output/convert-to-rem.md) |
#### Plugins Not Built-in
The following are official Rsbuild plugins that are not built into Modern.js:
- [Image Compress Plugin](https://github.com/rspack-contrib/rsbuild-plugin-image-compress): Compresses image resources used in the project.
- [Stylus Plugin](https://v2.rsbuild.rs/plugins/list/plugin-stylus): Uses Stylus as the CSS preprocessor.
- [UMD Plugin](https://github.com/rspack-contrib/rsbuild-plugin-umd): Used to build UMD format artifacts.
- [YAML Plugin](https://github.com/rspack-contrib/rsbuild-plugin-yaml): Used to reference YAML files and convert them to JavaScript objects.
- [TOML Plugin](https://github.com/rspack-contrib/rsbuild-plugin-toml): Used to reference TOML files and convert them to JavaScript objects.
```
```
---
url: /plugin/official/cli-plugins.md
---
# Overview
- [@modern-js/plugin-bff](/plugin/official/cli-plugins/plugin-bff.md): Provides BFF services and unified invocation capabilities.
- [@modern-js/plugin-ssg](/plugin/official/cli-plugins/plugin-ssg.md): Provides static site generation capabilities.
---
url: /plugin/official/cli-plugins/plugin-bff.md
---
# BFF Plugin
In a Modern.js application, developers can define API files under the `api/lambda` directory and export API functions using the BFF plugin. In the frontend code, these API functions can be directly invoked by importing the file, which initiates the API requests.
For more details, refer to [BFF - Basic Usage](/guides/advanced-features/bff/function.md).
---
url: /plugin/official/cli-plugins/plugin-ssg.md
---
# SSG Plugin
SSG (Static Site Generation) is a technical solution that renders complete static web pages at build time based on data and templates. This means that in a production environment, pages are populated with content by default and can be cached by a CDN. For pages that do not require dynamic data, SSG can provide better performance and higher security.
For more details, refer to [Static Site Generation (SSG)](/guides/basic-features/render/ssg.md).
---
url: /plugin/official/cli-plugins/plugin-styled-components.md
---
# Styled Components Plugin
In a Modern.js application, developers can use the Styled Components plugin to utilize the styled-components library within the app, enabling CSS-in-JS functionality.
For more details, please refer to [Using CSS-in-JS](/guides/basic-features/css/css-in-js.md).
---
url: /plugin/plugin-system.md
---
# Plugin System
Modern.js adopts a highly extensible, plugin-based architecture, where its core functionalities and extended capabilities are implemented through plugins. The plugin system not only ensures the framework's flexibility but also provides developers with powerful customization options. This document focuses on how to write Modern.js plugins, helping you quickly get started with plugin development.
## Core Concept: Everything is a Plugin
Modern.js adheres to the design philosophy of "everything is a plugin," modularizing the framework's various functional components and assembling and extending them through plugins. This design brings several advantages, including:
- **High Cohesion, Low Coupling:** Each functional module is independently developed, tested, and maintained, reducing system complexity.
- **Flexible and Extensible:** Users can easily customize the framework's behavior by writing or combining plugins without modifying the core code.
- **Easy to Reuse:** Plugins can be shared across projects, improving development efficiency.
- **Progressive Enhancement:** Plugins are introduced on demand, without the complexity of carrying all functionalities from the start.
## Plugin Types and Use Cases
Modern.js provides three main plugin types, corresponding to different stages of application development:
**CLI Plugins:**
- **Active Stage:** Build time (when executing the `modern` command).
- **Typical Scenarios:**
- Extending command-line tools.
- Modifying build configurations.
- Listening for file changes.
- Controlling the build process.
- **Configuration Method:** The `plugins` field in `modern.config.ts`.
**Runtime Plugins:**
- **Active Stage:** Application runtime (browser/Node.js environment).
- **Typical Scenarios:**
- Initializing global state or services.
- Encapsulating React Higher-Order Components (HOCs).
- Intercepting or modifying routing behavior.
- Controlling the rendering process.
- **Configuration Method:** The `plugins` field in `src/modern.runtime.ts`.
{/* **Server Plugins:**
- **Active Stage:** Server request processing stage.
- **Typical Scenarios:**
- Adding custom middleware.
- Extending server-side APIs.
- Customizing SSR logic.
- Integrating with backend frameworks.
- **Configuration Method:** The `plugins` field in `server/modern.server.ts`. */}
## Plugin Structure
A typical Modern.js plugin consists of the following key parts:
```ts
import type { Plugin } from '@modern-js/plugin';
const myPlugin: Plugin = {
name: 'my-awesome-plugin', // The unique identifier of the plugin (required)
// Plugin dependencies and execution order (optional)
pre: [], // List of plugin names to execute before this plugin, defaults to an empty array
post: [], // List of plugin names to execute after this plugin, defaults to an empty array
required: [], // List of required plugins; if a dependent plugin is not registered, an error will be thrown, defaults to an empty array
usePlugins: [], // List of plugin instances used internally, defaults to an empty array
// Register new Hooks (optional)
registryHooks: {},
// The entry function of the plugin (required)
setup(api) {
// The core logic of the plugin, calling plugin APIs through the api object
api.modifyRspackConfig(config => {
/* ... */
});
api.onPrepare(() => {
/* ... */
});
// ... Other API calls
},
};
export default myPlugin;
```
**Field Descriptions:**
##### `name`
- Type: `string`
- Description: Identifies the name of the plugin. This name must be unique within the plugin system; otherwise, the plugin will fail to load.
:::info
The plugin names declared in `pre`, `post`, and `required` refer to this `name` field.
:::
##### `setup`
- Type: `(api: PluginAPI) => MaybePromise<void>`
- Description: The main entry point for the plugin's logic.
###### `api`
- Type: `PluginAPI`
- Description: The plugin's API, containing the Hooks and utility functions supported by the plugin.
##### `pre`
- Type: `string[]`
- Description: Used to insert the plugin execution order. Plugins declared in `pre` will be executed before this plugin.
##### `post`
- Type: `string[]`
- Description: Used to determine the plugin execution order. Plugins declared in `post` will be executed after this plugin.
##### `required`
- Type: `string[]`
- Description: Other plugins that this plugin depends on. Before running, it will check if the dependent plugins are registered.
:::info
If unregistered plugin names are configured in `pre` or `post`, these plugin names will be **automatically ignored** and will not affect the execution of other plugins.
If you need to explicitly declare that the plugins that the current plugin depends on must exist, you need to use the `required` field.
:::
##### `usePlugins`
- Type: `Plugin`
- Description: Actively register other plugins of the same type within the plugin.
:::info
Plugins declared in `usePlugins` are executed before the current plugin by default. To execute them after, use the `post` declaration.
:::
##### `registryHooks`
- Type: `Record<string, PluginHook<(...args: any[]) => any>>`
- Description: Extend the currently supported Hook functions to implement custom functionality.
## Plugin Hook Model
The core of the Modern.js plugin system is its Hook model, which defines the communication mechanism between plugins. Modern.js mainly provides two types of Hooks:
### Async Hook
- **Characteristics:**
- Hook functions are executed asynchronously, supporting `async/await`.
- The return value of the previous Hook function is passed as the first argument to the next Hook function.
- Finally returns the return value of the last Hook function.
- **Use Cases:** Scenarios involving asynchronous operations (such as network requests, file reading/writing, etc.).
- **Creation Method:** Created using `createAsyncHook`.
Example:
```ts
// Define Hooks
import { createAsyncHook } from '@modern-js/plugin';
export type AfterPrepareFn = () => Promise<void> | void;
export const onAfterPrepare = createAsyncHook<AfterPrepareFn>();
// Register Hooks in the plugin
const myPlugin = () => ({
name: 'my-plugin',
registryHooks: {
onAfterPrepare,
},
setup: api => {
api.onPrepare(async () => {
// Use the registered Hooks in the plugin
const hooks = api.getHooks();
await hooks.onAfterPrepare.call();
});
},
});
// Use Hook in other plugins
const myPlugin2 = () => ({
name: 'my-plugin-2',
setup: api => {
api.onAfterPrepare(async () => {
// TODO
});
},
});
```
### Sync Hook (Synchronous Hook)
- **Characteristics:**
- Hook functions are executed synchronously.
- The return value of the previous Hook function is passed as the first argument to the next Hook function.
- Finally returns the return value of the last Hook function.
- **Use Cases:** Scenarios where data needs to be modified synchronously (such as modifying configurations, routes, etc.).
- **Creation Method:** Created using `createSyncHook`.
Example:
```ts
// Define Hooks
import { createSyncHook } from '@modern-js/plugin';
type RouteObject = {
/** TODO **/
};
const modifyRoutes = createSyncHook<(routes: RouteObject[]) => RouteObject[]>();
// Register Hooks in the plugin
const myPlugin = () => ({
name: 'my-plugin',
registryHooks: {
modifyRoutes,
},
setup: api => {
api.onPrepare(async () => {
const routes = {};
// Use registered Hooks in the plugin
const hooks = api.getHooks();
const routesResult = hooks.modifyRoutes.call(routes);
});
},
});
// Other plugins use Hooks
const myPlugin2 = () => ({
name: 'my-plugin',
setup: api => {
api.modifyRoutes(routes => {
// Modify routes
return routes;
});
},
});
```
## Plugin Development Best Practices
- **Single Responsibility:** Each plugin should focus on implementing a specific, cohesive function. Avoid creating plugins with complex functionalities and unclear responsibilities.
- **Naming Conventions:** Plugin names should be clear, concise, and follow certain naming conventions (such as `plugin-xxx` or `@scope/plugin-xxx`).
- **Type Safety:** Make full use of TypeScript's type system to ensure the type safety of the plugin API and reduce runtime errors.
- **Comprehensive Documentation:** Write clear documentation for the plugin, including API descriptions, usage examples, configuration explanations, and change logs.
- **Thorough Testing:** Conduct unit tests and integration tests on the plugin to ensure its stability, reliability, and compatibility in various scenarios.
- **Minimize Side Effects:** Plugins should minimize modifications to the external environment (such as global variables, file systems, etc.) to maintain the plugin's independence and portability.
- **Error Handling:** Plugins should properly handle potential errors to prevent the entire application from crashing due to plugin exceptions.
- **Performance Optimization:** Pay attention to the performance impact of the plugin, avoid unnecessary calculations and resource consumption, especially in loops or frequently called Hooks.
- **Version Control:** Follow Semantic Versioning (SemVer) to ensure the backward compatibility of the plugin and facilitate user upgrades.
Following these best practices can help you develop high-quality, easy-to-maintain, and easy-to-use Modern.js plugins.
---
url: /plugin/runtime-plugins/api.md
---
# Plugin API
Modern.js's Runtime Plugins allow you to extend and modify the behavior of your application during its React code execution. With Runtime Plugins, you can easily perform initialization tasks, implement React Higher-Order Component (HOC) wrapping, and more.
:::info
Runtime plugins need to be configured via the [`plugins`](/configure/app/runtime/plugins.md) field in `src/modern.runtime.ts`.
:::
## Plugin Structure
A typical Runtime Plugin looks like this:
```ts
import type { RuntimePlugin } from '@modern-js/runtime';
const myRuntimePlugin = (): RuntimePlugin => ({
name: 'my-runtime-plugin',
setup: api => {
// Use the api to register hooks
api.onBeforeRender(context => {
console.log('Before rendering:', context);
});
api.wrapRoot(App => {
return props => (
<MyContextProvider>
<App {...props} />
</MyContextProvider>
);
});
},
});
export default myRuntimePlugin;
```
- `name`: A unique identifier for the plugin.
- `setup`: A function that receives an `api` object, which provides all available Runtime plugin APIs.
## API Overview
The Runtime Plugin API is primarily divided into the following categories:
- **Information Retrieval**: Getting runtime configuration and hook functions.
- **Lifecycle Hooks**: Executing custom logic at different stages of the application's rendering process.
### Information Retrieval
#### `api.getRuntimeConfig`
Gets the runtime configuration defined by the user in the `modern.runtime.ts` file.
- **Usage**:
```ts
const config = api.getRuntimeConfig();
console.log(config.myCustomSetting);
```
:::warning
This method returns a _copy_ of the user's configuration. Modifying the returned value will not affect the original configuration.
:::
#### `api.getHooks`
Gets the hook functions that can be triggered manually.
- **Type:**
```ts
() => {
onBeforeRender: {
call: (context: any) => Promise<void>;
}
// Other hooks...
};
```
- **Usage:**
```ts
const hooks = api.getHooks();
await hooks.onBeforeRender.call(myContext);
```
### Lifecycle Hooks
#### `api.onBeforeRender`
Executes before the application renders (including both server-side rendering and client-side rendering). You can use this hook to perform data prefetching, modify the rendering context, etc.
- **Type:**
```ts
type OnBeforeRenderFn<RuntimeContext> = (
context: RuntimeContext,
) => Promise<void> | void;
```
`RuntimeContext` contains contextual information about the current request, such as the request object, response object, etc.
- **Usage:**
```ts
api.onBeforeRender(async context => {
const data = await fetchData(context.req);
context.data = data; // Add the data to the context
});
```
:::warning
- This hook executes before **every** render, so avoid performing long-running operations.
- You can modify the `context` object in this hook, and the modified `context` will be passed to subsequent rendering processes.
:::
#### `api.wrapRoot`
Allows you to wrap the application's root component with a custom React component. This is commonly used to add global Providers, layout components, etc.
- **Type:**
```ts
type WrapRootFn = (App: React.ComponentType<any>) => React.ComponentType<any>;
```
- **Usage:**
```ts
api.wrapRoot((App) => {
const AppWrapper = (props) => {
return (
<MyGlobalProvider>
<Layout>
<App {...props} /> {/* Make sure to pass props */}
</Layout>
</MyGlobalProvider>
);
};
return AppWrapper;
});
```
:::warning
- **It is crucial to pass the `props` to the original `App` component**, otherwise, the application may not function correctly.
- The component returned by `wrapRoot` is recreated on every render, so avoid defining complex logic or state within it.
:::
## Advanced Usage
### Combining Hooks
You can combine multiple hooks to implement more complex functionality. For example, you can use `onBeforeRender` to fetch data and then use `wrapRoot` to pass the data to the entire application via Context:
```ts
import { RuntimePlugin, RuntimeContext } from '@modern-js/runtime';
import { useContext, createContext } from 'react';
export const ThemeContext = createContext<{ theme: string } | null>(null);
export const themePlugin = (): RuntimePlugin => {
return {
name: 'theme-plugin',
setup: api => {
api.onBeforeRender(async context => {
const userPreference = await fetch('/api/user/theme-settings').then(
res => res.json(),
);
context.data = {
theme: userPreference.theme,
};
});
api.wrapRoot(App => {
return props => {
const context = useContext(RuntimeContext);
return (
<ThemeContext.Provider value={context.data}>
<App {...props} />
</ThemeContext.Provider>
);
};
});
},
};
};
```
---
url: /plugin/runtime-plugins/life-cycle.md
---
# Life Cycle
---
url: /plugin/server-plugins/api.md
---
# Plugin API
Modern.js's Server plugins allow you to extend and customize functionality during the server-side request processing phase, such as adding middleware, modifying request responses, etc.
:::info
Server plugins need to be configured via the `plugins` field in `server/modern.server.ts`.
:::
## Plugin Basic Structure
A typical Server plugin structure is as follows:
```typescript
import type { ServerPlugin } from '@modern-js/server-runtime';
const myServerPlugin = (): ServerPlugin => ({
name: '@my-org/my-server-plugin', // Plugin name, ensure uniqueness
setup: api => {
// Use the API here to register hooks, add middleware, etc.
api.onPrepare(() => {
const { middlewares } = api.getServerContext();
middlewares?.push({
name: 'my-middleware',
handler: async (c, next) => {
console.log('Processing request...');
await next();
},
});
});
},
});
export default myServerPlugin;
```
- `name`: A unique identifier for the plugin.
- The `setup` function receives an `api` object, which provides all available Server plugin APIs.
## Information Retrieval
#### `api.getServerContext`
Gets the context information of the Modern.js server.
- **Returns:** A `ServerContext` object containing the following fields:
| Field Name | Type | Description |
| ------------------- | ----------------- | -------------------------------------- |
| `middlewares` | `MiddlewareObj[]` | Middleware list |
| `renderMiddlewares` | `MiddlewareObj[]` | Render middleware list |
| `routes` | `ServerRoute[]` | Server routing information |
| `appDirectory` | `string` | Absolute path to the project root |
| `apiDirectory` | `string` | Absolute path to the API module dir |
| `lambdaDirectory` | `string` | Absolute path to the Lambda module dir |
| `sharedDirectory` | `string` | Absolute path to the shared module dir |
| `distDirectory` | `string` | Absolute path to the output directory |
| `plugins` | `ServerPlugin[]` | List of currently registered plugins |
- **Example:**
```typescript
api.onPrepare(() => {
const serverContext = api.getServerContext();
console.log(`App directory: ${serverContext.appDirectory}`);
console.log(`${serverContext.plugins.length} plugins registered`);
});
```
:::info
The context information returned by `getServerContext` is read-only. Use `updateServerContext` if you need to modify it.
:::
***
#### `api.getServerConfig`
Gets the server configuration defined by the user in the `server/modern.server.ts` file.
- **Returns:** The user-defined server configuration object.
- **Example:**
```typescript
api.onPrepare(() => {
const serverConfig = api.getServerConfig();
if (serverConfig.middlewares) {
console.log('User has customized middleware configuration');
}
});
```
***
#### `api.getHooks`
Gets all registered hook functions.
- **Returns:** An object containing all hook functions.
- **Example:**
```typescript
const hooks = api.getHooks();
// Manually trigger the onPrepare hook
await hooks.onPrepare.call();
```
:::warning
In custom plugins, you can only manually call the hooks registered by the corresponding plugin and cannot call official hooks to avoid affecting the normal execution order of the application.
:::
***
## Context Modification
#### `api.updateServerContext`
Updates the server context information.
- **Type:** `api.updateServerContext(updateContext: DeepPartial<ServerContext>)`
- **Parameters:**
- `updateContext`: The context object to update (partial update).
- **Execution Phase:** Can be used at any stage.
- **Example:**
```typescript
api.onPrepare(() => {
const context = api.getServerContext();
api.updateServerContext({
middlewares: [
...context.middlewares,
{
name: 'new-middleware',
handler: async (c, next) => {
await next();
},
},
],
});
});
```
***
## Lifecycle Hooks
#### `api.onPrepare`
Adds additional logic during the server preparation phase.
- **Type:** `api.onPrepare(prepareFn: () => void | Promise<void>)`
- **Parameters:**
- `prepareFn`: A preparation function, without parameters, can be asynchronous.
- **Execution Phase:** After the server completes configuration validation and before applying middleware.
- **Example:**
```typescript
api.onPrepare(async () => {
const { middlewares } = api.getServerContext();
// Add custom middleware
middlewares.push({
name: 'request-logger',
handler: async (c, next) => {
const start = Date.now();
await next();
const duration = Date.now() - start;
console.log(`Request duration: ${duration}ms`);
},
});
});
```
:::info
In the `onPrepare` hook, you can modify the context object returned by `getServerContext()` (such as `middlewares`, `renderMiddlewares`), and these modifications will take effect when the server starts.
:::
***
#### `api.onReset`
Adds additional logic when the server resets.
- **Type:** `api.onReset(resetFn: (params: { event: ResetEvent }) => void | Promise<void>)`
- **Parameters:**
- `resetFn`: A reset handler function that receives reset event parameters.
- `event.type`: Event type, possible values:
- `'repack'`: Repack event
- `'file-change'`: File change event
- `event.payload`: When `type` is `'file-change'`, contains an array of file change information.
- **Execution Phase:** When files change or repack is needed.
- **Example:**
```typescript
api.onReset(async ({ event }) => {
if (event.type === 'file-change') {
console.log('File changes detected:', event.payload);
// Perform cleanup or re-initialization operations
} else if (event.type === 'repack') {
}
});
```
***
## Other Notes
- Refer to [Server Plugin Lifecycle](/plugin/server-plugins/life-cycle.md) to understand the execution order of plugin hooks.
- The execution order of middleware can be controlled through the `order` field (`'pre'`, `'default'`, `'post'`), or through the `before` field to specify execution before other middleware.
---
url: /plugin/server-plugins/life-cycle.md
---
# Life Cycle
:::info
**Runtime Hooks**
The `onReset` hook is triggered at runtime when files change or code recompilation (rspack) is needed. It is not part of the initialization flow, so it is not shown in the diagram above.
- **Trigger Timing**: File changes (`event.type: 'file-change'`) or code recompilation (rspack) completion (`event.type: 'repack'`)
- **Use Cases**: Clearing cache, re-initializing resources, etc.
:::
---
url: /apis/app/commands.md
---
# Commands
Modern.js has some built-in commands that can help you quickly start a development server, build production environment code, and more.
Through this chapter, you can learn about the built-in commands of Modern.js and how to use them.
## modern dev
The `modern dev` command is used to start a local development server and compile the source code in the development environment.
```bash
Usage: modern dev [options]
Options:
-e --entry <entry> compiler by entry
-c --config <config> specify the configuration file, which can be a relative or absolute path
-h, --help show command help
--web-only only start web service
--api-only only start API service
```
After running `modern dev`, Modern.js will watch source file changes and apply hot module replacement.
```bash
$ modern dev
info Starting dev server...
> Local: http://localhost:8080/
> Network: http://192.168.0.1:8080/
```
### Compile Partial Pages
In multi-page (MPA) projects, the `--entry` option can be added to specify one or more pages to compile. In this way, only part of the code in the project will be compiled, and the dev startup speed will be faster.
For example, execute `modern dev --entry`, the entry selector will be displayed in the command line interface:
```text
$ modern dev --entry
? Please select the entry that needs to be built
❯ ◯ foo
◯ bar
◯ baz
```
For example, if you select the `foo` entry, only the code related to the `foo` entry will be compiled, and the code of other pages will not be compiled.
### Specify the page by parameter
You can also specify the page name through parameters after `--entry`, and the names of multiple pages can be separated by commas.
```bash
# Compile foo page
modern dev --entry foo
# Compile foo and bar pages
modern dev --entry foo,bar
```
## modern start
`modern start` is an alias of `modern dev` command, the usage of the two are exactly the same.
## modern build
The `modern build` command will build production-ready artifacts in the `dist/` directory by default. You can specify the output directory by modifying the configuration [`output.distPath`](/configure/app/output/dist-path.md).
```bash
Usage: modern build [options]
Options:
-c --config <config> specify the configuration file, which can be a relative or absolute path
-h, --help show command help
-w --watch turn on watch mode, watch for changes and rebuild
```
## modern new
The `modern new` command is used to enable features in an existing project.
For example, add application entry, enable some optional features such as BFF, micro frontend, etc.
```bash
Usage: modern new [options]
Options:
--config-file <configFile> specify the configuration file, which can be a relative or absolute path
--lang <lang> set the language (zh or en) for the new command.
-d, --debug using debug mode to log something (default: false)
-c, --config <config> set default generator config(json string)
--dist-tag <tag> use specified tag version for its generator
--registry set npm registry url to run npm command
-h, --help show command help
```
### Add Entry
In the project, execute the `new` command to add entries as follows:
```text
$ npx modern new
? Please select the operation you want: Create Element
? Please select the type of element to create: New "entry"
? Please fill in the entry name: entry
```
### Enable Features
In the project, execute the `new` command to enable features as follows:
```text
$ npx modern new
? Please select the operation you want: Enable Features
? Please select the feature name: (Use arrow keys)
❯ Enable BFF
Enable SSG
Enable Micro Frontend
```
:::tip
The `--config` parameter needs to use a JSON string.
pnpm does not support the use of JSON strings as parameter values currently. Use `npm new` to turn on.【[Relate Issue](https://github.com/pnpm/pnpm/issues/3876)】
:::
## modern serve
The `modern serve` command is used to start a Modern.js project in the production environment. It can also be used to preview the artifacts built for the production environment locally. Please note that you need to execute the [`build`](/apis/app/commands.md#modern-build) command beforehand to generate the corresponding artifacts.
```bash
Usage: modern serve [options]
Options:
-c --config <config> specify the configuration file, which can be a relative or absolute path
-h, --help show command help
--api-only only run API service
```
By default, the project will run in `localhost:8080`, you can modify the server port number with `server.port`:
```js
export default defineConfig({
server: {
port: 8081,
},
});
```
## modern upgrade
Execute the command `npx modern upgrade` in the project, by default, dependencies in the `package.json` are updated to the latest version.
```bash
Usage: modern upgrade [options]
Options:
--config <config> specify the configuration file, which can be a relative or absolute path
--registry <registry> specify npm registry (default: "")
-d,--debug using debug mode to log something (default: false)
--cwd <cwd> app directory (default: "")
-h, --help show command help
```
## modern inspect
The `modern inspect` command is used to view the Modern.js config, [Rsbuild config](https://v2.rsbuild.rs/config/index) and Rspack config of the project.
```bash
Usage: modern inspect [options]
Options:
--env <env> view the configuration in the target environment (default: "development")
--output <output> Specify the path to output in the dist (default: "./")
--verbose Show the full function in the result
-c --config <config> specify the configuration file, which can be a relative or absolute path
-h, --help show command help
```
After executing the command `npx modern inspect` in the project root directory, the following files will be generated in the `dist` directory of the project:
- `modern.js.config.mjs`:The Modern.js configuration currently used.
- `rsbuild.config.mjs`: The Rsbuild config to use at build time.
- `rspack.config.web.mjs`: The Rspack config used by to use at build time.
```bash
➜ npx modern inspect
Inspect config succeed, open following files to view the content:
- Rsbuild Config: /root/my-project/dist/rsbuild.config.mjs
- Rspack Config (web): /root/my-project/dist/rspack.config.web.mjs
- Modern.js Config: /root/my-project/dist/modern.js.config.mjs
```
### Configuration Env
By default, the inspect command will output the development configs, you can use the `--env production` option to output the production configs:
```bash
modern inspect --env production
```
### Verbose content
By default, the inspect command will omit the function content in the config object, you can use the `--verbose` option to output the full content of the function:
```bash
modern inspect --verbose
```
### SSR Configuration
If the project has enabled SSR, an additional `rspack.config.node.mjs` file will be generated in the `dist/`, corresponding to the Rspack configuration at SSR build time.
```bash
➜ npx modern inspect
Inspect config succeed, open following files to view the content:
- Rsbuild Config: /root/my-project/dist/rsbuild.config.mjs
- Rspack Config (web): /root/my-project/dist/rspack.config.web.mjs
- Rspack Config (node): /root/my-project/dist/rspack.config.node.mjs
- Modern.js Config: /root/my-project/dist/modern.js.config.mjs
```
## modern deploy
The `modern deploy` command is used to generate artifacts required for the deployment platform.
```bash
Usage: modern deploy [options]
Options:
-c --config <config> Specify configuration file path, either relative or absolute
-s --skip-build Skip the build stage
-h, --help Display command help
```
For more details, refer to [Deploy Application](/guides/basic-features/deploy.md).
---
url: /apis/app/hooks/api/lambda.md
---
# lambda/\*.ts
After enabling BFF, the files under the `lambda/` directory will be registered as BFF routes according to conventions.
:::note
The files can be written in `js` or `ts` languages, but they must use `esm` syntax to export functions.
:::
For detailed information, refer to [BFF API Routes](/guides/advanced-features/bff/function.md#api-routes).
---
url: /apis/app/hooks/config/favicon.md
---
# Favicon
When there is a `favicon.*` file in the `config` directory at the root of the project, Modern.js will automatically set the file to the [html.favicon](/configure/app/html/favicon.md) configuration option for generating the favicon icon on the page:
```
./config
└── favicon.ico
```
After the build is completed, you can see the following tags automatically generated in HTML:
```html
<link rel="icon" href="/favicon.ico" />
```
## Order
When setting up the favicon, Modern.js looks for files in the following order:
- `favicon.png`
- `favicon.jpg`
- `favicon.jpeg`
- `favicon.svg`
- `favicon.ico`
---
url: /apis/app/hooks/config/html.md
---
# html/
You can inject custom HTML fragments at different locations of the default internal HTML template through the `config/html` directory.
For specific usage, please refer to: [Custom HTML](/guides/basic-features/html.md).
---
url: /apis/app/hooks/config/icon.md
---
# Apple Touch Icon
When there is an `icon.*` file in the `config` directory at the root of the project, Modern.js will automatically set the file to the [html.appIcon](/configure/app/html/app-icon.md) configuration option for generating the Apple Touch Icon icon under the iOS system.
```
./config
└── icon.png
```
After the build is completed, you can see the following tags automatically generated in HTML:
```html
<link rel="apple-touch-icon" sizes="180x180" href="/static/image/icon.png" />
```
## Order
When setting up the app icon, Modern.js looks for files in the following order:
- `icon.png`
- `icon.jpg`
- `icon.jpeg`
- `icon.svg`
- `icon.ico`
---
url: /apis/app/hooks/config/mock.md
---
# mock/
When there is a `config/mock/index.js` file in the project directory, Modern.js will automatically enable the Mock service during development.
---
url: /apis/app/hooks/config/public.md
---
# public/
Any static assets can be placed in the `public/` directory, and the files will be deployed to the corresponding application domain by the server.
## Description
The file routing is based on the convention of the directory structure, where `public/` is the root directory corresponding to the root path of the Web application.
For example, the `config/public/sdk/index.js` file will be deployed under `${domain}/sdk/index.js` after deployment.
## Scenarios
For example, authentication files required by third-party systems such as `robots.txt` and `auth.xml`.
Or SDKs for other business parties (requiring unchanged routing), or HTML files without entry.
:::info
For static assets (such as SVG images) that need to be imported through import in the source code, it is recommended to manage them in the `src/assets` directory.
:::
## Code Compression
If the file in the directory is a `.js` file, it will be automatically compressed during production environment construction.
If the file ends with `.min.js`, it will not be compressed.
---
url: /apis/app/hooks/config/upload.md
---
# upload/
Any static assets can be placed in the `upload/` directory.
## Description
In the development environment, the static assets in this directory will be hosted under the `/upload` path. After building the application, the files in this directory will be copied to the dist directory.
This file convention is mainly used for developers to use plugins to proactively upload static assets to the CDN.
## Scenarios
For example, SDKs for project use only, such as `google-analysis.js` (usually requires HTTP caching).
Pictures, font files, common CSS, etc.
## Code Compression
If the file in the directory is a `.js` file, it will be automatically compressed during production environment construction.
If the file ends with `.min.js`, it will not be compressed.
## More Usage
In React components, you can add this prefix through [Environment Variables](/guides/basic-features/env-vars.md#asset_prefix):
```tsx
export default () => {
return (
<img src={`${process.env.ASSET_PREFIX}/upload/banner.png`}></img>
);
};
```
In addition, whether it is in [Custom HTML](/guides/basic-features/html.md) or any HTML file under [`config/public/`](/apis/app/hooks/config/public.md), you can directly use HTML tags to reference resources in the `config/upload/` directory:
```html
<script src="/upload/index.js"></script>
```
If you set the [`dev.assetPrefix`](/configure/app/dev/asset-prefix.md) or [`output.assetPrefix`](/configure/app/output/asset-prefix.md) prefix, you can also use template syntax to add the prefix directly:
```html
<script src="<%=assetPrefix %>/upload/index.js"></script>
```
:::info
Modern.js does not support using files under `config/upload/` through URLs in `config/public/*.css` (such as background-image).
:::
---
url: /apis/app/hooks/modern-config.md
---
# modern.config.ts
The Modern.js configuration file. Through this file, you can personalize the configuration of various aspects of the current project.
To learn more about how to use the configuration, please refer to [Configuration Usage](/configure/app/usage.md).
---
url: /apis/app/hooks/server/server.md
---
# modern.server.ts
This file extends the Modern.js Server. In this file, you can configure [Middleware](/guides/advanced-features/web-server.md#middleware), [RenderMiddleware](/guides/advanced-features/web-server.md#rendermiddleware), or [Plugin](/guides/advanced-features/web-server.md#plugin) for the Server that starts with the Modern.js project.
You can intercept and handle requests and responses, perform authentication and role checks, preprocess requests, and handle exceptions, etc. You can also insert specific business logic into the built-in processing logic (including route matching, resource addressing, header injection, page rendering, and static web hosting).
---
url: /apis/app/hooks/shared.md
---
# shared/
Shared source code directory. When there is common code in `api/`, `server/`, and `src/` in the project, you can put these codes in the `shared` directory instead of directly referencing them.
---
url: /apis/app/hooks/src/app.md
---
# App.tsx
The entry identifier when using [Self-controlled Routing](/guides/concept/entries.md#self-controlled-routing) in the application.
`App.tsx` is not the actual application entry; Modern.js will automatically generate the real entry file, which is roughly as follows:
```js
// runtime-global-context
import { setGlobalContext } from '@modern-js/runtime/context';
import App from '@_modern_js_src/App';
setGlobalContext({
App,
});
// index.tsx
import './runtime-global-context';
import { createRoot } from '@modern-js/runtime/react';
import { render } from '@modern-js/runtime/browser';
const ModernRoot = createRoot();
render(<ModernRoot />, 'root');
```
When `createRoot` is executed, it will retrieve the registered Global App and generate the actual React component.
:::note
In scenarios with multiple entry points, each entry can have its own independent `App.tsx`. For more details, see [Entry Points](/guides/concept/entries.md).
:::
---
url: /apis/app/hooks/src/entry.md
---
# entry.tsx
Normally, the [`routes/`](/apis/app/hooks/src/routes.md) and [`App.tsx`](/apis/app/hooks/src/app.md) hook files can meet our needs. When we need to add custom behavior before component rendering or take full control of the Rspack packaging entry, we can create `entry.ts` file in the src or entry directory. Here are two cases for discussion。
## Add custom behavior before Render
This is implemented in `src/entry.ts` as follows:
```js title=src/entry.tsx
import { createRoot } from '@modern-js/runtime/react';
import { render } from '@modern-js/runtime/browser';
const ModernRoot = createRoot();
async function beforeRender() {
// todo
}
beforeRender().then(() => {
render(<ModernRoot />);
});
```
## Take full control of the Rspack entry
When the project does not install the `@modern-js/runtime` dependency, `src/entry.tsx?` is the real Rspack packaging entry file, and you can directly organize the code like using create-react-app and other scaffolds:
```js title=src/entry.jsx
import React from 'react';
import ReactDOM from 'react-dom/client';
import App from './App';
ReactDOM.createRoot(document.getElementById('root')!).render(<App />);
```
---
url: /apis/app/hooks/src/entry.server.md
---
# entry.server.tsx
When the project initiates `server.ssr`, Modern.js generates a default Server-Side entry. The sample code is as follows:
```tsx title="entry.server.tsx"
import {
renderString,
createRequestHandler,
type HandleRequest,
} from '@modern-js/runtime/ssr/server';
const handleRequest: HandleRequest = async (request, ServerRoot, options) => {
const body = await renderString(request, <ServerRoot />, options);
return new Response(body, {
headers: {
'content-type': 'text/html; charset=utf-8',
},
});
};
export default createRequestHandler(handleRequest);
```
## Add Custom Entry Points
Users need to customize the Server-Side Rendering entry points, they can customize the server entry in `src/entry.server.ts` or `src/{entryName}/entry.server.ts`.
```tsx title="src/entry.server.tsx"
import {
renderString,
createRequestHandler,
type HandleRequest,
} from '@modern-js/runtime/ssr/server';
const handleRequest: HandleRequest = async (request, ServerRoot, options) => {
// do something before rendering
const body = await renderString(request, <ServerRoot />, options);
const newBody = body + '<div>Byte-Dance</div>';
return new Response(newBody, {
headers: {
'content-type': 'text/html; charset=UTF-8',
'x-custom-header': 'abc',
},
});
};
export default createRequestHandler(handleRequest);
```
---
url: /apis/app/hooks/src/modern.runtime.md
---
# modern.runtime.ts
The Modern.js Runtime configuration file allows for personalized configuration of the Runtime capabilities for the current project.
For specific usage of the configuration, please refer to [Runtime Configuration](/configure/app/runtime/0-intro.md).
---
url: /apis/app/hooks/src/routes.md
---
# routes/
The identifier for the entry point when the application uses [Conventional Routing](/guides/basic-features/routes/routes.md#conventional-routing).
Conventional routing uses `routes/` as the convention for the entry point and analyzes the files in the `src/routes` directory to obtain the client-side routing configuration.
Any `layout.tsx` and `page.tsx` under `src/routes` will be used as the application's routes:
```bash
.
└── routes
├── layout.tsx # [!code highlight]
├── page.tsx # [!code highlight]
└── user
├── layout.tsx
└── page.tsx
```
## Basic Example
The directory name under `routes` will be used as the mapping of the route URL. `layout.tsx` is used as the layout component and `page.tsx` is used as the content component in the routing. They are the leaf nodes of the entire route. For example, the following directory structure:
```bash
.
└── routes
├── page.tsx
└── user
└── page.tsx
```
will generate two routes:
- `/`
- `/user`
## Dynamic Routing
If the directory name of the route file is named with `[]`, the generated route will be used as a dynamic route. For example, the following file directory:
```
└── routes
├── [id]
│ └── page.tsx
├── blog
│ └── page.tsx
└── page.tsx
```
The `routes/[id]/page.tsx` file will be converted to the `/:id` route. Except for the `/blog` route that can be matched exactly, all other `/xxx` routes will be matched to this route.
In the component, you can use [useParams](/apis/app/runtime/router/router.md#useparams) to obtain the corresponding named parameter.
When using the [loader](/guides/basic-features/data/data-fetch.md#the-loader-function) function to obtain data, `params` will be passed as an input parameter to the `loader` function, and the corresponding parameter can be obtained through the attribute of `params`.
## Layout Component
In the following example, a common layout component can be added to all route components by adding `layout.tsx`:
```bash
.
└── routes
├── layout.tsx
├── page.tsx
└── user
├── layout.tsx
└── page.tsx
```
In the layout component, you can use `<Outlet>` to represent the child components:
```tsx title=routes/layout.tsx
import { Link, Outlet, useLoaderData } from '@modern-js/runtime/router';
export default () => {
return (
<>
<Outlet></Outlet>
</>
);
};
```
:::note
`<Outlet>` is a new API in React Router 7. For details, see [Outlet](https://reactrouter.com/en/main/components/outlet#outlet).
:::
---
url: /apis/app/hooks/src/server.md
---
# \*.\[server|node].tsx
Used in the application project to place server-side code. When `*.tsx` and `*.[server|node].tsx` coexist, SSR will prefer to use the `*.[server|node].tsx` file instead of the `*.tsx` file when rendering on the server.
---
url: /apis/app/runtime/bff/use-hono-context.md
---
# useHonoContext
Used to obtain Hono context in an integrated BFF function.
## Usage
```ts
import { useHonoContext } from '@modern-js/server-runtime';
```
## Function Signature
`function useHonoContext(): Context`
## Example
Developers can use `context` to obtain more request information, such as setting response headers:
```ts
import { useHonoContext } from '@modern-js/server-runtime';
export async function get() {
const c = useHonoContext();
c.res.headers.set('x-bff-api', 'true');
// ...
}
```
---
url: /apis/app/runtime/core/create-root.md
---
# createRoot
It is used to create the root component provided by Modern.js, which will automatically register Runtime plugins and complete the initialization of Runtime plugins.
## Usage
```ts
import { createRoot } from '@modern-js/runtime/react';
```
## Function Signature
```ts
export function createRoot(UserApp?: React.ComponentType | null): React.ComponentType<any>;
```
### Parameters
- `UserApp`: an optional parameter, and the default is the component exported from `App.tsx`.
---
url: /apis/app/runtime/core/render.md
---
# render
It is used to render project components.
## Usage
```ts
import { render } from '@modern-js/runtime/browser';
render(<ModernRoot />);
```
## Function Signature
```ts
export function render(App: React.ReactElement, id?: HTMLElement | string): Promise<any>;
```
### Parameters
- `App`:An instance of ReactElement created through [`createRoot`](/apis/app/runtime/core/create-root.md).
- `id`:The id of the DOM root element to be mounted, such as "root".
## Example
```tsx
import { createRoot } from '@modern-js/runtime/react';
import { render } from '@modern-js/runtime/browser';
const ModernRoot = createRoot();
async function beforeRender() {
// todo
}
beforeRender().then(() => {
render(<ModernRoot />);
});
```
---
url: /apis/app/runtime/core/runtime-context.md
---
# RuntimeContext
`RuntimeContext` is a React Context used to get Runtime context information in components. This Context can be accessed through React's `use` or `useContext` API.
:::warning
The `useRuntimeContext` Hook has been deprecated. Please use `use(RuntimeContext)` instead. `useRuntimeContext` is internally implemented as `useContext(RuntimeContext)`, while `use(RuntimeContext)` is the recommended new approach in React 19.
:::
## Usage
```tsx
import { use } from 'react';
import { RuntimeContext } from '@modern-js/runtime';
export function App() {
const runtimeContext = use(RuntimeContext); // You can also use useContext(RuntimeContext)
return <div>Hello World</div>
}
```
## Type Definition
```ts
type TRuntimeContext = {
initialData?: Record<string, unknown>;
isBrowser: boolean;
routes?: RouteObject[];
requestContext: RequestContext;
/**
* @deprecated Use `requestContext` instead
*/
context: RequestContext;
[key: string]: unknown;
};
```
### Property Description
- `isBrowser`: Indicates whether the current runtime environment is a browser
- `routes`: Route configuration information
- `requestContext`: Request context, containing `request` and `response` objects
- `context`: Deprecated, please use `requestContext` instead
### RequestContext
`RequestContext` is the type of the `requestContext` property, containing request and response related information:
```ts
type RequestContext = {
request: {
params: Record<string, string>; // Route parameters
pathname: string; // Pathname
query: Record<string, string>; // Query parameters
headers: IncomingHttpHeaders; // Request headers
host: string; // Hostname
url: string; // Full URL
referer?: string; // Referrer page
userAgent?: string; // User agent
cookie?: string; // Cookie string
cookieMap?: Record<string, string>; // Cookie map object
};
response: {
setHeader: (key: string, value: string) => void; // Set response header (server-side only)
status: (code: number) => void; // Set status code (server-side only)
locals: Record<string, any>; // Local data
};
};
```
**Notes**:
- `response.setHeader` and `response.status` are only available on the server-side (SSR)
- On the browser side, the `response` object may not contain these methods
- The `request` object is available on both server and browser, but server-side information is more complete
## Usage Examples
### Distinguishing Runtime Environment
```tsx
import { use } from 'react';
import { RuntimeContext } from '@modern-js/runtime';
function App() {
const { context, isBrowser } = use(RuntimeContext);
if (isBrowser === true) {
// Browser-side execution logic
console.log('browser render')
} else {
// Server-side execution logic
// Note: Functions like logger need to be injected into context through Runtime plugins
console.log('server render')
}
}
```
### Getting Request Context
When SSR is enabled, isomorphic request context can be obtained in both Node environment and browser environment.
The slight difference is that the Node environment also supports setting response headers, response codes, and provides Logger logging and Metrics tracking.
:::tip
When SSR is not enabled, only the information that can be obtained on the browser side is included.
:::
```tsx
import { use } from 'react';
import { RuntimeContext } from '@modern-js/runtime';
function App() {
const runtimeContext = use(RuntimeContext);
const { request, response } = runtimeContext.requestContext || {};
// Access request information
const userAgent = request?.userAgent || request?.headers?.['user-agent'];
const url = request?.url;
const query = request?.query;
const params = request?.params;
// Server-side can set response headers
if (!runtimeContext.isBrowser && response) {
response.setHeader('X-Custom-Header', 'value');
response.status(200);
}
return (
<div>
<div>User Agent: {userAgent}</div>
<div>URL: {url}</div>
<div>Query: {JSON.stringify(query)}</div>
</div>
);
}
```
### Accessing Injected Global Data
Global data can be injected into `RuntimeContext` through the `onBeforeRender` hook of Runtime plugins:
```tsx
import { use } from 'react';
import { RuntimeContext } from '@modern-js/runtime';
export default function MyComponent() {
const context = use(RuntimeContext);
const { message } = context;
return <div>{message}</div>;
}
```
---
url: /apis/app/runtime/router/router.md
---
# router
:::info
The router solution based on [react-router v7](https://reactrouter.com/).
:::
## hooks
### useNavigate
```ts
declare function useNavigate(): NavigateFunction;
interface NavigateFunction {
(
to: To,
options?: {
replace?: boolean;
state?: any;
relative?: RelativeRoutingType;
},
): void;
(delta: number): void;
}
```
The `useNavigate` hook returns a function that lets you navigate programmatically.
```tsx
import { useNavigate } from '@modern-js/runtime/router';
export function HomeButton() {
let navigate = useNavigate();
function handleClick() {
navigate('/home');
}
return (
<button type="button" onClick={handleClick}>
Go home
</button>
);
}
```
### useLocation
```ts
declare function useLocation(): Location;
interface Location extends Path {
state: unknown;
key: Key;
}
```
The `useLocation` hook returns the current [location](https://reactrouter.com/web/api/location) object. A new location object would be returned whenever the current location changes.
```ts
import { useLocation } from '@modern-js/runtime/router';
function usePageViews() {
let location = useLocation();
React.useEffect(() => {
ga.send(["pageview", location.pathname]);
}, [location]);
}
function App() {
usePageViews();
return (
//...
);
}
```
### useParams
```ts
declare function useParams<K extends string = string>(): Readonly<Params<K>>;
```
The `useParams` hook returns an object of key/value pairs of the dynamic params from the current URL that were matched by the `<Route path>`.
```tsx
import { Routes, Route, useParams } from '@modern-js/runtime/router';
function BlogPost() {
const { slug } = useParams();
return <div>Now showing post {slug}</div>;
}
function App() {
return (
<Routes>
<Route path="/" element={<div>home</div>} />
<Route path="/blog/:slug" element={<BlogPost />} />
</Routes>
);
}
```
### useRouteError
```ts
export declare function useRouteError(): unknown;
```
`useRouteError` returns the nearest ancestor Route error。
```tsx
import { useRouteError } from '@modern-js/runtime/router';
const ErrorBoundary = () => {
const error = useRouteError();
return (
<div>
<h1>{error.status}</h1>
<h2>{error.message}</h2>
</div>
);
};
export default ErrorBoundary;
```
## Components
### Link
```ts
declare function Link(props: LinkProps): React.ReactElement;
interface LinkProps
extends Omit<React.AnchorHTMLAttributes<HTMLAnchorElement>, 'href'> {
replace?: boolean;
state?: any;
to: To;
reloadDocument?: boolean;
}
type To = string | Partial<Path>;
```
A `<Link>` is an element that lets the user navigate to another page by clicking or tapping on it.
```ts
<Link to="/about">About</Link>
```
### NavLink
```ts
declare function NavLink(props: NavLinkProps): React.ReactElement;
interface NavLinkProps
extends Omit<LinkProps, 'className' | 'style' | 'children'> {
caseSensitive?: boolean;
children?:
| React.ReactNode
| ((props: { isActive: boolean }) => React.ReactNode);
className?: string | ((props: { isActive: boolean }) => string | undefined);
end?: boolean;
style?:
| React.CSSProperties
| ((props: { isActive: boolean }) => React.CSSProperties);
}
```
A `<NavLink>` is a special kind of `<Link>` that knows whether or not it is "active".
### Outlet
```ts
interface OutletProps {
context?: unknown;
}
declare function Outlet(props: OutletProps): React.ReactElement | null;
```
An `<Outlet>` should be used in parent route elements to render their child route elements. This allows nested UI to show up when child routes are rendered.
```tsx
function Dashboard() {
return (
<div>
<h1>Dashboard</h1>
{/* This element will render either <DashboardMessages> when the URL is
"/messages", <DashboardTasks> at "/tasks", or null if it is "/"
*/}
<Outlet />
</div>
);
}
function App() {
return (
<Routes>
<Route path="/" element={<Dashboard />}>
<Route path="messages" element={<DashboardMessages />} />
<Route path="tasks" element={<DashboardTasks />} />
</Route>
</Routes>
);
}
```
### Route
```ts
interface RouteObject {
path?: string;
index?: boolean;
children?: React.ReactNode;
caseSensitive?: boolean;
id?: string;
loader?: LoaderFunction;
action?: ActionFunction;
element?: React.ReactNode | null;
errorElement?: React.ReactNode | null;
handle?: RouteObject['handle'];
shouldRevalidate?: ShouldRevalidateFunction;
}
```
`Route` represents the route information. A `Route` object couples URL segments to components, data loading and data mutations.
`Route` can be used as a plain object, passing to the router creation functions:
```ts
const router = createBrowserRouter([
{
// it renders this element
element: <Team />,
// when the URL matches this segment
path: 'teams/:teamId',
// with this data loaded before rendering
loader: async ({ request, params }) => {
return fetch(`/fake/api/teams/${params.teamId}.json`, {
signal: request.signal,
});
},
// performing this mutation when data is submitted to it
action: async ({ request }) => {
return updateFakeTeam(await request.formData());
},
// and renders this element in case something went wrong
errorElement: <ErrorBoundary />,
},
]);
```
You can also declare your routes with JSX and `createRoutesFromElements`, the props to the element are identical to the properties of the route objects:
```ts
const router = createBrowserRouter(
createRoutesFromElements(
<Route
element={<Team />}
path="teams/:teamId"
loader={async ({ params }) => {
return fetch(`/fake/api/teams/${params.teamId}.json`);
}}
action={async ({ request }) => {
return updateFakeTeam(await request.formData());
}}
errorElement={<ErrorBoundary />}
/>,
),
);
```
## More
You can access to [React Router](https://reactrouter.com/) to get the full API information.
---
url: /apis/app/runtime/ssr/no-ssr.md
---
# NoSSR
The content wrapped by NoSSR will not be rendered at the server, nor will it be rendered during the client side hydrate. it will only be rendered immediately after the entire app is rendered.
## Usage
```tsx
import { NoSSR } from '@modern-js/runtime/ssr';
export default () => <NoSSR>...</NoSSR>;
```
## Example
In the following code, the `Time` component is used to display the current time. Since the time obtained by server-side rendering and client side hydrate are diff, React will throw an exception. For this case, you can use `NoSSR` to optimize:
```tsx
import { NoSSR } from '@modern-js/runtime/ssr';
function Time() {
return (
<NoSSR>
<div>Time: {Date.now()}</div>
</NoSSR>
);
}
```
## Scene
In CSR, it is often necessary to render different content according to the browser UA, or a parameter of the current page URL. If the application switches directly to SSR at this time, it is very likely that the results will not meet the expectations.
Modern.js provides complete browser side information in the SSR context, which can be used to determine the rendering result of the component on the server side.
Even so, if there is too much logic in the application, or the developer wants to use the context later, or does not want some content to be rendered at the server side. developer can use the NoSSR component to exclude this part from server-side rendering.
---
url: /apis/app/runtime/ssr/renderStreaming.md
---
# renderStreaming
Used for `React v18` + `Streaming SSR` to render readable streams, used in conjunction with `createRequestHandler`.
## Usage
```ts title="src/entry.server.tsx"
import {
renderStreaming,
createRequestHandler,
type HandleRequest,
} from '@modern-js/runtime/ssr/server';
const handleRequest: HandleRequest = async (request, ServerRoot, options) => {
const stream = await renderStreaming(request, <ServerRoot />, options);
return new Response(stream, {
headers: {
'content-type': 'text/html; charset=utf-8',
},
});
};
export default createRequestHandler(handleRequest);
```
## Function Signature
```ts
export type RenderStreaming = (
request: Request,
serverRoot: React.ReactElement,
optinos: RenderOptions,
) => Promise<ReadableStream>;
```
## Example
```tsx title="src/entry.server.tsx"
import {
renderStreaming,
createRequestHandler,
type HandleRequest,
} from '@modern-js/runtime/ssr/server';
const handleRequest: HandleRequest = async (request, ServerRoot, options) => {
// do something before render
const stream = await renderStreaming(request, <ServerRoot />, options);
// docs: https://developer.mozilla.org/en-US/docs/Web/API/TransformStream
const transformStream = new TransformStream({
transform(chunk, controller) {
// do some transform
},
});
stream.pipeThrough(transformStream);
return new Response(transformStream.readable, {
headers: {
'content-type': 'text/html; charset=utf-8',
},
});
};
export default createRequestHandler(handleRequest);
```
---
url: /apis/app/runtime/ssr/renderString.md
---
# renderString
Used for React String SSR to render strings, used in conjunction with `createRequestHandler`.
## Usage
```tsx title="src/entry.server.tsx"
import {
renderString,
createRequestHandler,
type HandleRequest,
} from '@modern-js/runtime/ssr/server';
const handleRequest: HandleRequest = async (request, ServerRoot, options) => {
const body = await renderString(request, <ServerRoot />, options);
return new Response(body, {
headers: {
'content-type': 'text/html; charset=utf-8',
},
});
};
export default createRequestHandler(handleRequest);
```
## Function Signature
```ts
export type RenderString = (
request: Request,
serverRoot: React.ReactElement,
optinos: RenderOptions,
) => Promise<string>;
```
## Example
```tsx title="src/entry.server.tsx"
import {
renderString,
createRequestHandler,
type HandleRequest,
} from '@modern-js/runtime/ssr/server';
const handleRequest: HandleRequest = async (request, ServerRoot, options) => {
// do something before render
const body = await renderString(request, <ServerRoot />, options);
const newBody = body + '<div>Byte-Dance</div>';
return new Response(newBody, {
headers: {
'content-type': 'text/html; charset=utf-8',
},
});
};
export default createRequestHandler(handleRequest);
```
---
url: /apis/app/runtime/ssr/requestHandler.md
---
# createRequestHandler
Used to customize the Server-Side Rendering entry to return the `requestHandler`.
## Usage
```tsx title="src/entry.server.tsx"
import {
renderString,
createRequestHandler,
type HandleRequest,
} from '@modern-js/runtime/ssr/server';
const handleRequest: HandleRequest = async (request, ServerRoot, options) => {
const body = await renderString(request, <ServerRoot />, options);
return new Response(body, {
headers: {
'content-type': 'text/html; charset=utf-8',
},
});
};
export default createRequestHandler(handleRequest);
```
## Function Signature
```ts
export type HandleRequest = (
request: Request,
ServerRoot: React.ComponentType,
options: HandleRequestOptions,
) => Promise<Response>;
export type RequestHandler = (
request: Request,
options: RequestHandlerOptions,
) => Promise<Response>;
export type CreateRequestHandler = (
handleRequest: HandleRequest,
) => Promise<RequestHandler>;
```
---
url: /apis/app/runtime/utility/css-in-js.md
---
# CSS-In-JS API
Use Style Component to write CSS.
## Usage
```ts
import styled from '@modern-js/plugin-styled-components/styled';
```
## Function Signature
see [styled-component API](https://styled-components.com/docs/api).
## Example
```tsx
import styled from '@modern-js/plugin-styled-components/styled';
const Button = styled.button`
background: palevioletred;
border-radius: 3px;
border: none;
color: white;
`;
const TomatoButton = styled(Button)`
background: tomato;
`;
function ButtonExample() {
return (
<>
<Button>I'm purple.</Button>
<br />
<TomatoButton>I'm red.</TomatoButton>
</>
);
}
```
---
url: /apis/app/runtime/utility/head.md
---
# Head
Used to add html elements (such as title, meta, script, etc.) to the `<head>` element, supports SSR.
## Usage
```tsx
import { Helmet } from '@modern-js/runtime/head';
export default () => <Helmet>...</Helmet>;
```
## Example
```tsx
import { Helmet } from '@modern-js/runtime/head';
function IndexPage() {
return (
<div>
<Helmet>
<title>My page title
Hello Modern.js!
);
}
export default IndexPage;
```
## More
For detail, see [react-helmet](https://github.com/nfl/react-helmet).
---
url: /apis/app/runtime/utility/loadable.md
---
# loadable
Used to create Loadable component
## Usage
```ts
import loadable from '@modern-js/runtime/loadable';
```
## Function Signature
```ts
type Options = {
resolveComponent?: (
module: Module,
props: Props,
) => React.ComponentType,
fallback?: JSX.Element;
ssr?: boolean;
}
function loadable(loadFn: Function, options?: Options) => LoadableComponent
```
### Input
#### loadFn
Used to load component.
```ts
import loadable from '@modern-js/runtime/loadable';
const OtherComponent = loadable(() => import('./OtherComponent'));
```
#### options.resolveComponent
Type: `(module: Module, props: Props) => React.ComponentType`
`module` is the component returned by `loadFn`, and `props` is the props parameter accepted by the component.
By default, we think that the default export of file is a react component, so we can render the component directly. But when the component is named export, or we need to dynamically determine which component needs to be rendered according to the `props`, we can use `resolveComponent`. Here is an example:
```ts title='component.js'
export const Apple = () => 'Apple!';
export const Orange = () => 'Orange!';
```
```ts title='loadable.js'
const LoadableApple = loadable(() => import('./components'), {
resolveComponent: components => components.Apple,
});
const LoadableOrange = loadable(() => import('./components'), {
resolveComponent: components => components.Orange,
});
const LoadableFruit = loadable(() => import('./components'), {
resolveComponent: (components, props) => components[props.fruit],
});
```
#### options.fallback
Whether to display fallback content during loading.
#### options.ssr
Whether to support SSR, the default value is `true`.
### Return Value
#### LoadableComponent
```ts
type LoadableComponent = React.ComponentType<
Props & { fallback?: JSX.Element }
> & {
preload(props?: Props): void;
load(props?: Props): Promise>;
};
```
---
url: /tutorials/examples/csr-auth.md
---
# Route Authorization
Modern.js defaults to the convention-based routing based on React Router v7. For more details, please refer to [Routing](/guides/basic-features/routes/routes.md#routing).
In a web application, if there are multiple routes, we may need to authorize access to some of them before accessing them. For example, in the following scenario:
- Access to the `/` route does not require authorization and can be accessed directly.
- Access to the `/protected` route requires authorization. If there is no authorization, it will automatically redirect to the `/login` route. After successful login, it returns to `/protected`.
---
url: /tutorials/foundations/introduction.md
---
# Modern.js Example Library
Welcome to Modern.js Example Library! Here you'll find practical code examples to help you get started with Modern.js quickly.
If you're new to Modern.js, we recommend reading the [Modern.js Introduction](/guides/get-started/introduction.md) first.
## 📚 Example List
- [Route Authorization](/tutorials/examples/csr-auth.md)
- ...
***
## 💡 Contribute Examples
If you have good examples to share, feel free to submit a PR on [GitHub](https://github.com/web-infra-dev/modern.js)!
---
url: /community/blog/2022-0708-updates.md
---
# 2022 年 7 \~ 8 月更新内容
> 发表于 2022.09.05
Modern.js 7 \~ 8 月的最新版本为 v1.17.0,本双月的主要更新有:
- **支持 React 18**:完成框架和插件对 React 18 的适配。
- **包版本统一**:Modern.js 所有组成包的版本号进行统一,提供升级命令。
- **Modern.js Module 支持 bundle 构建**:Modern.js Module 项目,支持对产物做 bundle 构建。
- **Reduck v1.1**:发布 Reduck v1.1,使用文档全面更新。
## 支持 React 18
Modern.js 框架和相关插件完成对 React 18 的适配。现在,只需要将项目中的 `react`、`react-dom` 两个包的版本,升级到最新的 React 18 大版本,就可以使用 React 18 的新功能。
注意,使用 `@modern-js/create` 命令默认创建的项目,安装的依赖 `react`、`react-dom` 的版本仍然为 17,如果希望使用 React 18,请手动升级这两个包的版本。
另外,SSR 流式渲染功能,目前尚在开发中,暂不支持。
## Modern.js 包版本统一
之前,组成 Modern.js 的各个包的版本号并不统一,Modern.js 自身的版本和这些包的版本缺少明确的对应关系。这不仅增加了我们的维护成本,而且给用户的使用和升级带来了很多困扰。
从 v1.15.0 版本开始,Modern.js 自身的版本号和所有组成包的版本号,进行了统一。例如,Modern.js v1.15.0,意味着所有组成包的版本号也是 v1.15.0。 每次发布新版本,Modern.js 所有包都会使用统一的版本号执行发布。 Github 上仓库的 [tag](https://github.com/modern-js-dev/modern.js/tags) 编号和 Modern.js 所有组成包的版本号是一一对应的。
我们提供了专门的升级工具: `@modern-js/upgrade`,可以自动升级 Modern.js 到当前的最新版本。使用方式为,在项目根路径下执行:
```bash
npx @modern-js/upgrade
```
## Modern.js Module 支持 bundle 构建
Modern.js Module 对底层实现进行重构,新增 [`output.buildConfig`](https://modernjs.dev/v1/docs/apis/module/config/output/build-config/) 配置,用于提供更加丰富的构建功能。
新的 Modern.js Module 项目,不仅支持对产物做 bundless 构建,也支持 bundle 构建。通过配置 `buildConfig` 下的 [`buildType`](https://modernjs.dev/v1/docs/apis/module/config/output/build-config/build-type) ,即可进行 bundle 构建:
```ts title="modern.config.ts"
import { defineConfig } from '@modern-js/module-tools';
export default defineConfig({
output: {
buildConfig: {
buildType: 'bundle', // 采用 bundle 构建
},
},
});
```
`buildConfig` 下还支持 [`bundleOptions`](https://modernjs.dev/v1/docs/apis/module/config/output/build-config/bundle-options) 配置,可以对构建行为做更多的自定义:如设置产物文件名、是否进行代码分片、设置代码压缩方式等。
## Reduck v1.1
Reduck 作为 Modern.js 的第一方状态管理方案,发布 v1.1 版本,增加对 React 18 Concurrent Rendering 的支持,并对开发体验和功能稳定性做了大量优化。
新增 API:
- [`useStore`](https://modernjs.dev/v1/docs/apis/app/runtime/model/use-store) :可以在组件内获取当前组件树共享的 Store,满足在组件外访问 Model 的场景需求。
- [`handleEffect`](https://modernjs.dev/v1/docs/apis/app/runtime/model/handle-effect):一个工具函数,可以极大地简化异步数据获取的逻辑代码。
- [`connect`](https://modernjs.dev/v1/docs/apis/app/runtime/model/connect): HOC 风格的 API,用于访问 Model。
开发体验方面,优化 Reduck 组成包的组织结构,减少用户侧依赖数量,现在只需要引入 `@modern-js-reduck/react` 一个包(Modern.js 中 Reduck 功能已内置,无需手动引入包);优化 API 的 TS 类型定义,改进类型信息的自动推导,整体达到 TS 支持开箱即用。
此外,对 Reduck [使用文档](https://modernjs.dev/v1/docs/guides/features/model/quick-start) 和 [API 文档](https://modernjs.dev/v1/docs/apis/app/runtime/model/model_) 做了全面更新,提供了更加丰富和详尽的内容。
## 其他更新
### 命令和配置
**新增命令**
- [`upgrade`](https://modernjs.dev/v1/docs/apis/app/commands/upgrade):自动升级 Modern.js 版本。功能同执行 `npx @modern-js/upgrade` 命令。
- [`inspect`](https://modernjs.dev/v1/docs/apis/app/commands/inspect):通过该命令可以输出当前项目使用的完整 rspack 配置。
- [`gen-release-note`](https://modernjs.dev/v1/docs/apis/module/commands/gen-release-note):自动根据当前仓库的 [changesets](https://github.com/changesets/changesets) 信息生成发布日志。此外,我们提供了[包版本管理专题文档](https://modernjs.dev/v1/docs/guides/features/changesets/introduce),方便大家更好的认识和使用 changesets 及相关功能。
**新增配置**
- [`source.preEntry`](https://modernjs.dev/v1/docs/apis/app/config/source/pre-entry):用于配置全局脚本,这段脚本会早于页面的代码执行。
### BFF
- 新增 [`afterLambdaRegisted`](https://modernjs.dev/v1/docs/apis/app/runtime/bff-server/after-lambda-registed) hook。用于使用 Express 框架时,在 BFF 函数注册路由之后执行。可以用来添加错误处理逻辑,新增路由等。
- 优化使用 Express 框架开发场景下的热更新性能。在比较大的项目中,BFF 函数更改,热更新也可以在几十毫秒内完成。
### SSR
- SSR 产物添加 Sourcemap,优化服务端调试 SSR 代码的体验。
### Web Server
- 支持按入口设置响应头,使用方式请参考[文档](https://modernjs.dev/v1/docs/apis/app/config/server/routes#自定义响应头)。
---
url: /community/blog/2022-0910-updates.md
---
# 2022 年 9 \~ 10 月更新内容
> 发表于 2022.11.01
Modern.js 9 \~ 10 月的最新版本为 v1.21.0,本双月的主要更新有:
- **支持 pnpm v7**:完成框架对 pnpm v7 的支持。
- **服务端增加 Typescript 作为 ts 文件编译器**。
## 支持 pnpm v7
Modern.js 框架完成了对 pnpm v7 的变更适配。
使用 `npx @modern-js/create@modern-1` 创建项目时会根据用户当前环境的 pnpm 版本进行安装依赖操作,并且在初始化项目中会在 `.npmrc` 中添加
`strict-peer-dependencies=false` 配置,避免安装时由于 `peerDependencies` 缺失导致安装依赖失败问题。
同时适配 `release`、`deploy` 命令对 pnpm v7 的支持。
pnpm v7 在命令传参方面姿势发生了变化,需注意:
在使用 pnpm 调用 `package.json` 中的命令时,如果需要传递参数至 pnpm,需要将参数放到命令前。
例如使用 pnpm `--filter` 参数执行 prepare 命令:
```bash
pnpm run --filter "./packages/**" prepare
```
如果需要传递参数至命令,需要将参数放到命令后。
例如,在如下 `package.json` 配置中:
```json
{
"scripts": {
"command": "modern command"
}
}
```
执行 command 命令时携带参数方式为:
```bash
pnpm run command --options
```
## 服务端增加 Typescript 作为 ts 文件编译器
在 Modernjs 之前的版本中,我们为了保证前后端编译器的统一,使用了 Babel 作为前后端默认的编译器,并保持相同的编译逻辑,但随着使用的项目增多,我们发现在一些服务端常用的语法场景下,Babel 编译 ts 有一些问题。
因此,我们将服务端编译 ts 的编译器由 Babel 改为了 Typescript,在别名解析逻辑上与 Babel 版本保持一致,同样支持使用 `tsconfig.json` 或者插件设置别名。
在执行 build 命令时,已默认使用 Typescript 编译,并默认开启了类型校验,很多项目在 9、10 双月已经在使用。
执行 dev 命令时,如果希望使用 Typescript 编译,需要安装 `ts-node`,`tsconfig-paths` 到 `devDependencies`,否则默认仍然使用 Babel 编译。在 Modern.js 2.0 中,我们将使用 ts-node 作为默认的编译器。
## 其他更新
### 配置更新
- 支持在 `tools.webpackChain` 中获取 `HtmlWebpackPlugin` 对象,使用方式请参考[文档](https://modernjs.dev/v1/docs/apis/app/config/tools/webpack-chain#htmlwebpackplugin)。
### 底层依赖升级
- husky 升级至 v8
使用 `npx @modern-js/create@modern-1` 创建项目时,husky 会默认安装 v8 版本,并移除 `package.json` 中 husky 的配置,使用 `.husky` 文件夹的形式管理 husky 配置。
在初次安装依赖时需要执行 `npx husky install` 进行 husky 初始化,默认项目会在 prepare 命令中完成,如果 husky 配置未生效,可通过手动执行完成 husky 配置。
## 功能预告
Modern.js 团队目前除了正常开发维护 Modern 1.0 外,正在全力打造 Modern.js 2.0。
Modern.js 2.0 将带来新的构建体系,除了支持使用稳定的 webpack 进行构建,还即将支持将底层构建工具切换为自研的 Rust bundler,提供更流畅的编译速度。
Modern.js 2.0 将基于 [React-Router v6](https://reactrouter.com) 推荐嵌套路由作为新的路由方式;将默认支持 React 18 并提供 Streaming SSR 的支持,使用户体验更加流畅。
---
url: /community/blog/overview.md
---
# Overview
Welcome to Modern.js blog!
You can find the latest update of Modern.js and our thought processes here. Occasionally we explain the infrastructure behind it.
## Announcing Modern.js v2: support Rspack
> Published on 16.03.2023
We are excited to announce the release of Modern.js v2!
Modern.js is a suite of infrastructure tools we built for web development inside Bytedance (we call ourself Web Infra). Since we open sourced this project a little more than a year ago, there were dozens of contributors helped us on development; we aggregated more than 2,000 pull requests and Modern.js started to support build tool like Rspack, features like nested routes, Streaming SSR and there are more to come!
We are extremely proud of what we have achieved so far, you can also refer to [this article(English version under construction)](/community/blog/v2-release-note.md)👈🏻 to see what has changed over the last year in Modern.js.
## What is Streaming SSR in React 18
> Published on 16.12.2022
Since React 18, React supports a new type of SSR (streaming SSR) and it brought two advantages over the React tool chain:
- Streaming HTML: Server will be able to transmit HTML to browser parts by parts, rather than waiting until the whole page being rendered. Client side will render the page faster thus dramatically increase performance benchmark scores like TTFB(Time to First Byte), FCP(First Contentful Paint) and more.
- Selective Hydration: On the client side, browser can hydrate only the HTML elements that has already been rendered, without needing to wait until the whole page finish rendering and all the javascript bundle being loaded.
To understand its design further, check out this [Github Discussion](https://github.com/reactwg/react-18/discussions/37) by Dan Abramov or watch this [talk](https://www.youtube.com/watch?v=pj5N-Khihgc).
Or read more from us at [here(Further content in English under construction)](https://mp.weixin.qq.com/s/w4FS5sBcHqRl-Saqi19Y6g).
## Introducing React Server Component in Modern.js
> Published on 01.12.2022
To explain the experimental React Server Component, the one-liner given by the React Team was: **zero-bundle-size React Server Components**.
We agreed with the React team that this is where the whole direction will move forward in React. Open source maintainers and contributors inside the React community are also actively building an eco-system around it.
Read more from React team at [here](https://react.dev/blog/2023/03/22/react-labs-what-we-have-been-working-on-march-2023#react-server-components) or more from us at [here](https://mp.weixin.qq.com/s/B-XLvW00vl5RE1Ur3EW4ow)
## Updates during Sept - Oct in 2022
> Published on 01.11.2022
We updated Modern.js to v1.21.0 during Sept - Oct. Major upgrade includes:
- **support pnpm v7**
- **added typescript compiler option on server side**
[Read more (English version under construction)](/community/blog/2022-0910-updates.md)
## Updates during July - August in 2022
> Published on 2022.09.05
Modern.js upgraded to v1.17.0 during July to August in 2022. Major updates include:
- **Support React 18**
- **Unifying packages**: All the Modern.js package version numbers are unified, and added version update command line in CLI.
- **Support npm module bundle building**: We support bundling npm module output.
- **Reduck v1.1**: We released [Reduck v1.1](https://github.com/web-infra-dev/reduck) and updated all our documentations.
[Read more (English version under construction)](/community/blog/2022-0708-updates.md)
---
url: /community/blog/v2-release-note.md
---
# Modern.js v2 发布:支持 Rspack 构建
> 发表于 2023.03.16
大家好,很高兴地向大家宣布,Modern.js v2 版本已经正式发布了!
**Modern.js 是字节跳动 Web Infra 团队开源的一套 Web 工程体系**。在开源以来的一年多时间里,Modern.js 保持稳定的迭代节奏,数十位贡献者参与了开发,累计提交 2000+ 个 Pull Request,并支持了 Rspack 构建、嵌套路由、流式渲染等新特性。
在这篇文章里,我们会和大家一起聊一聊 Modern.js 在过去一年多时间里的变化。

Modern.js v2 官网
## 背景
首先介绍一下我们为什么要做 Modern.js v2 版本,主要有以下几个原因:
1. **下沉更多能力**:在字节跳动内部,Web Infra 团队整合了多个 Web 开发框架和解决方案,收敛技术栈,将通用能力下沉到底层的 Modern.js 工程体系中。
2. **拥抱 Rust 生态**:随着社区中更多的前端工具链基于 Rust 重写,Modern.js 正在积极拥抱这一变化,将底层工具逐步替换为 Rust 实现。
3. **底层依赖升级**:为了对 Modern.js 的底层依赖进行大版本升级,包括 React v18、React Router v6 等,从而引入流式渲染、嵌套路由等新能力。
4. **定位调整**:从 2021 年开源以来,社区中的伙伴们给予我们很多有价值的反馈,这帮助我们对 Modern.js 的定位和架构进行更多地思考(详见下文)。
以上因素促使我们完成了 Modern.js v2 版本。
## 定位
在 v2 版本中,我们重新明确了 Modern.js 的定位:**Modern.js 是字节跳动 Web 工程体系的开源版本,它提供多个解决方案,来帮助开发者解决不同研发场景下的问题。**
目前我们开源了三个解决方案,分别面向 Web 应用开发场景、npm 包开发场景和文档站开发场景:

Modern.js 解决方案
作为 Modern.js 工程体系的一部分,以上每个解决方案都可以被单独使用,并且各自部署了独立的文档站点。开发者可以按需选择其中的一个或多个解决方案来使用。
在代码层面,这三个解决方案按照统一的研发规范迭代,并复用同一套插件机制,因此,它们提供的研发体验也较为一致。大家如果对内部实现感兴趣,可以在 GitHub 上的 [Modern.js 仓库](https://github.com/web-infra-dev/modern.js) 中找到它们的源代码。
下面让我们来了解一下这三个解决方案提供的最新能力。
## Modern.js 框架
**Modern.js 框架是一个基于 React 的渐进式 Web 开发框架**。在字节跳动内部,我们将 Modern.js 封装为上层框架,并支撑了数千个 Web 应用的研发。
> 由于 Modern.js 框架的使用最为广泛,在下文中,我们会省略「框架」,直接称其为 Modern.js。
在 Modern.js 落地的过程中,我们收到很多业务同学提出的诉求,包括构建性能、框架的灵活性和可扩展性、页面加载性能等方面,相信社区中的开发者也会面临相似的问题。
为了更好地满足这些诉求,Modern.js v2 提供了以下特性:
- 通过引入 Rust 构建工具 —— Rspack 来提升构建性能。
- 通过渐进式设计来保证框架的灵活性。
- 通过插件系统来提供更好的可扩展性。
- 通过嵌套路由来改善开发效率、优化加载性能。
### Rspack 构建模式
**Modern.js v2 提供开箱即用的双构建工具支持**,开发者可以在成熟的 Webpack 和更快的 Rspack 之间进行切换。大家对 Rspack 可能还不太了解,Rspack 是由字节跳动开源的 Web 构建工具,基于 Rust 语言开发,具有高性能、可定制、兼容 Webpack 生态等特性。

Rspack Logo
相较于 webpack,Rspack 的构建性能有明显提升,除了 Rust 带来的语言优势,这也来自于它的并行架构和增量编译等特性。经过 benchmark 验证,**Rspack 可以给 Modern.js 项目带来 5 ~ 10 倍编译性能的提升。**
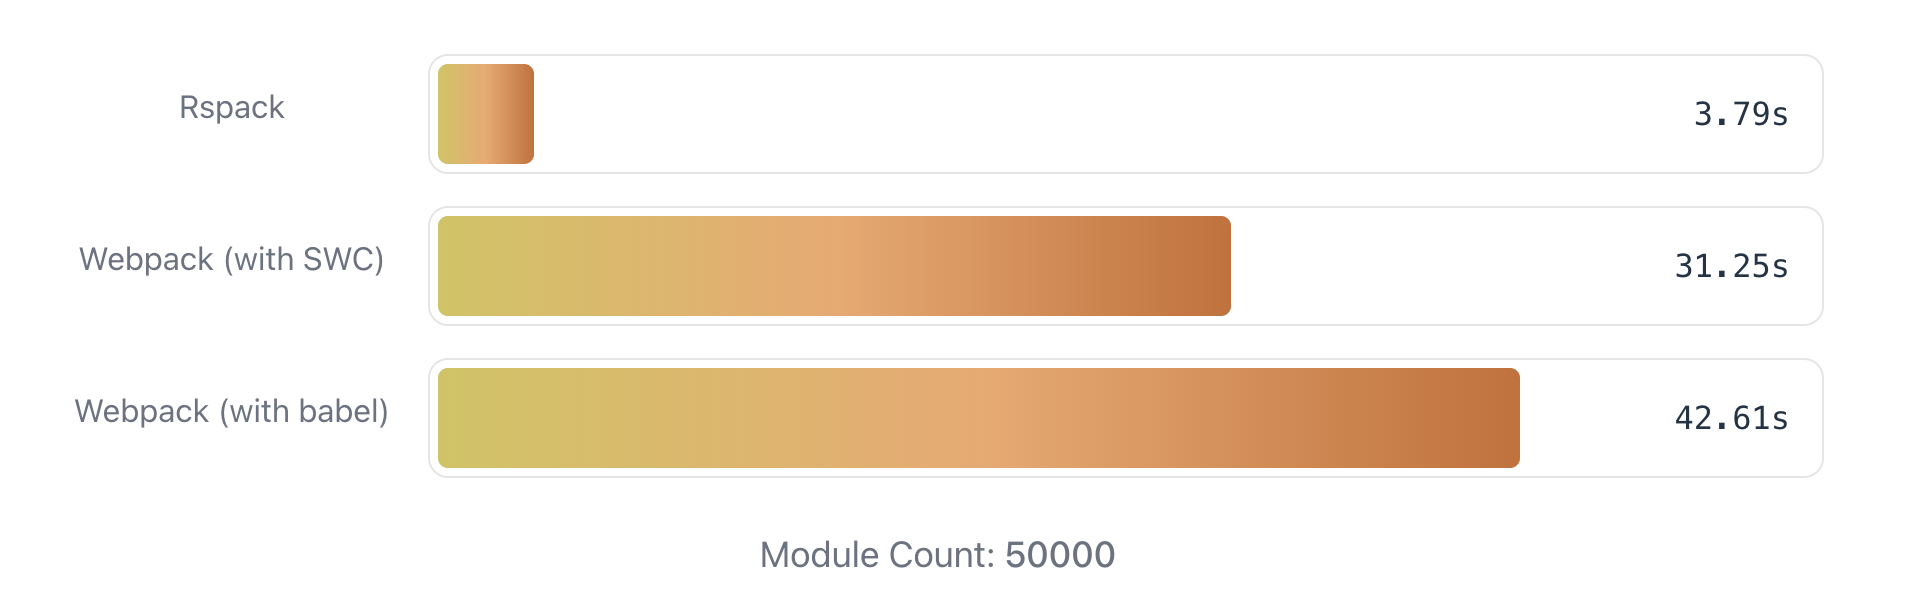
Rspack Benchmark
**Modern.js 已支持在 Rspack 模式下使用框架的 70% 功能和配置项**,包括服务器端渲染(SSR),静态站点生成(SSG)、嵌套路由、CSS Modules 和 Tailwind CSS 等功能。除了功能,Modern.js 在 Rspack 模式下的配置项也与 Webpack 模式基本一致,在我们的实际验证中,一个小型项目花几分钟就可以平滑切换到 Rspack 模式。
目前,Rspack 项目以及 Modern.js 的 Rspack 模式仍在快速迭代中。在未来几个月内,我们将逐步对齐 Webpack 模式和 Rspack 模式的绝大多数功能和配置,使更多项目能从 Webpack 平滑地过渡到 Rspack。
> Rspack 已于 2023.03.10 号正式开源,你也可以在非 Modern.js 的项目中直接使用 Rspack 进行构建。如果你对 Rspack 感兴趣,请阅读 [「Rspack 正式发布了」](https://rspack.rs/zh/blog/announcement.html)来了解更多。
### 渐进式设计
大家对 Modern.js 框架的第一印象可能是「一个大而全的框架」,但事实上,为了避免变得臃肿,**Modern.js 采取了渐进式设计**,将所有功能建立在灵活的插件系统之上,因此具备按需启用和可插拔的能力。
Modern.js 期望能支持不同规模的项目研发,考虑到中大型项目和小型项目对功能的诉求存在差异,**Modern.js 的大多数功能都是按需启用的**。在创建项目时,Modern.js 默认只安装核心模块,使 npm 依赖保持轻量;当需要用到额外功能时,你可以通过 modern new 命令一键开启,并自动安装相关依赖。
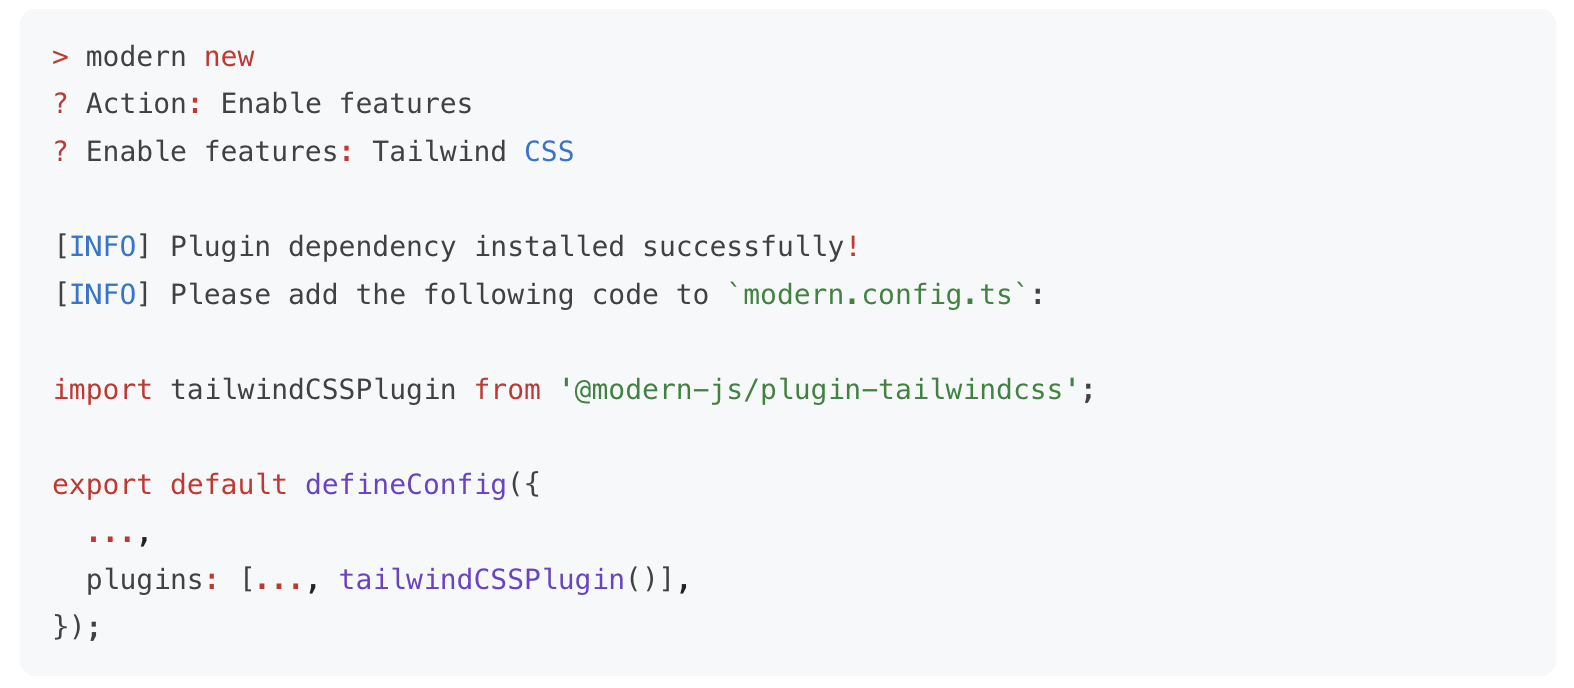
modern new 命令
比如:
- 对于基础的开发场景,项目中只需安装 Modern.js 的 CLI 工具 `@modern-js/app-tools`,即具备了开发调试、生产构建的能力。
- 当你需要在应用中增加一些 BFF 接口时,可以执行 modern new 命令来启用 BFF 功能。启用后,Modern.js 会自动安装所需的 BFF 插件,以及某个 Node.js 框架对应的插件(如 Koa / Express):

目前,你可以通过 `modern new` 命令来按需开启以下功能,未来我们也会将更多功能加入到 `new` 命令中,使其能够被便捷地集成。
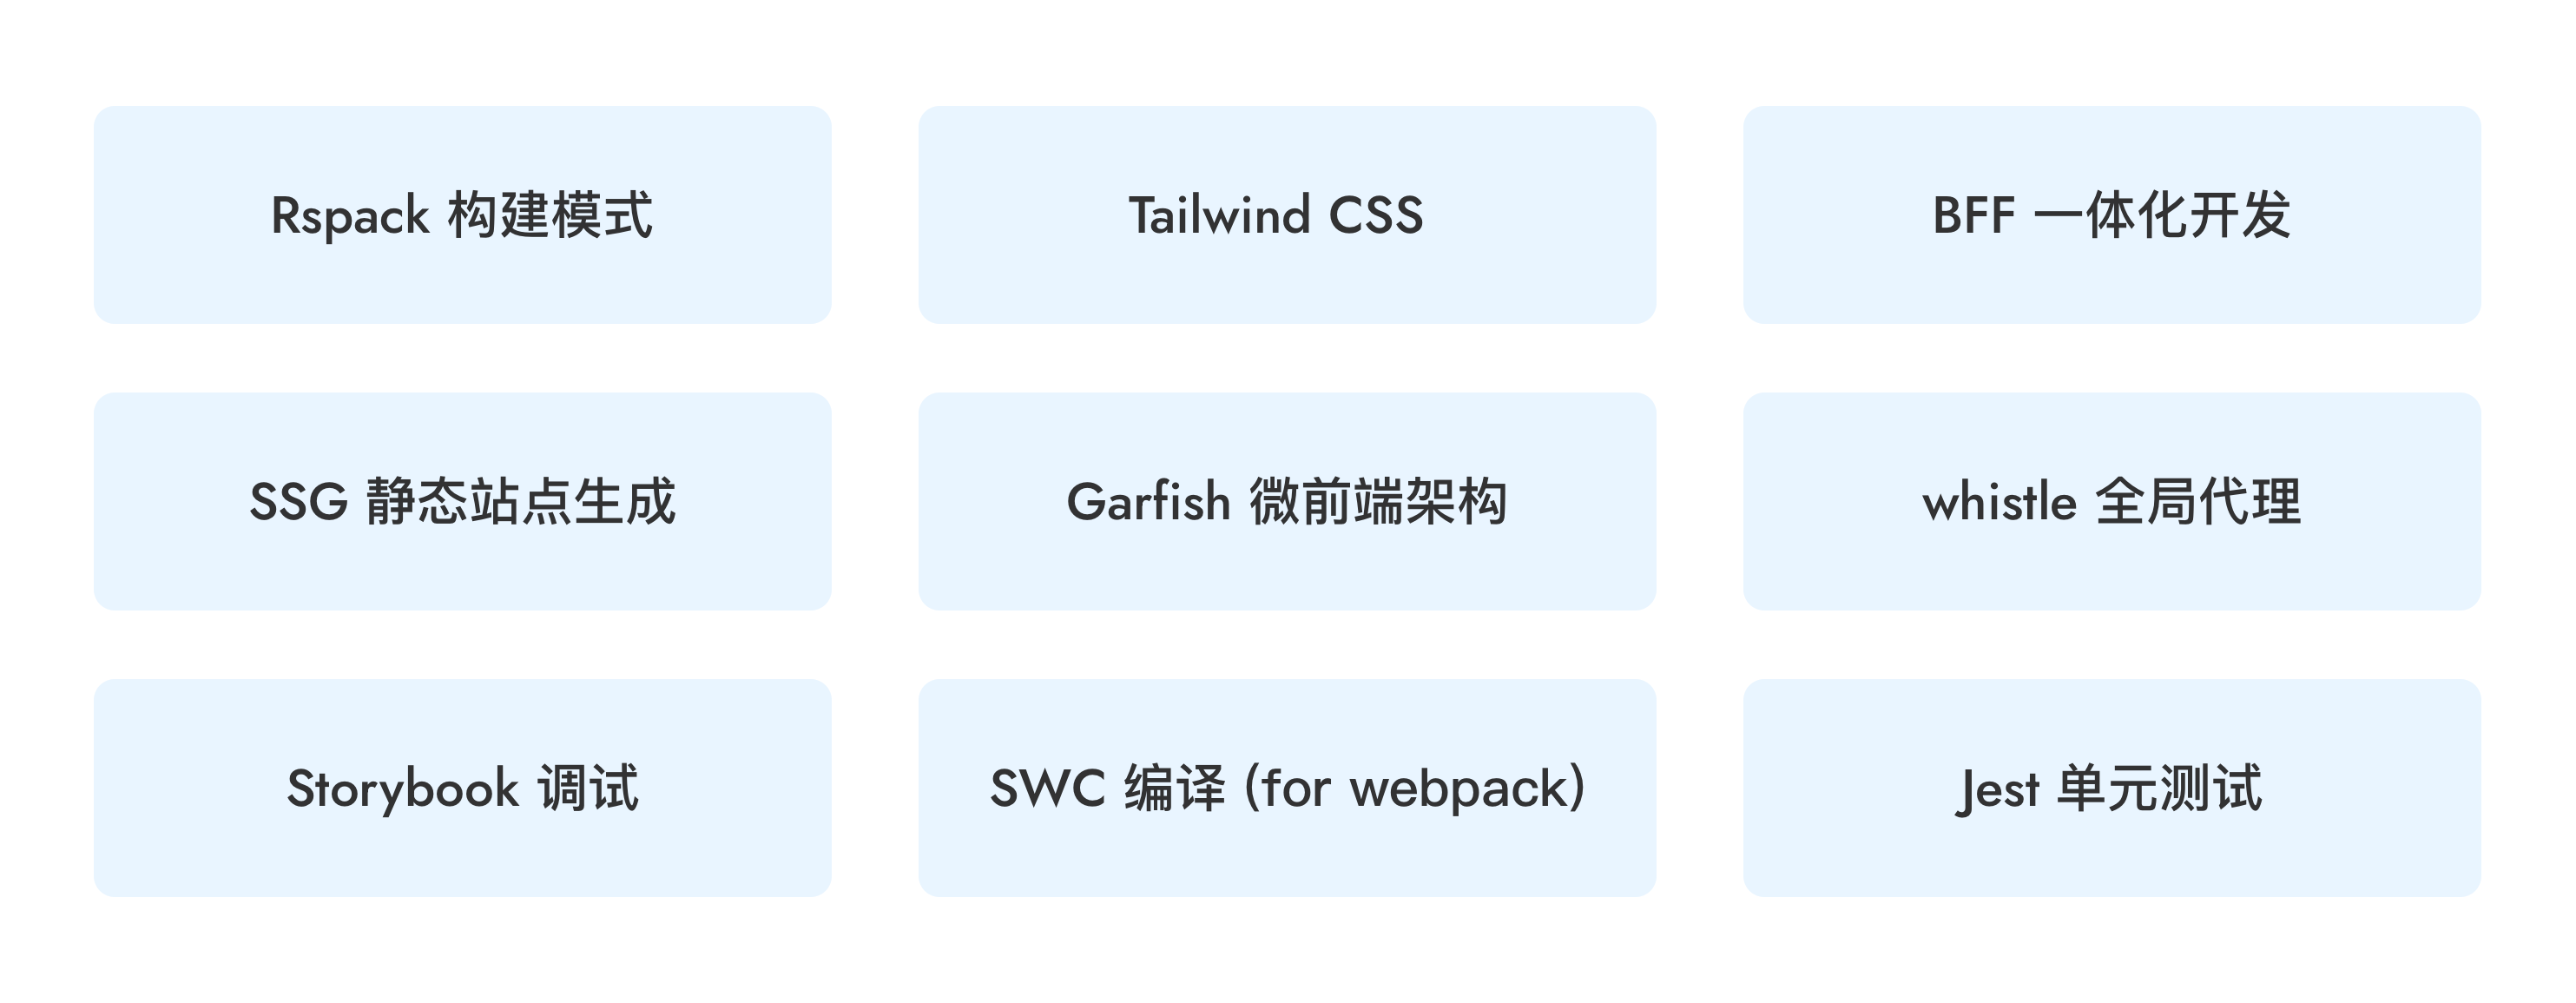
### 插件系统
开发者在实际项目中使用 Web 研发框架时,除了使用开箱即用的能力,也会有很强的定制化诉求。因此,Modern.js 设计了一套灵活的插件系统来满足这一点。
Modern.js 可以划分为三个核心部分:**CLI 工具、服务端和运行时**。其中,CLI 工具负责提供 CLI 命令和打包构建能力;服务端提供 SSR、BFF 等能力;运行时提供状态管理、路由等能力。

Modern.js 核心模块
我们为这三者分别设计了插件:
- **CLI 插件**:对应 CLI 工具,负责控制 CLI 命令、打包构建流程。
- **Server 插件**:对应服务端,用于处理服务端的生命周期以及客户端请求。
- **Runtime 插件**:对应运行时,用于处理 React 组件渲染逻辑。
这三种插件使用统一的 Hook 模型,并提供丰富的插件 API。比如,你可以使用插件做到:
- 注册自定义的 CLI 命令
- 修改 Rspack、PostCSS、Less、Sass 等基础工具的配置
- 修改运行时需要渲染的 React 组件
- 自定义控制台日志
- 自定义 Node.js 服务器框架
- ...
在字节跳动内部,我们借助这些插件 API,结合公司内的基建和平台,封装出内部的企业级框架。如果你需要对 Modern.js 框架进行深度定制,也可以借助这些插件 API 来完成。
> 如果你对 Modern.js 的插件系统感兴趣,请阅读 [「Modern.js - 自定义插件」](https://modernjs.dev/plugin/plugin-system.html)文档。
### 嵌套路由
**Modern.js v2 基于 React Router v6 提供了新的路由方式 —— 嵌套路由(Nested Routes)。**
如果大家了解过 Remix 或 Next.js 13,应该对嵌套路由不陌生了。嵌套路由与 Modern.js v1 提供的约定式路由相似,也是一种基于文件系统的路由。
在 Modern.js v2 中,我们约定在 `src/routes` 目录下的文件,在应用启动时会自动生成对应的路由结构,页面的路由与文件结构是相呼应的,并且可以为资源加载带来一些性能优化。
Modern.js 的嵌套路由包含以下功能:
- **资源加载**:基于路由结构,并行加载多级路由资源,子组件资源加载不再受父组件渲染影响。并且将路由资源进一步细分,保证路由跳转时的最小资源加载。
- **共享布局**:在路由之间轻松共享 UI,同时保持状态,并避免多余的重新渲染。
- **数据获取**:基于路由结构完成多级路由的数据并行获取。
在 Modern.js v2 中,只需要配置 `runtime.router`,即可开启嵌套路由:
> 如果你对嵌套路由的细节感兴趣,请阅读[「Modern.js - 路由」](https://modernjs.dev/guides/basic-features/routes.html#%E8%B7%AF%E7%94%B1)文档。
### 流式渲染
**Modern.js v2 基于 React v18 的全新 API 支持了流式渲染(Streaming SSR)。**
如果大家关注去年 React v18 的版本更新,可能会注意到它提供了新的 Server Side APIs,并对 Suspense 做了完整支持。在 Modern.js v2 中,我们通过 React Router v6 暴露的能力,在框架层面支持了流式渲染。
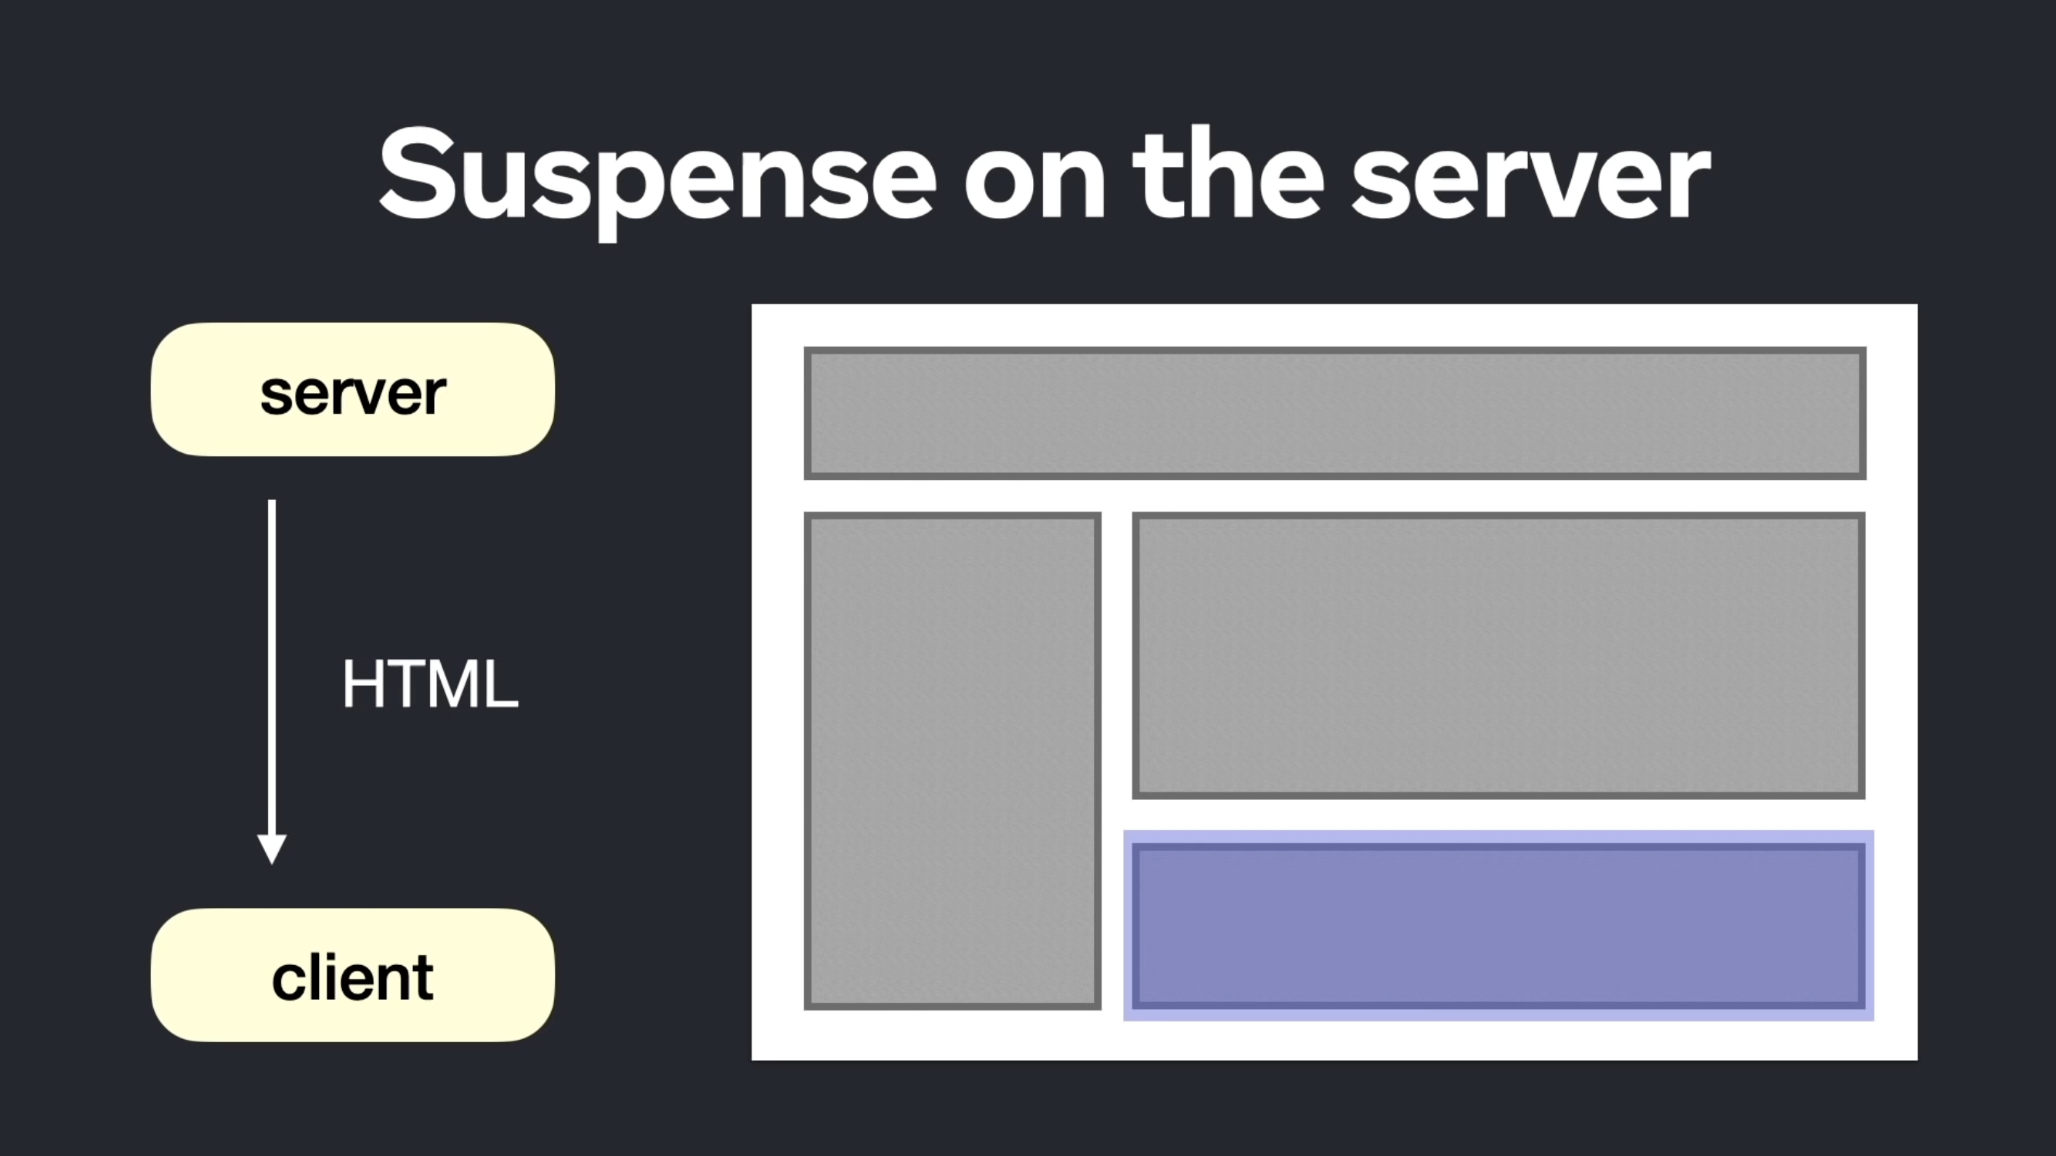
流式渲染利用 HTTP 的能力,允许将页面的 HTML 分割成较小的块,并逐步将这些块从服务器发送到客户端。页面无需等待所有数据加载完成,即可呈现完整用户界面,因此与数据无关的局部内容能够更早地显示出来。
在 Modern.js v2 中,只需要配置 `server.ssr.mode`,即可开启流式渲染:

> 如果你想在 Modern.js 中使用 SSR 和流式渲染,请阅读[「 Modern.js 服务端渲染(SSR)」](https://modernjs.dev/guides/advanced-features/ssr.html)文档。
## Modern.js Module
Modern.js Module 是我们针对 npm 包开发场景提供的解决方案,它为开发者提供了专业的 npm 包开发工具,能够更轻松地构建、调试和发布一个 npm 包。

Modern.js Module 首页
Modern.js Module 的核心能力包括:
- **构建能力**:基于 esbuild 实现的构建工具,提供类型生成能力,能够高度定制构建产物。
- **调试能力**:基于 Storybook 调试项目,可以测试代码功能、验证构建产物可用性。
- **版本管理能力**:基于 Changeset 提供版本管理命令,涵盖从开发到发布的过程。
- **扩展能力**:提供包含丰富 Hooks 的插件机制,支持扩展调试能力,或对流程进行自定义。
### 基于 esbuild 构建
在 v2 版本中,我们以 esbuild 为核心,扩展其插件机制,并结合 SWC 实现了一个通用的模块构建工具,它的特性包括:
- **支持 bundle 和 bundleless 两种模式的构建**。你可以选择构建产物的形式 —— 是打包处理后的 bundle 产物,还是直接通过 transform 处理的 bundleless 产物。
- **相较于 esbuild,提供更丰富的构建能力和插件 Hook**。例如,在样式方面,默认支持 Less、Sass、PostCSS 和 CSS Modules,并支持静态资源处理、SVGR 等常用能力。这些能力在 bundle 和 bundleless 模式下均可使用。
在生成 TS 类型文件上,Modern.js Module v2 也支持新的方式:
- **类型文件的 bundle 处理**:对生成的类型文件进行打包处理,生成一个单独的类型文件。
- **类型文件里的别名处理**:对生成的类型文件里包含的别名路径进行转换。
总的来说,相较于 v1 版本,Modern.js Module v2 提供了更完整的构建能力,同时构建效率也有明显提升。
> 如果你对 Modern.js Module 感兴趣,请移步[「Modern.js Module 文档」](https://modernjs.dev/module-tools)来了解更多。
## Rspress
Rspress 是一个面向文档站场景的框架,它的目标是给开发者提供一个简单、高效、可扩展的文档站解决方案。
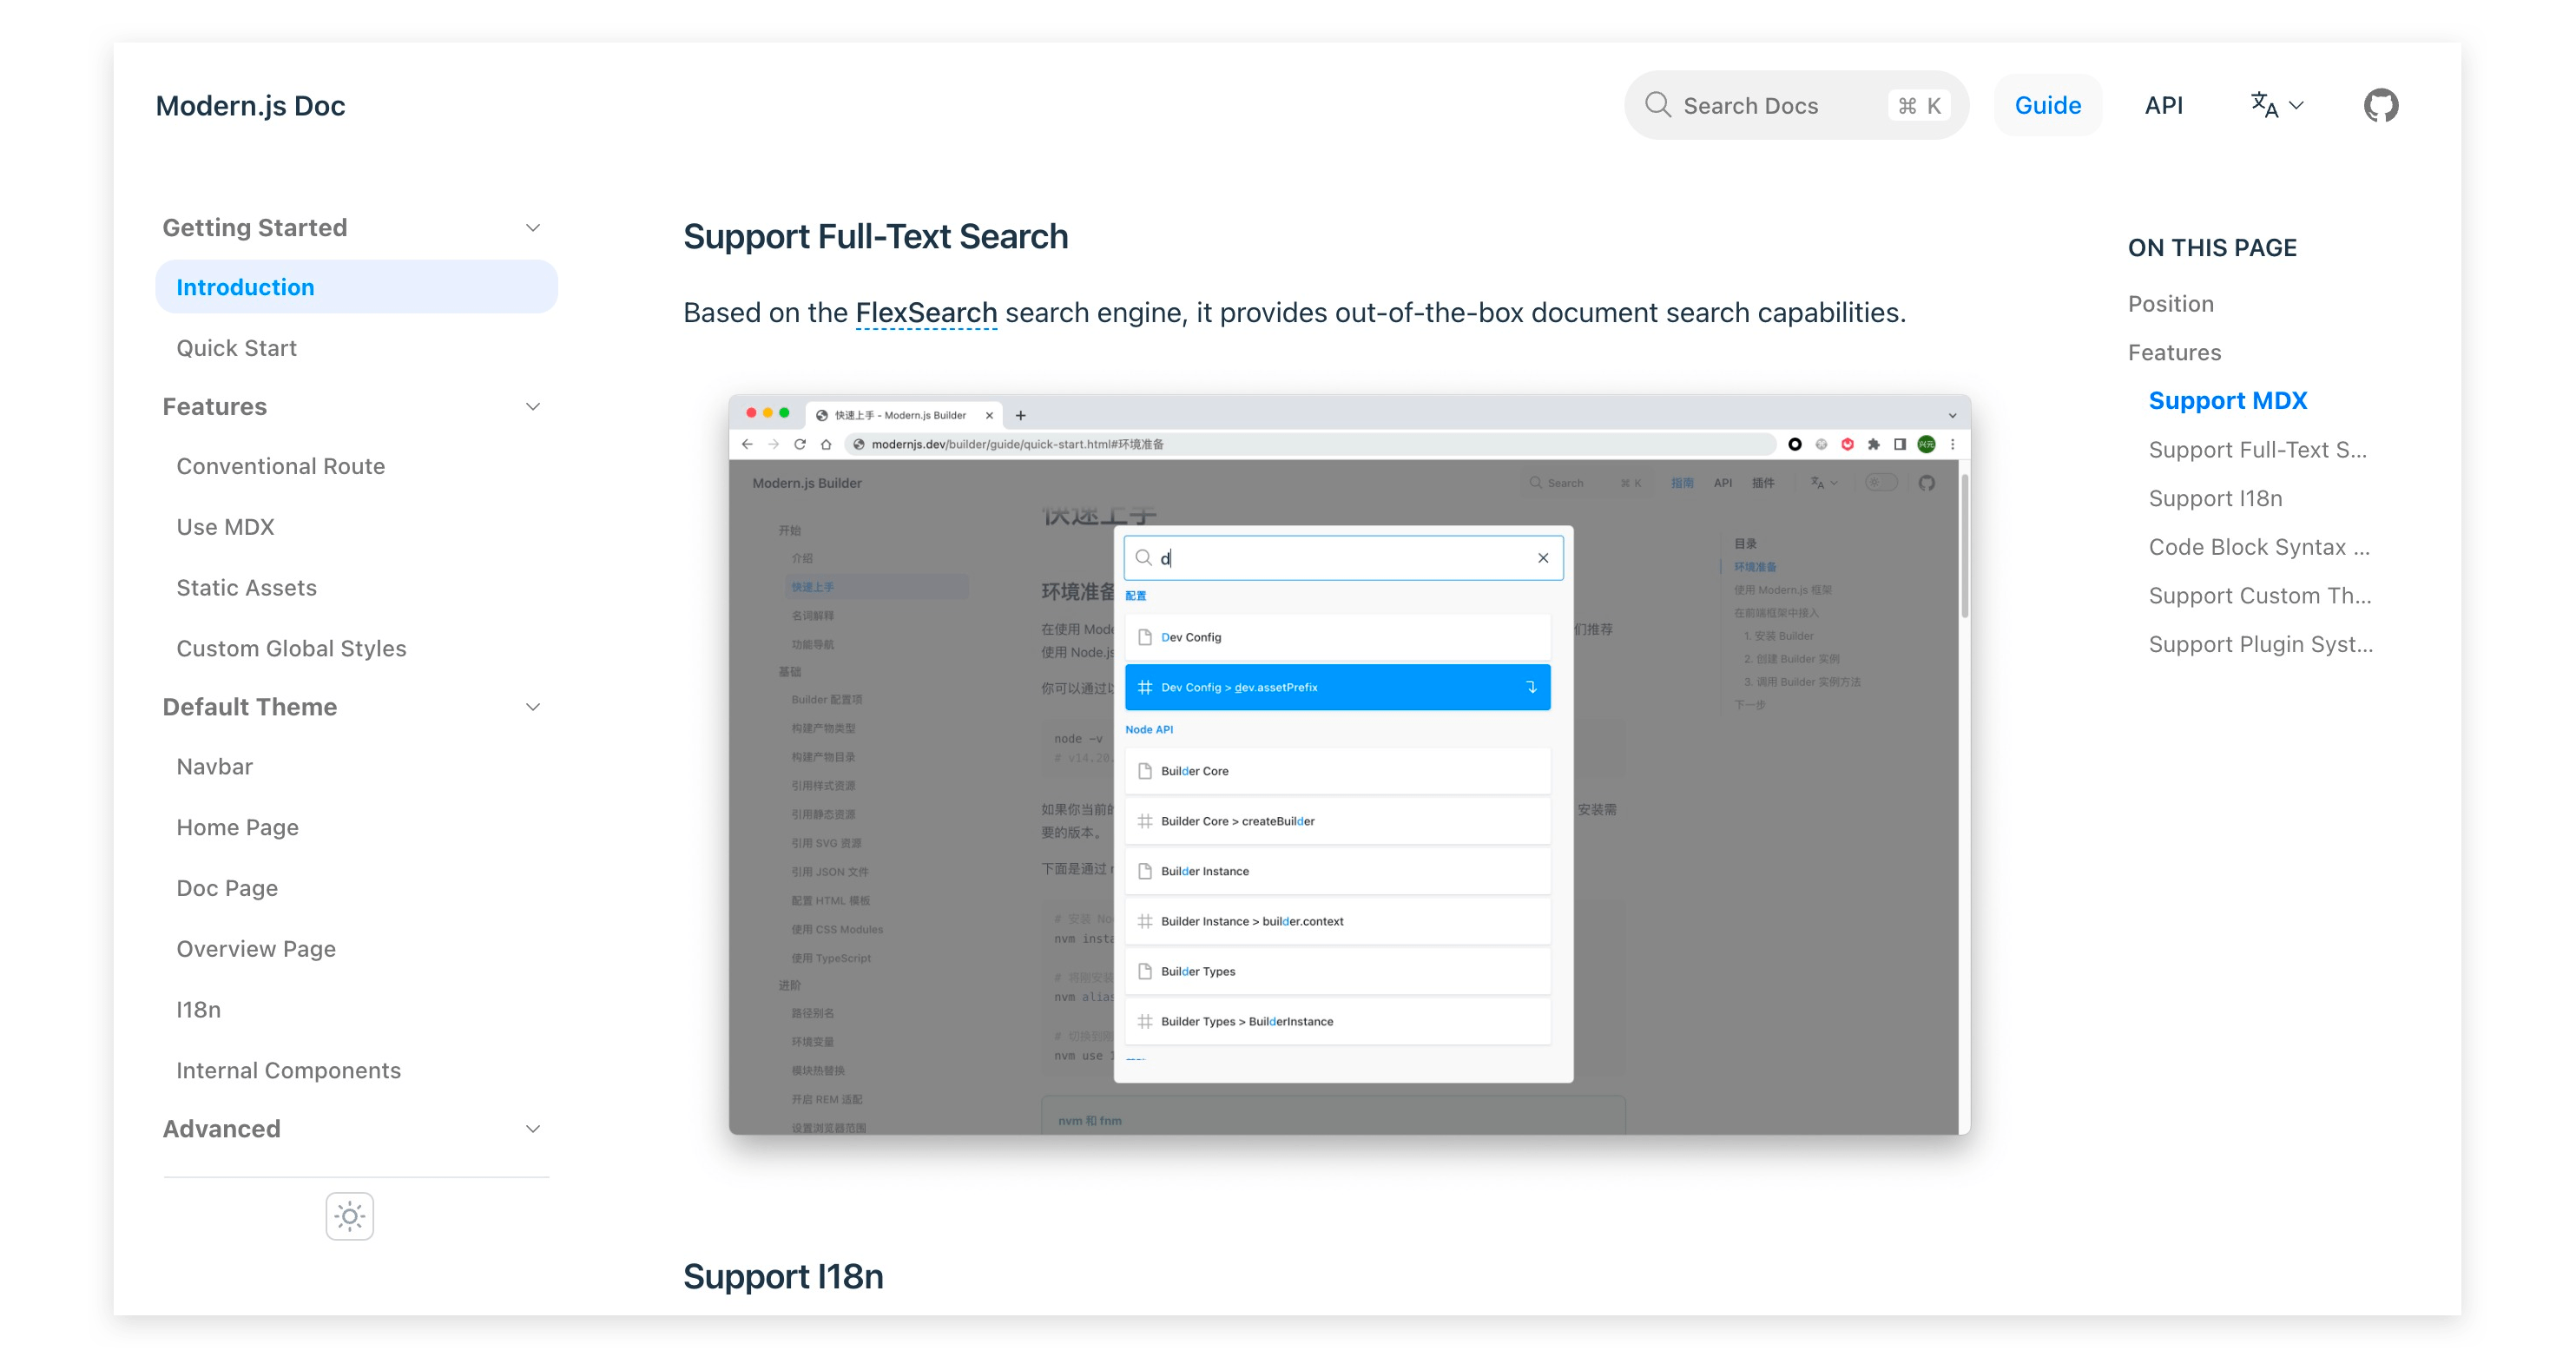
Rspress 官网介绍页
目前,Rspress 包含如下能力:
- **基于 Rspack 构建**:项目构建和 HMR 速度飞快,提供愉悦的开发和生产部署体验。
- **支持 MDX 语法**:在普通 Markdown 语法的基础上可以嵌入 React 组件和 JSX 语法。
- **全文搜索**:内置开箱即用的全文搜索能力,基于 FlexSearch 实现。
- **支持国际化**:提供多语言文档切换功能,且支持多语言内容搜索。
- **自定义主题**:内置一套默认主题,你可以基于这套主题进行扩展,也可以从零定制一套自定义主题。
- **插件机制**:提供丰富的插件钩子能力,让你能够充分自定义扩展框架功能。
我们做 Rspress 的初心,是为了解决我们团队内的文档站搭建需求。随着 Rspress 的功能逐渐完整,我们也将它开放给社区使用,使它能发挥更大的价值。
目前,Rspress 仍处于 beta 测试状态,相关源代码已经开放在 [Rspress 仓库](https://github.com/web-infra-dev/rspress) 中,并提供了基础的 [使用文档](https://rspress.rs/)。在未来,我们将继续投入,使之成为一个完成度更高的文档解决方案。
## 致谢
Modern.js 中的部分代码实现参考了社区中的开源项目,我们对这些项目表示衷心的感谢:
- `@modern-js/bundle-require`: 修改自 [bundle-require](https://github.com/egoist/bundle-require)。
- `@modern-js/plugin`: hook API 的实现参考了 [farrow-pipeline](https://github.com/farrow-js/farrow/tree/master/packages/farrow-pipeline)。
- `@modern-js/plugin-data-loader`: 部分实现参考了 [remix](https://github.com/remix-run/remix)。
## 最后
现阶段 Modern.js 仍是一个很年轻的开源项目,在未来,我们将继续拥抱长期主义,持续打磨功能和文档,并以更透明的方式与社区共同协作。
如果你有兴趣尝试一下 Modern.js,欢迎试用并留下你的反馈意见\~
- 官网:[modernjs.dev](https://modernjs.dev)
- GitHub 仓库:[github.com/web-infra-dev/modern.js](https://github.com/web-infra-dev/modern.js)
---
url: /community/blog/v3-release-note.md
---
# Modern.js v3 Release: Focused on web framework, embracing ecosystem development
> Published on 2025.02.06
## Introduction
It has been three years since the [Modern.js 2.0 release](/community/blog/v2-release-note.md). We sincerely thank the community developers for using and trusting Modern.js. Modern.js has maintained a steady iteration pace, with over 100 versions released.
In Bytedance, the web development framework based on Modern.js has become mainstream. The proportion of active web projects in the company has grown from 43% at the beginning of 2025 to nearly 70% now.
Over these three years, we have continuously added new features, performed code refactoring and optimizations, and received extensive community feedback. These experiences have become important references for the improvements in version 3.0. After careful consideration, we decided to release Modern.js 3.0, delivering a comprehensive upgrade to the framework.
## The Evolution from Modern.js 2.0 to 3.0
From Modern.js 2.0 to 3.0, there are two core transformations:
**More Focused: Dedicated to Being a Web Framework**
- Modern.js 2.0: Included Modern.js App, Modern.js Module, and Modern.js Doc
- Modern.js 3.0: Represents only Modern.js App. Modern.js Module and Modern.js Doc have been incubated into [Rslib](https://rslib.rs) and [Rspress](https://rspress.dev)
**More Open: Actively Embracing Community Tools**
- Modern.js 2.0: Built-in various tools with framework-specific API designs
- Modern.js 3.0: Strengthened plugin system, improved integration capabilities, and recommends high-quality community solutions
***
## What's New in Modern.js 3.0
### React Server Component
:::tip TL;DR
Modern.js 3.0 integrates React Server Component, supporting both CSR and SSR projects with progressive migration.
:::
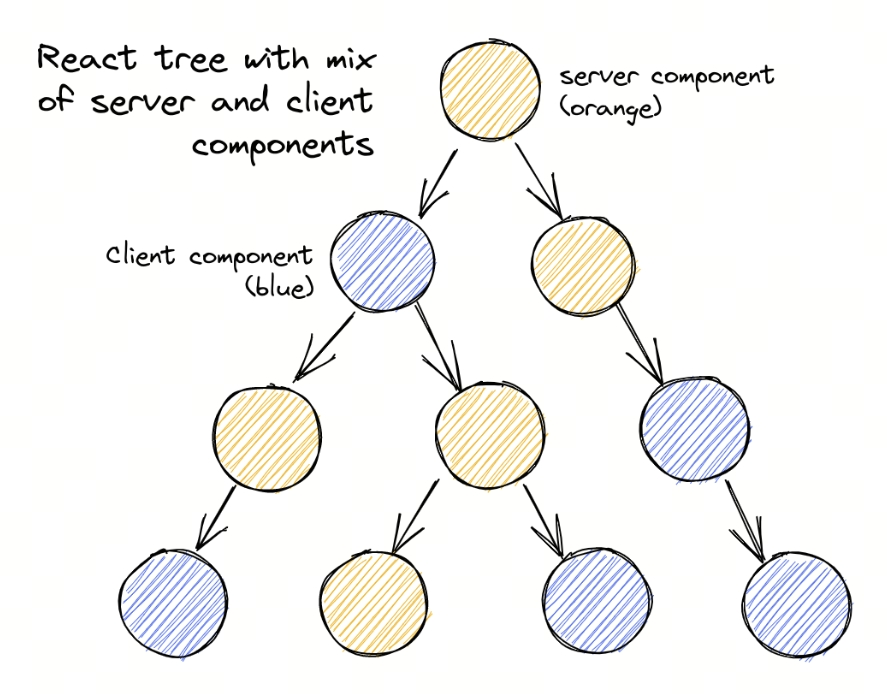
#### What is React Server Component
React Server Components (RSC) are a new type of component that allows **component logic to execute entirely on the server**, streaming the rendered UI directly to the client. Compared to traditional client components, Server Components offer the following benefits:
| Feature | Description |
| ----------------------- | ----------------------------------------------------------------------------------------------------------------------------------------------------------------------------- |
| Zero Client Bundle Size | Component code is not included in the client JS bundle — it only executes on the server, speeding up initial page load and rendering |
| Higher Cohesion | Components can directly access databases, call internal APIs, and read local files, improving development efficiency |
| Progressive Enhancement | Can be seamlessly mixed with client components, selectively offloading interactive logic to the client while maintaining high performance and supporting complex interactions |
It's important to clarify that RSC and SSR are **fundamentally different concepts**:
- **RSC**: Describes the **component type** — where the component executes (server vs. client)
- **SSR**: Describes the **rendering mode** — where the HTML is generated (server vs. client)
The two can be used together: Server Components can be used in SSR projects as well as CSR projects. In Modern.js 3.0, we support both modes, allowing developers to choose based on their needs.

#### Out of the Box
In Modern.js 3.0, simply enable RSC in the configuration:
```ts title="modern.config.ts"
export default defineConfig({
server: {
rsc: true,
}
});
```
:::info
Once enabled, all route components will default to Server Components. Some components in your project may not be able to run on the server — you can add the `'use client'` directive to those components to preserve their original behavior, and then migrate gradually.
:::
#### RSC Features in Modern.js 3.0
Modern.js has always chosen React Router as its routing solution. Last year, React Router v7 [announced support](https://remix.run/blog/rsc-preview) for React Server Components, which provided the foundation for implementing RSC in SPA applications for Modern.js.
Compared to other frameworks in the community, Modern.js has made several optimizations for RSC:
- Uses Rspack's latest RSC plugin for building, significantly improving RSC project build speed and further optimizing bundle size.
- Unlike mainstream community frameworks that only support RSC + SSR, Modern.js 3.0's RSC also supports CSR projects.
- During route navigation, the framework automatically merges multiple Data Loader and Server Component requests into a single request with streaming responses, improving page performance.
- In nested routing scenarios, the route component type is not affected by the parent route component type — developers can adopt Server Components starting from any route level.
#### Progressive Migration
With flexible component boundary control, Modern.js 3.0 provides a progressive migration path. Modern.js 3.0 allows Server Component migration at the **route component level**, without needing to migrate the entire component tree.
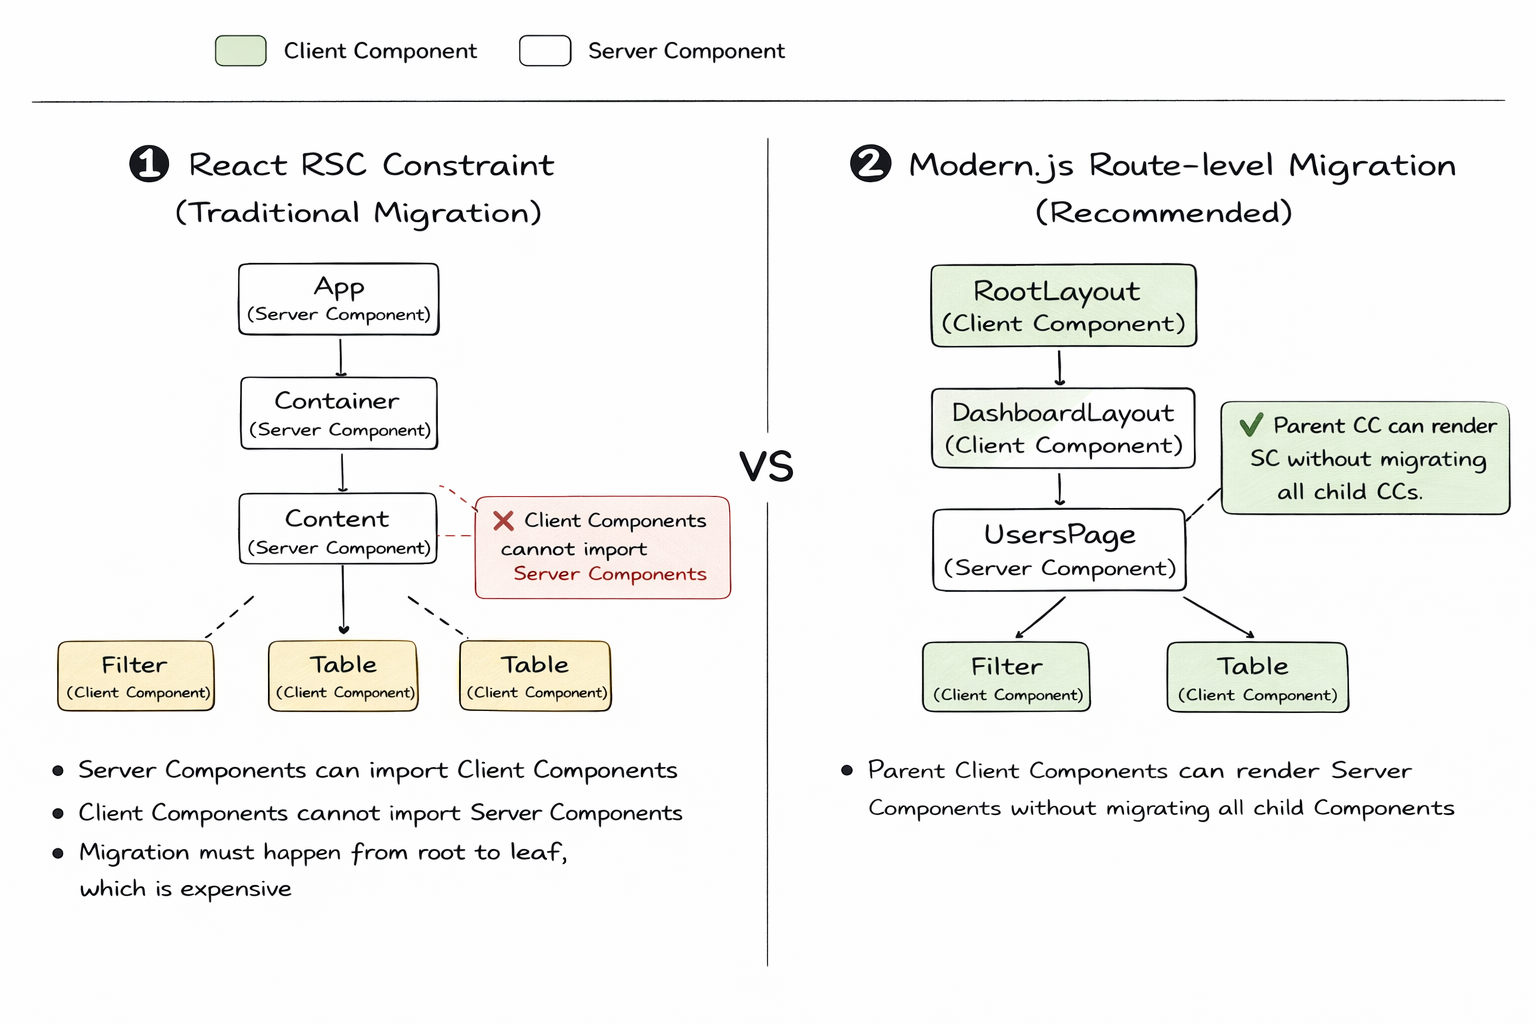
:::info
For more details on React Server Component, see: [React Server Component](/guides/basic-features/render/rsc.md)
:::
***
### Embracing Rspack
:::tip TL;DR
Modern.js 3.0 removes webpack support, fully embraces Rspack, and upgrades to the latest Rspack & Rsbuild 2.0.
:::
In 2023, we open-sourced Rspack and added support for Rspack as an optional bundler in Modern.js. Internally at ByteDance, over 60% of Modern.js projects have already switched to Rspack for building.
After more than two years of development, Rspack has surpassed 10 million monthly downloads in the community, becoming a widely adopted bundler in the industry. Meanwhile, Modern.js's Rspack build mode has also been continuously improved.

In Modern.js 3.0, we decided to remove webpack support, making Modern.js lighter and more efficient, while taking full advantage of Rspack's new features.
#### Smoother Development Experience
After removing webpack, Modern.js 3.0 better follows Rspack best practices, with improvements in build performance, installation speed, and more:
**Underlying Dependency Upgrades**
Modern.js 3.0 upgrades its underlying Rspack and Rsbuild dependencies to version 2.0, and optimizes default build configurations based on the new versions for more consistent behavior.
Refer to the following docs for details on underlying behavior changes:
- [Rsbuild 2.0 Upgrade Guide](https://v2.rsbuild.rs/guide/upgrade/v1-to-v2)
- [Rspack 2.0 Breaking Changes](https://github.com/web-infra-dev/rspack/discussions/9270)
**Faster Build Speed**
Modern.js leverages multiple Rspack features to reduce build time:
- Barrel file optimization enabled by default: 20% faster component library builds
- Persistent caching enabled by default: 50%+ faster non-initial builds
**Faster Installation**
After removing webpack-related dependencies, Modern.js 3.0 has significantly fewer build dependencies:
- 40% fewer npm dependencies
- 31 MB reduction in installation size
#### Smaller Build Output
Modern.js now enables multiple Rspack output optimization strategies by default, producing smaller bundles than webpack. For example:
**Enhanced Tree Shaking**
Enhanced tree shaking analysis can handle more dynamic import patterns, such as destructuring:
```ts
// Destructuring in parameters
import('./module').then(({ value }) => {
console.log(value);
});
// Destructuring in function body
import('./module').then((mod) => {
const { value } = mod;
console.log(value);
});
```
**Constant Inlining**
Cross-module constant inlining helps minifiers perform more accurate static analysis, eliminating dead code branches:
```ts
// constants.js
export const ENABLED = true;
// index.js
import { ENABLED } from './constants';
if (ENABLED) {
doSomething();
} else {
doSomethingElse();
}
// Build output - dead branch eliminated
doSomething();
```
***
### Full-Chain Extensibility
:::tip TL;DR
Modern.js 3.0 officially opens its complete plugin system, providing runtime and server plugins, along with flexible application entry handling.
:::
Modern.js 2.0 offered CLI plugins and a beta version of runtime plugins, allowing developers to extend their projects. However, in practice, we found the existing capabilities insufficient for complex business scenarios.
Modern.js 3.0 provides more flexible customization capabilities, allowing full-lifecycle plugins for applications to help teams unify business logic and reduce duplicate code:
- **CLI Plugins**: Extend functionality during the build phase, such as adding commands and modifying configurations
- **Runtime Plugins**: Extend functionality during the rendering phase, such as data prefetching and component wrapping
- **Server Plugins**: Extend server-side functionality, such as adding middleware and modifying request/response
#### Runtime Plugins
Runtime plugins run during both CSR and SSR processes. The new version provides two core hooks:
- `onBeforeRender`: Execute logic before rendering, useful for data prefetching and injecting global data
- `wrapRoot`: Wrap the root component to add global Providers, layout components, etc.
You can register plugins in `src/modern.runtime.ts`. Compared to manually importing higher-order components at the entry point, runtime plugins are pluggable, easy to update, and don't need to be imported repeatedly in multi-entry scenarios:
```ts title="src/modern.runtime.tsx"
import { defineRuntimeConfig } from "@modern-js/runtime";
export default defineRuntimeConfig({
plugins: [
{
name: "my-runtime-plugin",
setup: (api) => {
api.onBeforeRender((context) => {
context.globalData = { theme: "dark" };
});
api.wrapRoot((App) => (props) => );
},
},
],
});
```
:::info
For more on runtime plugin usage, see the docs: [Runtime Plugins](/plugin/runtime-plugins/api.md)
:::
#### Server Middleware
In practice, we found that some projects need to extend the Web Server — for example, authentication, data prefetching, fallback handling, dynamic HTML script injection, and more.
In Modern.js 3.0, we rebuilt the Web Server using [Hono](https://hono.dev) and officially opened up server middleware and plugin capabilities. Developers can use Hono middleware to meet their needs:
```ts title="server/modern.server.ts"
import { defineServerConfig, type MiddlewareHandler } from "@modern-js/server-runtime";
const timingMiddleware: MiddlewareHandler = async (c, next) => {
const start = Date.now();
await next();
const duration = Date.now() - start;
c.header('X-Response-Time', `${duration}ms`);
};
const htmlMiddleware: MiddlewareHandler = async (c, next) => {
await next();
const html = await c.res.text();
const modified = html.replace(
"",
''
);
c.res = c.body(modified, { status: c.res.status, headers: c.res.headers });
};
export default defineServerConfig({
middlewares: [timingMiddleware],
renderMiddlewares: [htmlMiddleware],
});
```
:::info
For more on server plugin usage, see the docs: [Custom Web Server](/guides/advanced-features/web-server.md)
:::
#### Custom Entry
In Modern.js 3.0, we redesigned the custom entry API to be clearer and more flexible than the previous version:
```ts title="src/entry.tsx"
import { createRoot } from '@modern-js/runtime/react';
import { render } from '@modern-js/runtime/browser';
const ModernRoot = createRoot();
async function beforeRender() {
// Async operations before rendering, such as initializing SDKs or fetching user info
}
beforeRender().then(() => {
render();
});
```
:::info
For more on entry usage, see the docs: [Entries](/guides/concept/entries.md)
:::
***
### Routing Improvements
:::tip TL;DR
Modern.js 3.0 includes React Router v7 built-in, provides config-based routing, and AI-friendly debugging capabilities.
:::
#### Built-in React Router v7
In Modern.js 3.0, we upgraded to React Router v7 and deprecated built-in support for v5 and v6. This decision was based on the following considerations:
**Version Evolution and Stability**
React Router v6 was an important transitional version that introduced many new features (such as data loading and error boundaries). v7 further optimizes performance, stability, and developer experience while maintaining v6 API compatibility. As the React Router team positions Remix as an independent framework, the React Router core library is likely to be maintained long-term on v7, making it a more reliable choice.
**Upgrade Path**
- **From v6**: React Router v7 is a non-breaking upgrade for v6 developers. In Modern.js 2.0, we already provided React Router v7 plugin support, allowing you to progressively upgrade via the plugin, verify compatibility, and then migrate to Modern.js 3.0.
- **From v5**: There are significant API changes from v5 to v7. We recommend following the [React Router official migration guide](https://reactrouter.com/upgrading/v5).
#### Config-Based Routing
In Modern.js, we recommend using convention-based routing to organize code. However, in real-world scenarios, developers occasionally encounter situations like:
- Multiple paths pointing to the same component
- Flexible route control
- Conditional routing
- Legacy project migration
Therefore, Modern.js 3.0 provides full config-based routing support, which can be used alongside convention-based routing or independently.
```ts title="src/modern.routes.ts"
import { defineRoutes } from "@modern-js/runtime/config-routes";
export default defineRoutes(({ route, layout, page }) => {
return [
route("home.tsx", "/"),
route("about.tsx", "about"),
route("blog.tsx", "blog/:id"),
];
});
```
:::info
For more on config-based routing, see the docs: [Config-Based Routing](/guides/basic-features/routes/config-routes.md)
:::
#### Route Debugging
Run the `npx modern routes` command to generate a complete route structure analysis report in the `dist/routes-inspect.json` file.
The report displays each route's path, component file, data loader, error boundary, loading component, and other details, helping developers quickly understand the project's route configuration and troubleshoot routing issues. The structured JSON format is also easy for AI agents to understand and analyze, improving the efficiency of AI-assisted development.
:::info
For usage details, see the docs: [Route Debugging](/guides/basic-features/routes/config-routes.md#debugging-routes)
:::
***
### Server-Side Rendering
:::tip TL;DR
Modern.js 3.0 redesigned SSG capabilities, provides flexible caching mechanisms, and further improved fallback strategies.
:::
#### Static Site Generation (SSG)
In Modern.js 2.0, we provided static site generation capabilities. This feature is well-suited for pages that can be statically rendered, significantly improving first-screen performance.
In the new version, we redesigned SSG:
- Data fetching uses Data Loader, consistent with non-SSG scenarios
- Simplified API with lower learning curve
- Better integration with convention-based routing
In the new version, you can use data loaders for data fetching, consistent with non-SSG scenarios. Then simply specify the routes to render in the `ssg.routes` configuration:
```ts title="modern.config.ts"
export default defineConfig({
output: {
ssg: {
routes: ['/blog'],
},
},
});
```
```ts title="routes/blog/page.data.ts"
export const loader = async () => {
const articles = await fetchArticles();
return { articles };
};
```
:::info
For more on SSG usage, see the docs: [SSG](/guides/basic-features/render/ssg.md)
:::
#### Caching Mechanism
Modern.js 3.0 provides caching mechanisms at different levels to help improve first-screen performance. All caches support flexible configuration, such as HTTP-like `stale-while-revalidate` strategies:
**Render Cache**
Supports caching the entire SSR result page, configured in `server/cache.ts`:
```ts title="server/cache.ts"
import type { CacheOption } from '@modern-js/server-runtime';
export const cacheOption: CacheOption = {
maxAge: 500, // ms
staleWhileRevalidate: 1000, // ms
};
```
:::info
For render cache usage, see the docs: [Render Cache](/guides/basic-features/render/ssr-cache.md)
:::
**Data Cache**
The new version provides a `cache` function that offers finer-grained data-level control compared to render cache. When multiple data requests depend on the same data, `cache` can avoid duplicate requests:
```ts title="server/loader.ts"
import { cache } from "@modern-js/runtime/cache";
import { fetchUserData, fetchUserProjects, fetchUserTeam } from "./api";
// Cache user data to avoid duplicate requests
const getUser = cache(fetchUserData);
const getProjects = async () => {
const user = await getUser("test-user");
return fetchUserProjects(user.id);
};
const getTeam = async () => {
const user = await getUser("test-user"); // Reuses cache, no duplicate request
return fetchUserTeam(user.id);
};
export const loader = async () => {
// Both getProjects and getTeam depend on getUser, but getUser only executes once
const [projects, team] = await Promise.all([getProjects(), getTeam()]);
return { projects, team };
};
```
:::info
For more on data cache usage, see the docs: [Data Cache](/guides/basic-features/data/data-cache.md)
:::
#### Flexible Fallback Strategies
Through practice, we have developed multi-dimensional fallback strategies:
| Type | Trigger | Fallback Behavior | Use Case |
| ----------------- | -------------------------------------- | ---------------------------------------------------------- | ---------------------------------------------------- |
| Error Fallback | Data Loader execution error | Triggers ErrorBoundary | Data request error handling |
| Render Error | Server-side rendering error | Falls back to CSR, reusing existing data for rendering | SSR error handling |
| Business Fallback | Loader throws `throw Response` | Triggers ErrorBoundary with corresponding HTTP status code | 404, permission checks, and other business scenarios |
| Client Loader | Configure Client Loader | Bypasses SSR, requests data source directly | Scenarios requiring client-side data fetching |
| Forced Fallback | Query parameter `?__csr=true` | Skips SSR, returns CSR page | Debugging, temporary fallback |
| Forced Fallback | Request header `x-modern-ssr-fallback` | Skips SSR, returns CSR page | Gateway-level fallback control |
***
### Lightweight BFF
:::tip TL;DR
Modern.js 3.0 rebuilt the Web Server based on Hono, provides Hono-based integrated functions, and supports cross-project invocation.
:::
#### Hono Integrated Functions
In Modern.js 3.0, we use [Hono](https://hono.dev) as the BFF runtime framework, allowing developers to extend the BFF Server using the Hono ecosystem and enjoy Hono's lightweight, high-performance advantages.
With `useHonoContext`, you can access the full Hono context, including request information and response headers:
```ts title="api/lambda/user.ts"
import { useHonoContext } from '@modern-js/server-runtime';
export const get = async () => {
const c = useHonoContext();
const token = c.req.header('Authorization');
c.header('X-Custom-Header', 'modern-js');
const id = c.req.query('id');
return { userId: id, authenticated: !!token };
};
```
#### Cross-Project Invocation
Previously, Modern.js BFF could only be used within the current project. We received developer feedback requesting the ability to use BFF across different projects. This is mostly due to migration and operation costs — reusing existing services is clearly more practical than extracting code and deploying a separate service.
To ensure developers get an experience similar to local integrated calls, we provide cross-project invocation capabilities.
:::info
For more on BFF usage, see the docs: [BFF](/guides/advanced-features/bff.md)
:::
***
### Deep Integration with Module Federation
:::tip TL;DR
Modern.js 3.0 deeply integrates with [Module Federation 2.0](https://module-federation.io), supporting MF SSR and application-level module exports.
:::
#### MF SSR
Modern.js 3.0 supports using Module Federation in SSR applications, combining module federation with server-side rendering to deliver better first-screen performance.
```ts title="modern.config.ts"
export default defineConfig({
server: {
ssr: {
mode: 'stream',
},
},
});
```
Combined with Module Federation's [data fetching](https://module-federation.io/guide/basic/data-fetch/index.html) capabilities, each remote module can define its own data fetching logic:
```ts title="src/components/Button.data.ts"
export const fetchData = async () => {
return {
data: `Server time: ${new Date().toISOString()}`,
};
};
```
```tsx title="src/components/Button.tsx"
export const Button = (props: { mfData: { data: string } }) => {
return ;
};
```
#### Application-Level Modules
Unlike traditional component-level sharing, Modern.js 3.0 supports exporting **application-level modules** — modules with full routing capabilities that can run like independent applications. This is a key capability for micro-frontend scenarios.
**Producer Exports Application**
```ts title="src/export-App.tsx"
import '@modern-js/runtime/registry/index';
import { render } from '@modern-js/runtime/browser';
import { createRoot } from '@modern-js/runtime/react';
import { createBridgeComponent } from '@module-federation/modern-js/react';
const ModernRoot = createRoot();
export const provider = createBridgeComponent({
rootComponent: ModernRoot,
render: (Component, dom) => render(Component, dom),
});
export default provider;
```
**Consumer Loads Application**
```tsx title="src/routes/remote/$.tsx"
import { createRemoteAppComponent } from '@module-federation/modern-js/react';
import { loadRemote } from '@module-federation/modern-js/runtime';
const RemoteApp = createRemoteAppComponent({
loader: () => loadRemote('remote/app'),
fallback: ({ error }) =>
Error: {error.message}
,
loading:
Loading...
,
});
export default RemoteApp;
```
Through the wildcard route `$.tsx`, all requests to `/remote/*` are handled by the remote application, and the remote application's internal routing works normally.
:::info
For more on Module Federation usage, see the docs: [Module Federation](/guides/topic-detail/module-federation/introduce.md)
:::
***
### Tech Stack Updates
:::tip TL;DR
Modern.js 3.0 upgrades to React 19, with Node.js 20 as the minimum supported version.
:::
#### React 19
Modern.js 3.0 uses React 19 by default for new projects, with React 18 as the minimum supported version.
If your project is still using React 16 or React 17, please first complete the version upgrade following the [React 19 official upgrade guide](https://react.dev/blog/2024/04/25/react-19-upgrade-guide).
#### Node.js 20
As Node.js continues to evolve, Node.js 18 has reached EOL. In Modern.js 3.0, we recommend using Node.js 22 LTS and no longer guarantee support for Node.js 18.
#### Storybook Rsbuild
In Modern.js 3.0, we implemented Storybook for Modern.js applications based on [Storybook Rsbuild](https://github.com/rspack-contrib/storybook-rsbuild).
Through a Storybook Addon, we convert and merge Modern.js configuration into Rsbuild configuration, and use Storybook Rsbuild to drive the build, keeping Storybook debugging aligned with development command configurations.
:::info
For more on Storybook usage, see the docs: [Using Storybook](/guides/basic-features/debug/using-storybook.md)
:::
#### Using Biome
As community tooling continues to evolve, faster and simpler toolchains have matured. In Modern.js 3.0, new projects use [Biome](https://biomejs.dev/) by default for code linting and formatting.
***
## Upgrading from Modern.js 2.0 to 3.0
### Key Changes
Upgrading to Modern.js 3.0 means embracing a lighter, more standards-aligned modern development paradigm. By fully aligning with mainstream ecosystems like Rspack and React 19, it eliminates maintenance pain points caused by legacy dependencies and significantly improves build and runtime performance.
Going forward, we will also provide more AI integrations and best practices based on Modern.js 3.0. Combined with the flexible full-stack plugin system, developers can reuse community knowledge with minimal learning cost, achieving a transformative improvement in development efficiency and modern application architecture.
:::info
For more improvements and changes, see the docs: [Upgrade Guide](/guides/upgrade/overview.md)
:::
## Feedback and Community
Finally, we once again thank every developer who has given us feedback and support. We will continue to communicate with the community and grow together.
If you encounter any issues, feel free to reach out through the following channels:
- [GitHub Issues](https://github.com/web-infra-dev/modern.js/issues)
- [Discord](https://discord.gg/qPCqYg38De)
- [Lark](https://applink.larkoffice.com/client/chat/chatter/add_by_link?link_token=d21hc667-9403-48a9-ba32-bc1440a80279)
---
url: /community/contributing-guide.md
---
# Contributing Guide
Thanks for that you are interested in contributing to Modern.js. Before starting your contribution, please take a moment to read the following guidelines.
## Setup the Dev Environment
### Fork the Repo
[Fork](https://help.github.com/articles/fork-a-repo/) this repository to your
own GitHub account and then [clone](https://help.github.com/articles/cloning-a-repository/) it to your local.
### Install Node.js
We recommend using Node.js 22. You can check your currently used Node.js version with the following command:
```bash
node -v
```
If you do not have Node.js installed in your current environment, you can use [nvm](https://github.com/nvm-sh/nvm) or [fnm](https://github.com/Schniz/fnm) to install it.
Here is an example of how to install the Node.js 22 LTS version via nvm:
```bash
# Install the LTS version of Node.js 22
nvm install 22 --lts
# Make the newly installed Node.js 22 as the default version
nvm alias default 22
# Switch to the newly installed Node.js 22
nvm use 22
```
### Install pnpm
```sh
# Enable pnpm with corepack, only available on Node.js >= `v14.19.0`
corepack enable
```
### Install Dependencies
```sh
pnpm install
```
What this will do:
- Install all dependencies
- Create symlinks between packages in the monorepo
- Run the `prepare` script to build all packages (this will take some time, but is necessary to make ensure all packages are built)
> A full rebuild of all packages is generally not required after this. If a new feature you are developing requires an updated version of another package, it is usually sufficient to build the changed dependencies.
### Set Git Email
Please make sure you have your email set up in ``. This will be needed later when you want to submit a pull request.
Check that your git client is already configured the email:
```sh
git config --list | grep email
```
Set the email to global config:
```sh
git config --global user.email "SOME_EMAIL@example.com"
```
Set the email for local repo:
```sh
git config user.email "SOME_EMAIL@example.com"
```
## Making Changes and Building
Once you have set up the local development environment in your forked repo, we can start development.
### Checkout A New Branch
It is recommended to develop on a new branch, as it will make things easier later when you submit a pull request:
```sh
git checkout -b MY_BRANCH_NAME
```
### Build the Package
To build the package you want to change, first open the package directory, then run the `build` command:
```sh
# Replace some-path with the path of the package you want to work on
cd ./packages/some-path
pnpm run build
```
Alternatively, you can build the package from the root directory of the repository using the `--filter` option:
```sh
pnpm run --filter @modern-js/some-package build
```
Build all packages:
```sh
pnpm run prepare
```
If you need to clean all `node_modules/*` in the project, run the `reset` command:
```sh
pnpm run reset
```
## Testing
### Add New Tests
If you've fixed a bug or added code that should be tested, then add some tests.
You can add unit test cases in the `/tests` folder. The test syntax is based on [Rstest](https://rstest.rs/).
### Run Unit Tests
Before submitting a pull request, it's important to make sure that the changes haven't introduced any regressions or bugs. You can run the unit tests for the project by executing the following command:
```sh
pnpm run test
```
Alternatively, you can run the unit tests of single package using the `--filter` option:
```sh
pnpm run --filter @modern-js/some-package test
```
### Run E2E Tests
In addition to the unit tests, the Modern.js also includes end-to-end (E2E) tests, which checks the functionality of the application as a whole.
You can run the `test:e2e` command to run the E2E tests:
```sh
pnpm run test:e2e
```
If you need to run a specified test, you can add keywords to filter:
```sh
# Only run test cases with the copy-assets keyword
npx rstest copy-assets
```
## Linting
To help maintain consistency and readability of the codebase, we use a ESLint to lint the codes.
You can run the Linter by executing the following command:
```sh
pnpm run lint
```
## Benchmarking
You can input `!bench-framework` or `!bench-module` in the comment area of the PR to do benchmarking on `@modern-js/app-tools` and `@modern-js/module-tools` respectively (you need to have Collaborator and above permissions).
You can focus on metrics related to build time and bundle size based on the comparison table output by comments to assist you in making relevant performance judgments and decisions.
Dependencies installation-related metrics base on publishing process, so the data is relatively lagging and is for reference only.
## Documentation
Currently Modern.js provides documentation in English and Chinese. If you can use Chinese, please update both documents at the same time. Otherwise, just update the English documentation.
You can find all the documentation in the `packages/document` folder:
```bash
root
└─ packages
└─ document # Documentation for Modern.js Framework
```
This website is built with Rspress, the document content can be written using markdown or mdx syntax. You can refer to the [Rspress Website](https://rspress.rs/) for detailed usage.
The source code of Rspress can be found in [this repo](https://github.com/web-infra-dev/rspress).
## Submitting Changes
### Add a Changeset
Modern.js is using [Changesets](https://github.com/changesets/changesets) to manage the versioning and changelogs.
If you've changed some packages, you need add a new changeset for the changes. Please run `change` command to select the changed packages and add the changeset info.
```sh
pnpm run change
```
### Committing your Changes
Commit your changes to your forked repo, and [create a pull request](https://help.github.com/articles/creating-a-pull-request/).
### Format of PR titles
The format of PR titles follow Conventional Commits.
An example:
```
feat(plugin-swc): Add `xxx` config
^ ^ ^
| | |__ Subject
| |_______ Scope
|____________ Type
```
## Publishing
We use **Modern.js Monorepo Solution** to manage version and changelog.
Repository maintainers can publish a new version of all packages to npm.
Here are the steps to publish (we generally use CI for releases and avoid publishing npm packages locally):
1. Pull latest code from the `main` branch.
2. Install:
```sh
pnpm i
```
3. Build packages:
```sh
pnpm run prepare
```
4. Bump version:
```sh
pnpm run bump
```
5. Commit the version change.
```sh
git add .
git commit -m "Release va.b.c"
```
---
url: /community/releases.md
---
# Releases
## Changelog
Please visit [GitHub - Releases](https://github.com/web-infra-dev/modern.js/releases) to see what has changed with each release of Modern.js.
## Version Specification
Modern.js follows the [Semantic Versioning](https://semver.org) specification.
- Major version: Contains incompatible API changes.
- Minor version: Contains backward compatible functional changes.
- Patch version: Contains backwards compatible bug fixes
## Release Cycle
- Modern.js generally releases an official release every Thursday.
- If critical bugs appear, we will release a revised version on the same day.
- We expect to keep Modern.js v2 stable and compatible, there are currently no plans to release the next major version.
## Version Upgrade
When you need to upgrade the Modern.js version in your project, you can use the `modern upgrade` command, refer to [Upgrade](/guides/get-started/upgrade.md).
```bash
npx modern upgrade
```
---
url: /community/showcase.md
---
# Showcase
Welcome to the Modern.js showcase page! Here, we present a collection of websites that have been built using Modern.js.
If you have built a website using Modern.js, we would love for you to share it with the community. Simply reply to the GitHub discussion thread with a link to your website. We will collect content on a regular basis and display it on the current page.
## The Cases
[Tiktok SellerFrameworkseller-us-accounts.tiktok.com](https://seller-us-accounts.tiktok.com/)[Tiktok StreamerFrameworkshop.tiktok.com](https://shop.tiktok.com/streamer/welcome)[Tiktok Shop PartnerFrameworkpartner-us.tiktok.com](https://partner-us.tiktok.com/)[DoubaoFrameworkwww.doubao.com](https://www.doubao.com/)[VolctransFrameworktranslate.volcengine.com](https://translate.volcengine.com/)[WritingoFrameworkwritingo.net](https://writingo.net/)[RspackDocrspack.rs](https://rspack.rs/)[Modern.jsDocmodernjs.dev](https://modernjs.dev/en/)[Shidian BaikeFrameworkshidian.baike.com](https://shidian.baike.com/)[XiaoheFrameworkxiaohe.cn](https://xiaohe.cn/)[DongchediBuilderm.dcdapp.com](https://m.dcdapp.com/motor/feoffline/usedcar_channel/channel.html)[Volcengine DeveloperFrameworkdeveloper.volcengine.com](https://developer.volcengine.com/)
---
url: /community/team.md
---
# Meet the Team
The development of Modern.js is driven by ByteDance's Modern.js team and community contributors.
## Core Team Members
The Modern.js core team members:
## All Contributors
Thanks to the following friends for their contributions to Modern.js:
[](https://github.com/web-infra-dev/modern.js/graphs/contributors)
---
url: /index.md
---
[NEWModern.js 3.0 is released!→](/community/blog/v3-release-note)# Modern.js 3.0A Progressive React Framework for modern web development
[Introduction](/guides/get-started/introduction)[Quick Start](/guides/get-started/quick-start)[Rust BundlerBuilt with Rspack bundler for faster build speed.](/guides/concept/builder)[Integrated BFFDevelop BFF code in the same project, enjoy simple function calls.](/guides/advanced-features/bff/index)[Nested RoutesFile-as-route, comes with lots performance optimizations.](/guides/basic-features/routes/routes)[Multi-Rendering ModeRSC, SSR, SSG, all out of the box for you.](/guides/basic-features/render/ssr)[CSS SolutionsCSS Modules, CSS-in-JS, Tailwind CSS, take your pick.](/guides/basic-features/css/css)[Easy to ConfigureLaunch with zero configuration, then everything is configurable.](/configure/app/usage)Guide- [Quick Start](/guides/get-started/quick-start)
- [Core Concept](/guides/concept/entries)
- [Basic Features](/guides/basic-features/routes)
- [Advanced Features](/guides/advanced-features/bff)
API- [Configuration](/configure/app/usage)
- [Command](/apis/app/commands)
- [Runtime](/apis/app/runtime/core/bootstrap)
- [Conventions](/apis/app/hooks/src/app)
Topic- [Module Federation](/guides/topic-detail/module-federation/introduce)
- [Plugin System](/plugin/plugin-system)
Help- [Changelog](https://github.com/web-infra-dev/modern.js/releases)
- [GitHub Issues](https://github.com/web-infra-dev/modern.js/issues)
- [Github Discussion](https://github.com/web-infra-dev/modern.js/discussions)